
Projects and Construction: Material Management
A project may require materials that you need to plan before work begins. By budgeting materials and managing them properly, you can ensure that the project runs smoothly and that all the materials are available on time. Now you can manage everything in one place instead of maintaining a project's material list outside the system—and you don’t need to switch between the project budget, purchase orders, receipts, and issues to keep the materials on track.
In MYOB Acumatica 2026.1.1, the new Project Materials (PM306500) form gives you full visibility into project materials throughout their lifecycle.
Each material listed on the form is linked to the project budget key, so actual costs stay aligned with the related budget lines and commitments. You can reserve stock items, purchase items to be delivered to a warehouse, or have items delivered to the project site while you track the materials through fulfillment.
Each material line represents one material requirement—that is, a specific stock or non-stock item and the quantity needed for a specific project task. In each material line, you can view the project task, account group, and cost code. This makes it easy to track each material’s costs against the corresponding budget line and monitor commitments and actual costs in the project budget.
- The Project Materials form is available in the Modern UI if the new Material Management feature in the Projects feature group is enabled on the Enable/Disable Features (CS100000) form.
- You can enable the Material Management feature only if the Inventory feature is enabled.
What You Can Do on the Project Materials Form
The Project Materials (PM306500) form serves as a centralized location for managing and tracking all the materials in one place—as well as for monitoring fulfillment as related documents are processed. From the form, you can create a purchase order or material issue for a line.
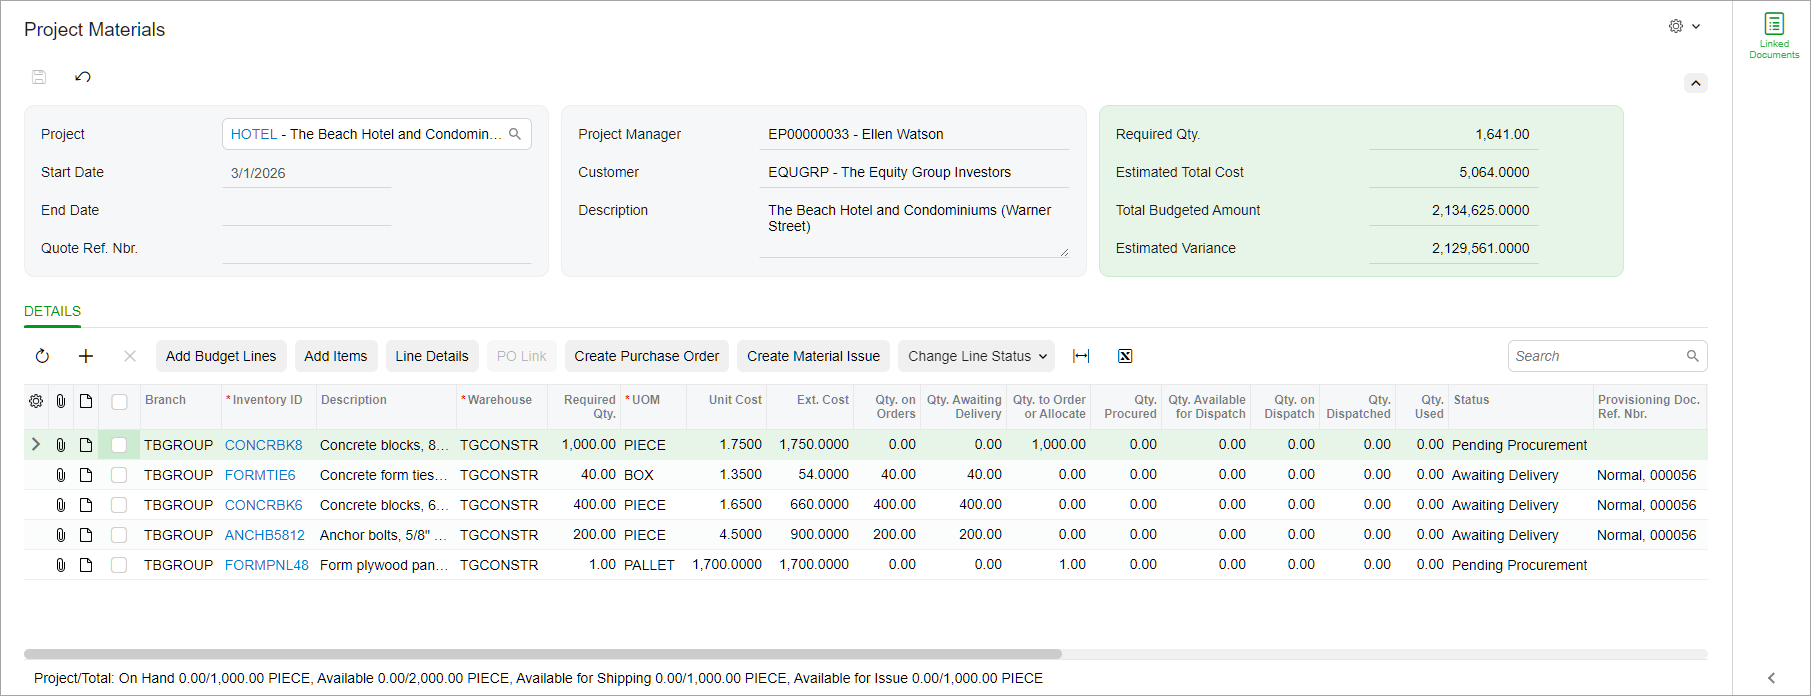
On this form, you can:
- Build and maintain the project’s consolidated material list
- Track project materials against budget lines by linking a project task, account group, and cost code to each material requirement
- Specify the provisioning source for each material line—use available stock, purchase the material to the warehouse, or drop-ship the material directly from the vendor to the project site
- Purchase materials for a project or allocate available materials in a warehouse
- Monitor the status of each project material throughout ordering, delivery, and issuing
- View all purchasing and inventory documents related to project's materials in one place
Selecting the Default Reason Code and Reporting Group
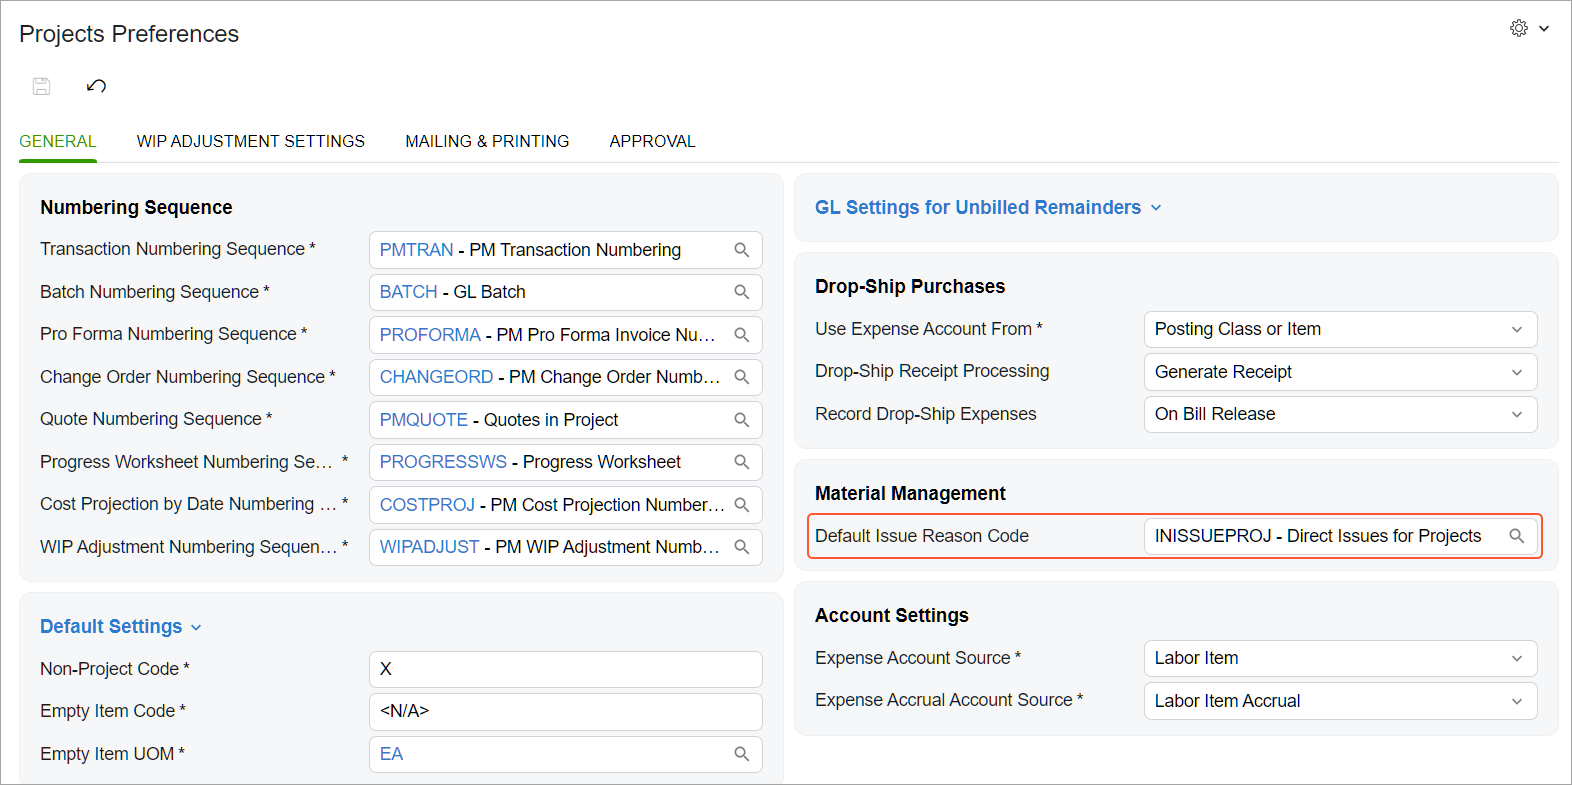
Before you start creating projects’ material lists, you need to select the reason code for issuing project materials in the new Default Issue Reason Code box on the Projects Preferences (PM100000) form. You do this to indicate that the items have been issued for a project and to provide the posting accounts for the generated inventory issue transaction. The system will insert this reason code in each line of:
- An inventory issue on the Issues (IN302000) form
- A new document of the Material Issue type on the Shipments (SO302000) form
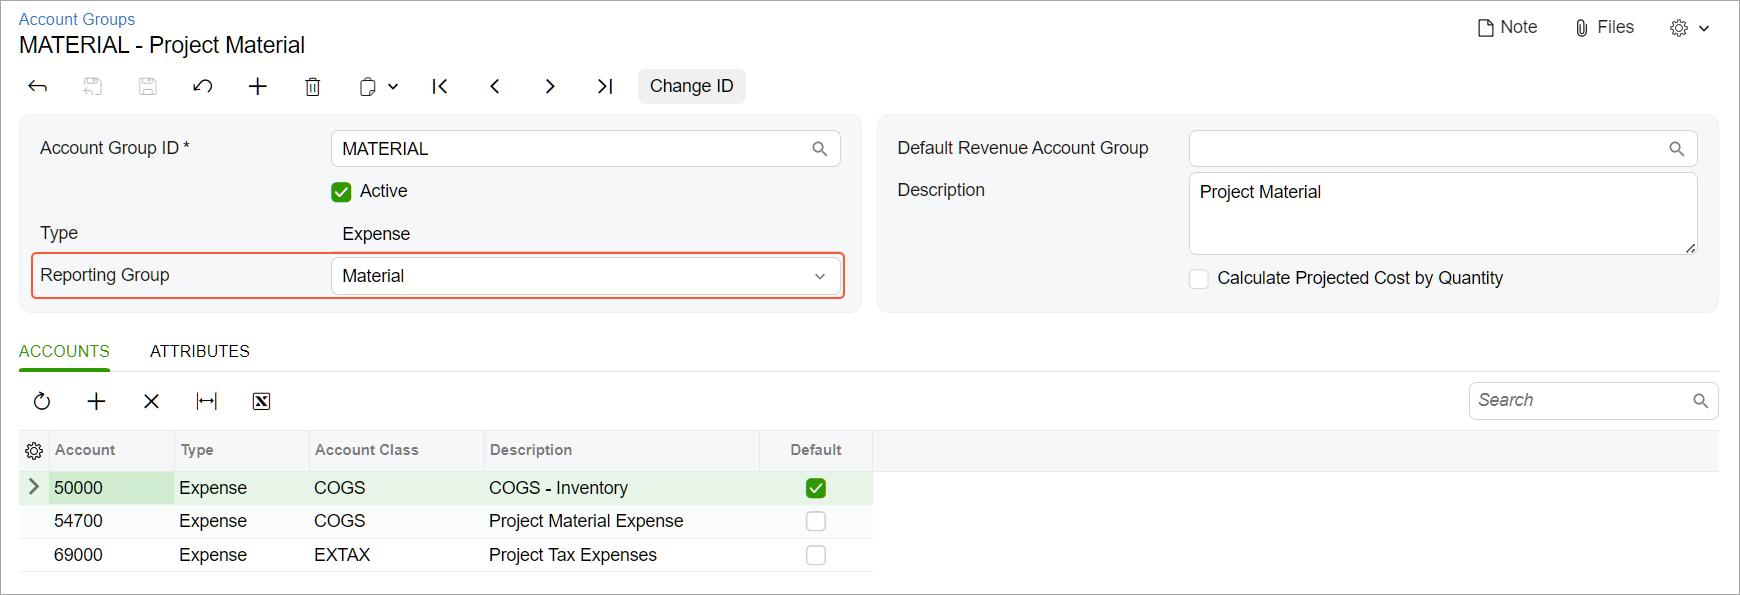
On the Account Groups (PM201000) form, you need to select the Material reporting group for expense account groups that you’ll use in cost budget lines related to project materials. Selecting this option makes the system calculate the total budgeted amount for the materials related to cost budget lines with this account group on the new Project Materials (PM306500) form, described below.
Setting Up Availability Calculation Rules
To be able to track available project materials, you set up the needed availability calculation rules. An availability calculation rule defines which plan types affect the calculation of available quantities of inventory items in the system.
Each document that affects inventory creates one or more item plans—system records that represent future increases or decreases in item quantity. Each item plan has a plan type, which determines how that planned quantity affects item availability. For example, depending on the plan type, the available item quantity may decrease when you allocate project materials or increase when you purchase project materials.
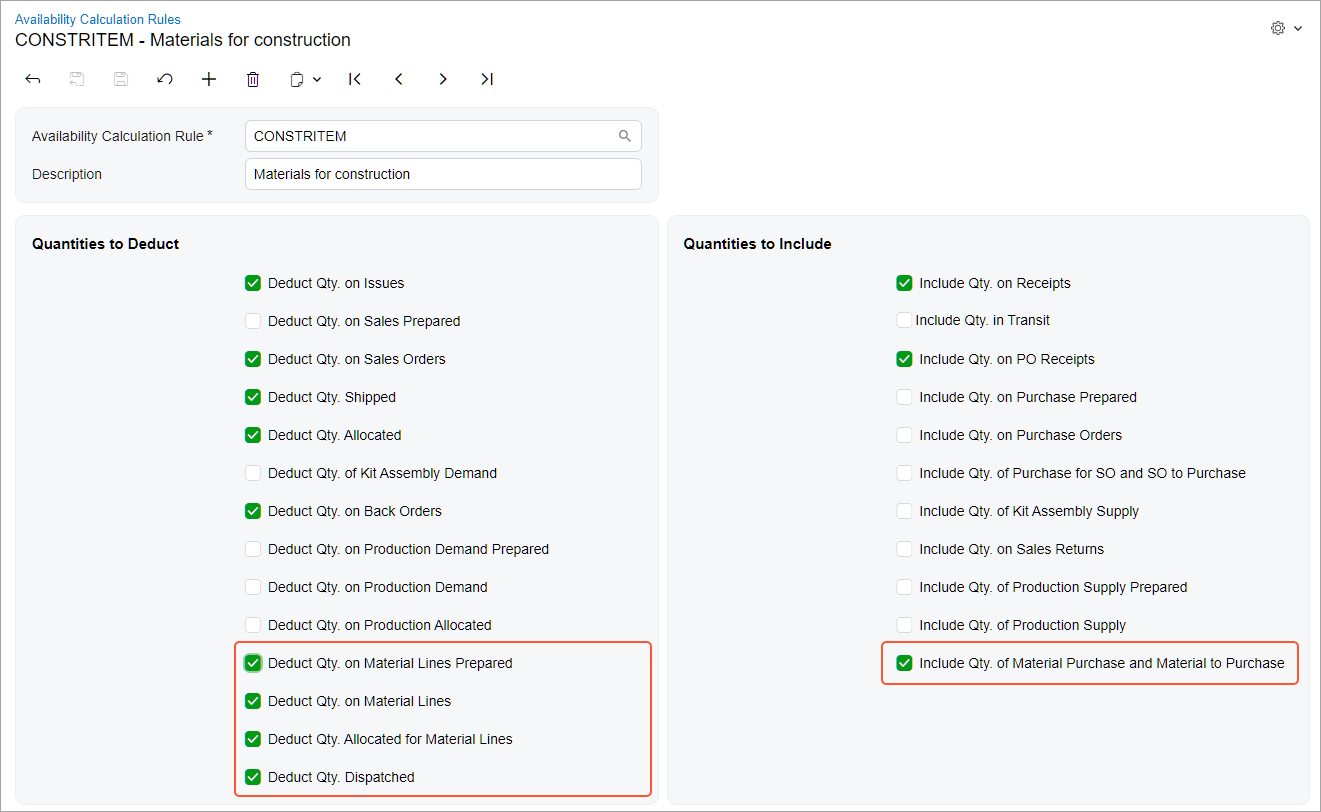
When you create an availability calculation rule on the Availability Calculation Rules (IN201500) form, you can now specify how item plans related to material lines affect item availability calculation. To do this, you select or clear the new check boxes, shown below.
Once the rule has been set up, you specify it in the Availability Calculation Rule box on the Item Classes (IN201000) form for the item class used to create project materials. For details, see Availability Calculation Rules: General Information.
Creating a Project's Material List
Once the setup steps have been performed, you use the Project Materials (PM306500) form to create the material list for a specific project.
To get started, you select a project in the Summary area. The system shows the project’s basic information along with the budgeted quantities and costs of the materials. This information helps you connect material planning to the cost budget. Then on the Details tab, you add the project's material lines.
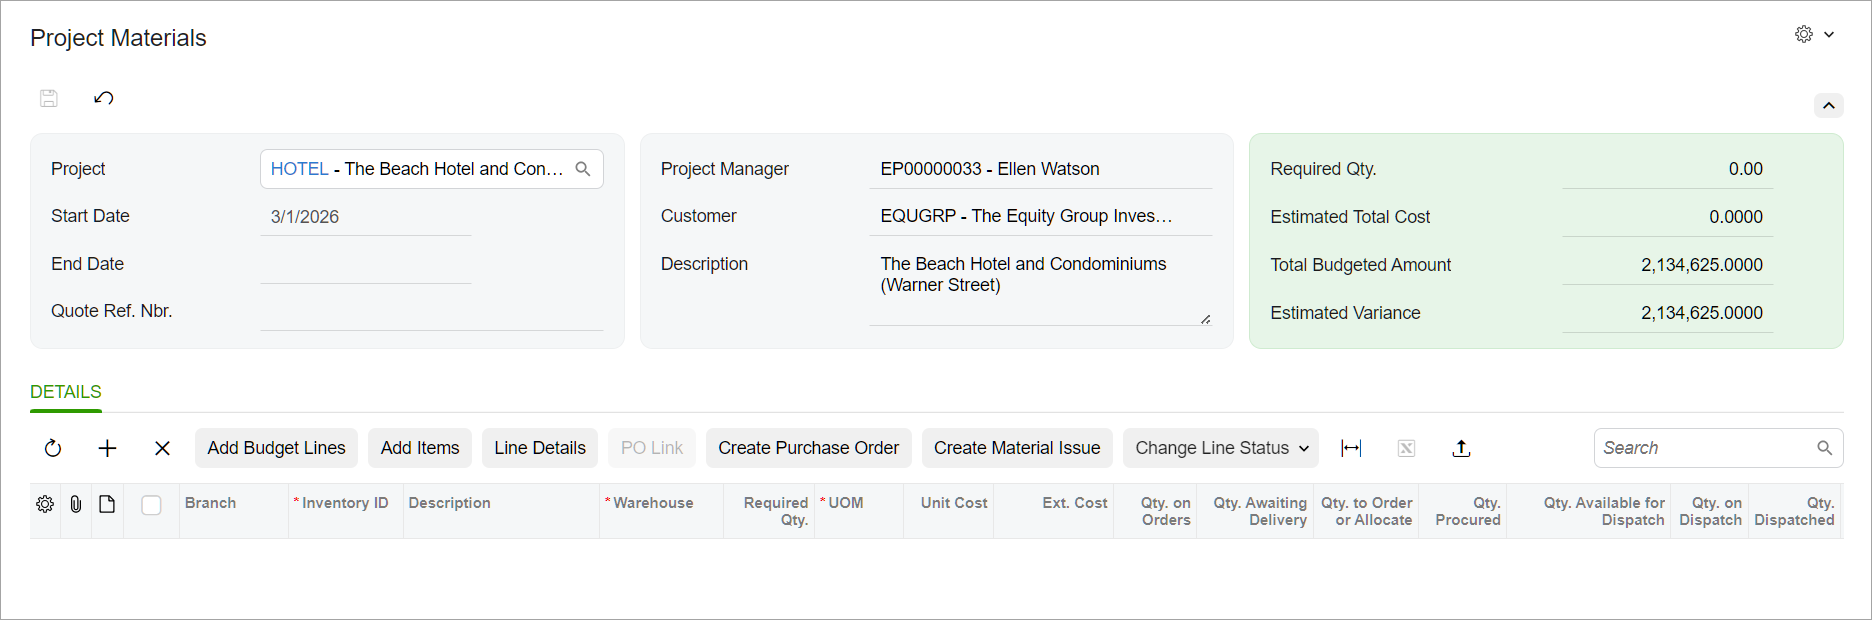
Populating the Project’s Material List
You populate material lines on the Details tab of the Project Materials (PM306500) form by adding:
- The project's cost budget lines
- Stock items or non-stock items that require a purchase receipt and shipment
- The associated project quote's estimation lines
The following sections describe each option.
Adding Materials from Cost Budget Lines
If the project status is In Planning or Active, you can create or expand the project's material list based on cost budget lines.
To add the project's cost budget lines to the material list on the Project Materials (PM306500) form:
- Click Add Budget Lines (Item 1 below).
- In the dialog box, select the needed cost budget lines (Item 2).
- Click Add Lines & Close (Item 3).
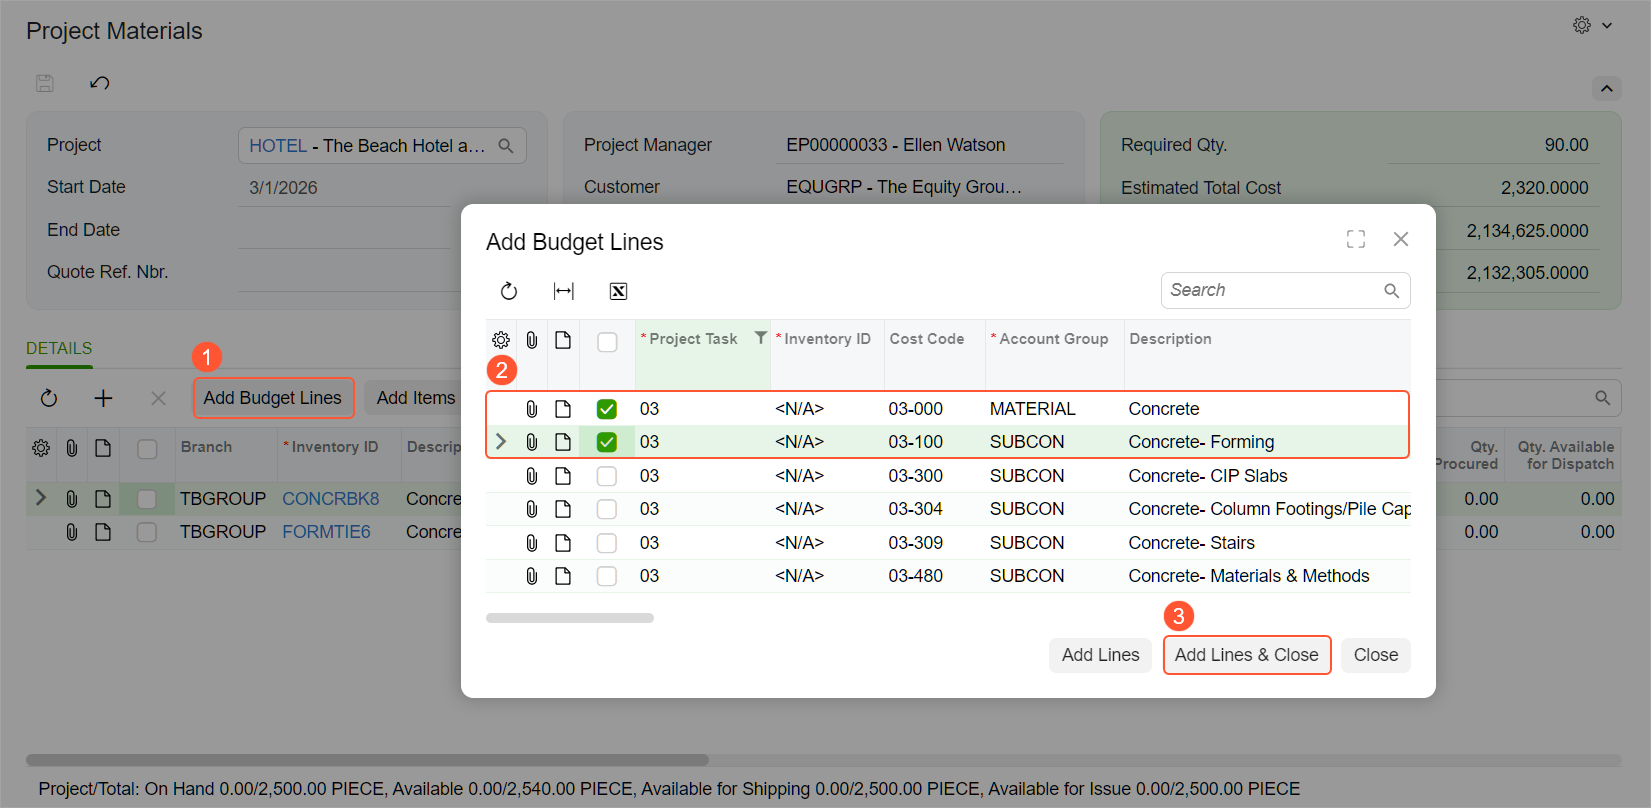
If project costs aren’t budgeted at the item level—that is, the Inventory ID column has N/A on the Cost Budget tab of the Projects (PM301000) form—this column remains empty in the added material lines on the Project Materials form.
Adding Items to the Project's Material List Directly
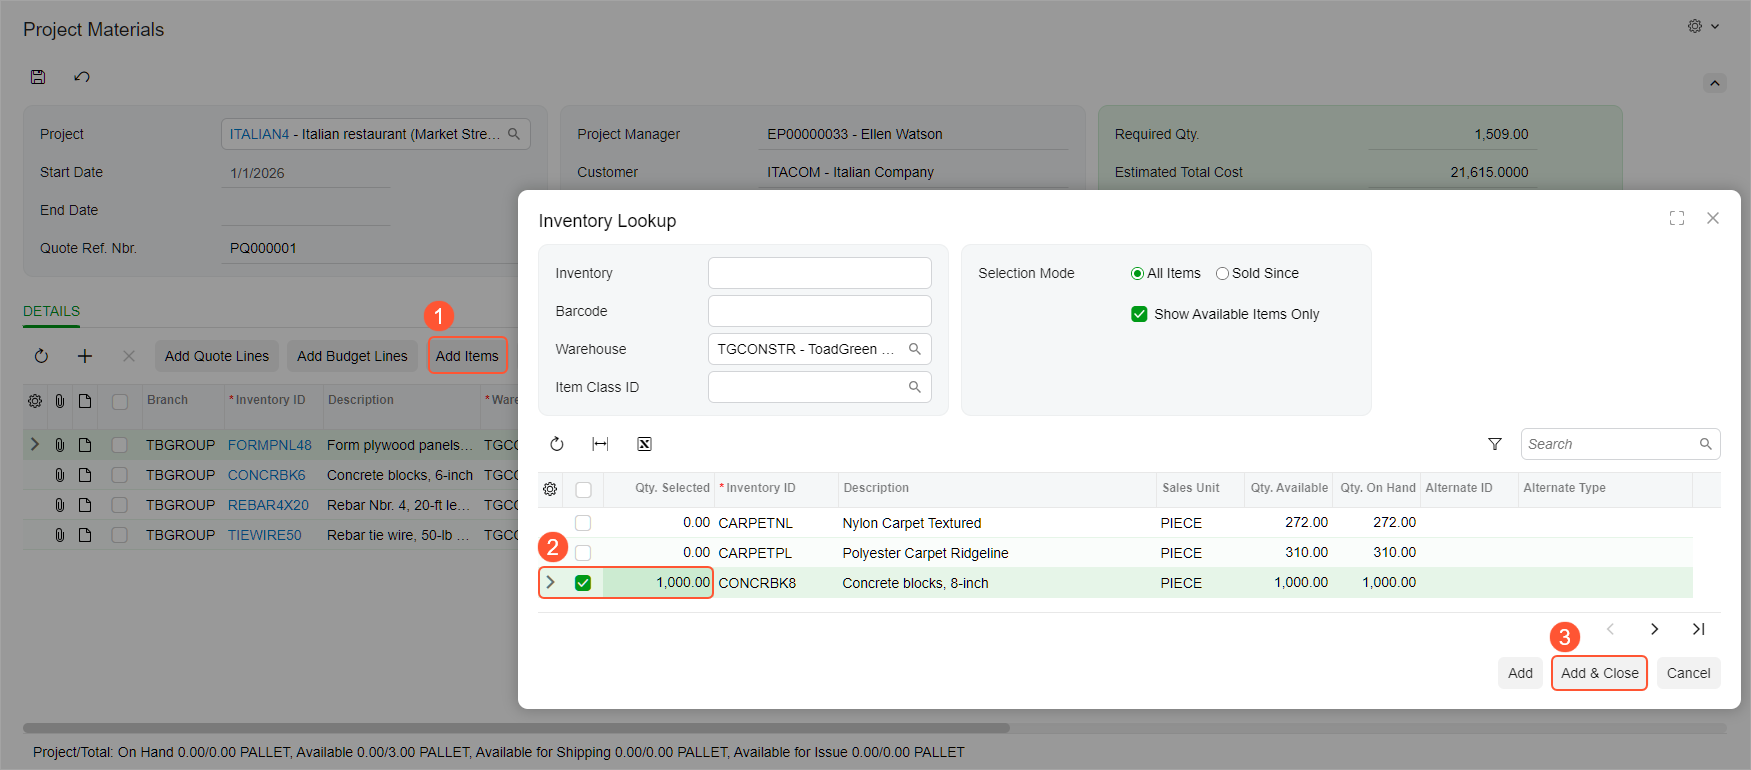
On the Project Materials (PM306500) form, you can create or expand a project's material list by using the Inventory Lookup dialog box. This dialog box shows item availability across warehouses and locations and lets you add multiple stock items at a time to the project materials. To add items in this way:
- Click the needed line.
- Click Add Items on the table toolbar (Item 1 below).
- In the Inventory Lookup dialog box, which opens, select items and specify their quantities (Item 2).
- Click Add & Close (Item 3).
- Save your changes.
You can also add items manually. In the Inventory ID column, you can select:
- A stock item created on the Stock Items (IN202500) form
- A non-stock item created on the Non-Stock Items (IN202000) form with the Require Receipt and Require Shipment check boxes selected
Adding Materials from Quote Estimation Lines
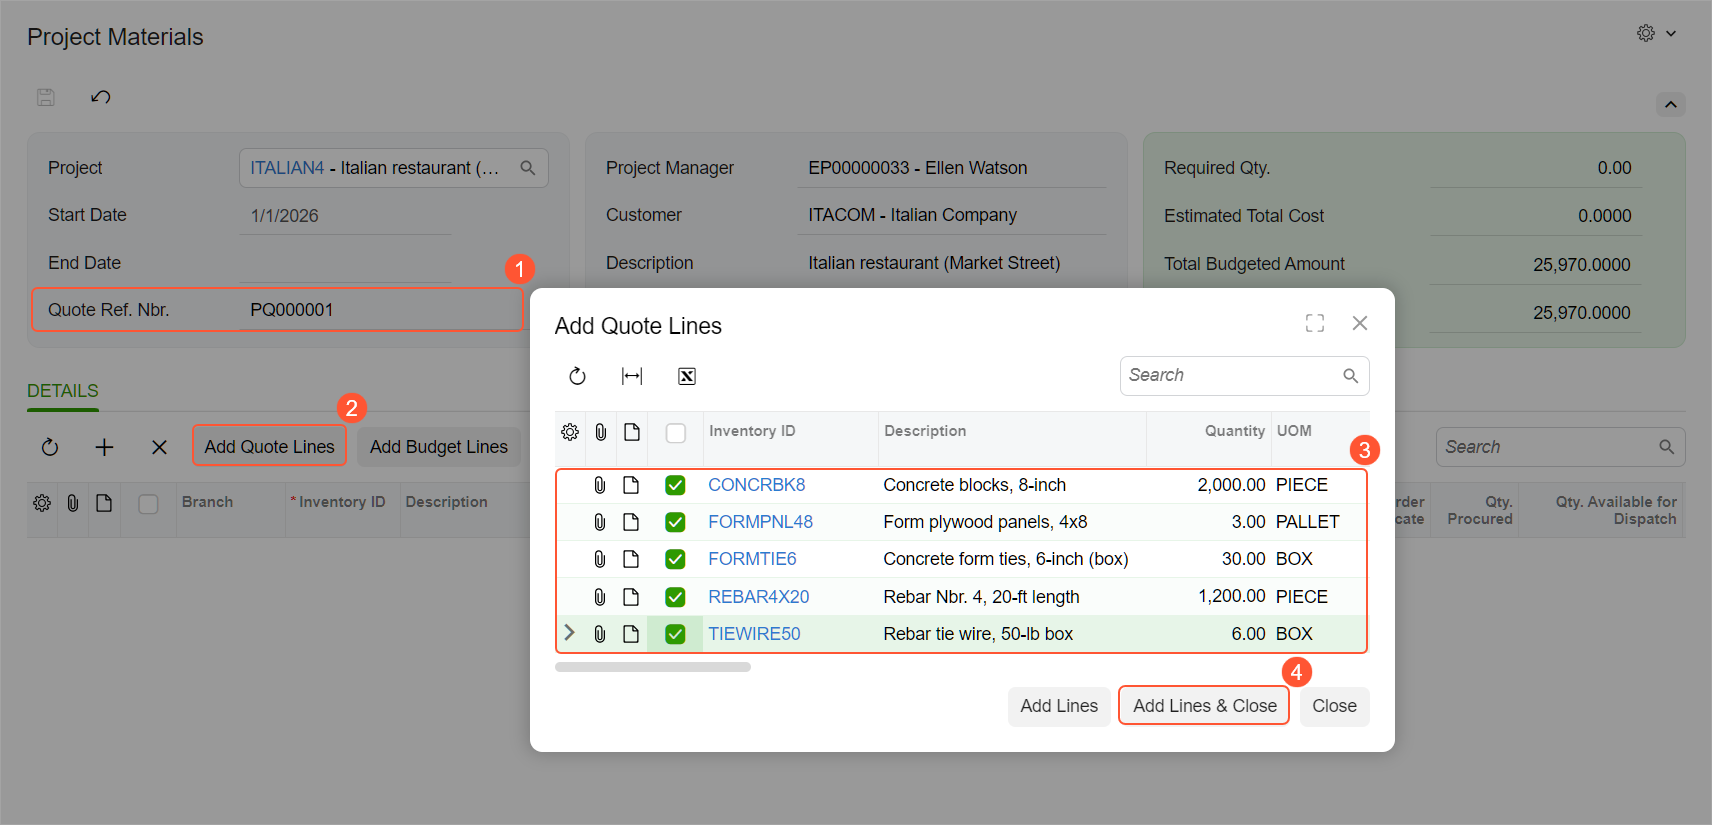
The project quote may have more detailed material requirements than the project budget does. In this case, you can create the project's material list from the project quote's estimation lines. For a project created from a project quote, the Quote Ref. Nbr. box contains a number (Item 1 below). If the project status is In Planning or Active, you can add items from the estimation lines to the Project Materials (PM306500) form as follows:
- Click Add Quote Lines on the table toolbar (Item 2).
- In the dialog box, select the needed lines (Item 3).
- Click Add Lines & Close (Item 4).
Selecting Provisioning Sources for Project Materials
Once material lines have been added on the Project Materials (PM306500) form, you can specify how each item will be supplied:
- Through material allocation from the available company inventory
- By purchasing materials and delivering to your company warehouse
- By drop-shipping materials directly to the project site
You review the available item quantity in the Qty. Available for Dispatch column and select the needed option in the Provisioning Source column:
- None (default): You leave this option if the item quantity is available in the warehouse; you can allocate the needed quantity for the project.
- Purchase to Order: You need to purchase the item—that is, create a purchase order—and have the item delivered to a warehouse.
- Project Drop-Ship: You need to drop-ship the item directly from the vendor to the project site—that is, create a project drop-ship order.
Allocating Materials for the Project
Now that you’ve created the material list and specified how materials will be supplied, you need to make sure the needed materials will be available right on time.
Some project materials may already be available in one of your warehouses. To make sure that these materials are still available when they’re needed, you allocate them in the warehouse. For each material line, you review the needed quantity in the Qty. to Order or Allocate column on the Project Materials (PM306500) form.
To allocate an item:
- Click the needed line.
- Click Line Details on the table toolbar (Item 1 below).
- In the dialog box, select the needed item and specify its quantity (Items 2 and 3).
- Click OK (Item 4).
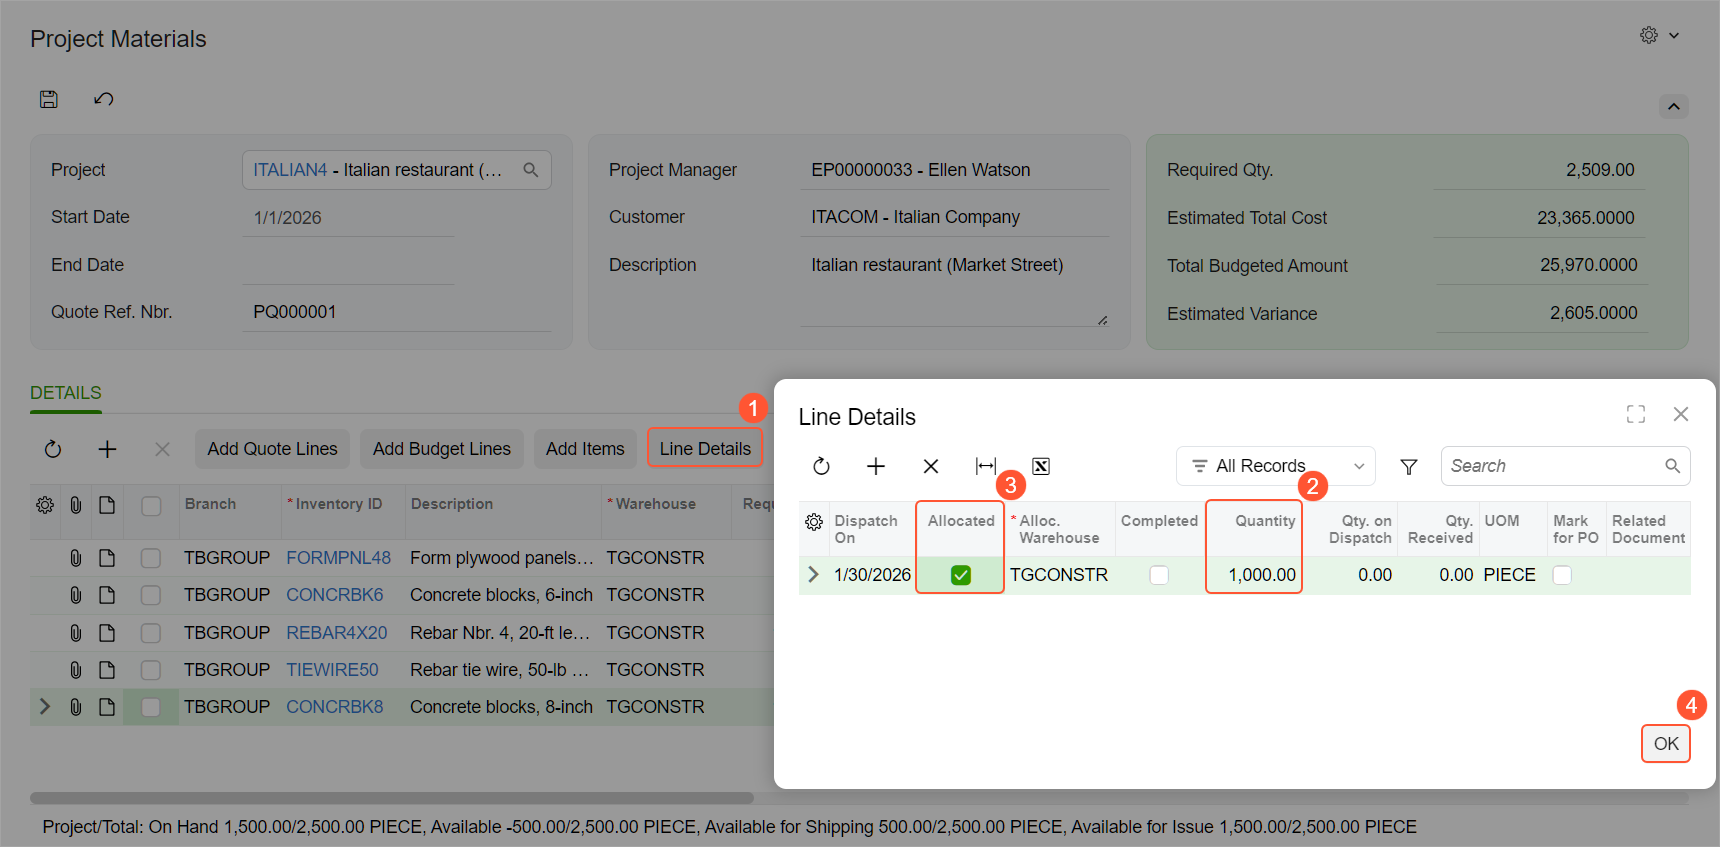
Viewing Item Availability for a Material Line
If you click a material line on the Project Materials (PM306500) form, the table footer displays the availability of the inventory item for the specified warehouse. For each availability bucket in the table footer, the system shows either a single value with the available quantity of items or two values separated by a slash:
- The available quantity of items in the selected warehouse location related to this particular project and project task.
- The total quantity of free stock items and project stock items stored in this warehouse location.
Two values are shown if both of the following are true:
- The Project-Specific Inventory feature is enabled on the Enable/Disable Features (CS100000) form.
- The line's warehouse location is linked to the project with the Track by Project Quantity or Track by Project Quantity and Cost inventory tracking mode (see Project Inventory Tracking: Item Availability Tracking for details).
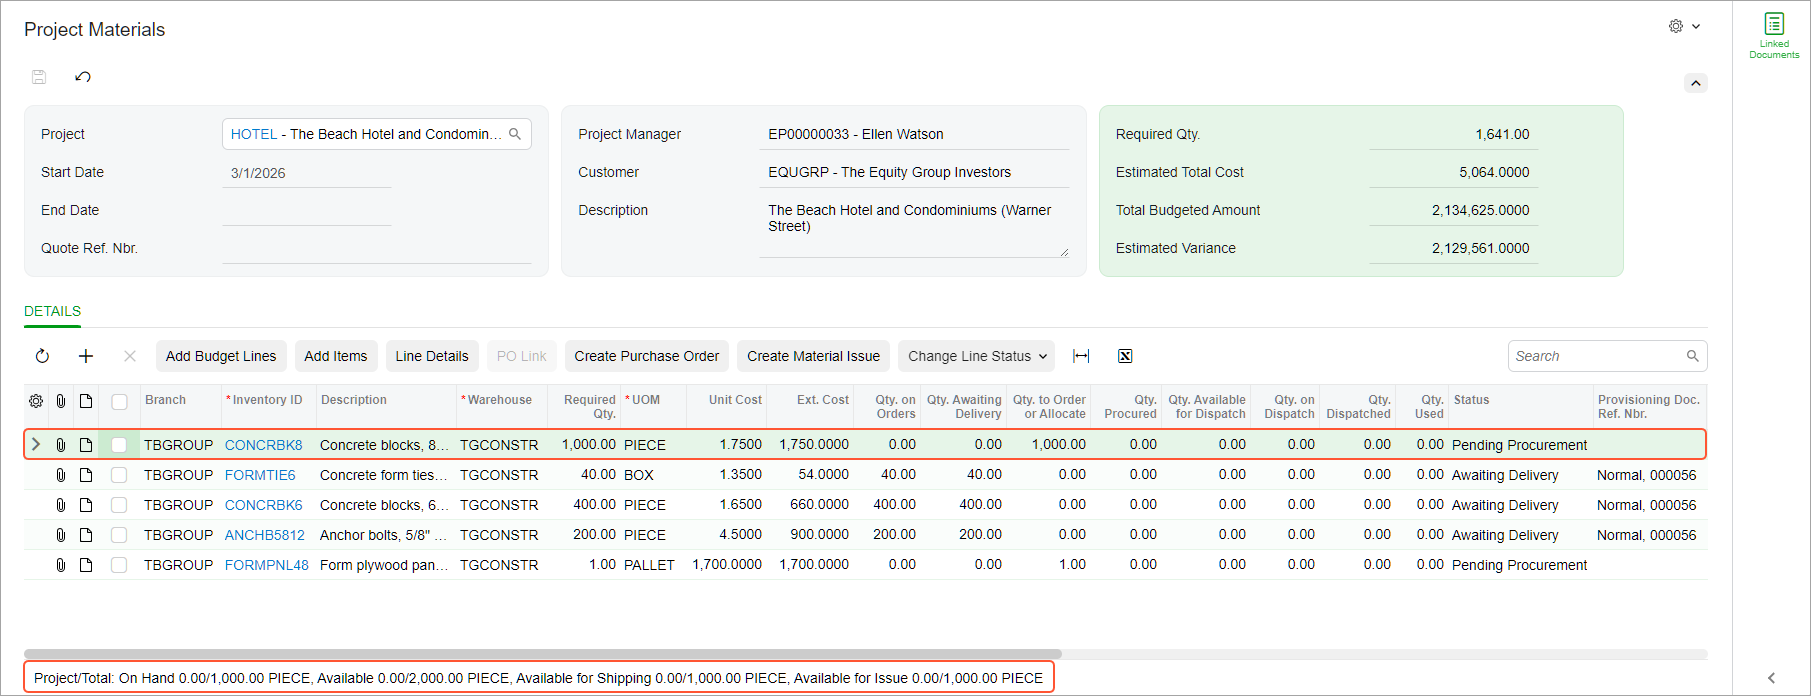
Creating Purchase Orders for Project Materials
When the required item quantity isn't fully available or allocated in a warehouse, Pending Procurement is shown in the Status column for the material line on the Project Materials (PM306500) form. To initiate purchasing, you click Create Purchase Order on the table toolbar. The system initiates purchase order creation as follows, depending on the option in the Provisioning Source column:
- For the Project Drop-Ship provisioning source, it creates a purchase order of the Project Drop-Ship type on the Purchase Orders (PO301000) form, meaning that the material will be delivered directly from the vendor to the project site. This purchase order includes all material lines with the same vendor.
- For the Purchase to Order provisioning source, it opens the Create Purchase Orders (PO505000) form, and you can create purchase orders of the Normal type. Each purchase order will include all material lines with the same vendor.
When a purchase order for a material line is created, the system updates these columns in the line on the Project Materials form (see below):
- Qty. on Orders: The quantity in the corresponding purchase order line
- Qty. Awaiting Delivery: The quantity in the corresponding purchase order line to be received in the warehouse
- Status: Awaiting Delivery
- Provisioning Doc. Ref. Nbr.: The purchase order type and reference number
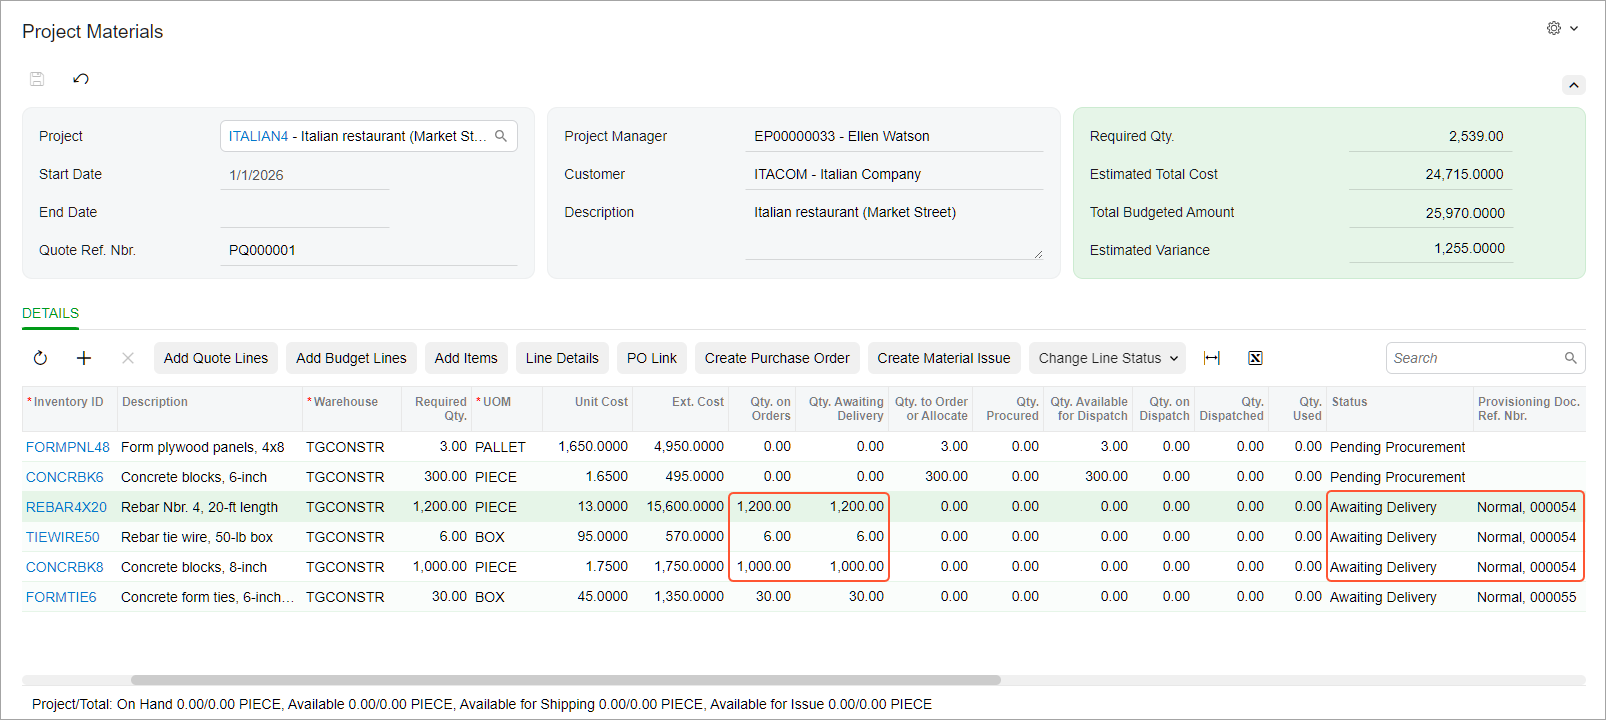
Tracking the Receipt of Materials in a Warehouse
Suppose that the project materials have been purchased and then received in a warehouse. To record the receipt of the materials in the system, you’ve entered and then released a purchase receipt for the purchase order. This updates the following columns on the Project Materials (PM306500) form for the material lines:
- Qty. Procured: The purchased quantity
- Qty. Available for Dispatch: The quantity available in the warehouse
- Status: Ready for Dispatch
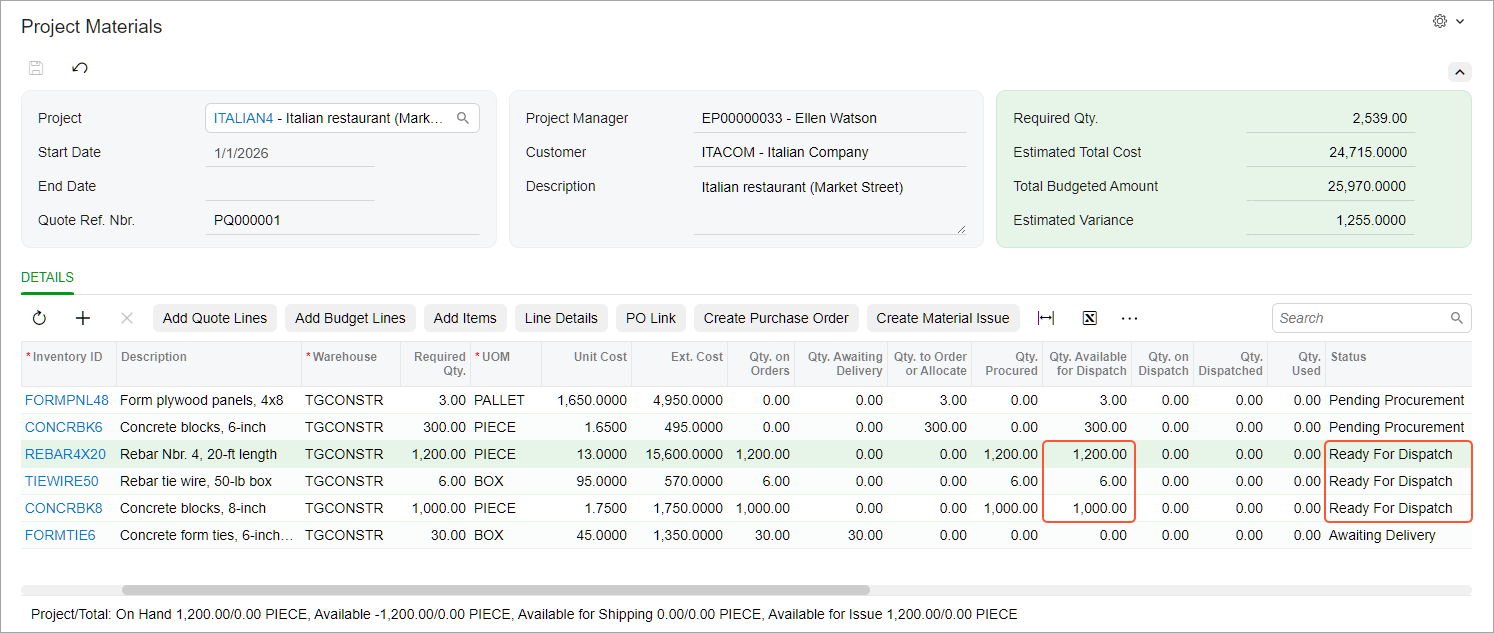
At this point, the project materials can be shipped to the project site.
Reflecting Materials’ Movement to the Project Site
When you're ready to record the movement of listed materials to the project site, you do either of the following:
- Process a project drop-ship order if you need to ship the materials directly from the vendor to the project site
- Process a material issue if you need to ship or deliver the materials from your warehouse to the project site
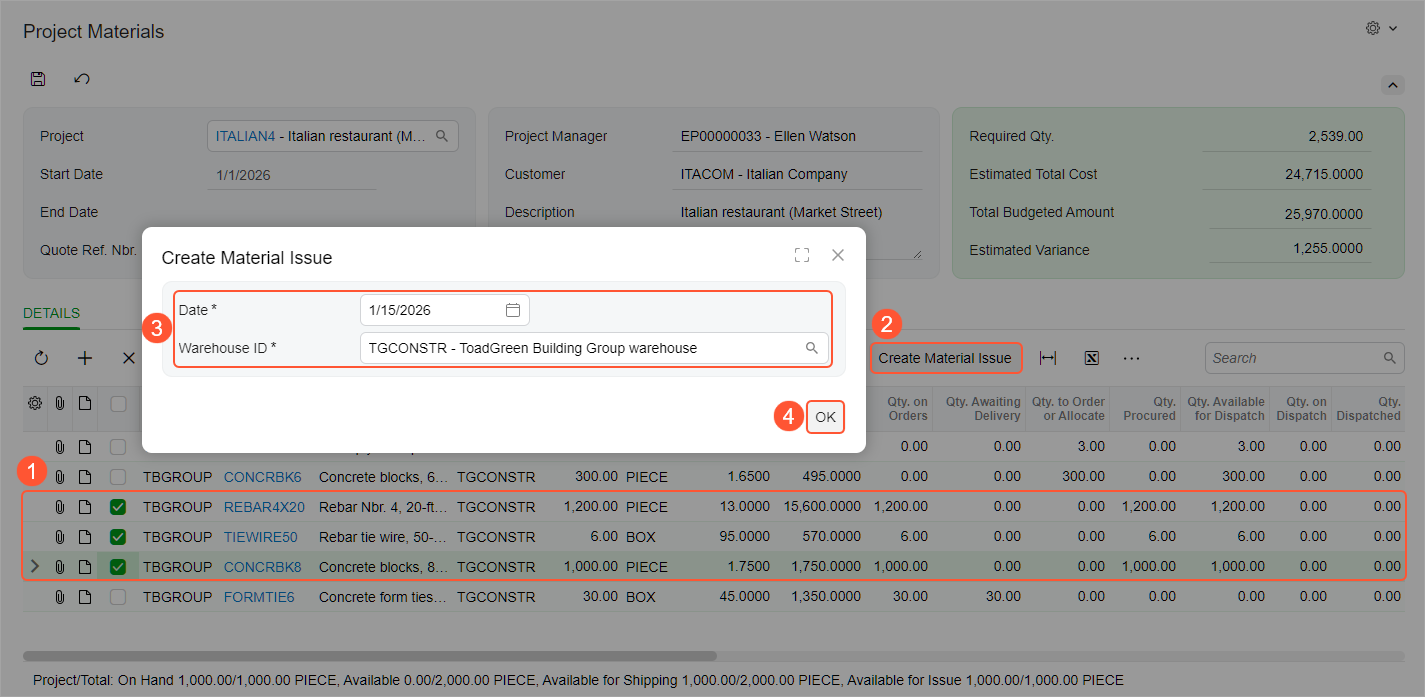
To create a material issue, you do the following on the Project Materials (PM306500) form:
- Select the material lines (Item 1 below).
- Click Create Material Issue (Item 2).
- In the dialog box, check the date and the warehouse (Item 3).
- Click OK (Item 4).
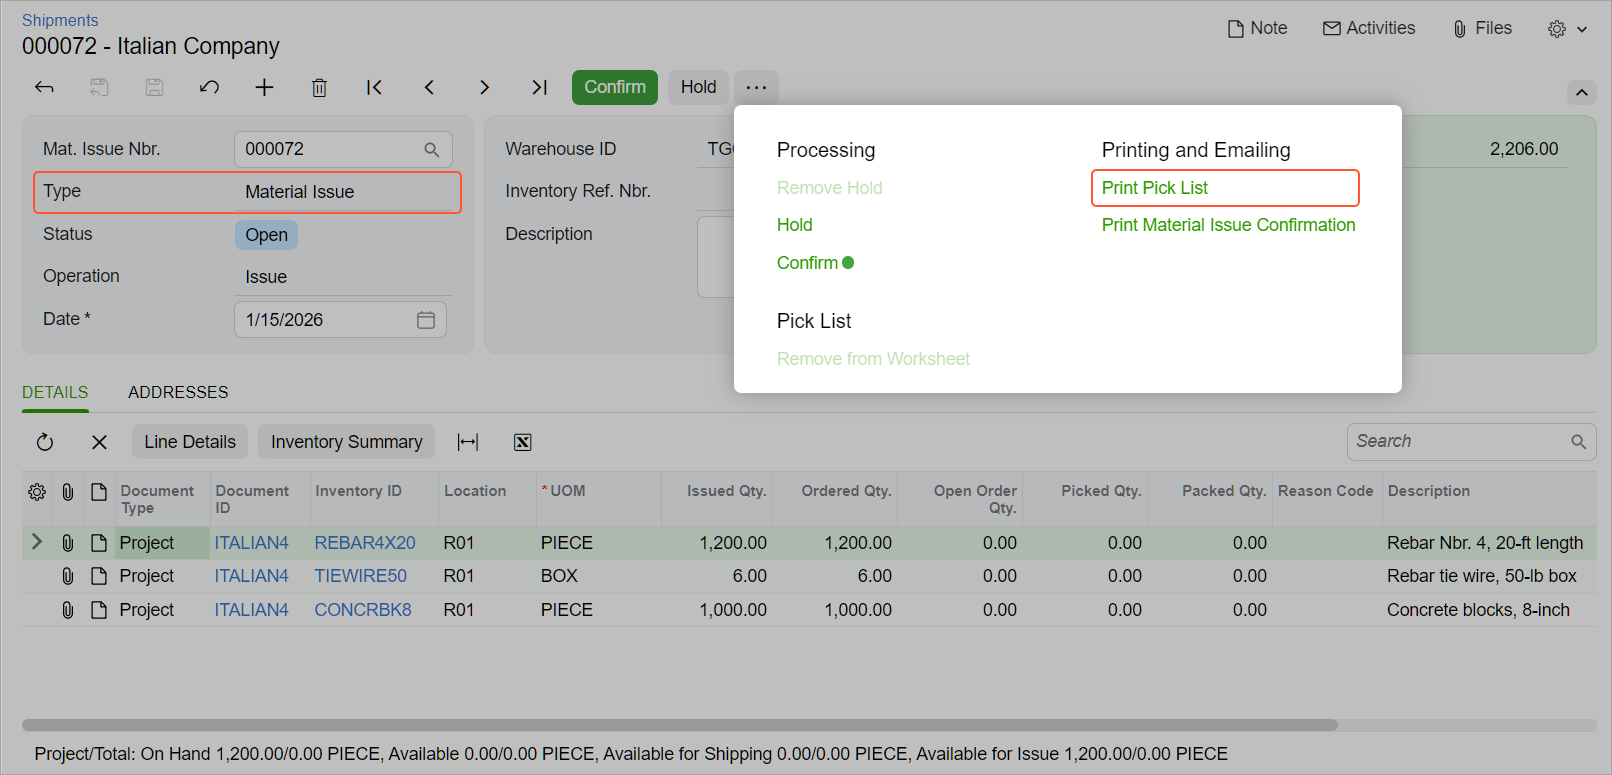
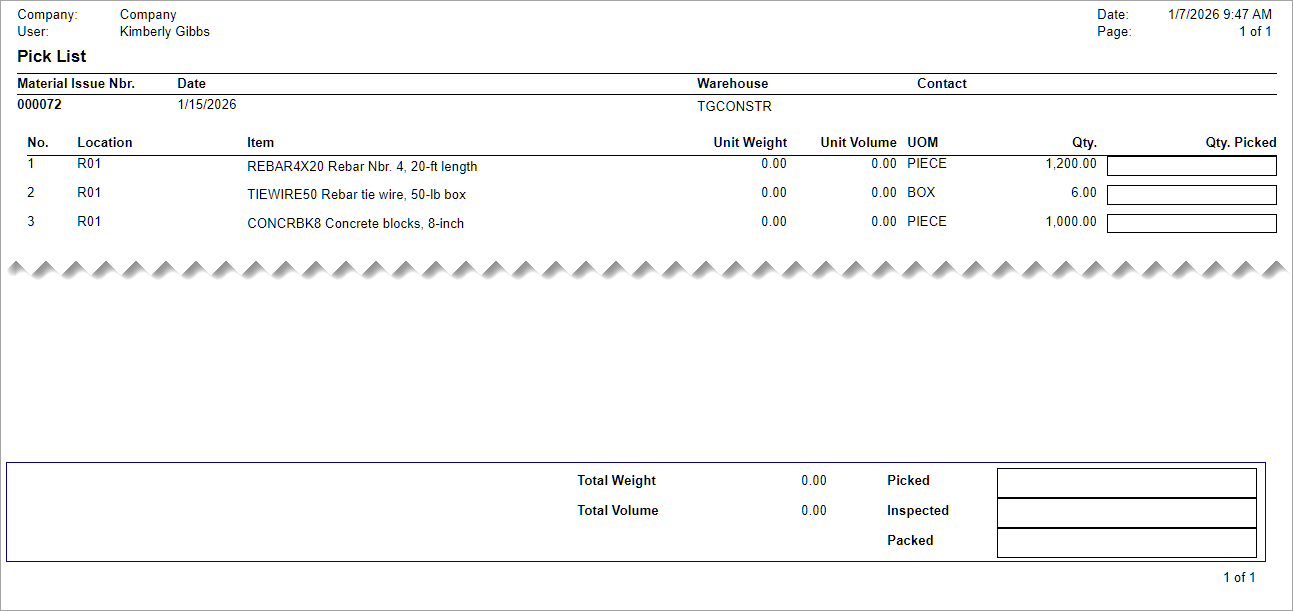
The system opens the material issue on the Shipments (SO302000) form. If you need to provide a pick list of the project materials to warehouse personnel, click Print Pick List on the More menu.
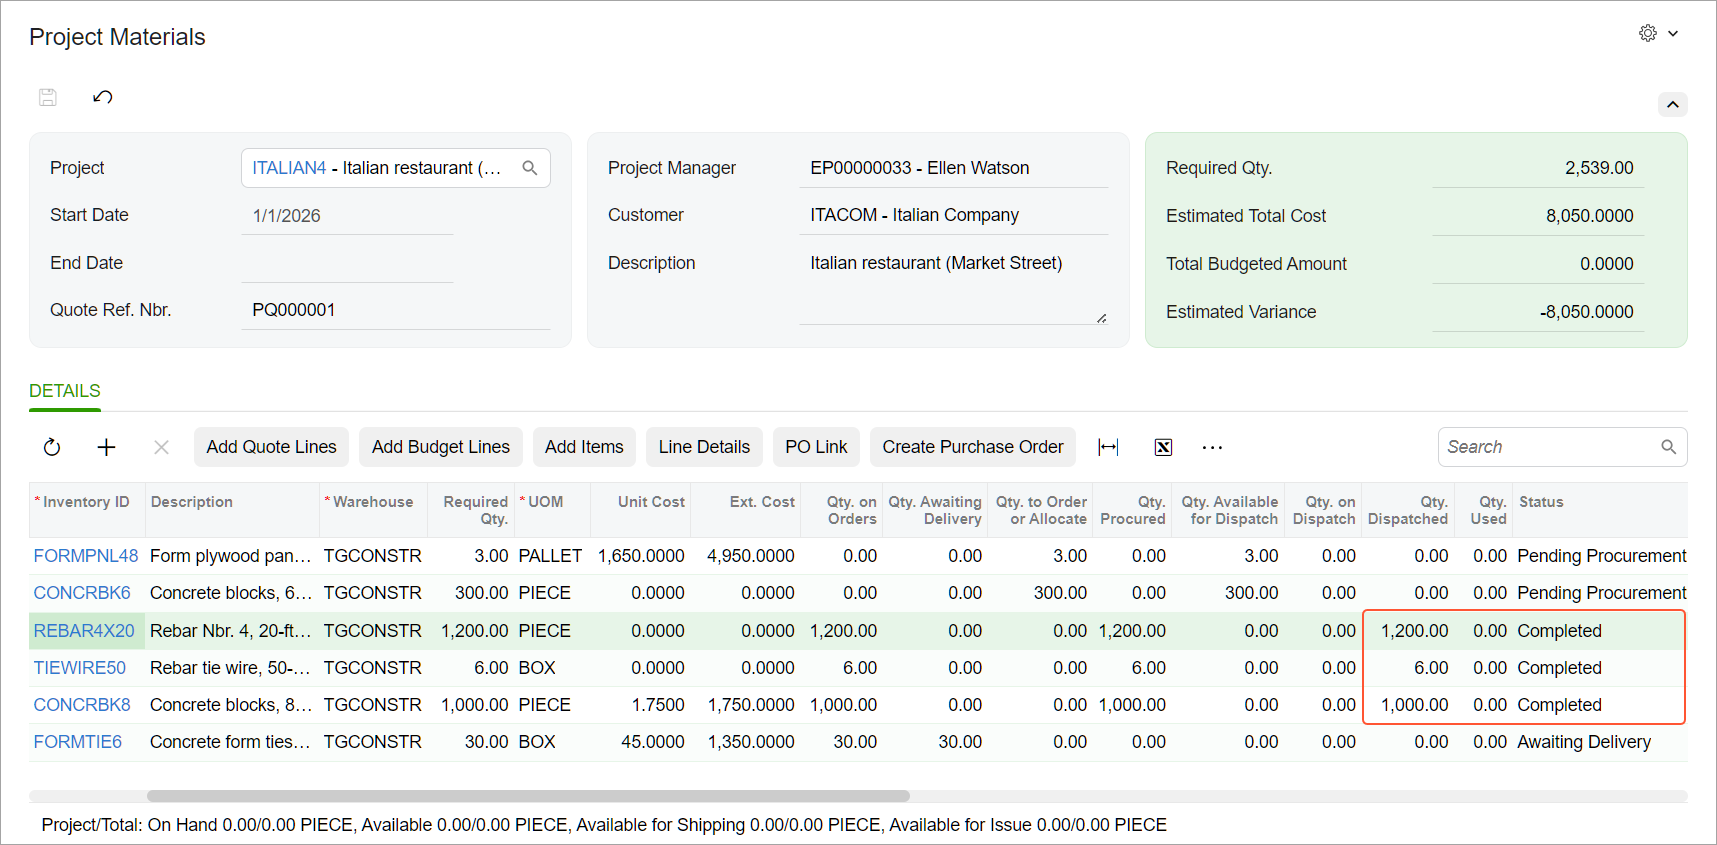
Once the material issue has been created for the material lines, the Qty. on Dispatch column is updated on the Project Materials form. And when you confirm the material issue for the material lines, the following columns are updated, as shown below:
- Qty. Dispatched: The quantity issued from the warehouse to the project site
- Status: Completed
Operations with Individual Material Lines
While you're working on the Project Materials (PM306500) form, you can manage any material line by changing its status. To do this, select the needed lines, click Change Line Status on the table toolbar and then click the needed command.
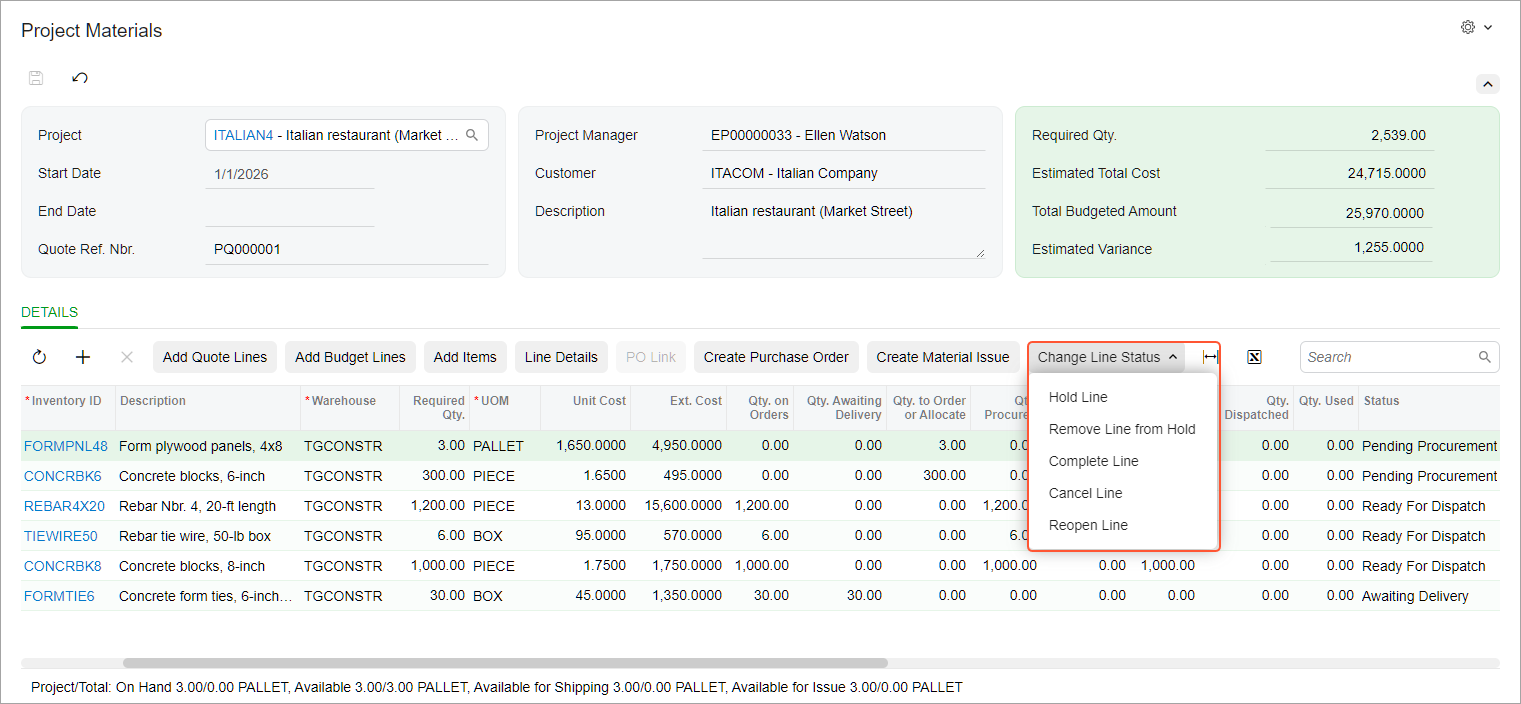
You can click any of these commands to change the status of the selected line:
- Hold Line: Changes the line's status to On Hold to temporarily forbid the creation of a purchase order or material issue for the line. This command is available only if the line has no open material issues.
- Remove Line from Hold: Changes the line status from On Hold to its previous status in the workflow: Pending Procurement or Awaiting Delivery.
- Complete Line: Changes the line status to Completed, which means that the materials have been received and used. The line becomes read-only, and no further purchasing or issuing is allowed. You can reopen the line, if needed.
- Cancel Line: Changes the line status to Canceled, which means that the material in the line is no longer needed for the project. The line becomes read-only, and no further purchasing or issuing is allowed. You can reopen the line, if needed.
- Reopen Line: Changes the line status from Completed or Canceled to its previous status in the workflow: Pending Procurement or Awaiting Delivery.
Consolidated View of Inventory Documents for Materials
By using the Linked Documents side panel tab on the Project Materials (PM306500) form, you can view all material issues, purchase receipts, and inventory issues related to the project’s material lines.
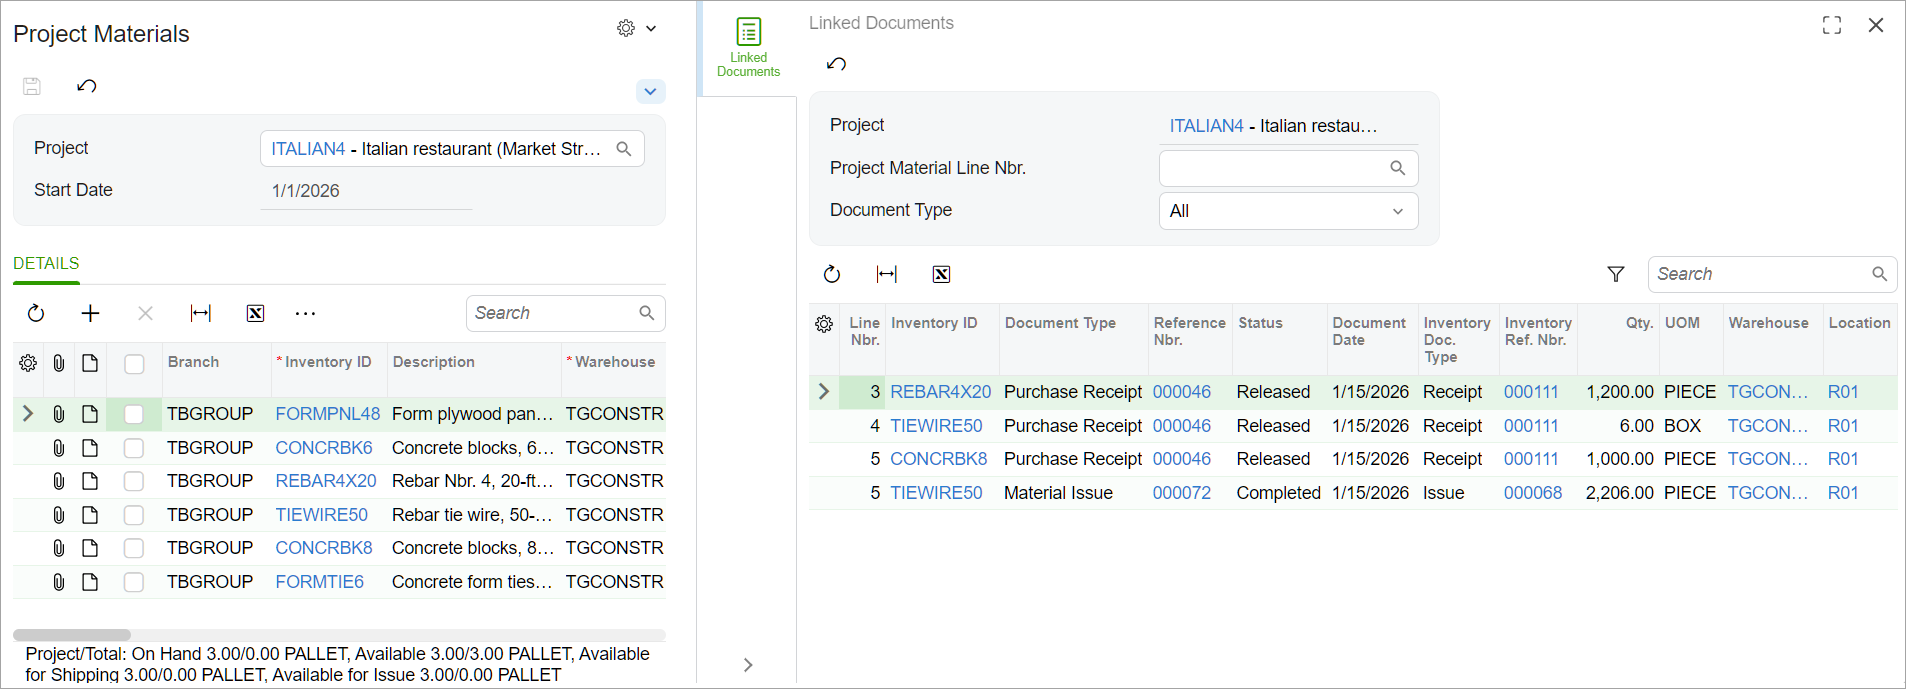
To view these documents for a particular material line:
- You add the Line Nbr. column to the visible columns of the Project Materials form to view the number of a particular line.
- You select this line number in the Project Material Line Nbr. box of the side panel tab.
Viewing Material Lines Related to Purchase Order Lines
In MYOB Acumatica 2026.1.1, you can also view information about the material line related to a purchase order line. To do this, you use the Demand dialog box of the Purchase Orders (PO301000) form, shown below. You open it by clicking a line and then clicking View Demand on the table toolbar of the Details tab.
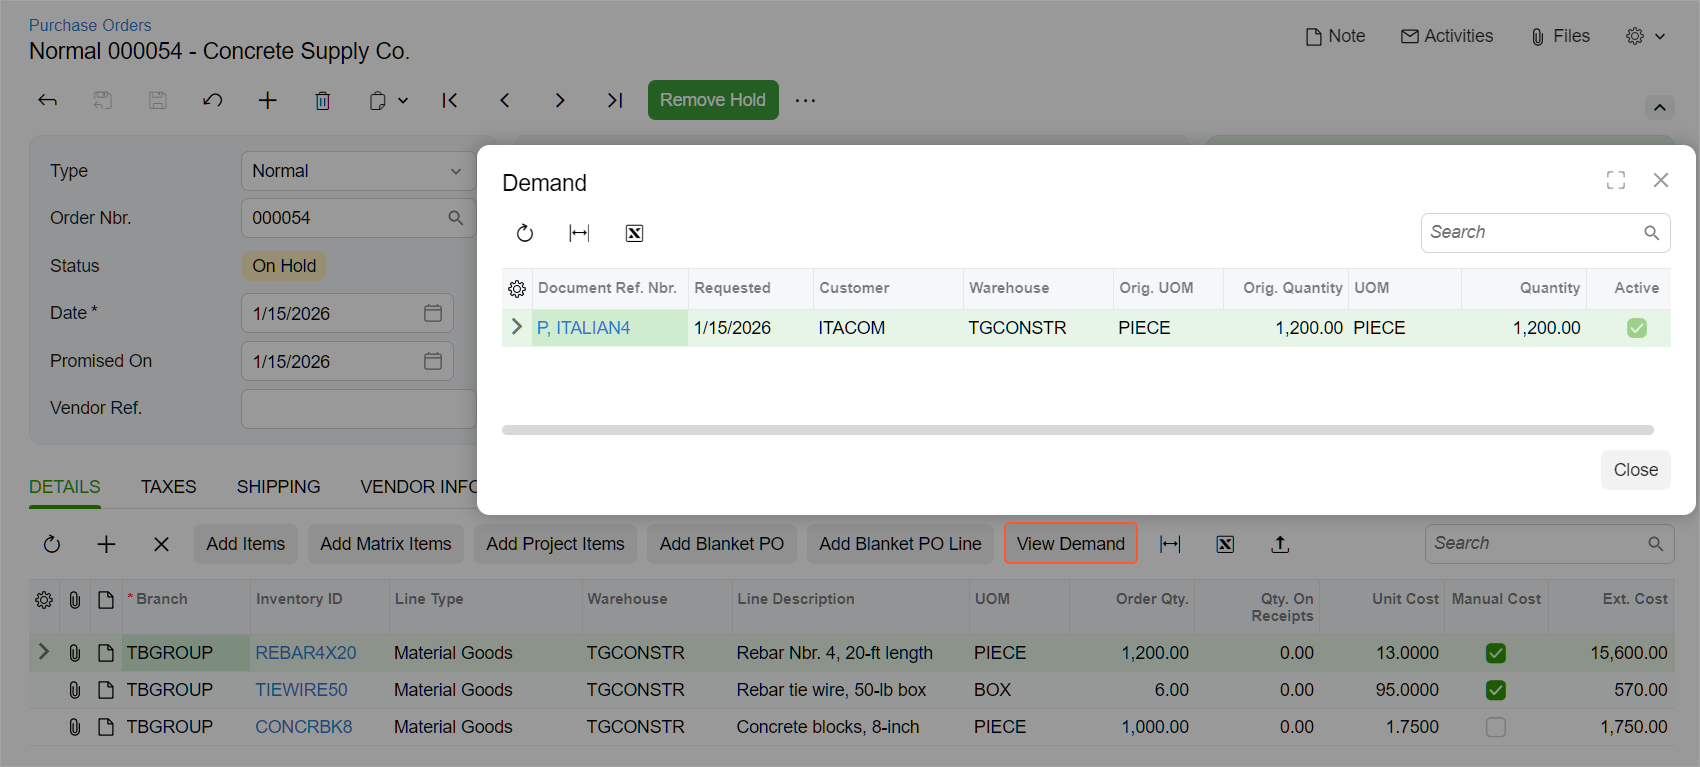
If you want to view the project's entire material list from the dialog box, you click the link in the Document Ref. Nbr. column. This opens the Project Materials (PM306500) form with the project selected.
Linking a Purchase Order to a Material Line
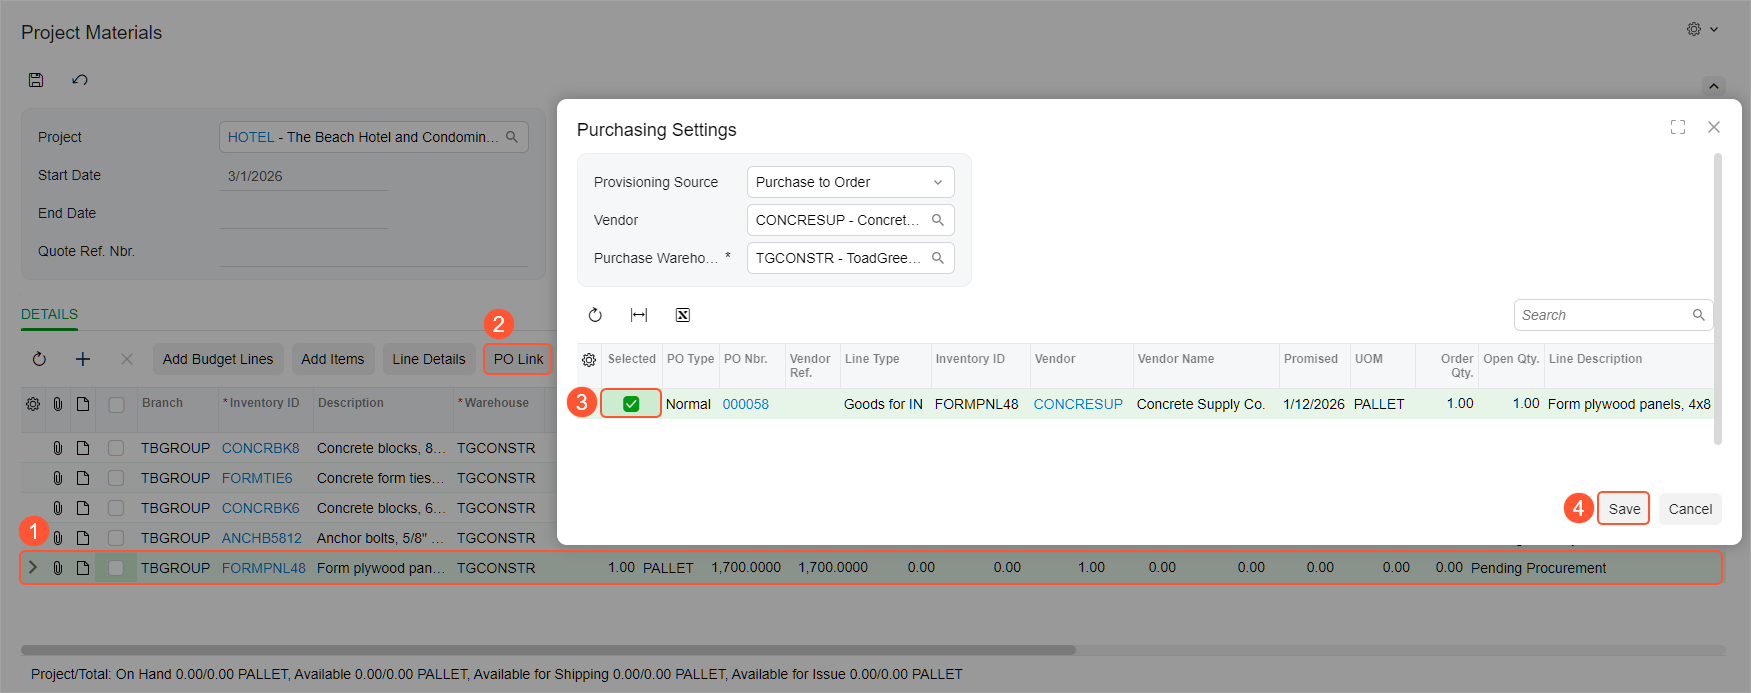
A purchase order or project drop-ship order may be created before a corresponding material line is added to the Project Materials (PM306500) form. In this case, once you’ve added the material line, you can link it to the purchase order line as follows:
- Click the needed line (Item 1 below).
- Click PO Link on the table toolbar (Item 2).
- In the Purchasing Settings dialog box, select the corresponding purchase order line (Item 3).
- Click Save (Item 4).
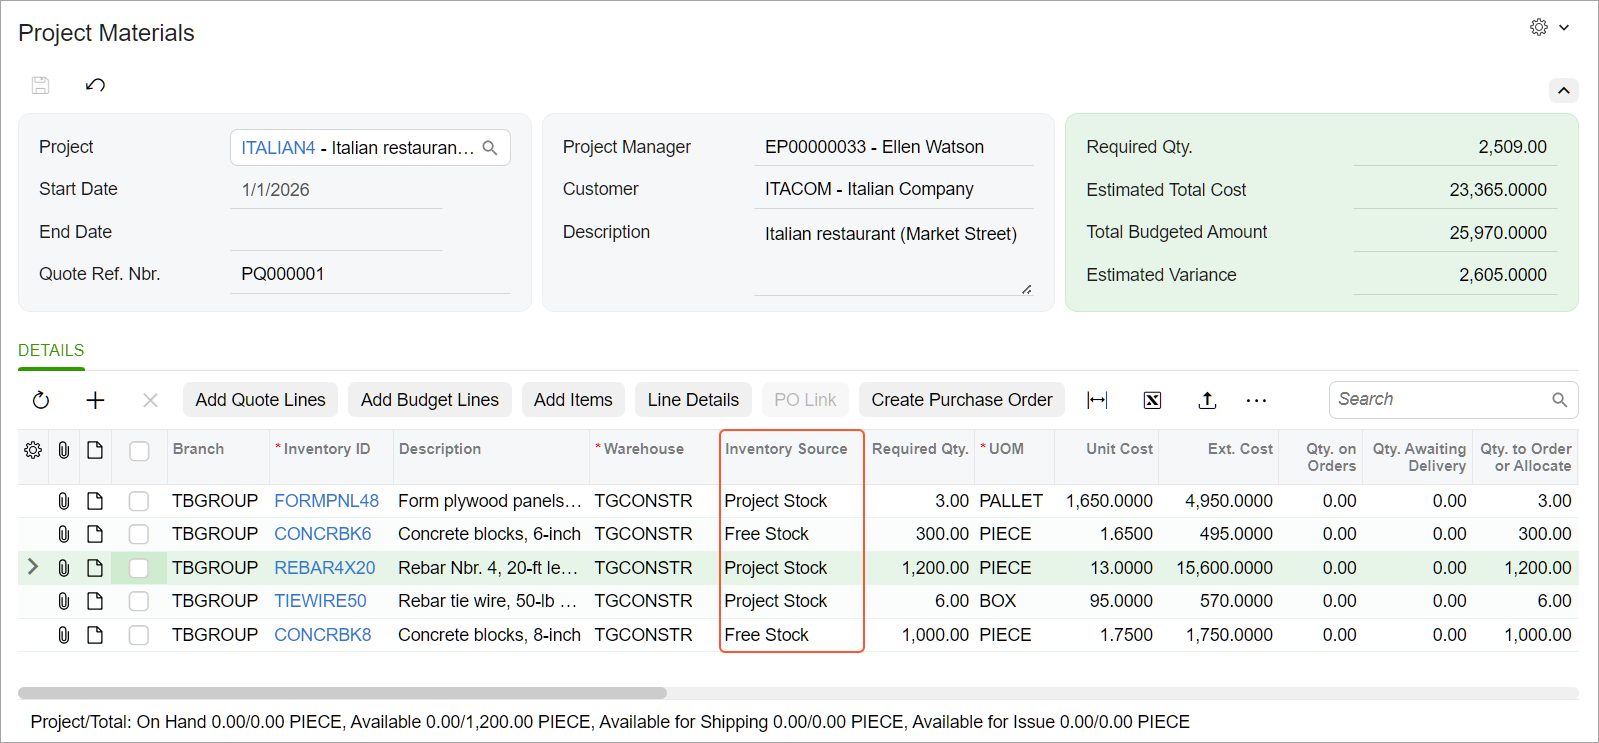
Inventory Source for Project Materials
If you've enabled the Project-Specific Inventory feature and are using this functionality in your system, you can view the inventory source of a material line on the Project Materials (PM306500) form. You can change this inventory source if the selected project has the following settings on the Projects (PM301000) form:
- Inventory Tracking: Track by Project Quantity or Track by Project Quantity and Cost
- Allow Issue from Free Stock: Selected
Mass-Processing and Automated Warehouse Operations for a Material Issue
You can process a material issue similarly to a shipment on the following forms:
- Process Shipments (SO503000)
- Pick, Pack, and Ship (SO302020)
- Picking Worksheets (SO302500)
- Create Pick Lists (SO503050)
Availability Calculation Rules with New Item Plans
You can refer to the following table for the rules on the Availability Calculation Rules (IN201500) form with new item plans:
| Check Box | Description |
|---|---|
| Deduct Qty. on Material Lines Prepared | Indicates whether the available item quantity is decreased when some item quantity is added to a document with the new Material Prepared item plan |
| Deduct Qty. on Material Lines | Indicates whether the available item quantity is decreased when some item quantity is added to a document with the new Material Booked item plan |
| Deduct Qty. Allocated for Material Lines | Indicates whether the available item quantity is decreased when some item quantity is added to a document with the new Material Allocated item plan |
| Deduct Qty. Dispatched | Indicates whether the available item quantity is decreased when some item quantity is added to a document with the new Material Dispatched item plan |
| Include Qty. of Material Purchase and Material to Purchase | Indicates whether the available item quantity is increased or decreased when some item quantity is added to a document with the new Material to Purchase, Material Purchase, Material Purchase Prepared, or Material Receipts item plan |
Learn More
For additional insights on project material management, purchases, and inventory, you may want to check out these resources: