
Projects and Construction: Optimized Project Document Management
In MYOB Acumatica 2026.1.1, project document management has been enhanced to give project teams more control, visibility, and flexibility when working with project files. You can now configure tag structures by project, access line-level attachments, assign tags to multiple files in one click, and control how duplicate files are uploaded.
Additional capabilities let you assign tags to files attached to construction documents, automatically tag files by using AI, review project documents and files in one place, and annotate PDF files directly in the system.
- Document Management for managing project files. With this feature enabled, the Document Tag Setup tab appears on the Projects (PM301000) form only in the Modern UI.
- Construction Project Management for enhancements related to construction documents.
- 360 Dashboards for enhancements related to the Project Status (PM301500) form.
- PDF Annotator Integration for making annotations to PDF files.
- AI Automation for using AI-powered tag suggestions.
Creating Tags and Setting Up Tag-Based Access to Project Files
The Configure Tags (PM201500) form has been renamed to File Tags (SM202560). You now use this form only to define tags, their descriptions, and their access rights. On the Tags pane, you no longer configure the tag in a hierarchical structure; instead, the pane contains a list. Because tags aren’t defined at different levels, the Parent Tag box has been removed.
To create a tag, you perform these steps:
- In the Tags pane, add a tag (Item 1 below).
- In the Tag Name box, enter the name of the tag (Item 2).
- Optional: In the Description box, enter the tag's description (Item 3).
- Save your changes.
The system creates the tag and displays it in the Tags pane alphabetically (Item 4).
For each role that may be assigned to an employee working with projects, you select the appropriate access level in the Access Rights column (Item 5).
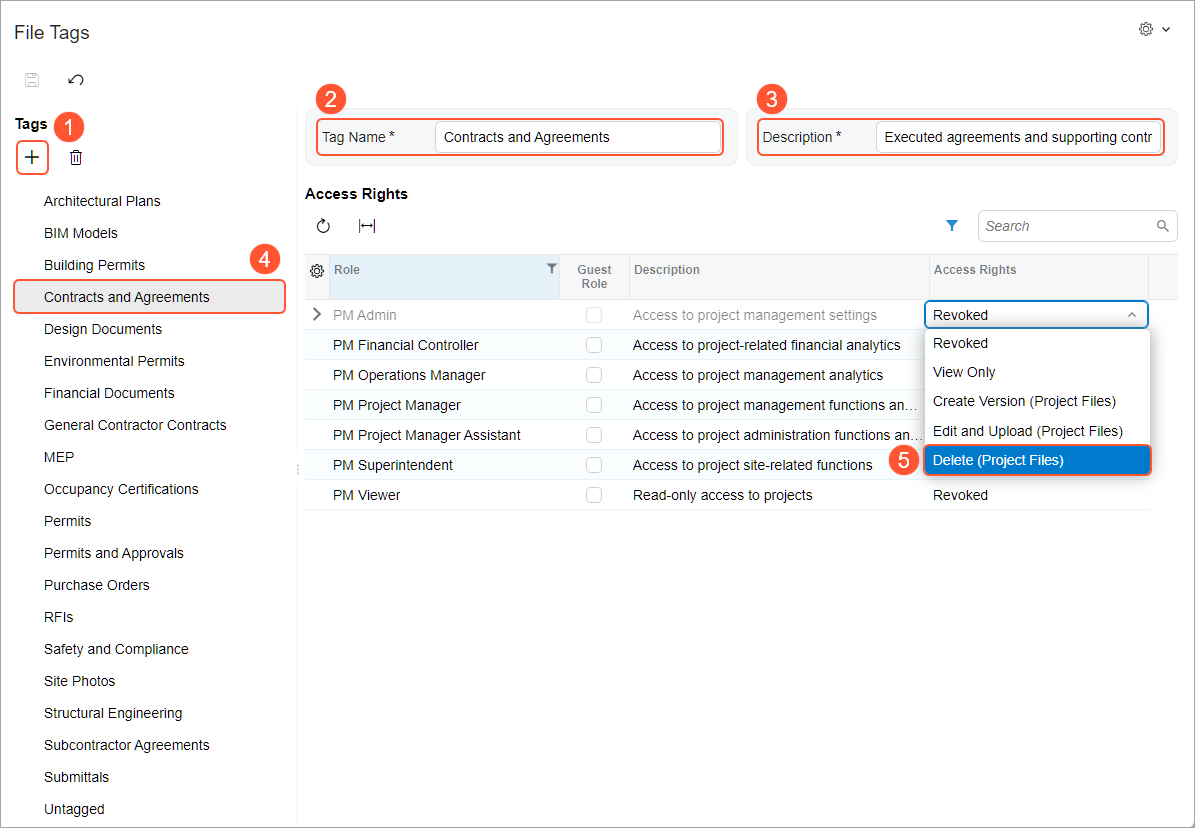
The following access levels—which determine how users with the role can use a file with the tag—can be assigned to a tag:
- Revoked: Users can't access the tag or its files.
- View Only: Users can view tagged files but can't modify them.
- Create Version (Project Files): Users can view, download, check out, and upload new versions.
- Edit and Upload (Project Files): Users can view, download, check out, and upload new files or versions, as well as assign the tag.
- Delete (Project Files): Users can perform all actions plus delete.
Once all the tags have been set up, you can proceed with creating project-specific tag templates.
Defining a Tag Template for Projects
Projects may require different ways of organizing documents and thus different sets of tags. A project tag template contains a reusable tag hierarchy that defines which tags are used for a project by default and how they’re arranged. When you assign a tag template to a project (or project template), the system copies the tag hierarchy to the project so that you don’t need to build it from scratch.
You define tag templates on the new Project Tag Templates (PM204500) form. For each new tag template, you:
- Enter the template ID and description and save your changes.
- In the Tags pane, create tags under the All Tags top-level node, which appears when the tag template is saved. You can create a hierarchical list of tags or a single-level list of tags.
- When you're ready to make the tag template available for users, select the Active check box.
- Save your changes.
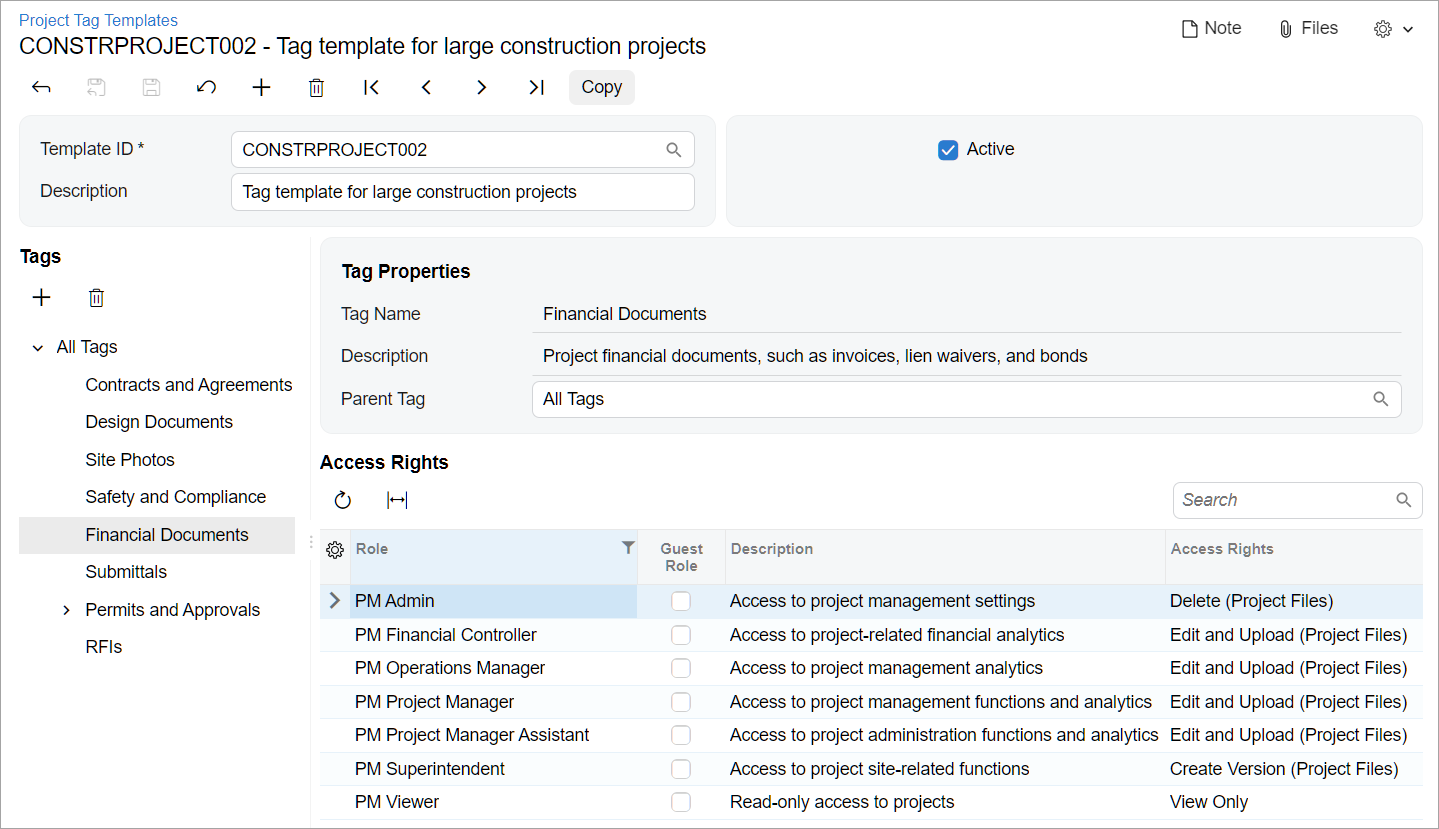
You add tags to the Tags pane as follows:
- Select the node under which you want to add tags (Item 1 below).
- Click the Add button (Item 2).
- In the dialog box that opens, select the needed tags (Item 3).
- Click Add. The system closes the dialog box and adds the tags under the selected node.
- Save your changes.
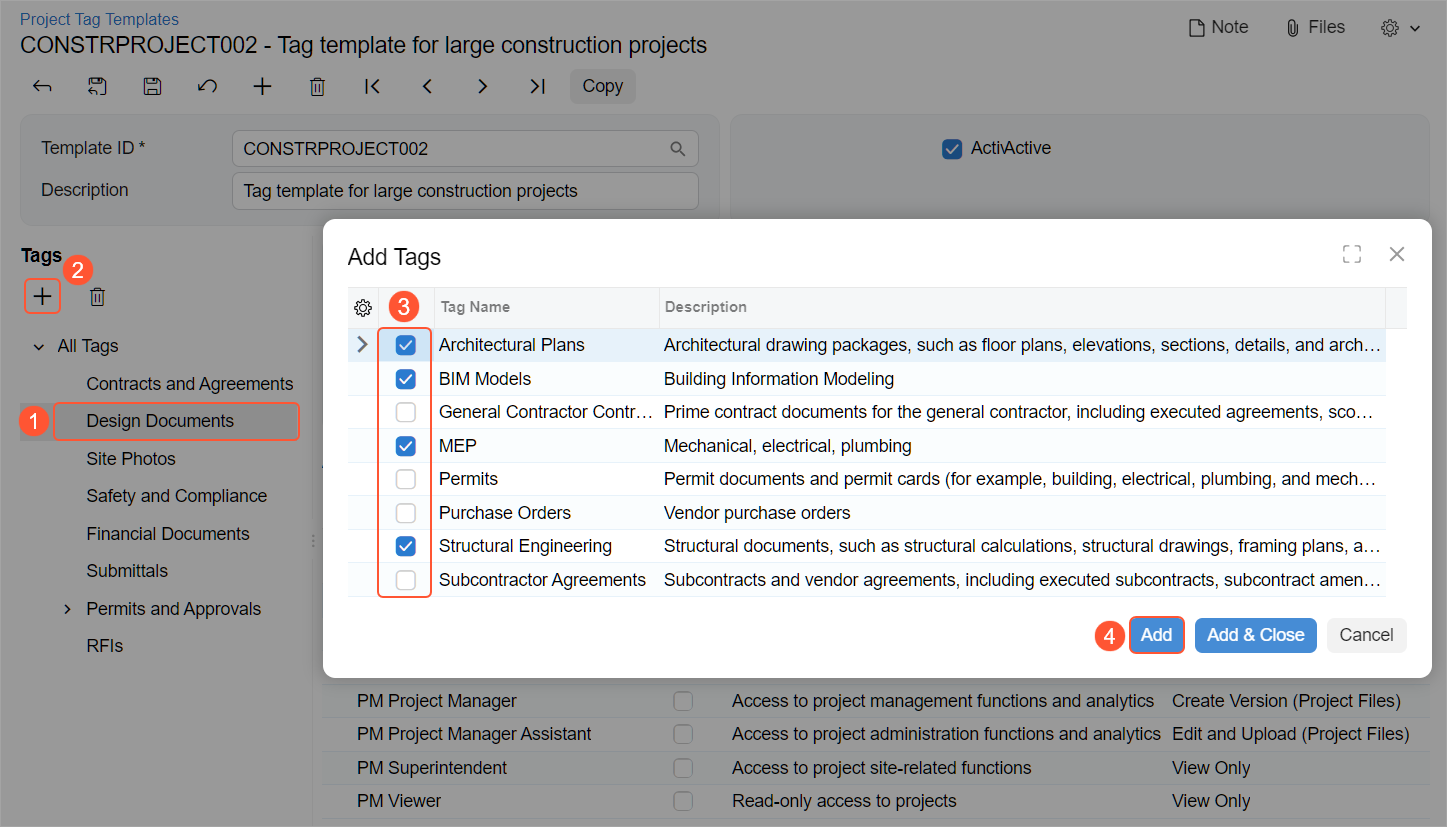
You can see the added tags below.
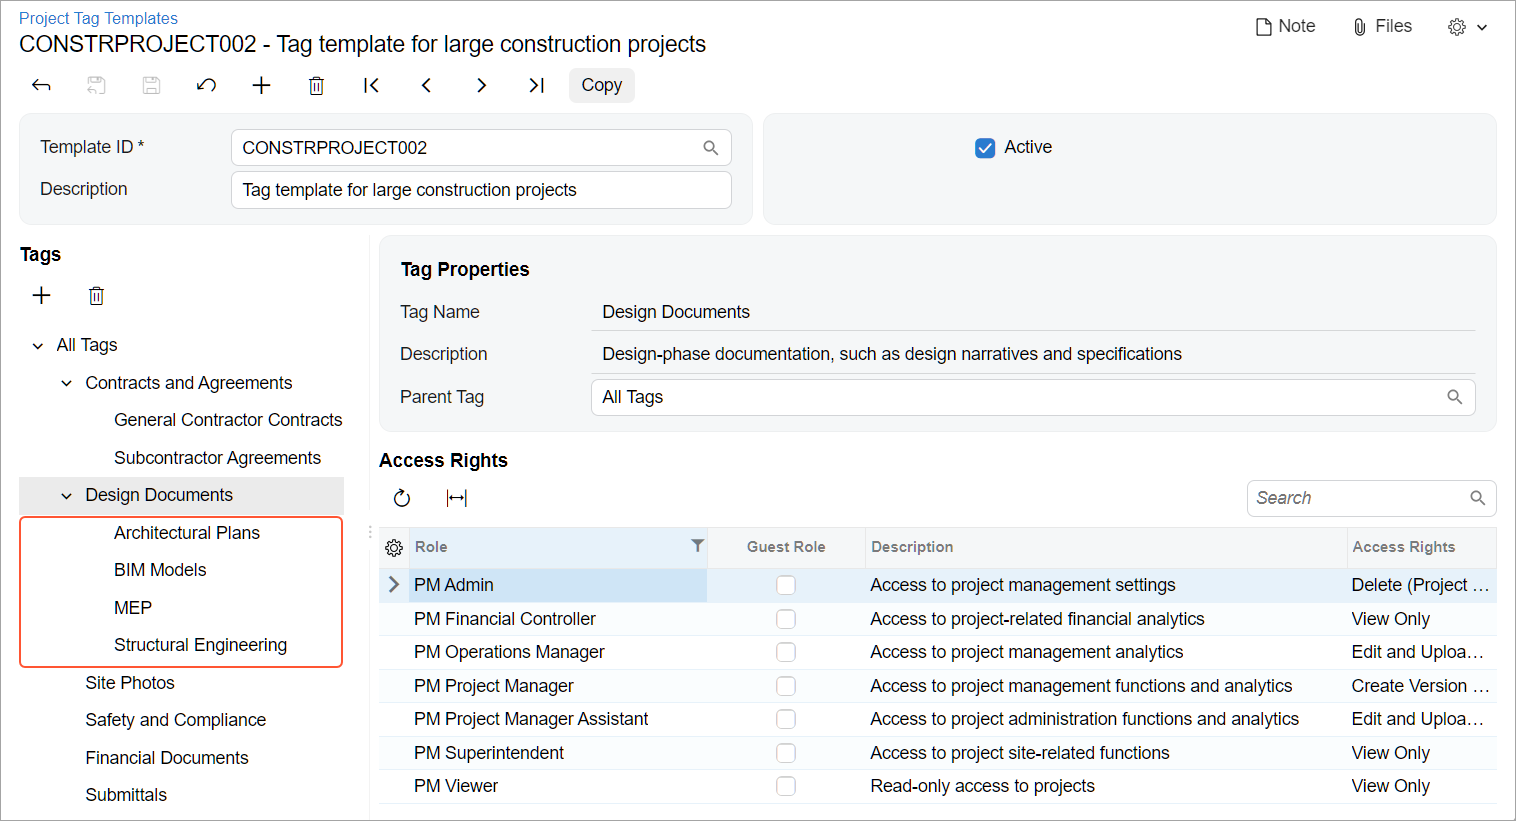
You can view all tag templates in the Project Tag Templates (PM2045PL) list of records.
Selecting a Tag Template for a Project
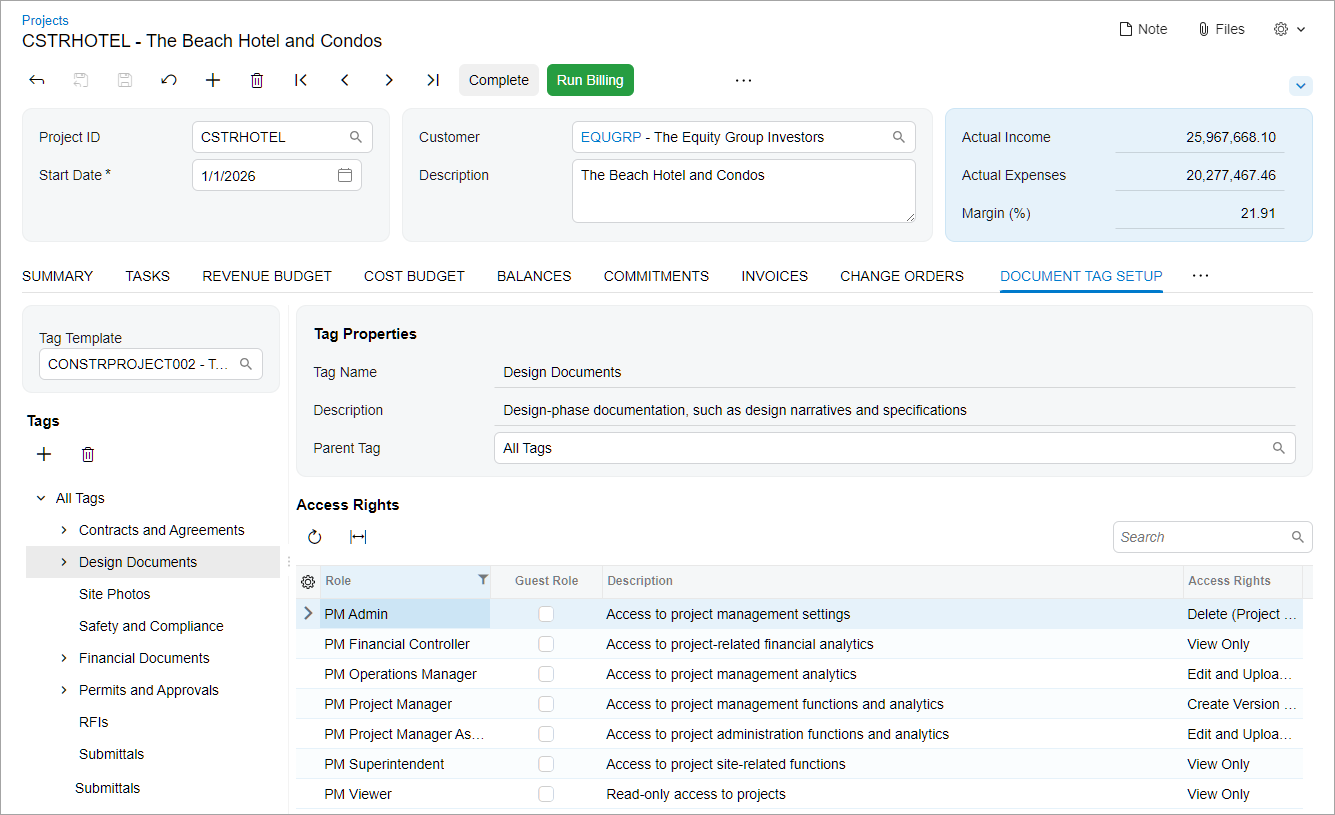
You assign a tag template to a project on the new Document Tag Setup tab—which appears only in the Modern UI—of the Projects (PM301000) form. Once you select a template in the Tag Template box, the system displays:
- The tags in the Tags pane.
- The name, description, and parent tag of the tag selected in the pane.
- Each user role’s access level to the selected tag. The table is read-only; access rights can be changed only on the File Tags (SM202560) form.
Selecting a Tag Template for a Project Template
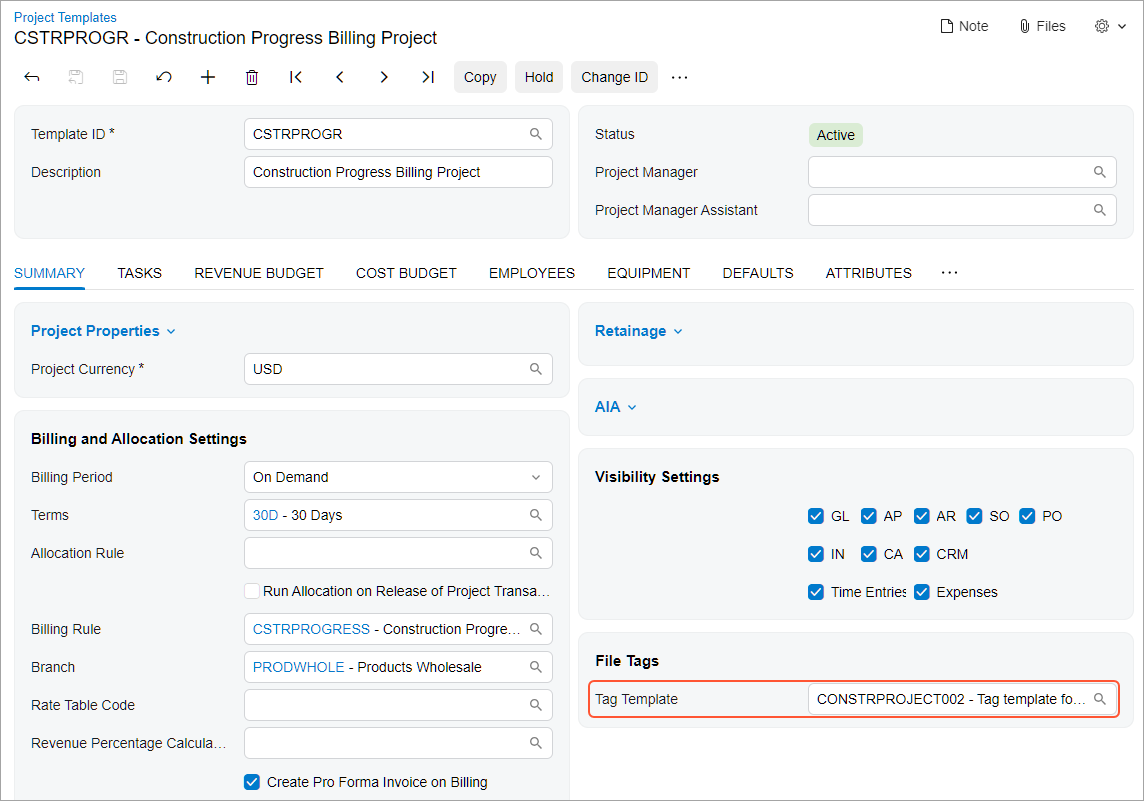
You can also specify a tag template for a project template. On the Project Templates (PM208000) form, the new File Tags section has been added to the Summary tab. This section has the Tag Template box (see below), which lets you select a project tag template. When you create a project from this project template, the system copies the selected tag template to the project.
Setting Up the Tag Template for a Project
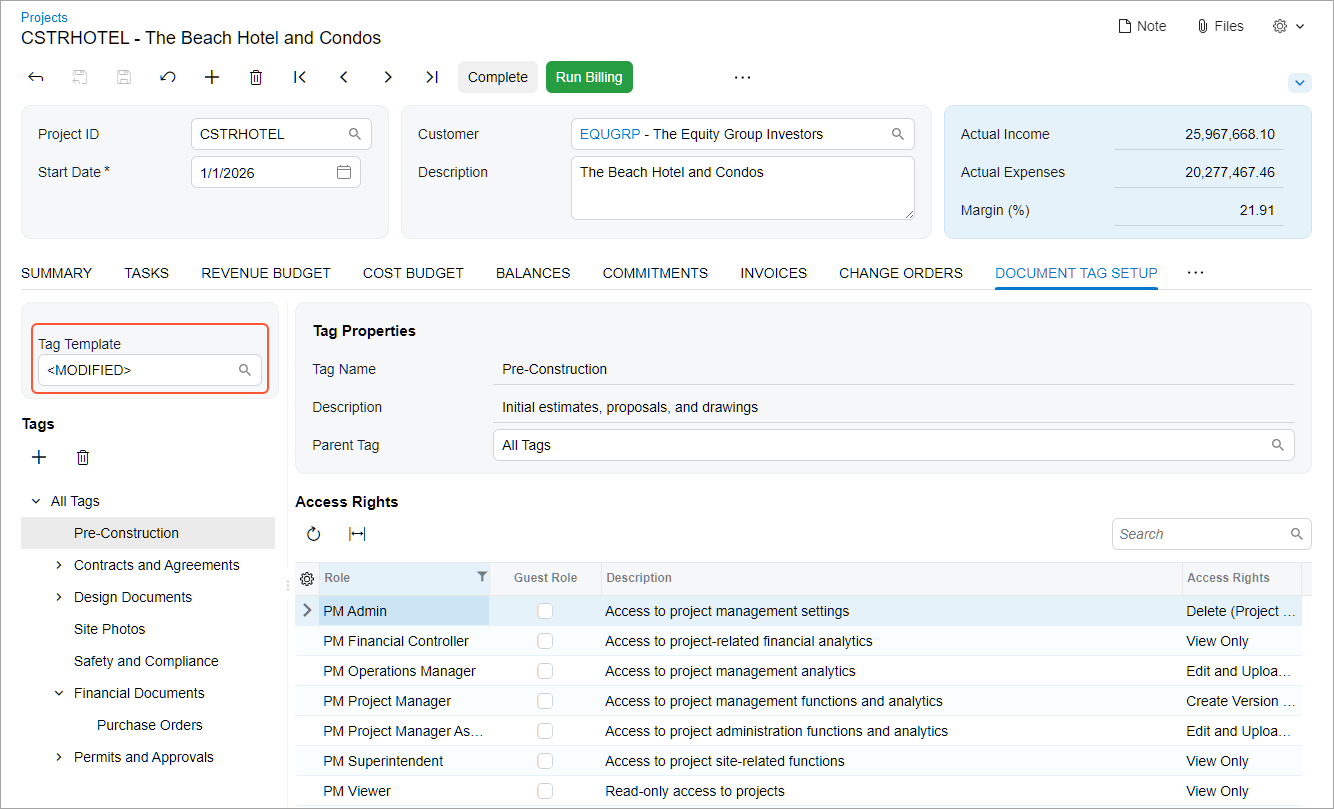
Once the tag template is assigned to a project on the Projects (PM301000) form, you can tailor this template for the project by doing the following:
- Adding existing tags to the template
- Selecting a different parent tag for an existing tag
- Moving tags within the Tags pane by dragging them
When you perform any of these operations and save your changes, the system opens a confirmation dialog box. If you confirm the changes, the system inserts <MODIFIED> in the Tag Template box (as shown below).
Managing All Project Files More Easily
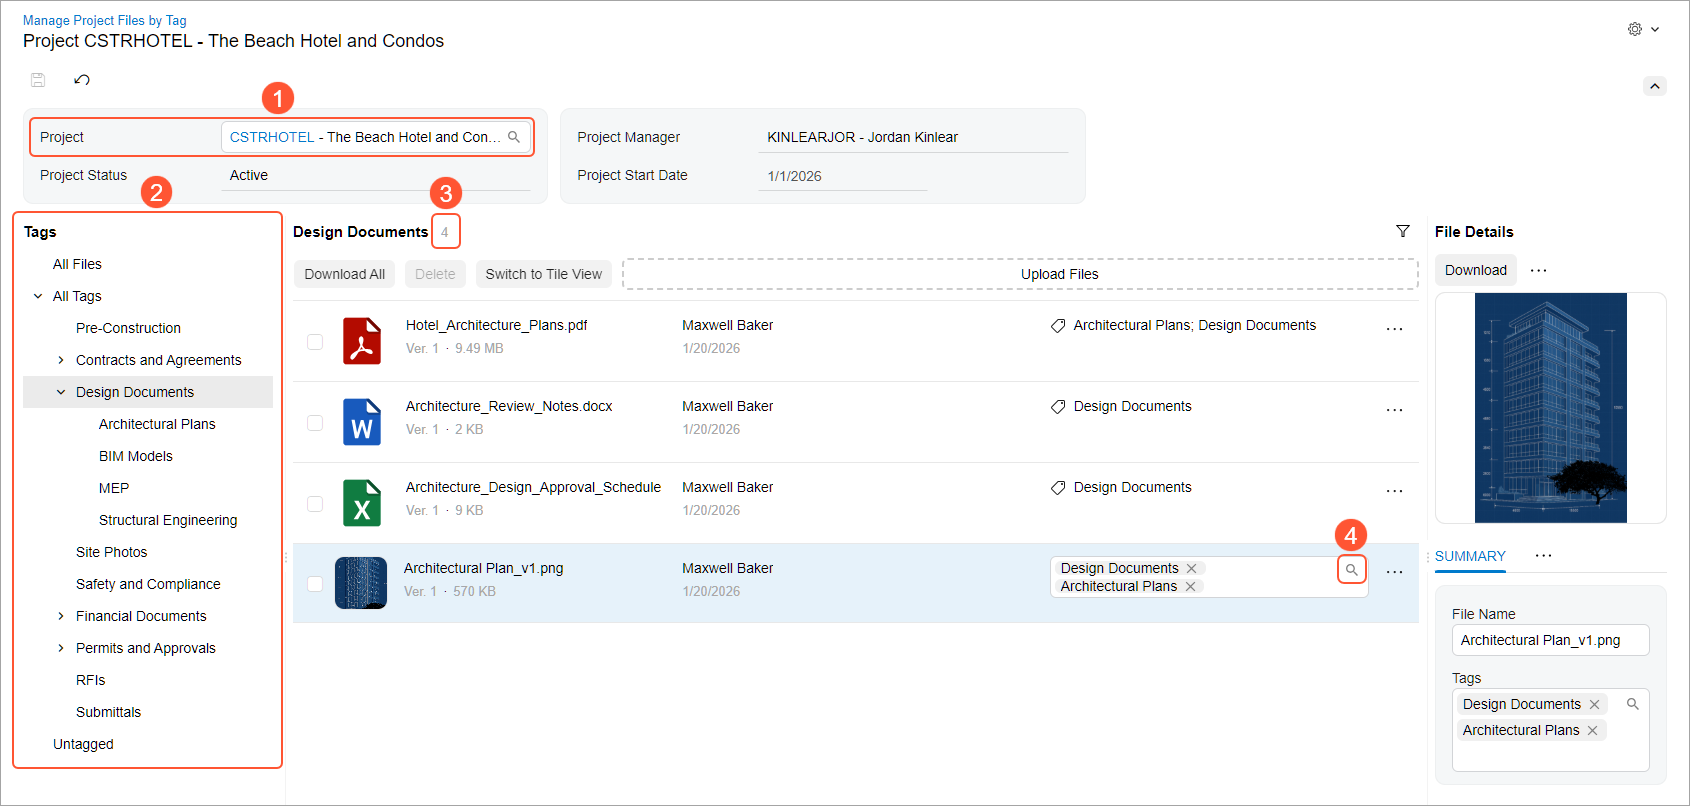
Once you've selected a tag template for a project—and perhaps modified it—you can manage all project-related files on the Manage Project Files by Tag (PM509000) form. When you select the project (Item 1 below), the system shows all project tags in the Tags pane (Item 2).
In the central pane, you can see the number of the files with the selected tag, including the All Files, All Tags, and Untagged nodes (Item 3).
To edit the tags assigned to a file, you click the row with the file, click the magnifier button (Item 4), and select the tags in the Select Tags lookup table. Alternatively, you can start typing the tag name, and the system will open the list of the tags matching this string; you select the needed tag.
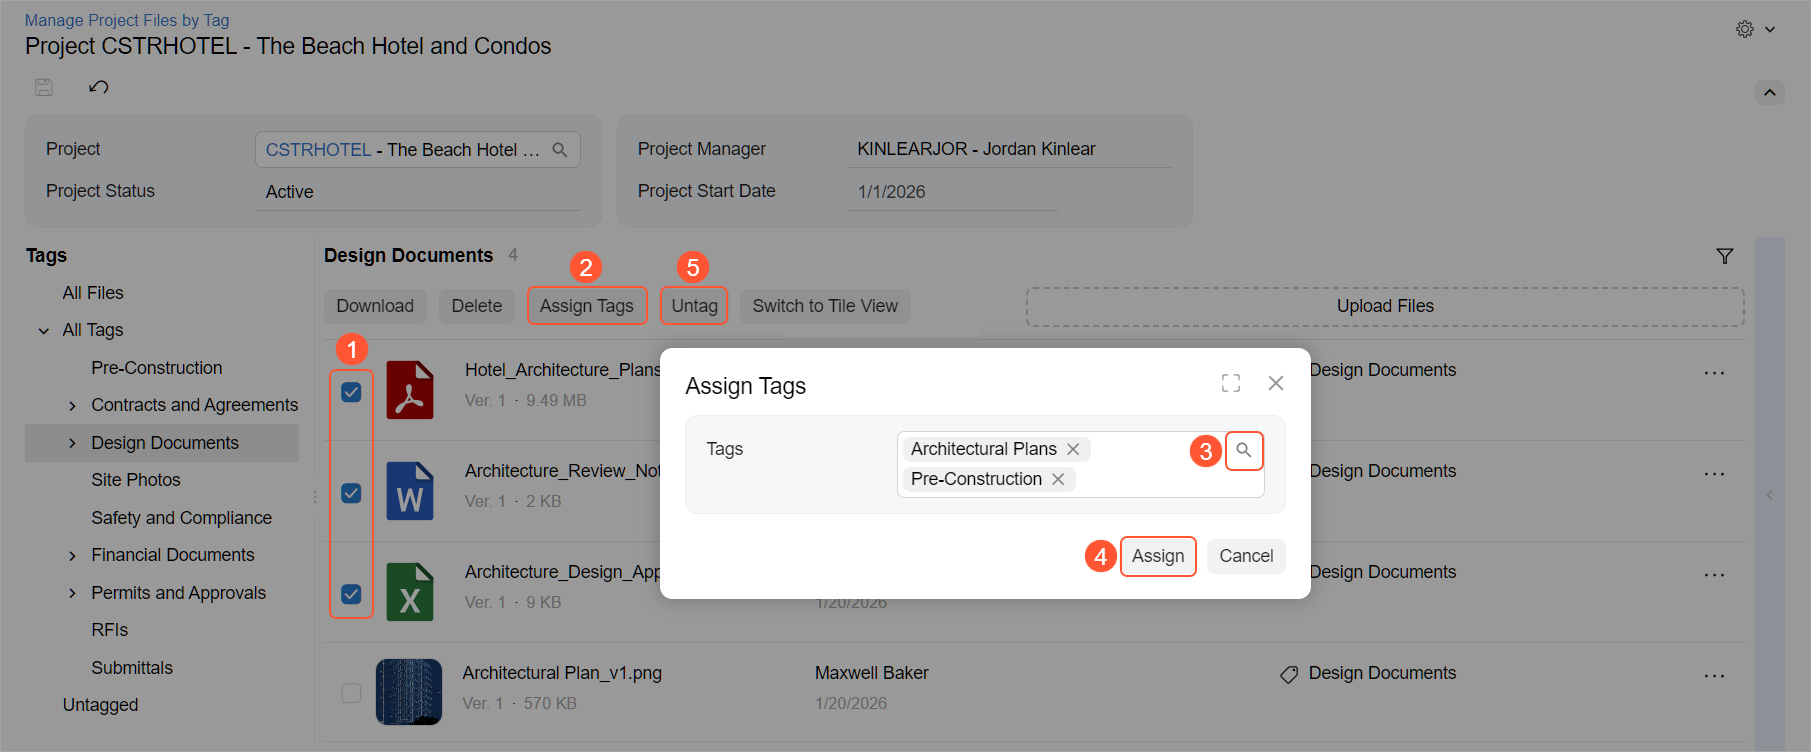
To assign the same tag or tags to multiple files, you:
- Select the files (Item 1 below).
- Click Assign Tags (Item 2), which opens the dialog box.
- In the Tags box, click the magnifier button (Item 3) and select
the tags in the Select Tags lookup table.Tip:Alternatively, you can start typing the tag name, and the system will open the list of the tags with this name for you to choose from.
- Click Assign (Item 4).
To remove all the tags from one file or from multiple files, you select the needed files and click Untag (Item 5).
Managing Project Files by Record Type
While working with files on the enhanced Manage Project Files by Record Type (PM509500) form, you can:
- View the vendor or employee ID in a row with the file.
- Search for files by vendor or employee.
Finding files works somewhat differently depending on what you’ve selected in the Record Types pane:
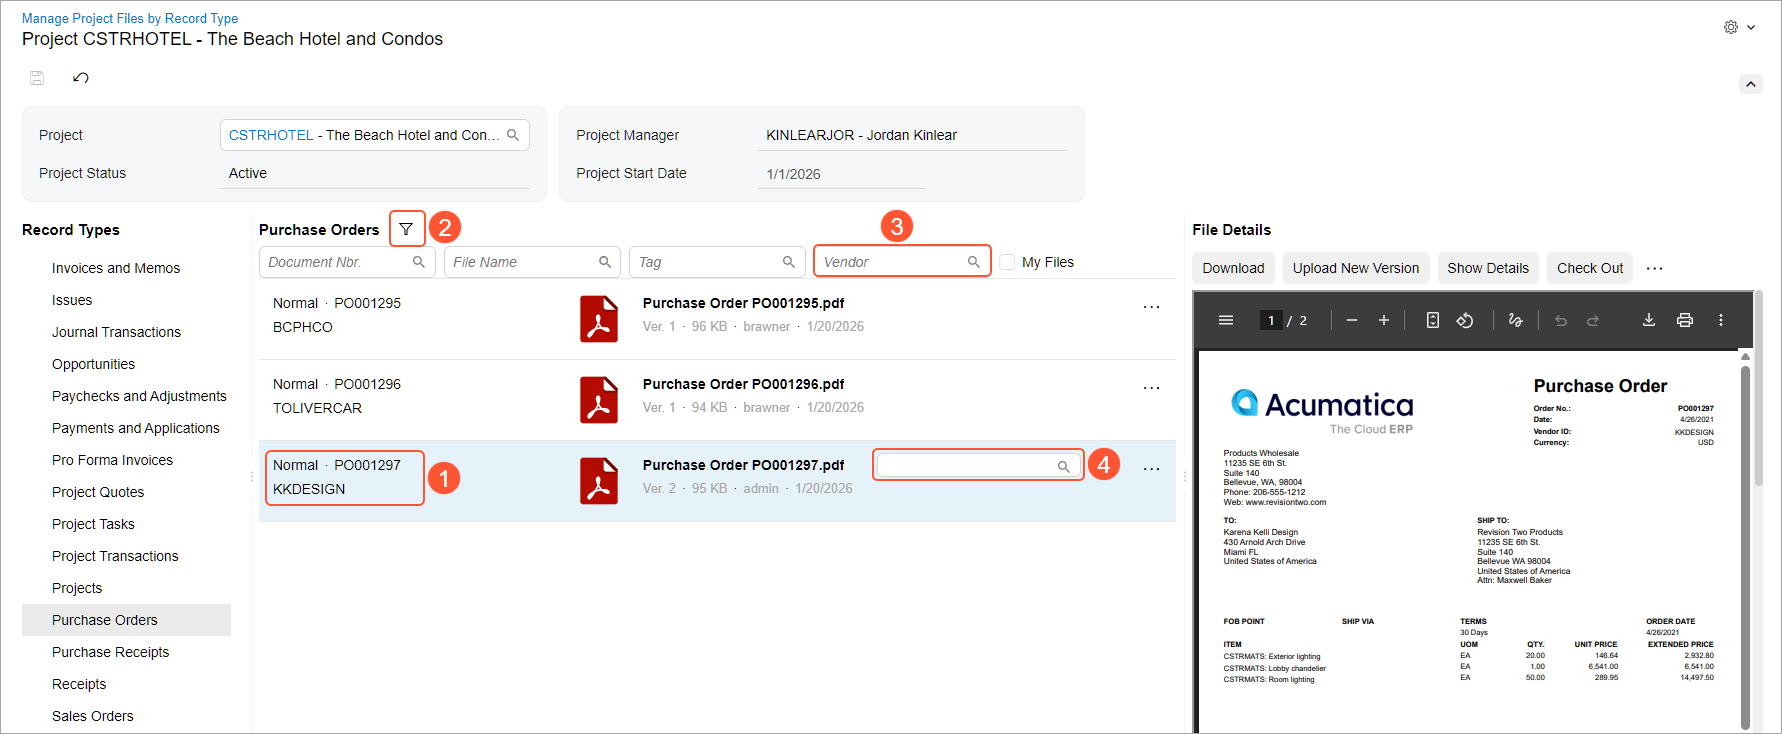
- Bills and Adjustments, Compliance Documents, Purchase Orders, Purchase Receipts, and Subcontracts: For these record types, the central pane now shows the linked document's reference number and the vendor identifier (Item 1 below). If you need to find files related to a particular vendor, you use the new Vendor filter (Items 2 and 3).
- Expense Claims, Expense Receipts, and Employee Time Cards: For these record types, the central pane now shows the linked document's reference number and the employee identifier. To find files related to a specific employee, you use the new Employee filter.
You can also edit the set of the tags for a file. To do this, click the line with the file and add the needed tags to the new box (Item 4), similar to the workflow on the Manage Project Files by Tag (PM509000) form.
Uploading a Duplicate File
On the Manage Project Files by Tag (PM509000) form, you might try to upload a file that already exists in the system. If the file has the same name and extension as the existing file, the system prompts you to select the way to proceed. When you click Upload Files, the system opens the Upload Files dialog box, temporarily uploads the file on the form, and shows its summary information (see below). You can:
- Cancel the uploading if the file is a duplicate
- Upload it as a new file version
- Upload it as a new file
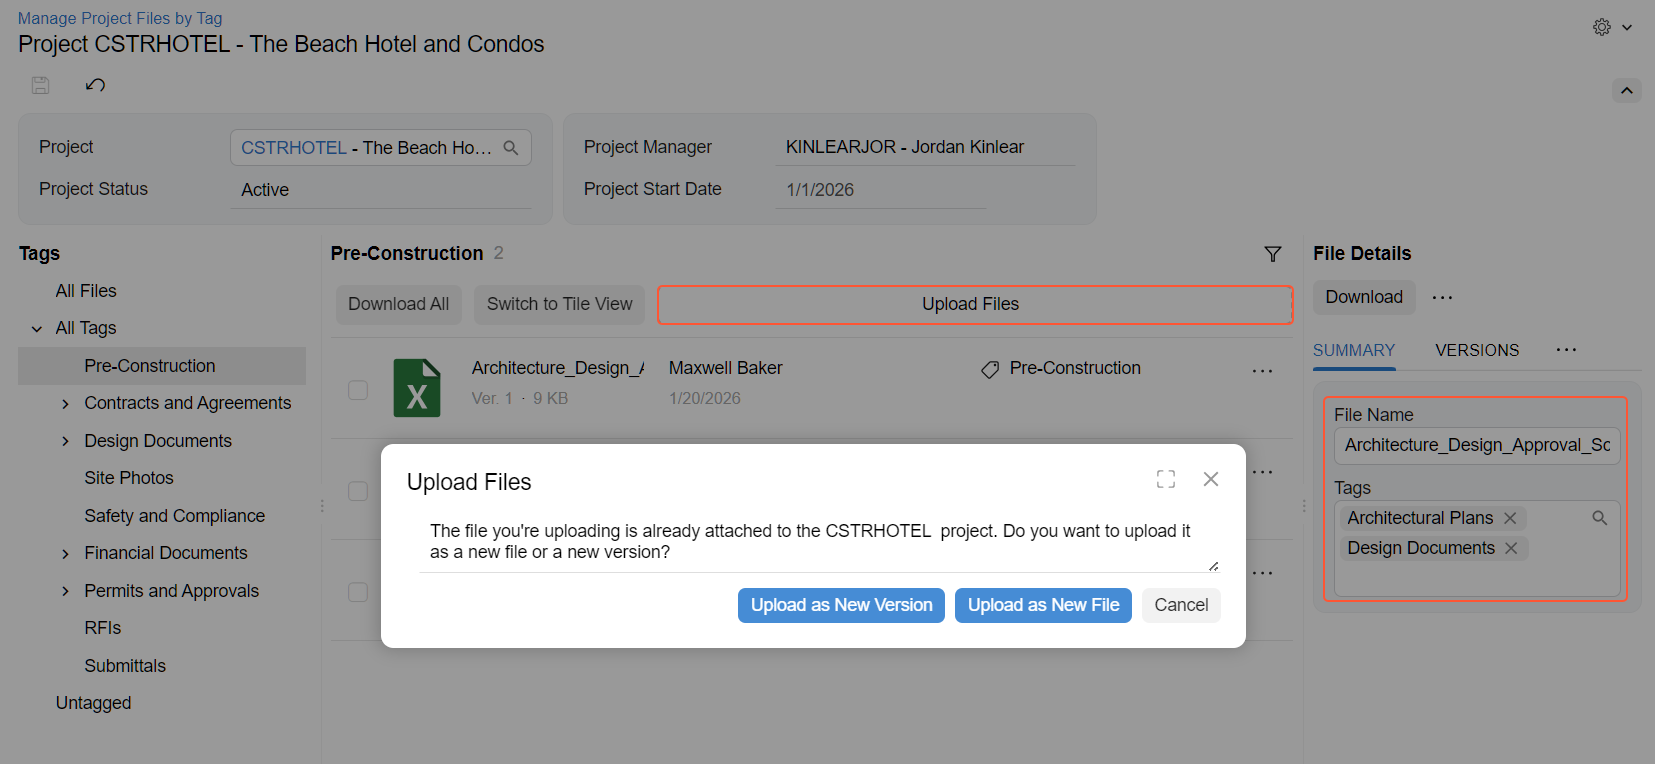
Similarly, if you try to upload a file with the same name and extension on the Manage Project Files by Record Type (PM509500) form, the Upload Files dialog box opens for you to select what to do about the file.
Viewing Options for Project Files
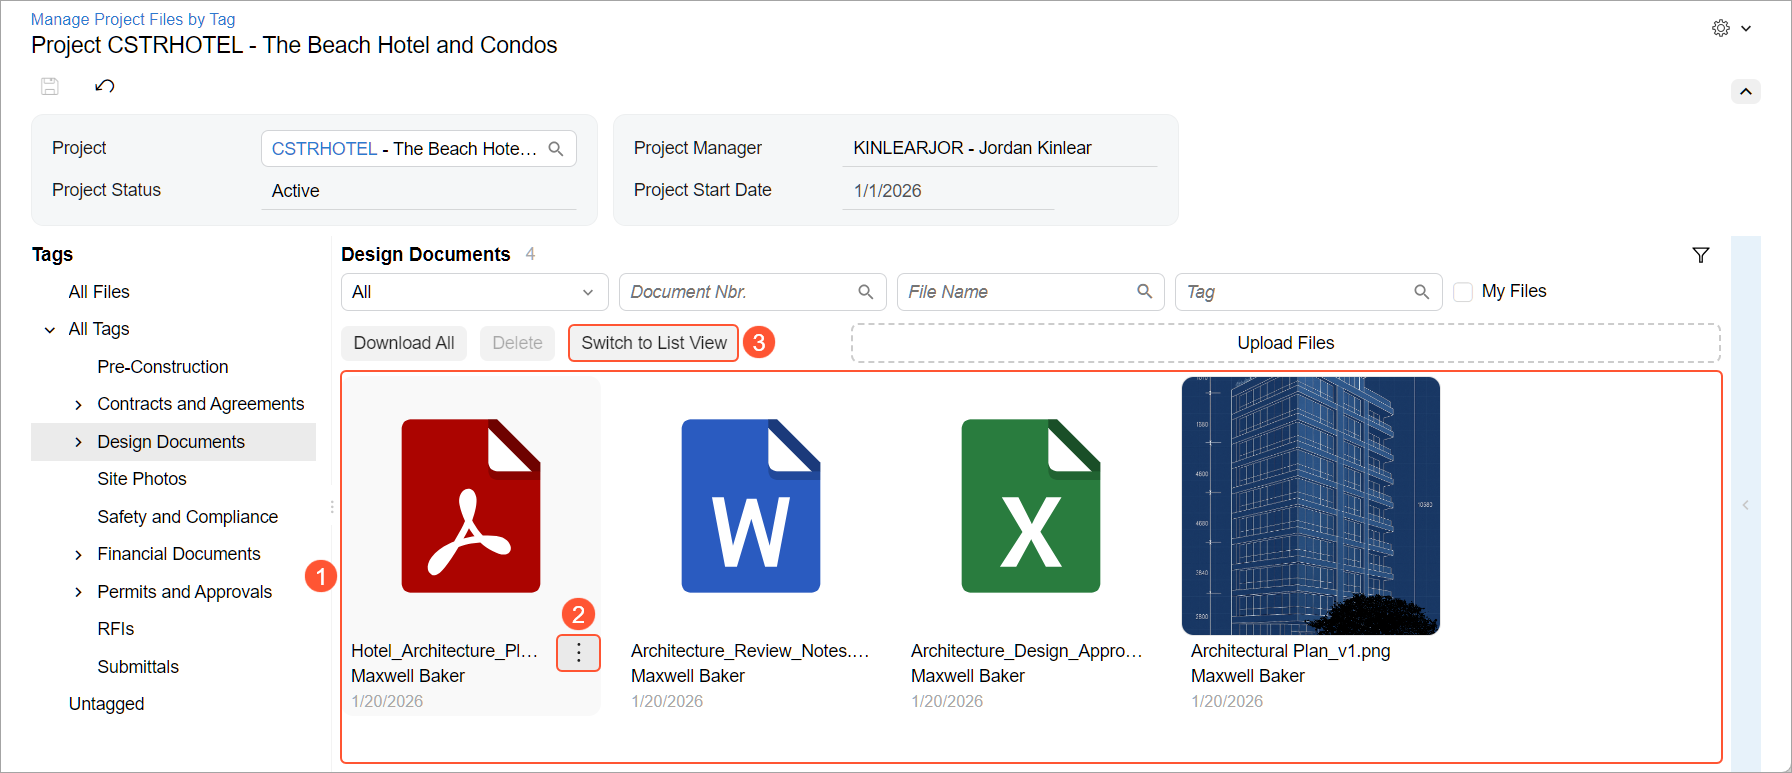
You can toggle between list view and icon (tile) view on the Manage Project Files by Tag (PM509000) form. If you click Switch to Tile View in the central pane, the system displays files as tiles (Item 1 below).
Each tile shows the file’s preview icon, the file name, the username of the user who uploaded the file, and the date of the last version.
Depending on the file type, clicking its icon opens:
- An image viewer for image files
- File details for other files
To open the row-level More menu, you hover over the tile and click the button that appears (Item 2).
To see the list of the files again, you click Switch to List View (Item 3).
Using Additional Tagging Options
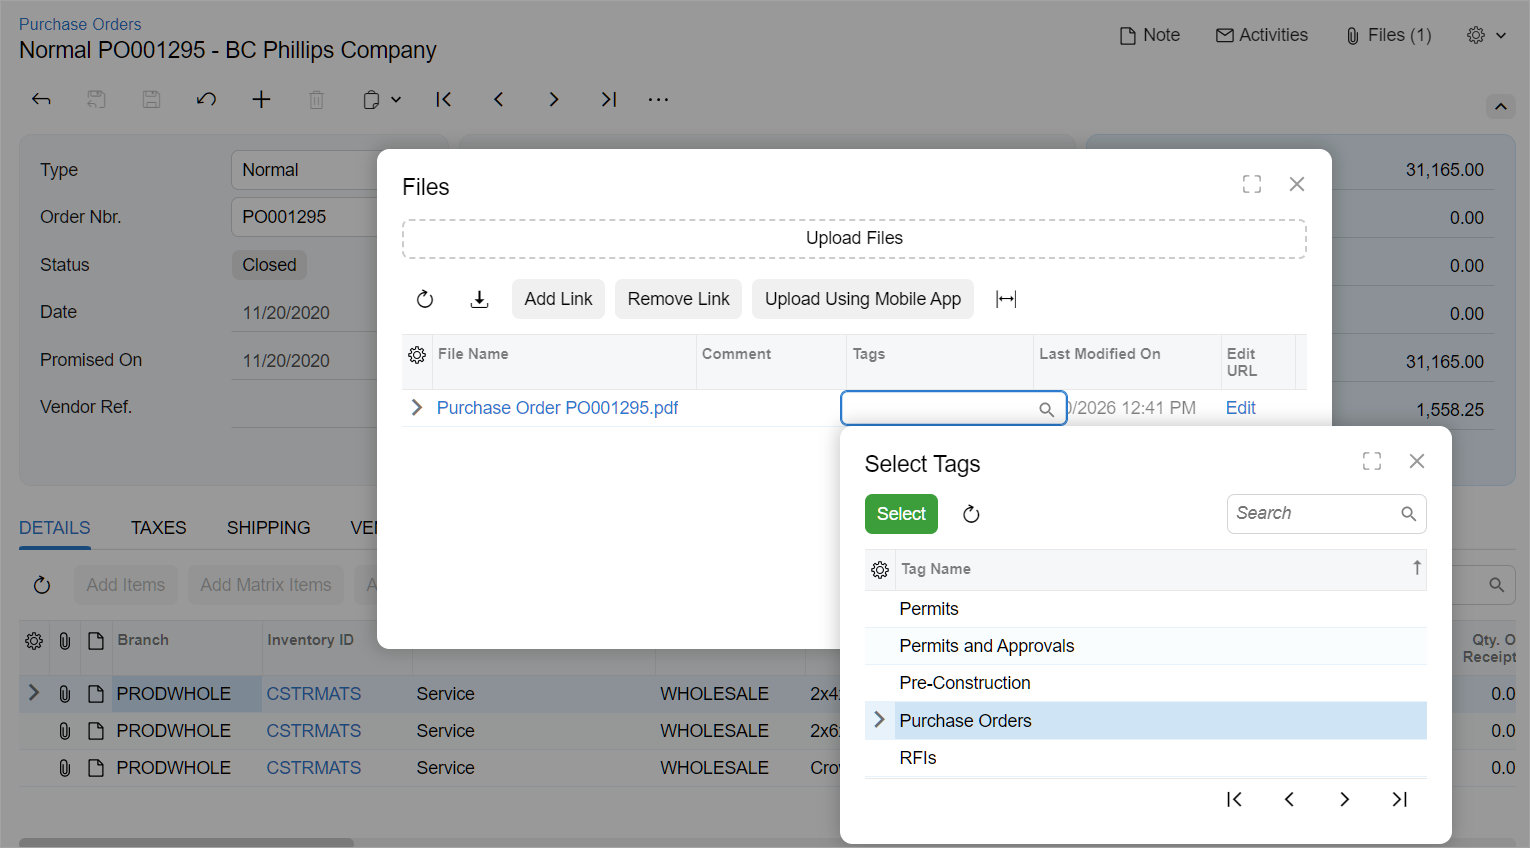
You can assign or change tags in the new Tags column of the Files dialog box on forms with the Files menu on the form title bar, as shown below. When you select the tags, you don’t need to save the form—the system adds the selected tags automatically.
Linking Project Files to Project Documents
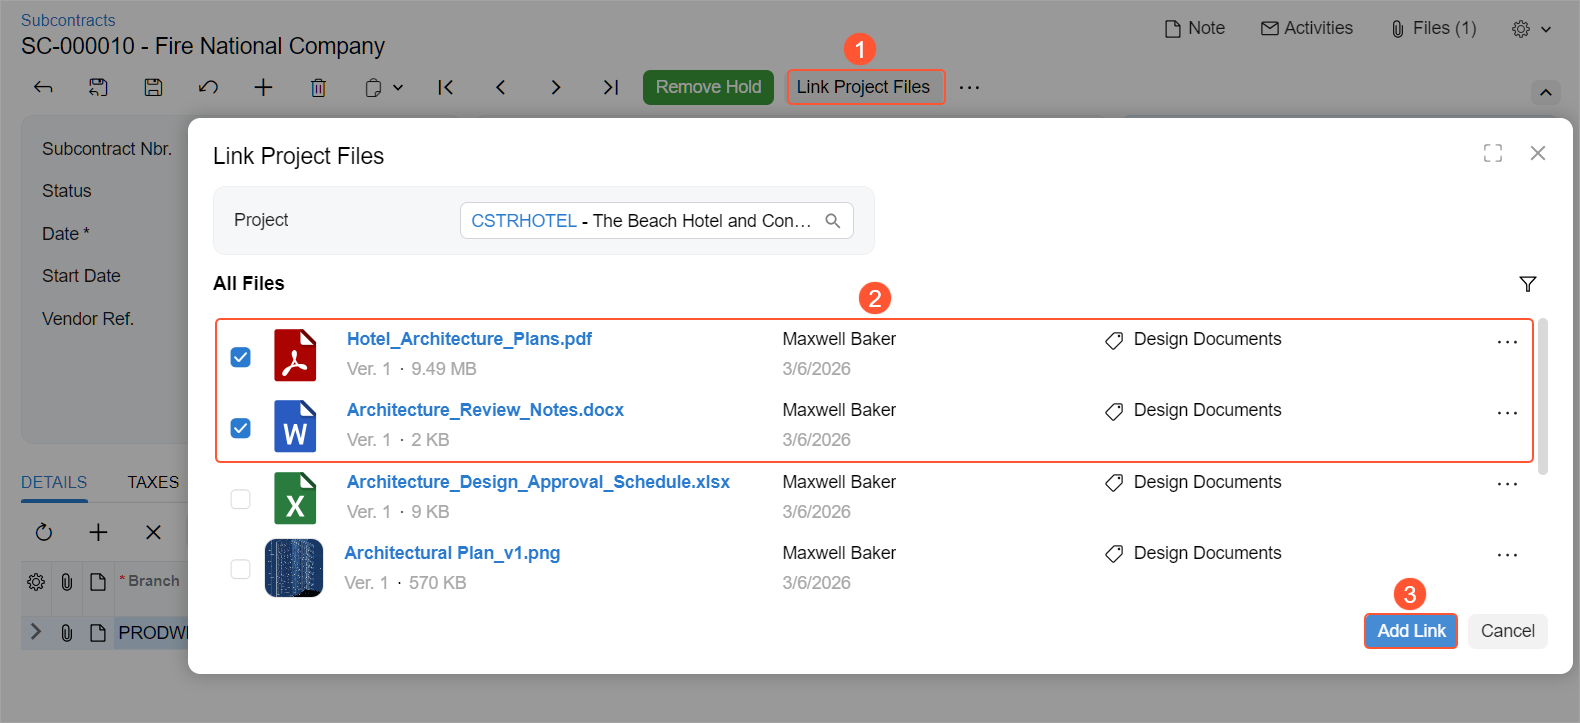
When the Construction Project Management feature is enabled, you can link the selected project files as attachments to construction documents. You no longer need to create duplicate physical copies of the documents. The new Link Project Files button has been added to the form toolbar (and the same command to the More menu) on these forms:
- Change Orders (PM308000)
- Change Requests (PM308500)
- Daily Field Report (PJ304000)
- Drawing Log (PJ303000)
- Photo Log (PJ305000)
- Project Issue (PJ302000)
- Request for Information (PJ301000)
- Subcontracts (SC301000)
- Submittals (PJ306000)
When you click Link Project Files, the dialog box with the same name opens. You select the project files and then link them to the currently opened record by clicking Add Link.
Centralized Project View with File Management
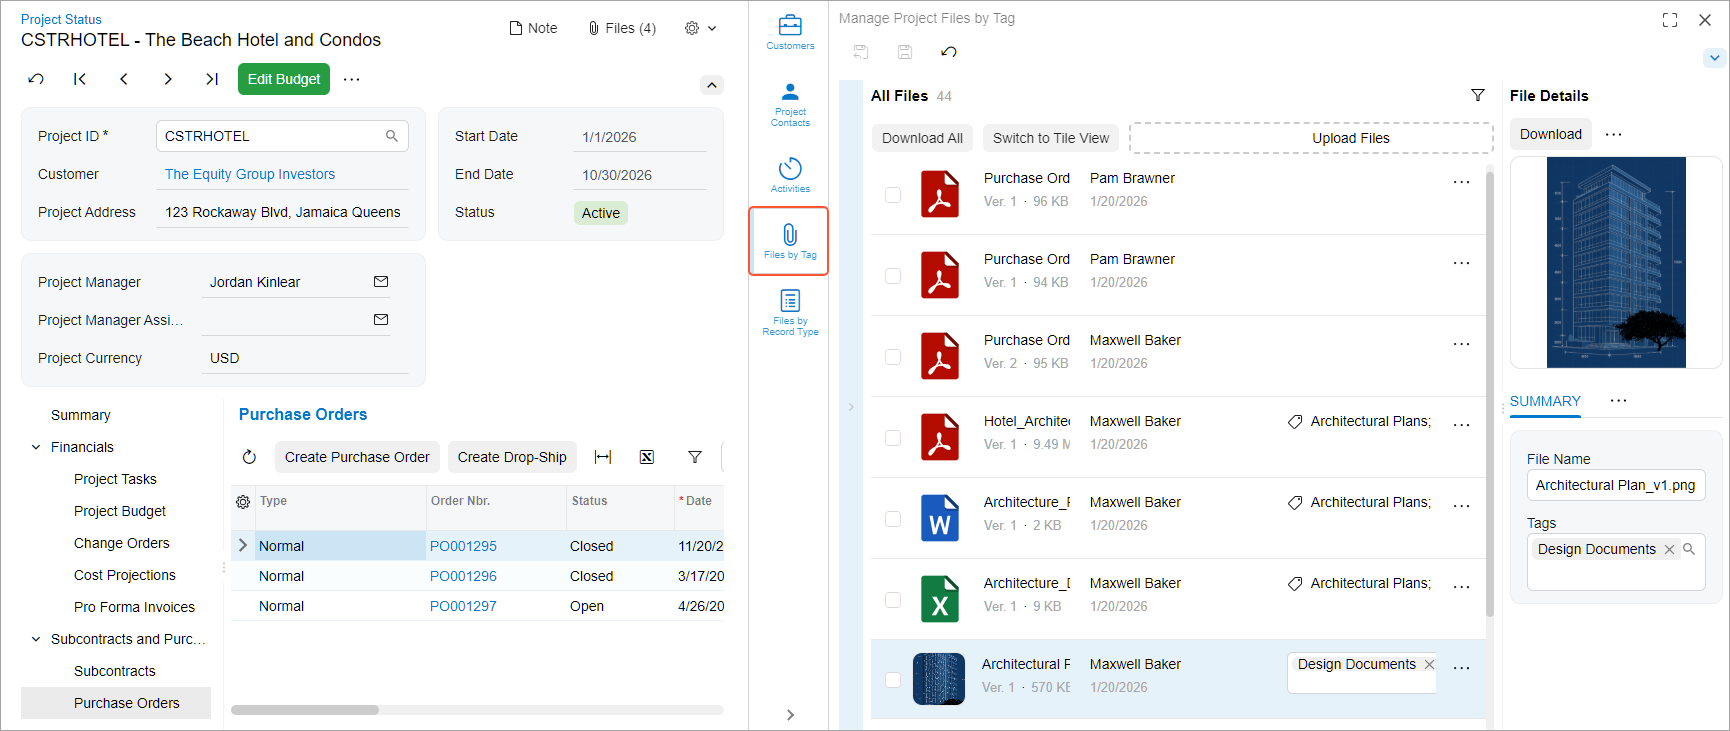
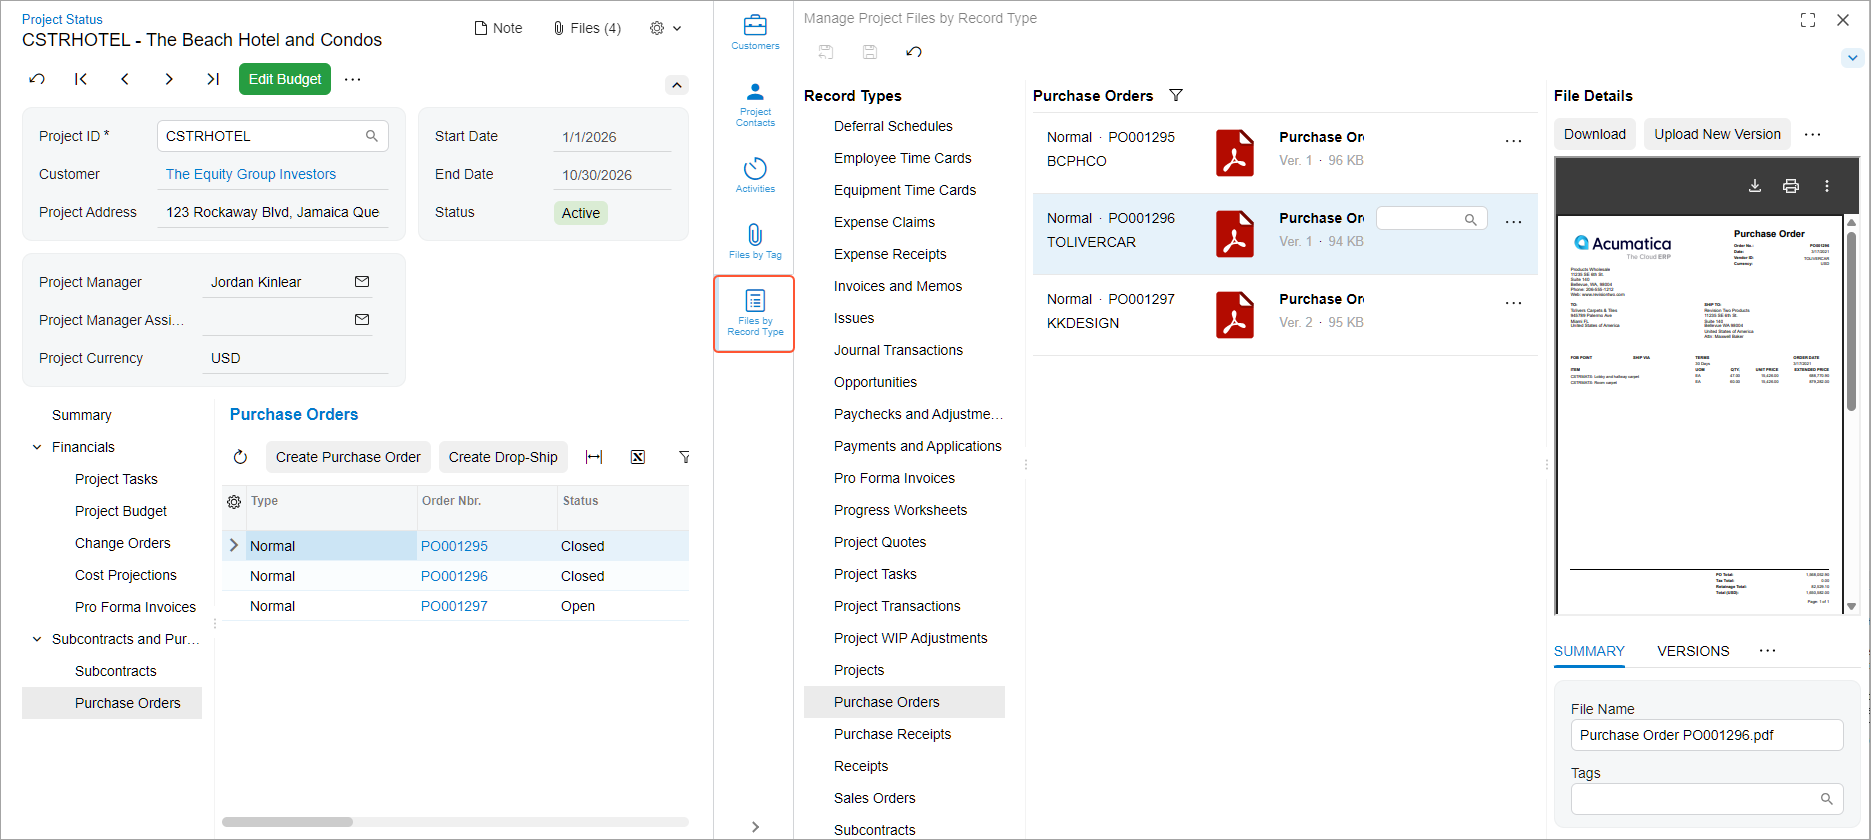
When the Document Management feature is enabled on the Enable/Disable Features (CS100000) form, you can view the following new side panel tabs on the Project Status (PM301500) form, as shown below:
- Files by Tag: Opens the Manage Project Files by Tag (PM509000) form with all project-related files.
- Files by Record Type: Opens the Manage Project Files by Record Type (PM509500) form with the files attached to the project and project-related records.
Annotating PDF Files with the New Side Panel
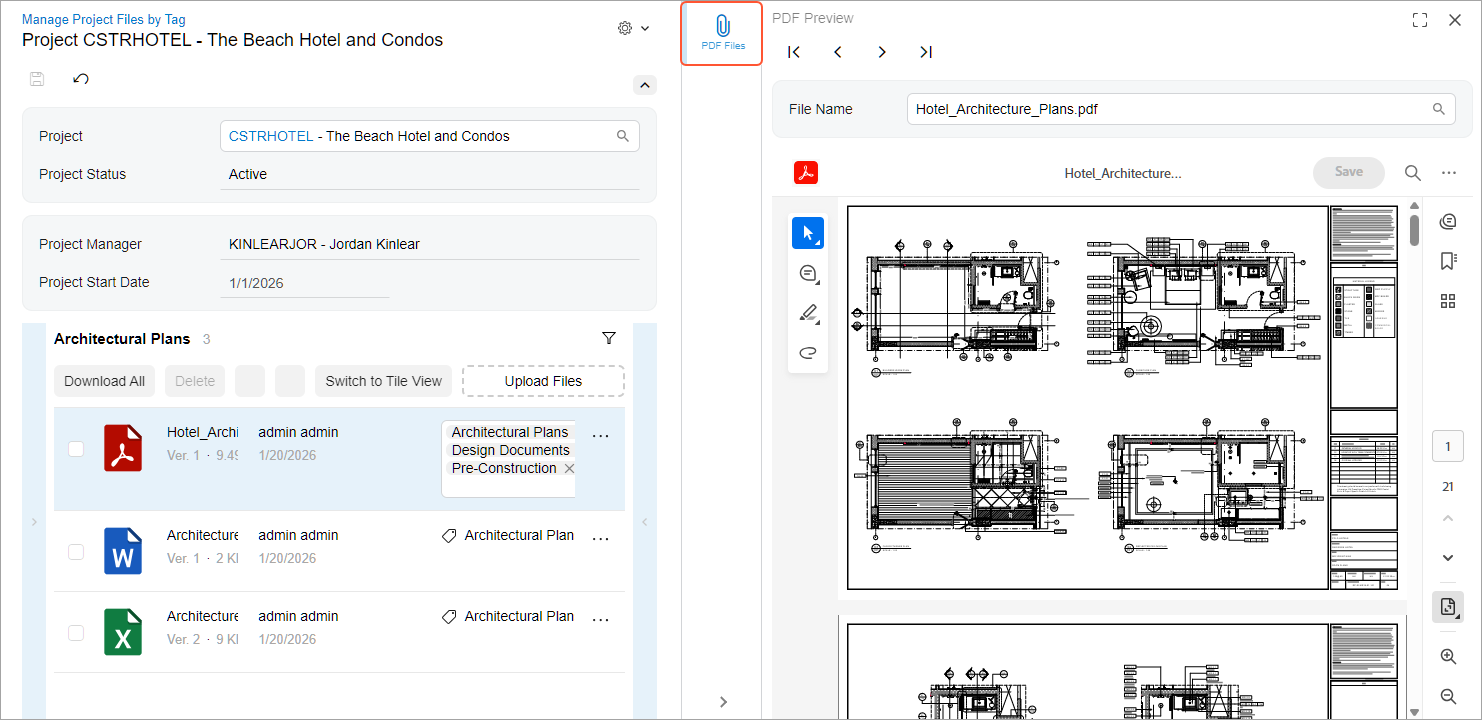
When the PDF Annotator Integration feature is enabled on the Enable/Disable Features (CS100000) form, you can annotate PDF files on the Manage Project Files by Tag (PM509000) form. The new PDF Files side panel tab becomes available (see below).
In the File Name box, you can see all PDF files attached to the selected project and its related records. If you click a file in the central pane, the system opens its preview. From the panel, you can:
- Open the file in the integrated PDF Annotator
- Add highlights, notes, or drawings
- Save your changes as a new version to keep the version history
For details about the integration, see Integrations: Annotate PDF Attachments.
AI-Powered File Autotagging
When the AI Automation feature is enabled on the Enable/Disable Features (CS100000) form, you can use the new FILE-AUTOTAG prompt on the LLM Prompts (ML202000) form.
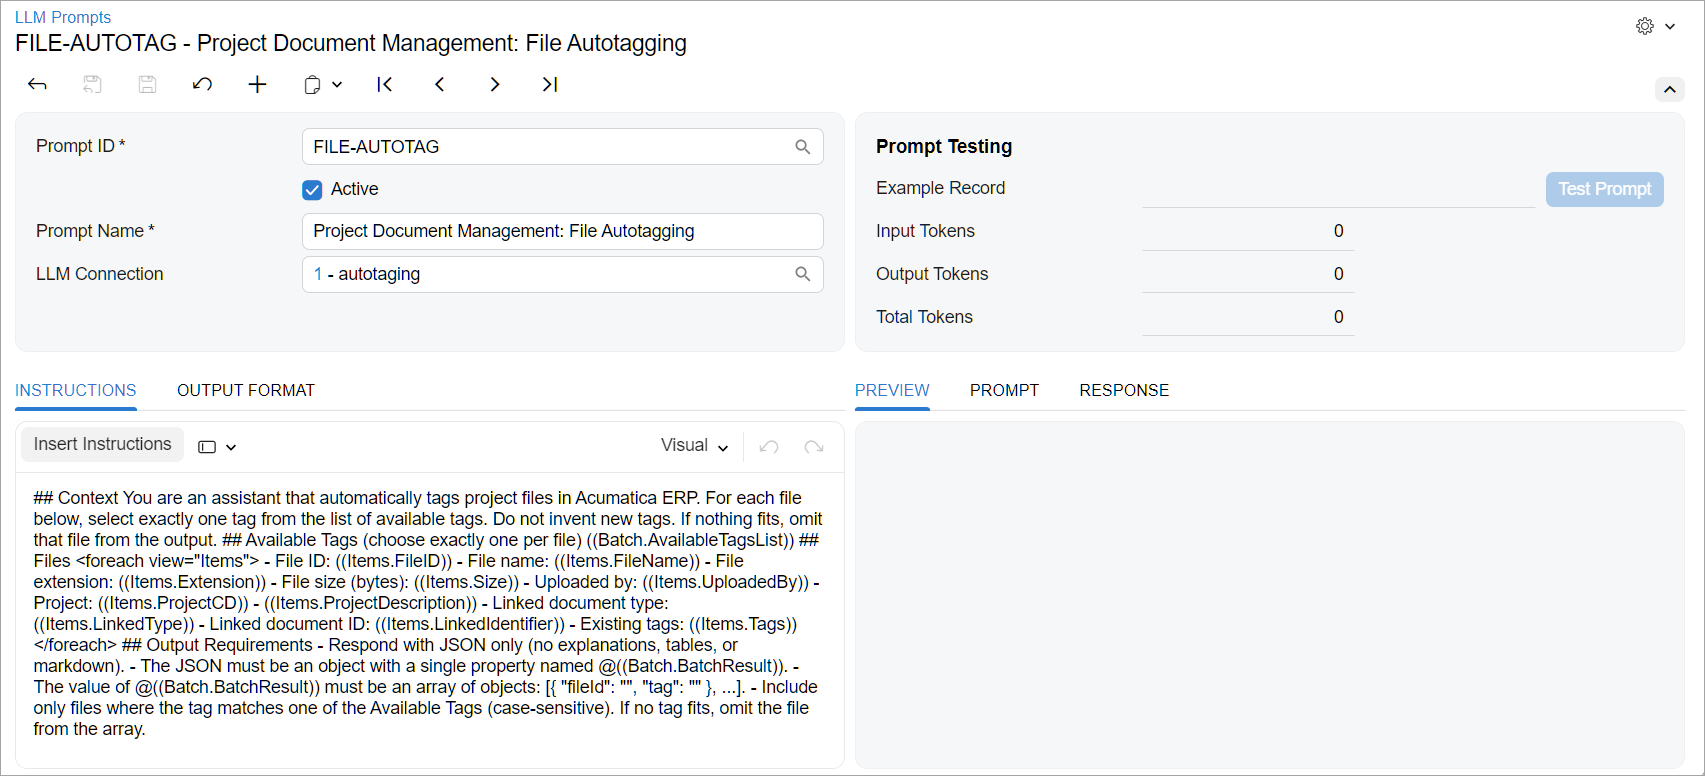
The FILE-AUTOTAG prompt instructs the system to:
- Select exactly one existing tag per file based on file metadata (file name, extension, uploader, project, linked document type and ID, existing tags)
- Output a JSON object with the
@((Batch.BatchResult))array of the{ "fileId": "", "tag": "" }objects
You can use only tags from the available list; if no appropriate tag exists, the file is skipped. Currently, the prompt analyzes only metadata (not file content).
If you change the prompt, the Reset to Default command appears on the Clipboard menu of the form toolbar. If you click the command, the system:
- Resets this prompt's name, instructions, and output format to its default state.
- Clears the Active check box.
When the FILE-AUTOTAG prompt is active and an LLM connection is configured, you can use autotagging while uploading new files. On the Manage Project Files by Tag (PM509000) and Manage Project Files by Record Type (PM509500) forms, file uploading automatically triggers the prompt.
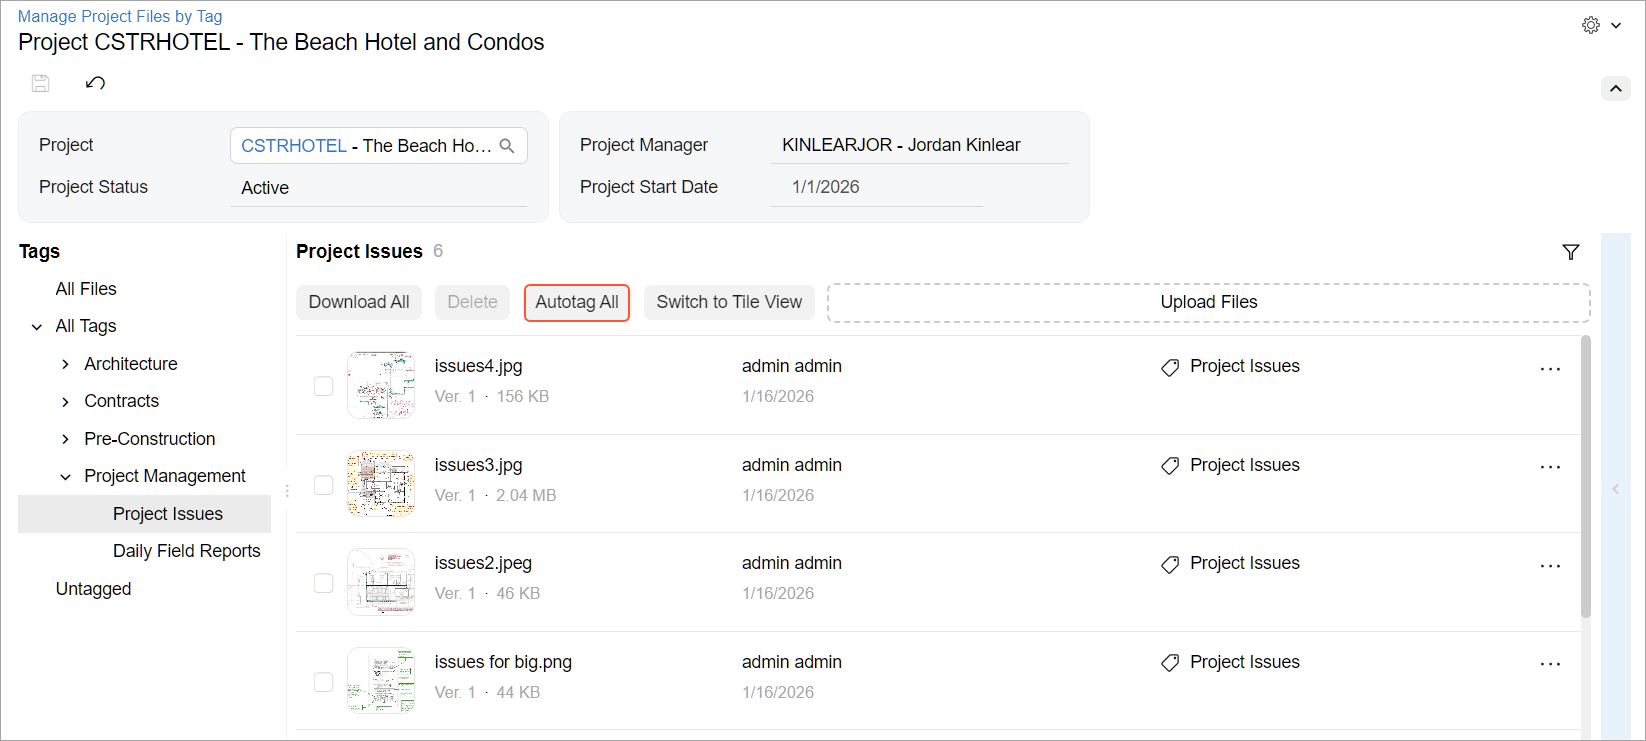
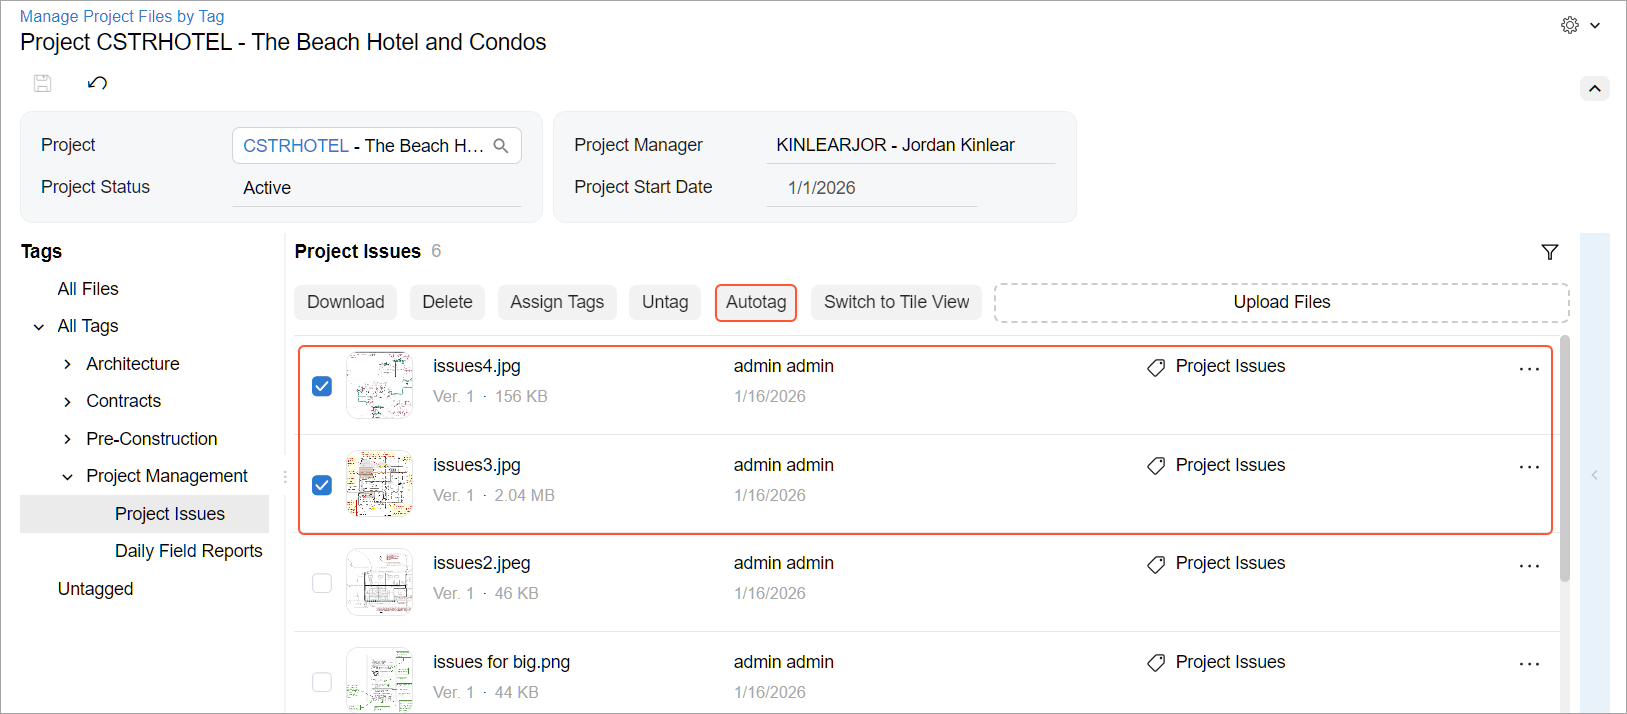
With the FILE-AUTOTAG prompt active, you can autotag multiple existing files by using the new buttons on the Manage Project Files by Tag form, as shown below:
- Autotag All: Autotags all files currently displayed in the central pane. You can see the button when no files are selected.
- Autotag: Autotags the selected files in the central pane. You can see the button when at least one file is selected.
For details about AI Studio, see Integration with LLM Providers: General Information.
What You Can Do Now
- Create project-specific tag templates that match different project workflows
- Gain better visibility into line-level document attachments
- Control how duplicate files are handled
- Mass-update file tags
- Use PDF annotation directly in the system
Learn More
Need more details about file management? See Managing Project Files.