
Integrations: Electronic Document Signing
In MYOB Acumatica 2026.1.1, eSign integration has been improved and expanded. In addition to Adobe Acrobat® Sign, you can now use DocuSign™ to send documents for electronic signing, track the signing process, and sync signed files with the system.
You can access these capabilities in the new eSign category of the Integration workspace by using these links to the new forms:
- eSign Accounts (ES301000)
- Manage eSign Documents (ES401000)
- eSign Sync (ES501000)
The sections below walk you through how the integration is configured and how documents are sent for electronic signing and tracked in the system.
Requirements for the Integration
The following steps must be confirmed at the system level before you set up the integration with the esignature provider:
- Configure an API application in the provider’s portal: DocuSign™ or Adobe® Acrobat® Sign.
- Get the credentials for the API application.
Creating Each Electronic Signing Account
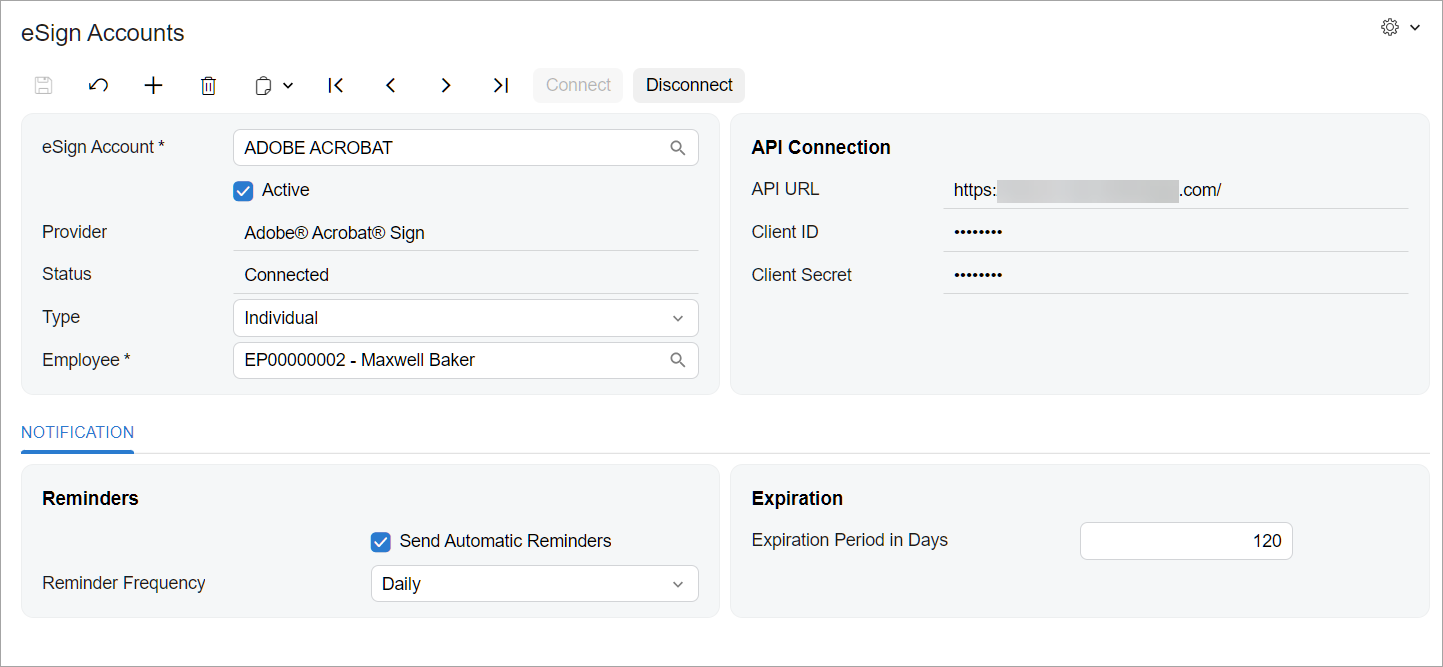
If you’re a system administrator, you create at least one electronic signing account that’s used to connect MYOB Acumatica to an esignature provider. To do this, you use the eSign Accounts (ES301000) form, shown below. You can create multiple accounts for the same provider—for example, one per employee or one shared account for a team.
To create an account for an individual, you enter the following and save the record:
- The account name
- The provider
- The Individual account type
- The provider credentials and API connection settings
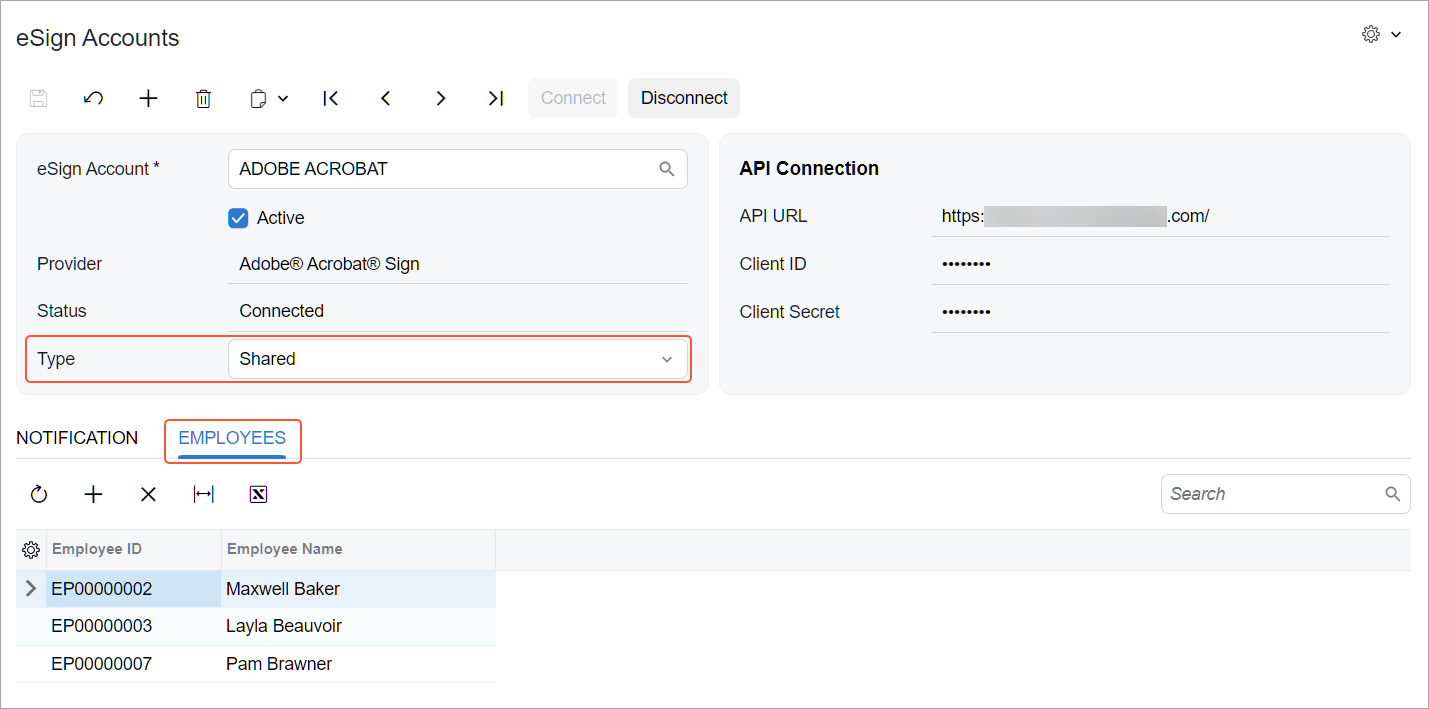
To create an electronic signing account that will be used by multiple employees, you enter the following and save the record:
- The Shared account type
- On the Employees tab, which appears, the list of the employees
Connecting to the Esignature Provider
After you specify the API connection settings for an account on the eSign Accounts (ES301000) form, you click Connect on the form toolbar. The system then:
- Starts the provider’s OAuth authorization flow
- Makes the Connect button unavailable and the Disconnect button available if the connection is successful
Now that the account is connected, you're ready to submit documents for an esignature.
Opening a File to Request an Esignature
You can request esignatures for electronic documents—such as contracts, quotes, purchase orders, or sales orders—or for other files attached to a record in the system.
To submit a document for electronic signing, you:
- Open the Files dialog box from the record's form.
- Click Edit to open the file on the File Maintenance (SM202510) form.
- If the Versions tab shows multiple versions of the file, click the version that should be signed electronically.
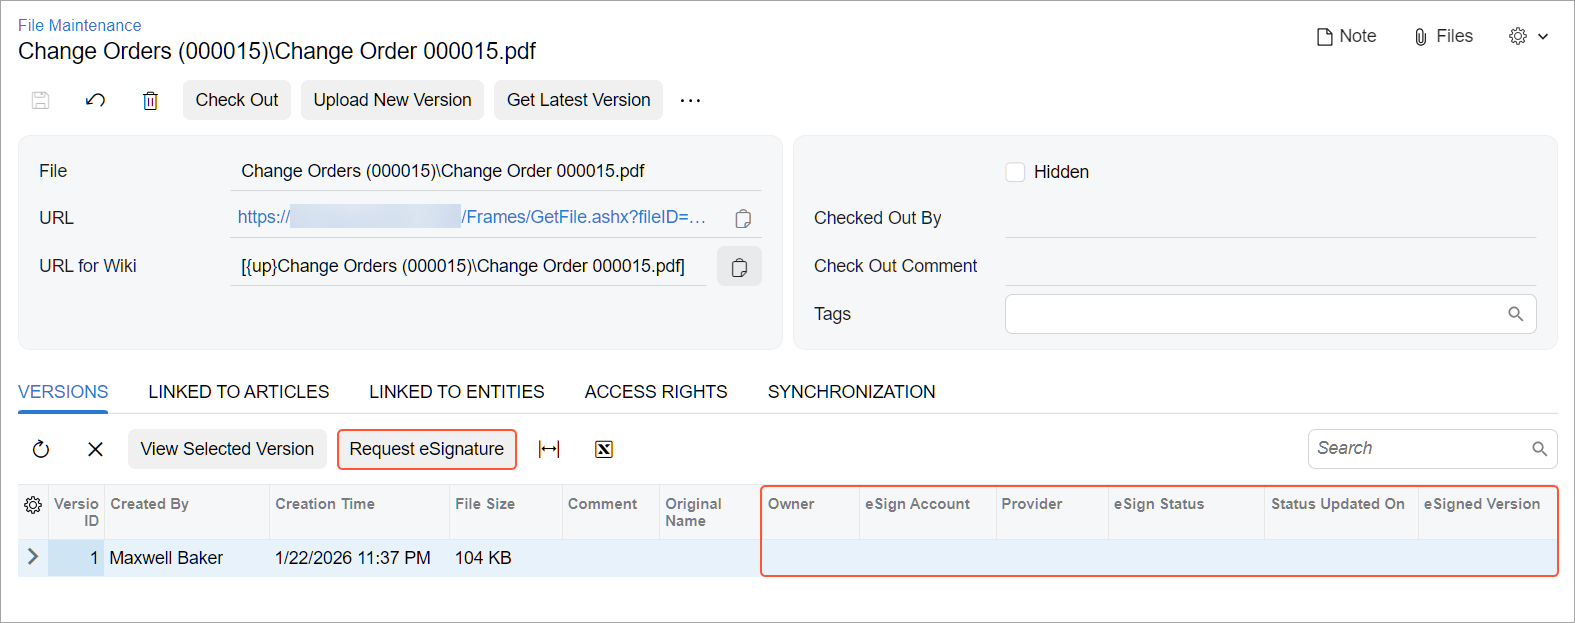
- On the table toolbar (see below), click the new Request eSignature button.
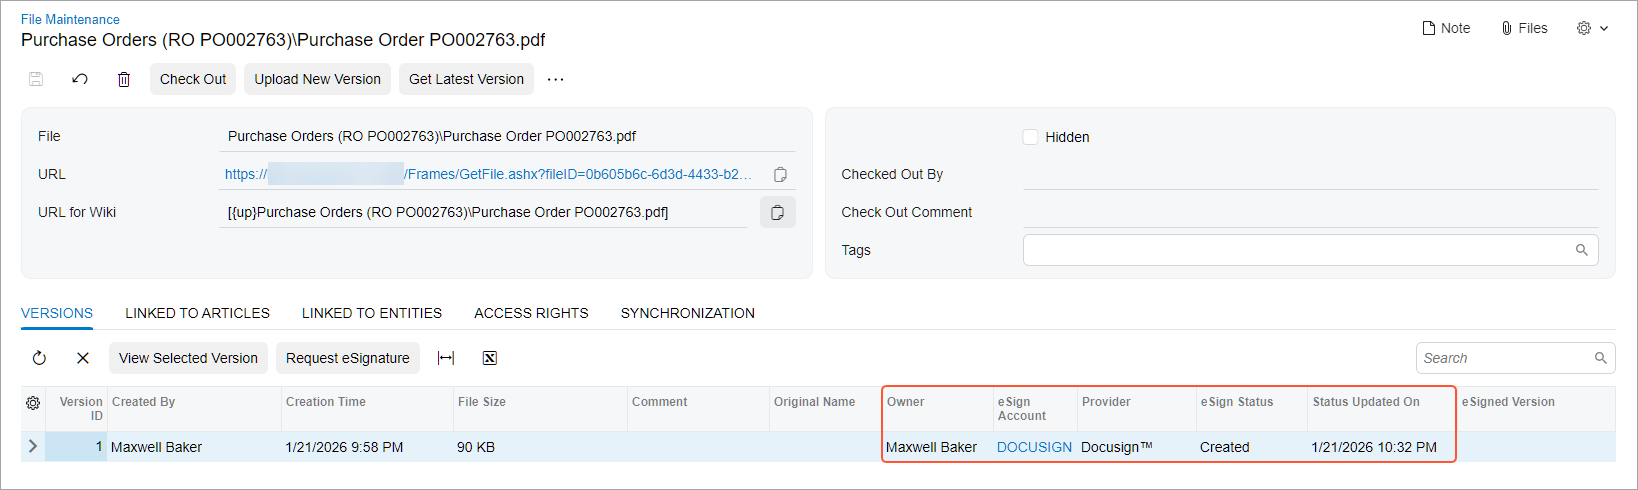
In the new table columns (see below), you can view information about the process of electronically signing the file.
Requesting an Esignature
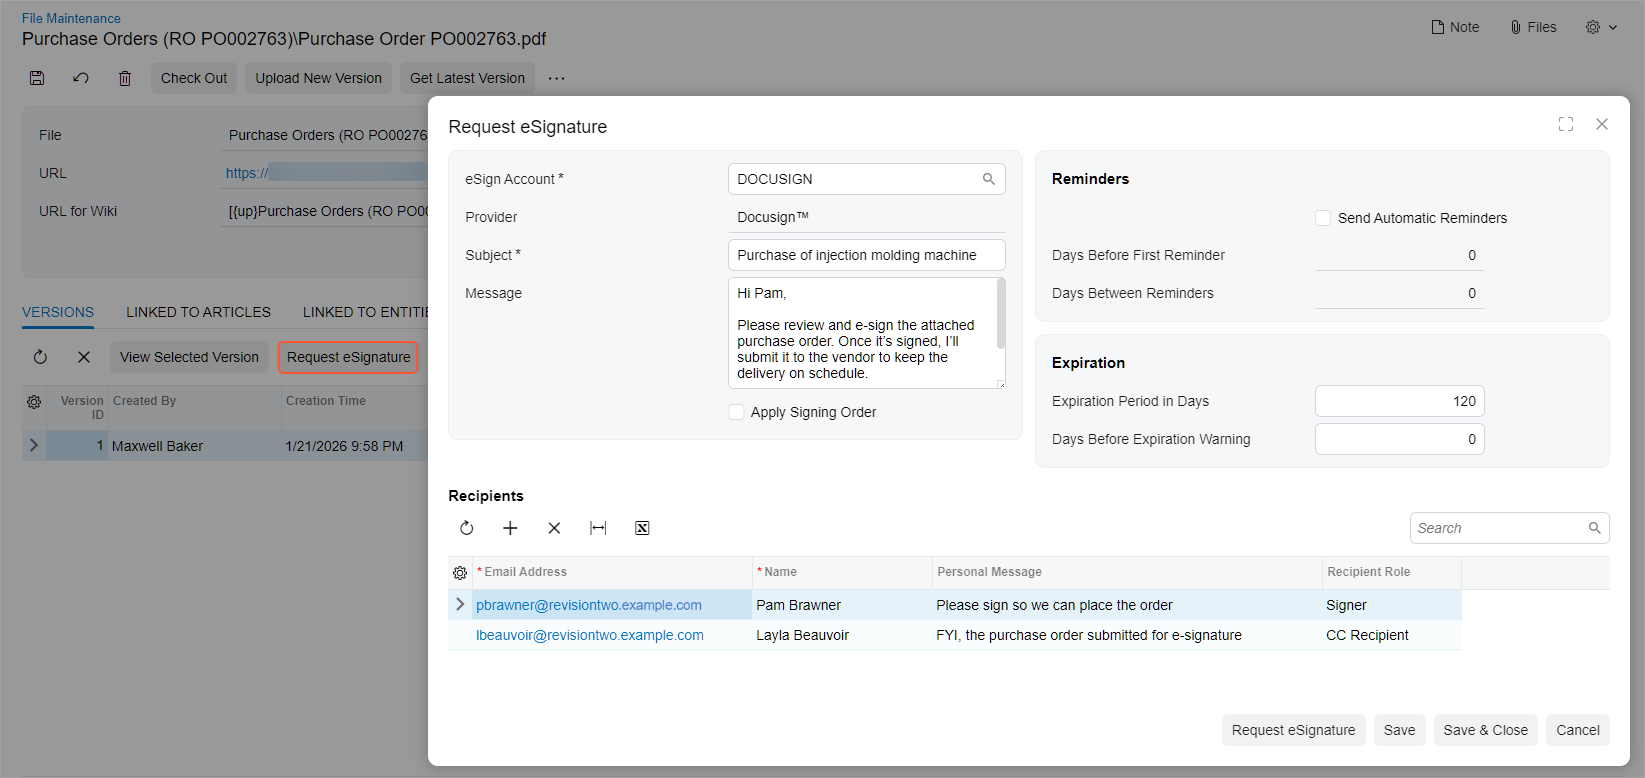
When you click Request eSignature on the File Maintenance (SM202510) form, the dialog box opens. To submit the file, you do the following (see below):
- Select an eSign account.
- Select the provider.
- Enter the subject and message for the email that the provider will generate.
- Optional: Set an automatic reminder for recipients.
- Optional: Set an expiration period for the request to electronically sign the document.
- In the Recipients table:
- Add recipients’ email addresses.
- Select recipients’ roles.
- Optional: Add a separate note for a specific recipient.
When you click Request eSignature in the dialog box, the esignature provider's webpage opens so that you can complete the sending process.
When the sending is complete, the system updates the esignature details—such as the sender, electronic signing account, and status—on the File Maintenance form, as shown below.
Managing Electronic Documents
On the Manage eSign Documents (ES401000) processing form, you manage electronic documents that have been submitted for esignature. In the Summary area, you can view your employee name and ID. By default, the Show Mine check box is selected, meaning that the form lists only documents you have submitted for esignature.
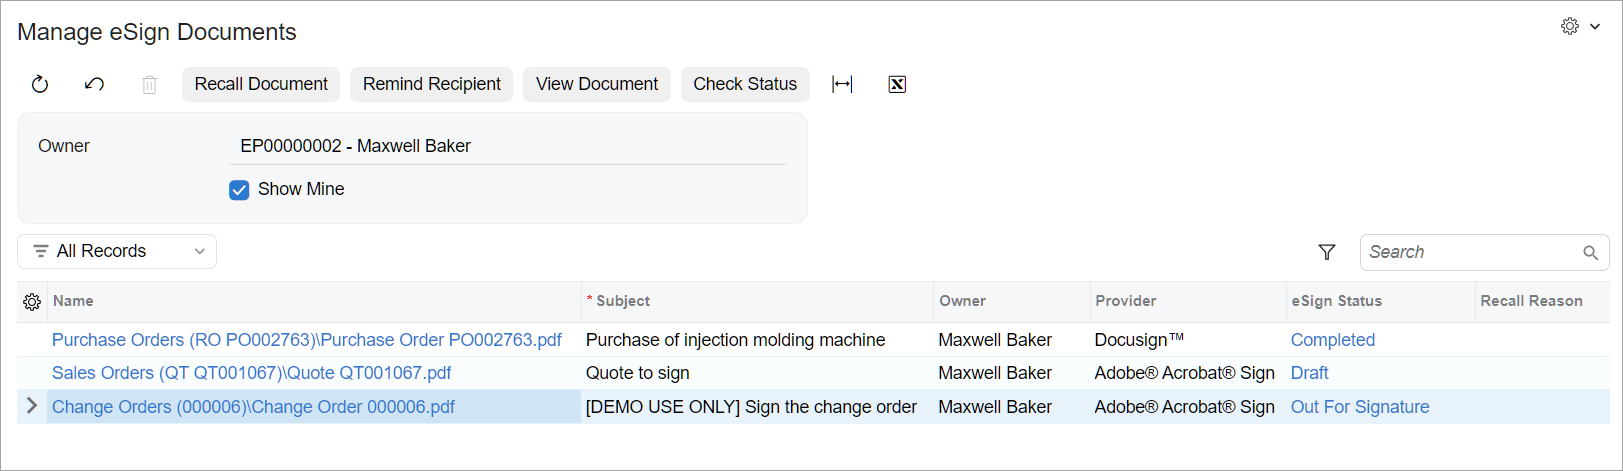
To manage the signing process, you can use the following buttons on the form toolbar:
- Recall Document: Cancels an esignature request. This button is
available only when the file has been sent and isn't yet signed.
When you click the button, it opens the Recall Document dialog box, in which you can enter the reason and confirm that you want to recall the document. After you recall the document, the signing status changes to Canceled/Declined (for Adobe Acrobat Sign) or Voided (for DocuSign).
- Remind Recipient: Sends a reminder email to the recipients while the document is awaiting signing.
- View Document: Opens the provider's webpage for the file.
- Check Status: Sends an API request to update the signing status of the selected file.
- Delete: Deletes the esignature request.
Checking the Signing Status
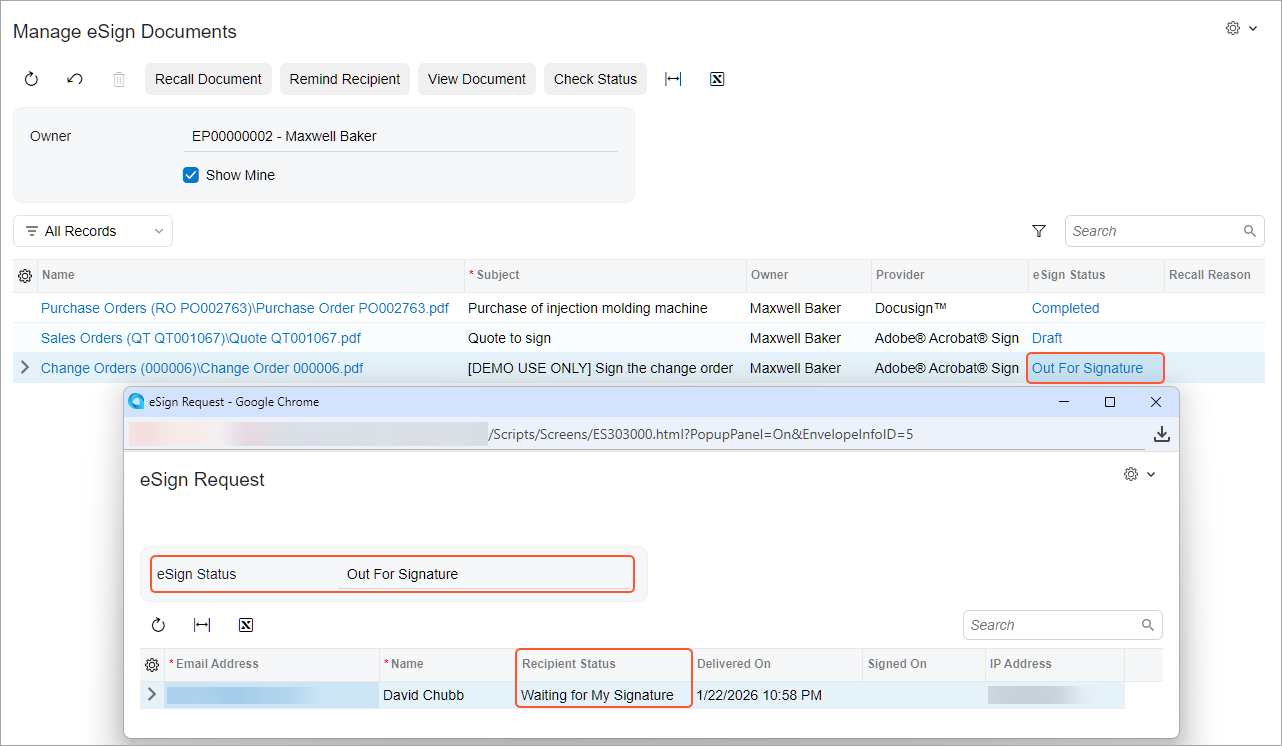
To check the current status of an electronic document, you click the link in the eSign Status column for the document's line on the Manage eSign Documents (ES401000) form. On the eSign Request (ES303000) form, which opens, you can view:
- The eSign Status value in the Summary area
- The recipients and their current statuses in the table
Syncing Esignature Requests
On the eSign Sync (ES501000) processing form, shown below, you synchronize esignature requests with the connected providers:
- To sync particular requests, you select the requests and click Sync.
- To sync all requests, you click Sync All.
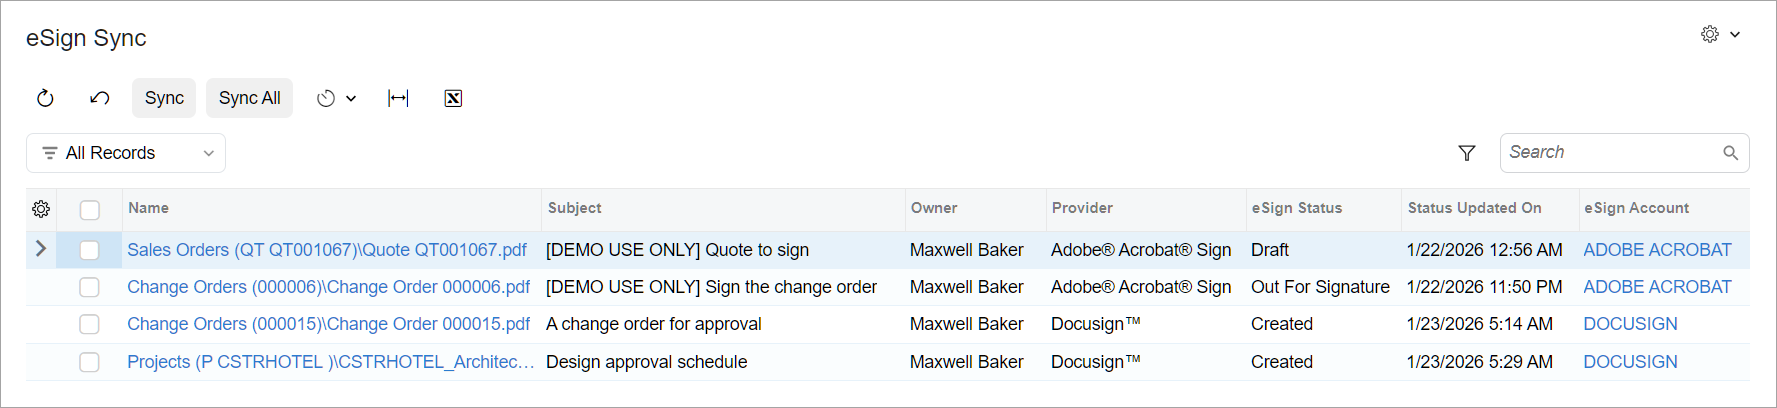
During synchronization, the system shows progress and results in the Processing dialog box.
You can schedule regular synchronization of esignature requests. Thus, request statuses—such as Out for eSignature, Completed, Declined, Voided, or Expired—stay up to date. This also ensures that signed electronic documents are uploaded to the system and attached to the originating records in a timely manner.
Managing Access Rights
To give a user full access to the electronic signing functionality, you assign the new eSign role on the User Roles (SM201005) form.
By default, users with the following roles have the Delete access level to the new Manage eSign Documents (ES401000) and eSign Sync (ES501000) forms:
- System Administrator
- Acumatica Support
Key Capabilities
- Configure esignatures with fully supported DocuSign and Adobe Acrobat Sign integration
- Send documents for electronic signing and track the signing status directly in MYOB Acumatica
- Manage and synchronize esignature requests so that signed documents are attached to their originating records
Learn More
For more information about electronic document signing, see Integrating with Esignature Providers.