
Integrations: Expanded Acumatica Add-In for Outlook (Modern UI)
Starting in MYOB Acumatica 2026 R1, the Acumatica add-in for Outlook provides expanded capabilities for working with emails. While viewing an email in Outlook, you can now:
- Quickly view related and linked records to better understand the email’s context and find needed information
- Create a wide range of MYOB Acumatica records based on the email—directly from the add-in.
- Link the email to related or new records with just a few clicks
These capabilities are available only when you use the add-in in the Modern UI. During the add-in’s installation, you can select the version to use: Modern UI or Classic UI. However, only the Modern UI features the expanded functionality described in this topic.
Continue reading to explore the new capabilities.
Highlights
When you use the MYOB Acumatica add-in for Outlook in the Modern UI, you can:
- Instantly access context: Review all MYOB Acumatica records that have been linked to the open email, as well as other records related to it, without leaving Outlook. This can give you immediate insight into the customer or project history.
- Build additional connections: Link the email you’re viewing—along with its attachments—to any number of additional records in a single workflow.
- Create the records you need on the spot: Create MYOB Acumatica records based on the email and link each record to the email.
Setting Up the Add-In Interface
You can use either the Modern UI or the Classic UI in the Acumatica add-in for Outlook, depending on whether or not you want to use the new capabilities.
Before downloading the manifest file for the add-in installation, review the option in the new Outlook Add-In UI box of the Site Preferences (SM200505) form. You can select Modern or Classic. By default, the box contains the Default UI option selected when the system was first deployed.
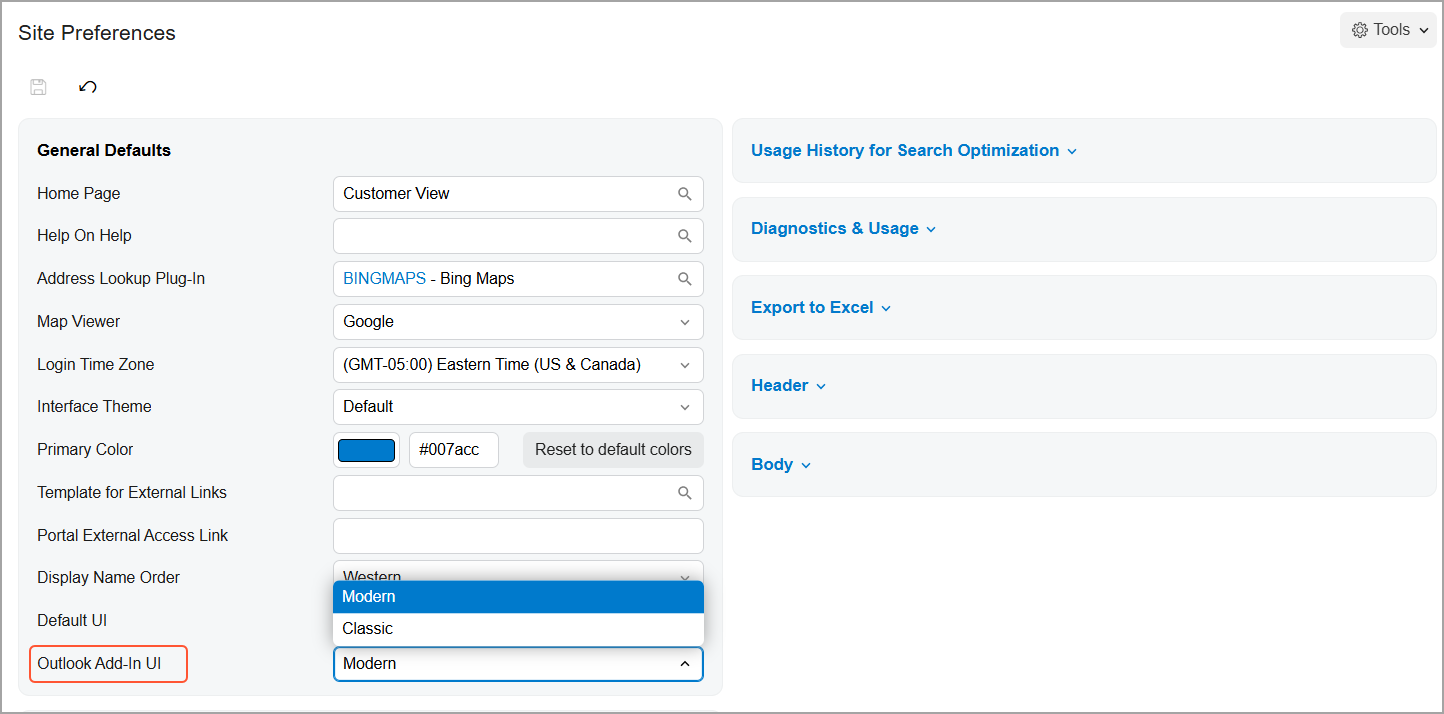
After you download the manifest file to your device, you can easily identify which interface the manifest file was generated for by looking at its name. The manifest file created for the Modern UI includes Modern UI in the name, such as OutlookAddinManifestModernUI. Install the add-in, as described in Acumatica Add-In for Outlook: To Install the Acumatica Add-In.
Next, let’s explore the new capabilities, enhancements, and redesigned experience available in the Acumatica add-in for Outlook with the Modern UI.
Getting Started with the Modern UI
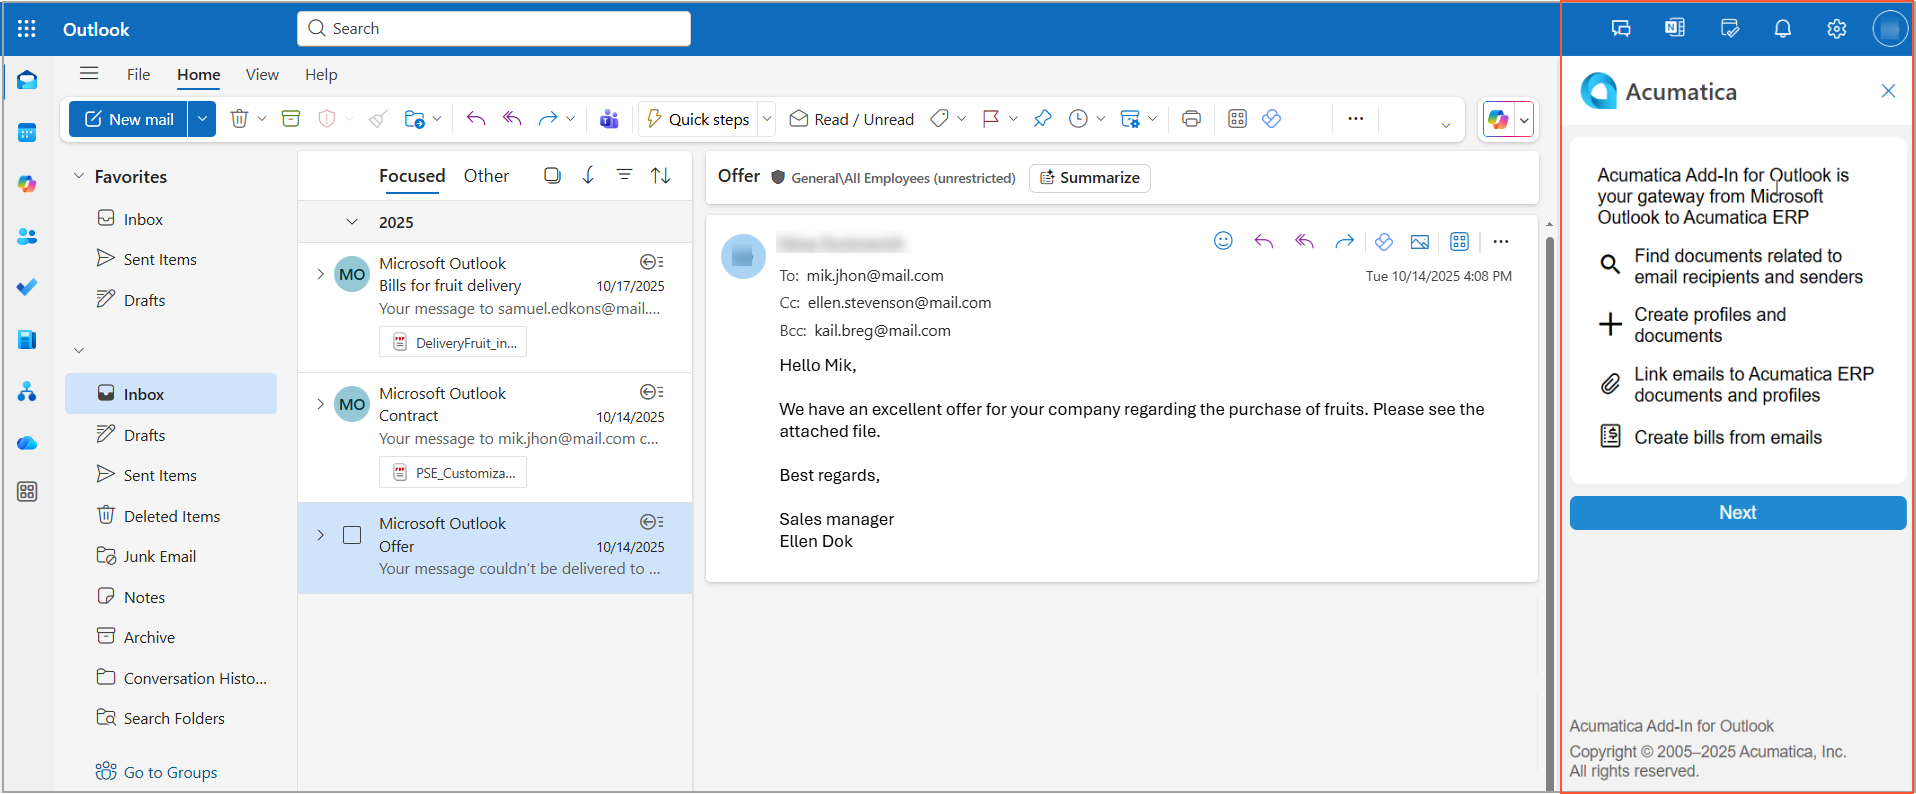
When you launch the Acumatica add-in with the Modern UI for the first time, the add-in panel displays an introductory page that highlights its key functionality. Click Next to go to the Sign-In page.
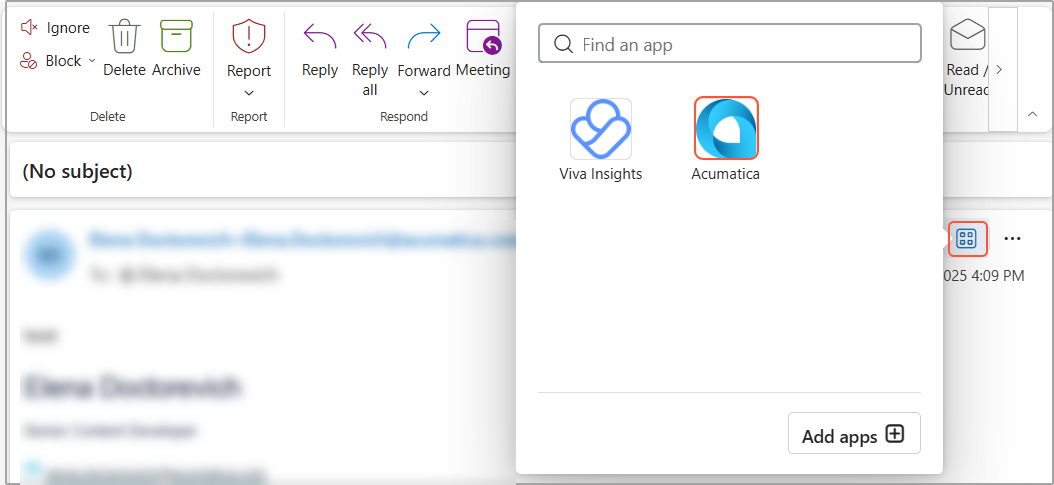
After you sign in, open any email and click the More Apps icon on the ribbon toolbar or in the upper-right corner of the email. In the list of apps, you’ll see the Acumatica button. Click it to run the add-in.
The add-in panel shows one of the following pages, depending on the email you’re viewing:
- Linked Records if the email has been linked to any records in MYOB Acumatica—that is, if the email activity has been created for the records.
- Related Records if the email has no existing links to records in the system.
Tip:The related records contain the same email address as the sender of the opened email or one of the recipients.
This introductory page helps you quickly understand the context for the email and decide what to do next.
Reviewing Linked Records
On the Linked Records page (see below), the following sections show records linked to the email:
- Email Attached To: Records (profiles—such as business accounts or contacts—and documents) linked to the email or its attachments
- Incoming Documents: The attached documents that have been
submitted to MYOB Acumatica for recognitionTip:This section is available if the AP Document Recognition Service feature is enabled on the Enable/Disable Features (CS100000) form and the attached document is in a recognizable format, such as PDF. For details, see Acumatica Add-In for Outlook: Incoming Document Management.
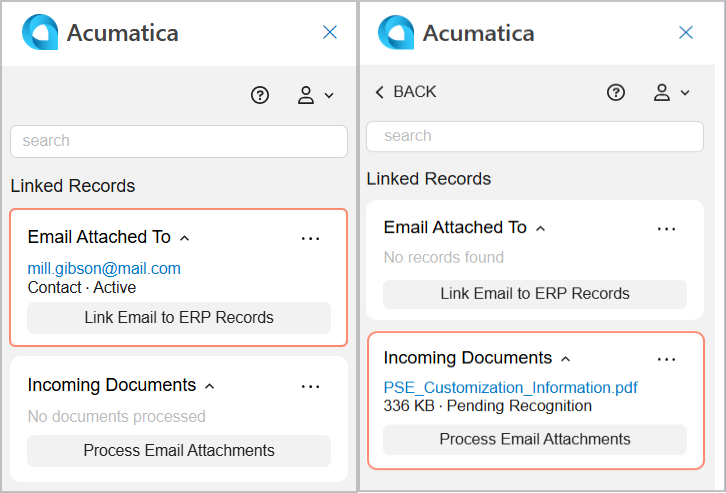
To link the email to additional records, click Link Email to ERP Records to open the Related Records page.
Linking an Email to Related Records
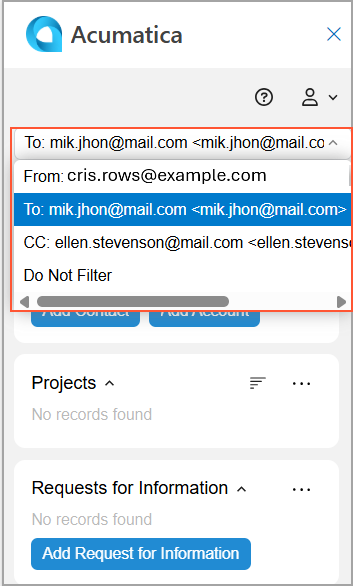
On the Related Records page, select an email address in the Filter box (shown below) to see the records that contain this email address. You can filter records by the email address of the sender or any recipient. By default, the From address is selected.
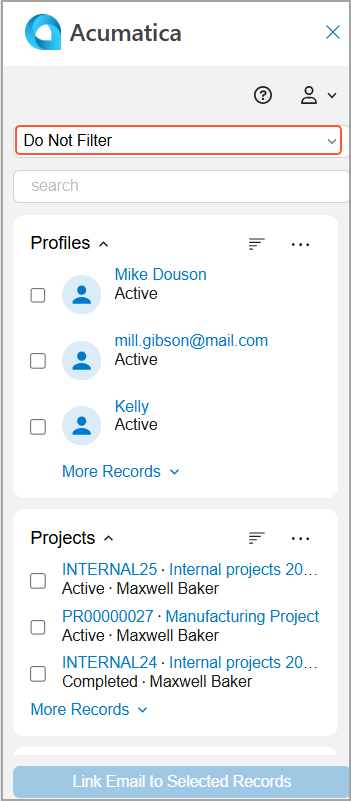
If you select Do Not Filter in the Filter box, the page displays records, grouped by type, that have been created in MYOB Acumatica, including records that aren’t related to the email. This option is useful if you want to link the email to a record—such as a project—that doesn’t contain any of the email addresses from the opened email. To find a particular record quickly, use the Search box.
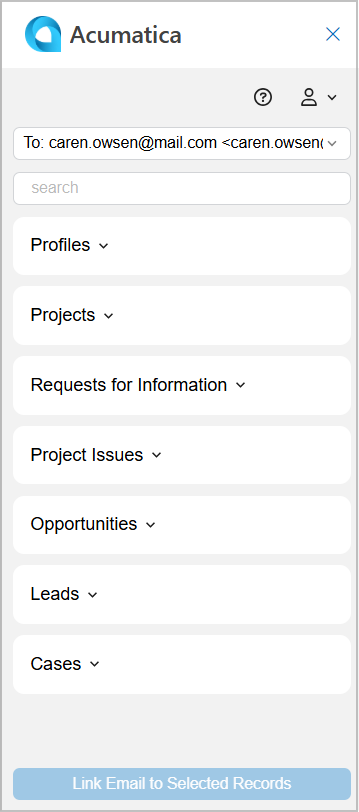
Below the Filter and Search boxes, you see records, grouped by type, that are available for linking. Initially the groups of records are expanded. You can collapse them as shown below.
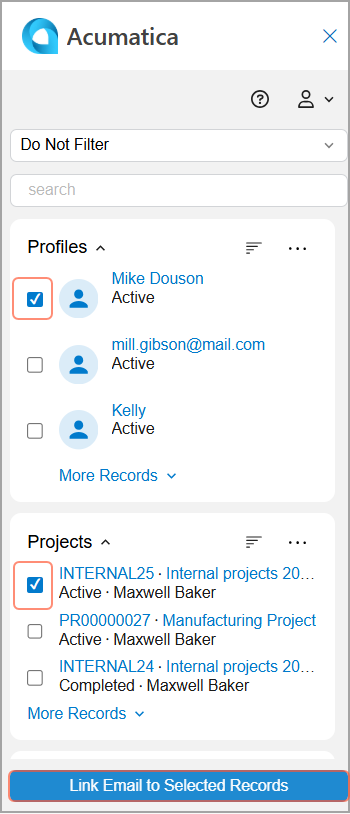
After you select one or more records, click Link Email to Selected Records (see below). The Email Activity page opens in the add-in panel so that you can complete the linking process.
Creating an Email Activity
On the Email Activity page of the add-in panel, you can save the opened email in MYOB Acumatica by creating a new email activity and linking it to the records you’ve selected on the Related Records page.
Depending on the type of the records you select, the system may fill in some boxes of the Email Activity page (as shown below).
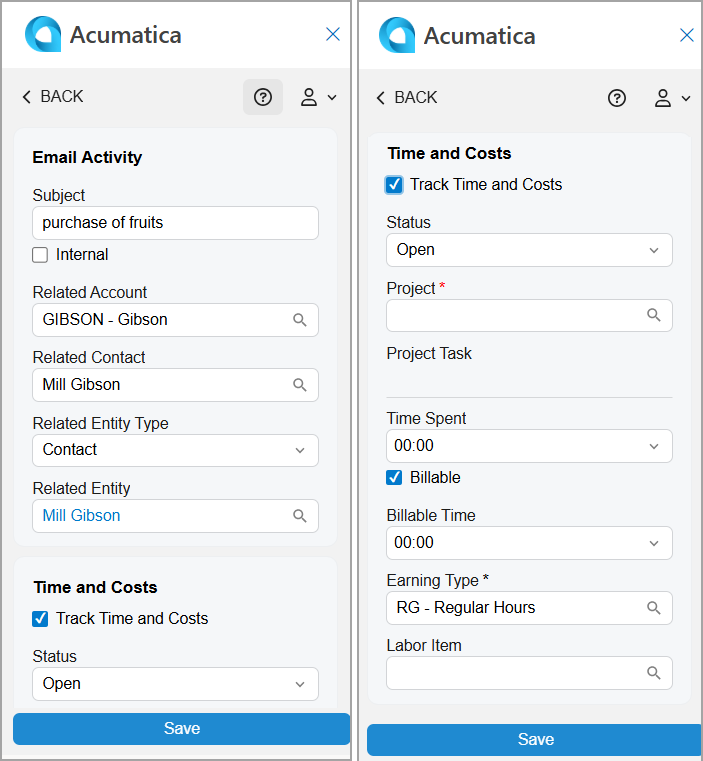
When you save the email activity, the system:
- Opens the Linked Records page with the records linked to the email shown in the Email Attached To section.
- Displays the saved email activity on the Activities tab of the MYOB Acumatica data entry form corresponding to the record selected in the Related Entity box.
- Saves any email attachments as files linked to the email activity.
- Changes the status of the email activity to Completed and fills in the Completed On box with the current date and time.
For details, see Acumatica Add-In for Outlook: Email Activity Management.
Creating Related Records
On the Related Records page, you can create new records in MYOB Acumatica based on the selected email address or the message’s content. To do this, use the buttons in the record groups, such as Add Opportunity or Add Contact (see below).
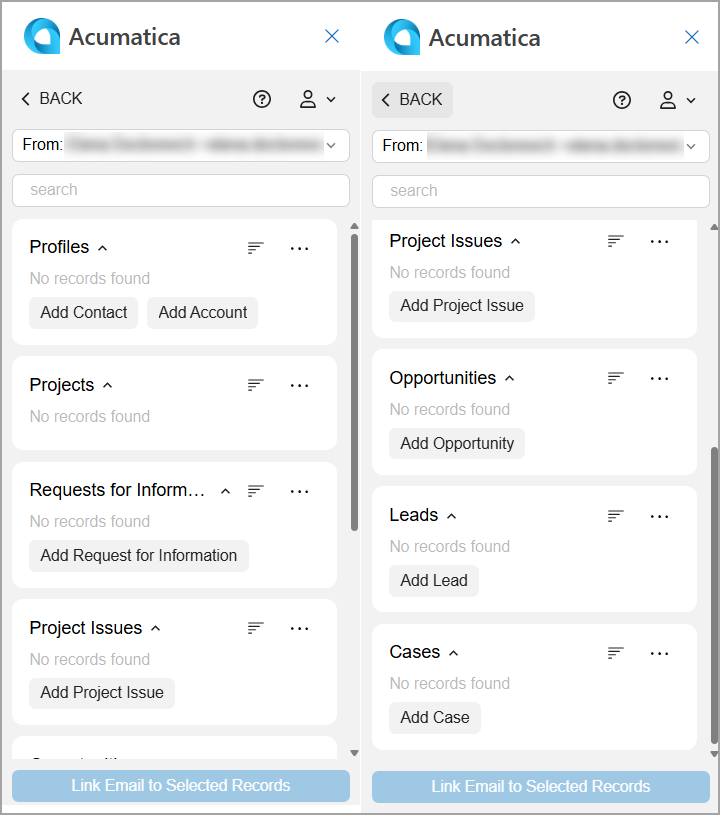
When you click one of these buttons, you can create the corresponding record directly in the add-in. When you save the new record, one of the following happens, depending on whether you select the Link Email to Contact check box on the record’s entry form:
- If the check box is cleared, the list refreshes, displaying the new record.
- If the check box is selected, the Email Activity page opens. When you save the email activity, the email is linked to the new record in MYOB Acumatica.
In the Learn More section, you’ll find links to information on creating these records.
Recognizing Attachments
To recognize an email attachment in MYOB Acumatica, click Process Email Attachments on the Linked Records page. On the Attachment Selection page, select the document you want to submit for recognition and click Process.
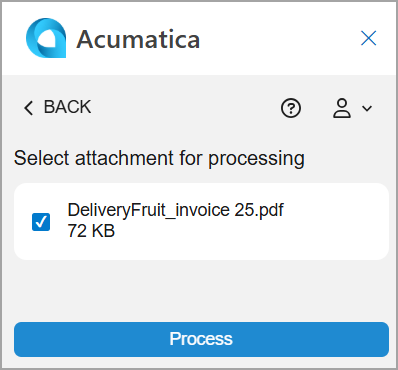
When processing completes, the Linked Records page refreshes and shows the recognized document in the Incoming Documents section.
Learn More
- For configuration and usage details for the Acumatica add-in for Outlook, see Add-In for Outlook: Modern UI.
- For information about installing the add-in for the Classic UI, see To Install the Acumatica Add-In.
- For details about the access rights to each add-in page and the creation of each type of
record, see the needed topic:
- Acumatica Add-In for Outlook: General Information
- Acumatica Add-In for Outlook: Email Activity Management
- Acumatica Add-In for Outlook: Contact Management
- Acumatica Add-In for Outlook: Business Account Management
- Acumatica Add-In for Outlook: Lead Management
- Acumatica Add-In for Outlook: Opportunity Management
- Acumatica Add-In for Outlook: Case Management
- Acumatica Add-In for Outlook: Requests for Information Management
- Acumatica Add-In for Outlook: Project Issue Management