
Finance: Other Improvements
In MYOB Acumatica 2024.1.1, multiple improvements to financial management processes and the UI have been introduced, as described below.
Revaluation of Customer and Vendor Prepayment Balances
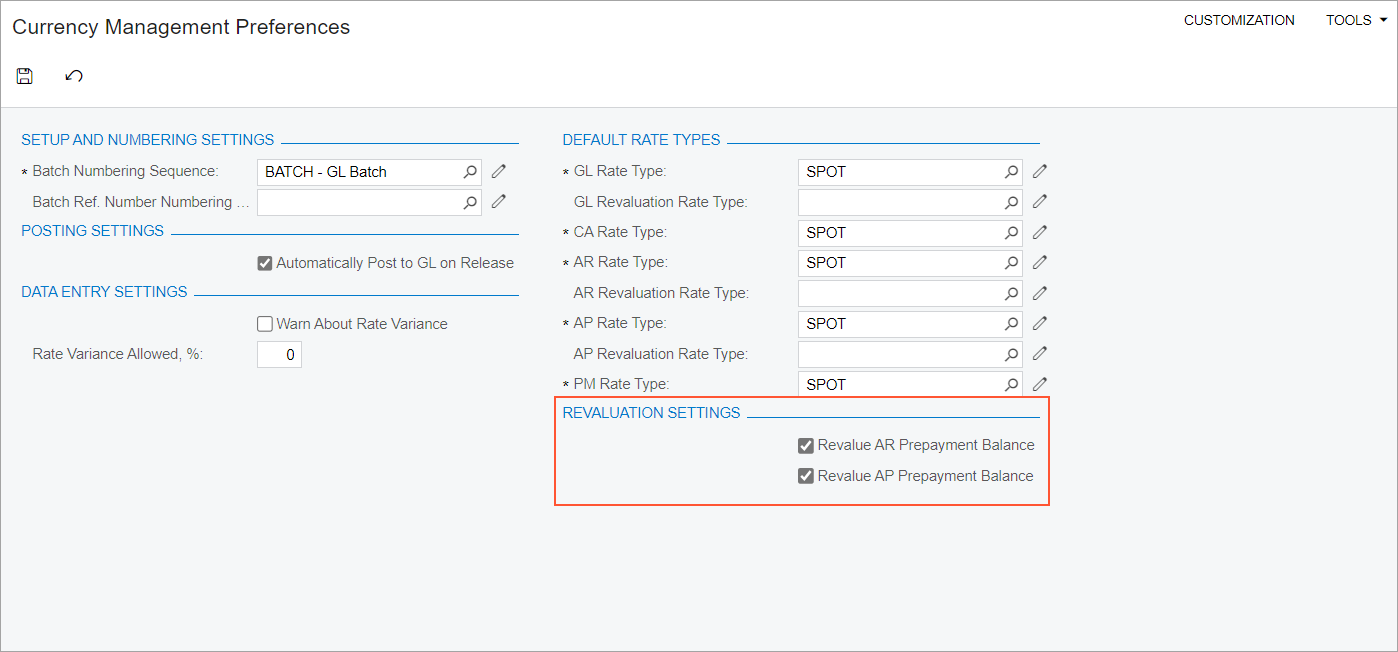
MYOB Acumatica 2024.1.1 now provides the ability to revalue customer or vendor prepayment balances—that is, the balances of dedicated prepayment accounts to which customer or vendor documents of the Prepayment type have been posted. Now on the Revalue AR Accounts (CM505000) and Revalue AP Accounts (CM504000) forms, a user can select a prepayment account or multiple accounts. The user then initiates the process of revaluing their balances by clicking Revalue on the form toolbar.
To make customer prepayment accounts available on the Revalue AR Accounts form, an administrative user must specify the appropriate setting on the Currency Management Preferences (CM101000) form. The user must select the Revalue AR Prepayment Balance check box (which is cleared by default) in the new Revaluation Settings section (shown in the following screenshot). To make vendor prepayment accounts available on the Revalue AP Accounts form, the administrative user selects the Revalue AP Prepayment Balance check box in the same section of the form.
These forms are available if the Multicurrency Accounting feature is enabled on the Enable/Disable Features (CS100000) form.
Creation of a Reversing Batch Originating in AP After Reclassification
In MYOB Acumatica , the reclassification of AP bills has been optimized. The process of AP bill reclassification involves a user correcting some value in the bill, such as an account, a subaccount, or a project. When a user corrects any of these values in the AP bill and initiates the reclassification, the system creates the GL transaction with the new details, as well as a reversing batch for the original GL transaction.
Now the reversing batch originates in AP. That is, AP is specified in the Module box in the Summary area of the Journal Transactions (GL301000) form for a GL transaction with the Reversing Entry check box selected in the Summary area.
Reimplementation of the New Zealand Straight-Line Depreciation Method
In MYOB Acumatica 2024.1.1, the New Zealand Straight-Line depreciation method has been reimplemented
to use the new depreciation engine. The method of calculating depreciation is based on
percentage calculation. An asset's depreciation base in the first depreciation period is
defined as Acquisition Cost * Business Use (%).
For the New Zealand Straight-Line method, additions and deductions are not allowed. Depreciation is not calculated for the year in which the asset is disposed of. If the depreciation has been calculated, it will be reversed. The logic of calculating a depreciation amount for a short year is the same as it is for an ordinary year. No depreciation amounts are posted in suspended periods. After a user unsuspends an asset, the depreciation schedule is prolonged as by the number of suspended periods.
Reimplementation of the Dutch 2 Depreciation Method
MYOB Acumatica 2024.1.1 provides the Dutch Method 2 depreciation method with the Full Period averaging convention, which has been reimplemented to use the new depreciation engine. The depreciation rate for this method is calculated by using a constant percentage and the number of periods in a year. The constant percentage defines the part of the asset's net book value that should be depreciated during this year.
With this method, the depreciation expenses per period are calculated as Net Book
Value * Depreciation Rate. The depreciation rate is calculated as 1
– (1 – Percentage / 100)
^
(1/Number of periods in a year).
Confirmation for the Voiding of Deposited Payments
On the Payments and Applications (AR302000) and Checks and Payments (AP302000) forms, when a user clicks Void to void a payment that has been deposited, the system displays a confirmation dialog box, as shown in the following screenshot.
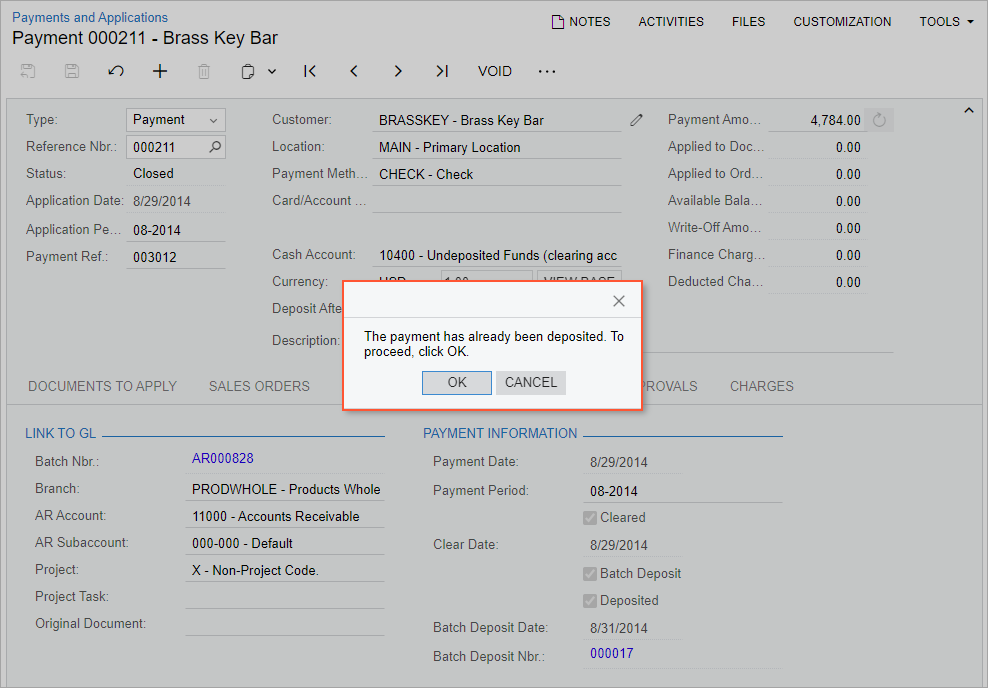
The screenshot illustrates a payment that has been added to a bank deposit on the Bank Deposits (CA305000) form. For such a payment, the Batch Deposit and Deposited check boxes are selected on the Financial tab of the Payments and Applications form. When a user clicks Void on the form toolbar, the confirmation message warns the user that this is a deposited payment. The user can click OK to proceed with voiding the payment or Cancel to cancel the operation.
Specification of the Time Limit of the Consolidation Process
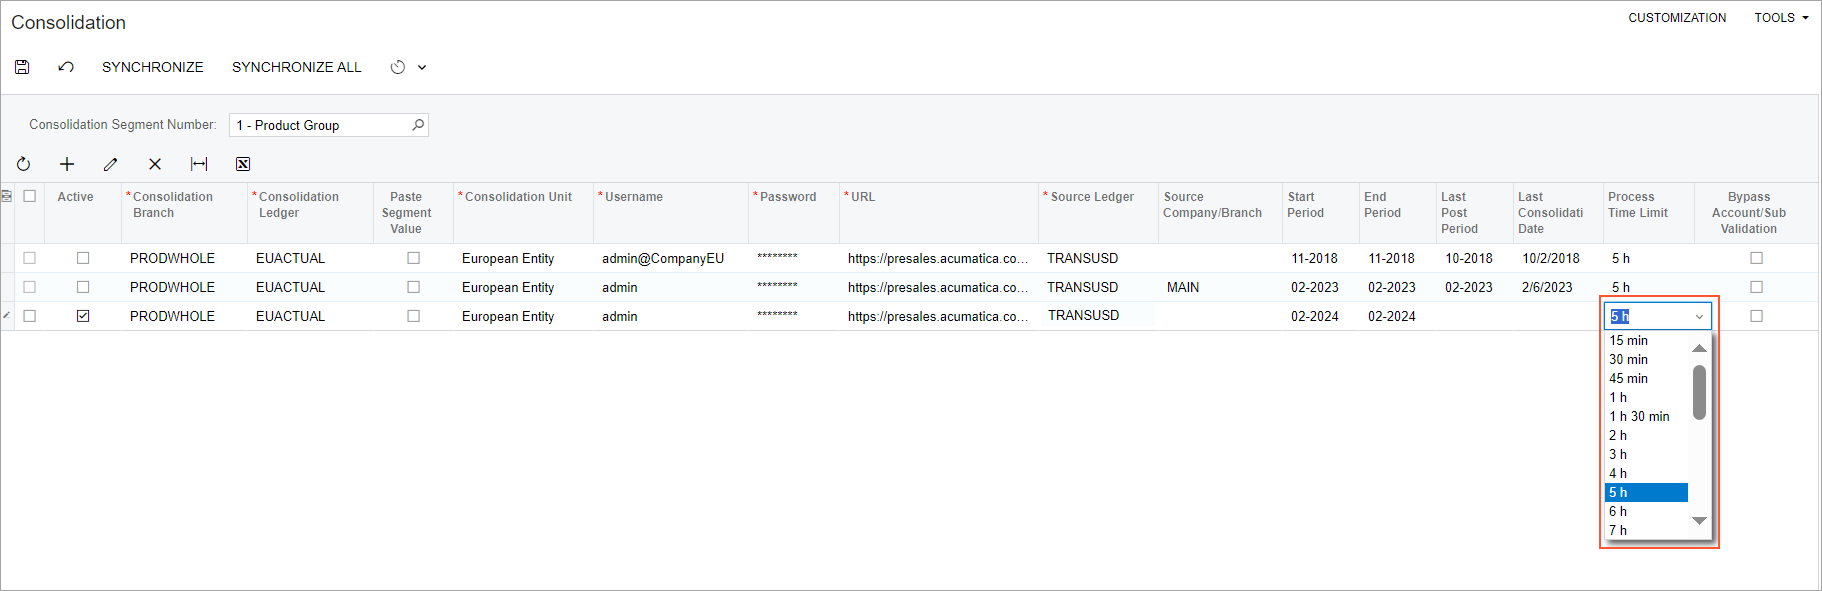
Starting in MYOB Acumatica 2024.1.1, a user can specify the time limit allocated to the system to perform the consolidation process for the selected consolidation unit or units. Once the time limit is reached, the system stops the process.
On the Consolidation (GL103000) form, the new Process Time Limit column has been added (as shown in the following screenshot).

In the Process Time Limit column, a dropdown list of predefined time intervals is available (see the following screenshot). The following options are available: 15 min, 30 min, 45 min, 1 h, 1 h 30 min, 2 h, 3 h, 4 h, 5 h, 6 h, 7 h, 8 h, 9 h, 10 h, 11 h, 12 h, 13 h, 14 h, 15 h, 16 h, 17 h, 18 h, 19 h, 20 h, 21 h, 22 h, 23 h, and 24 h. By default, 5 h is specified; a user can override this setting before starting the synchronization process.
Enhancements to the Release of Write-Offs
In previous versions of MYOB Acumatica, on the Write Off Balances and Credits (AR505000) form, an error could occur during the creation of documents with of the Credit WO type. In this case, the system released the generated credit write-off documents but failed to release their applications. The documents maintained the Open status without a batch being posted to the general ledger. If these documents existed in the system, the process run on the Prepare Statements (AR503000) form could fail with an error.
Starting in MYOB Acumatica 2024.1.1, the problem has been resolved. Now the system does not create orphan write-off documents when the release of write-offs fails.
Improved Sorting Order on the Prepare Payments Form
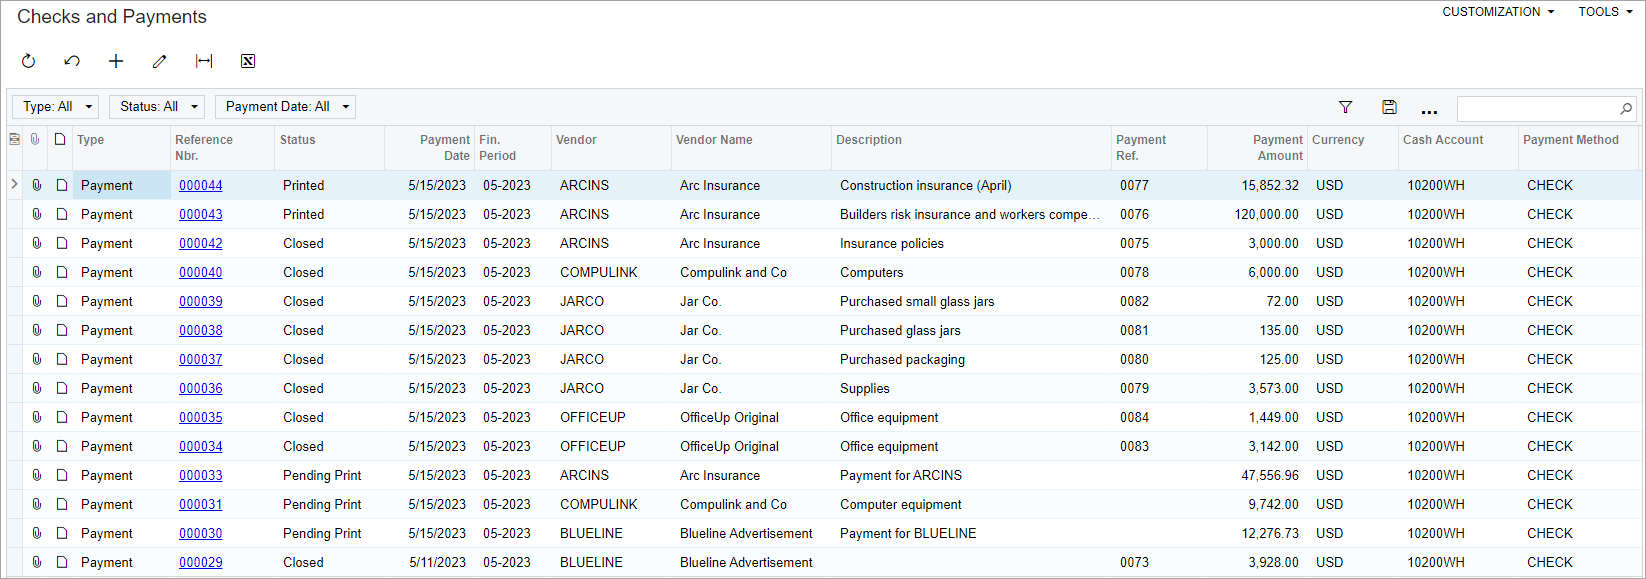
In previous versions of MYOB Acumatica, when a user ran a process on the Prepare Payments (AP503000) form, the system created checks that were sorted by reference numbers but not by vendors. As a result, checks issued to the same vendor did not have consecutive numbers.
Starting in MYOB Acumatica 2024.1.1, when a user opens the Prepare Payments form to prepare checks, the user can sort the records in alphabetical order by the vendor ID and click Process on the form toolbar. The checks for the same vendor will be generated with consecutive numbers, as shown in the following screenshot.
Ability to Upload a Trial Balance for Companies with Branches Not Requiring Balancing
In previous versions of MYOB Acumatica, it was not possible to upload a trial balance for a company that had the With Branches Not Requiring Balancing type because the system required the trial balance to be imported by branch and the trial balance had to be balanced.
In MYOB Acumatica 2024.1.1, the following UI changes have been made on the Trial Balance (GL303010) form to solve this problem:
- In the Summary area, the Branch box has been replaced with the Company/Branch box (see Item 1 in the screenshot below). The selection of the branch or company is restricted depending on the company type. A user can select a company if its type is Without Branches or With Branches Not Requiring Balancing. A user can select a branch if the company type is With Branches Requiring Balancing.
- On the Transaction Details tab, the Imported Branch (Item 2) and Mapped Branch (Item 3) columns have been added to the table. The Mapped Branch column is filled in during the validation of the setting in the Imported Branch column.
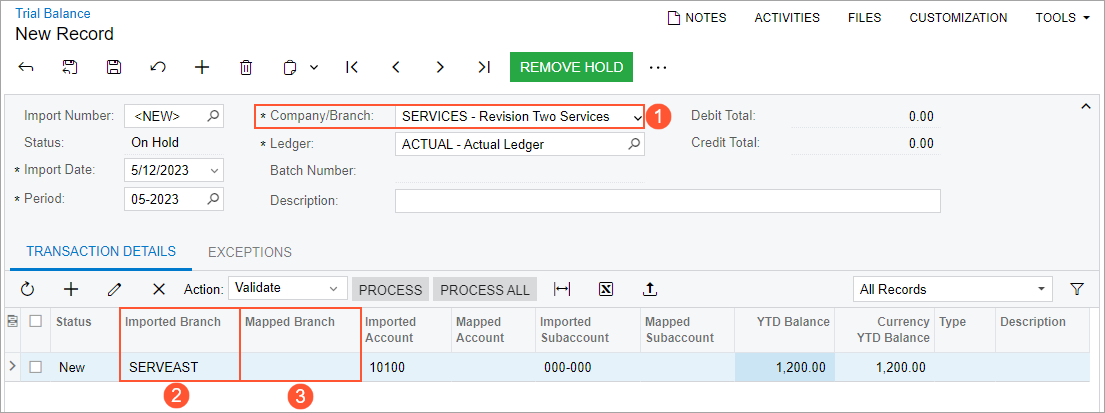
The settings in the new UI elements are involved in the import of a trial balance, the validation of imported values, the merge of duplicates, the creation of the Exceptions table, and the creation of transactions.
Reimplementation of the Australian Depreciation Method
In MYOB Acumatica 2024.1.1, the Australian Diminishing Value depreciation method has been reimplemented by using the new depreciation engine.
The reimplemented Australian Diminishing Value method is based on the Declining Balance algorithm. The method uses the Percent per Year setting for calculating depreciation amounts and take into account leap years. The depreciation calculation is based on the number of days the asset is held in a financial period; the first depreciation period and the disposal period are defined as the exact number of days the asset is held.
Reimplementation of the New Zealand Depreciation Method
In MYOB Acumatica 2024.1.1, the New Zealand Diminishing Value depreciation method has been reimplemented to use the new depreciation engine.
This method of calculating the depreciation uses the Percent per Year setting for calculating depreciation amounts and uses the exact number of days in each period within the financial year. The method is based on the Full Period averaging convention, and does not take leap years into account. In addition, when an asset is disposed of, it cannot be depreciated in the year of its disposal.
UI Changes for Checks with Multiple Stubs
The Check Register (AP404500) form has been modified to show all check numbers used by the system when a check with multiple stubs has been printed, as shown in the following screenshot.
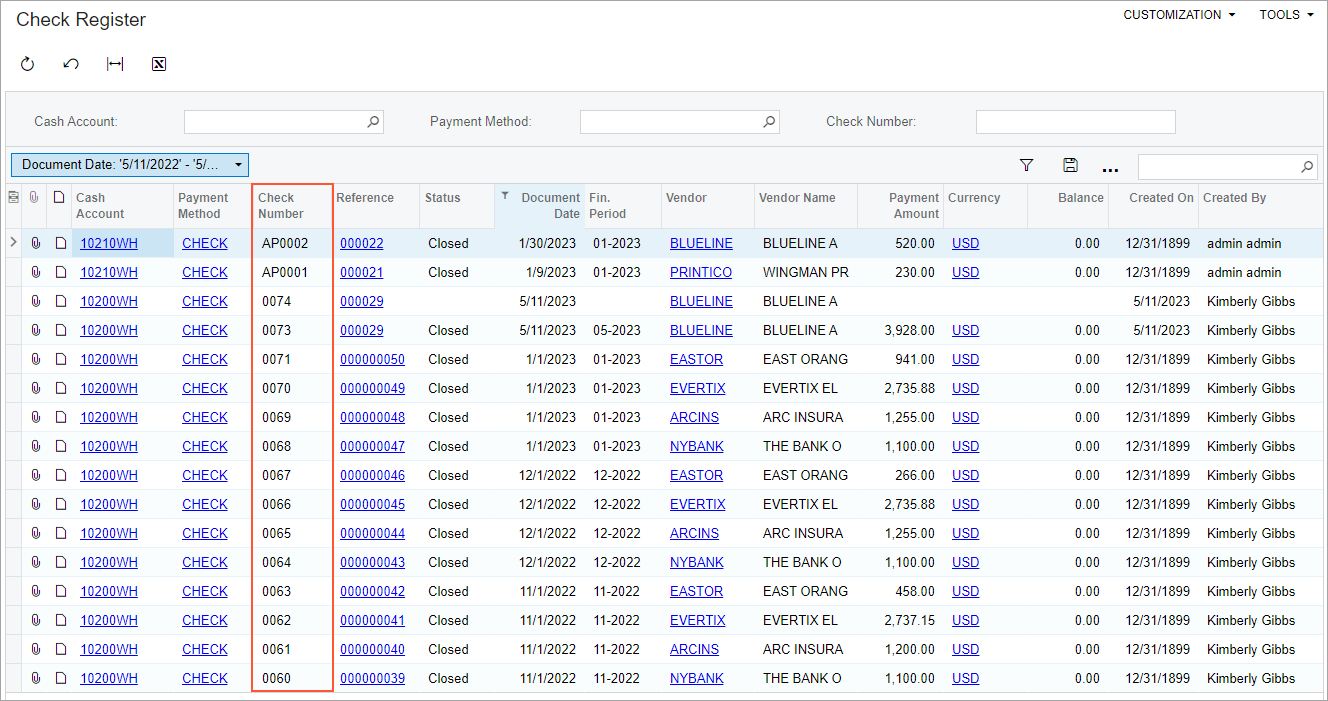
This enhancement helps users to easily understand why some check numbers have been used and in which payments they are used.
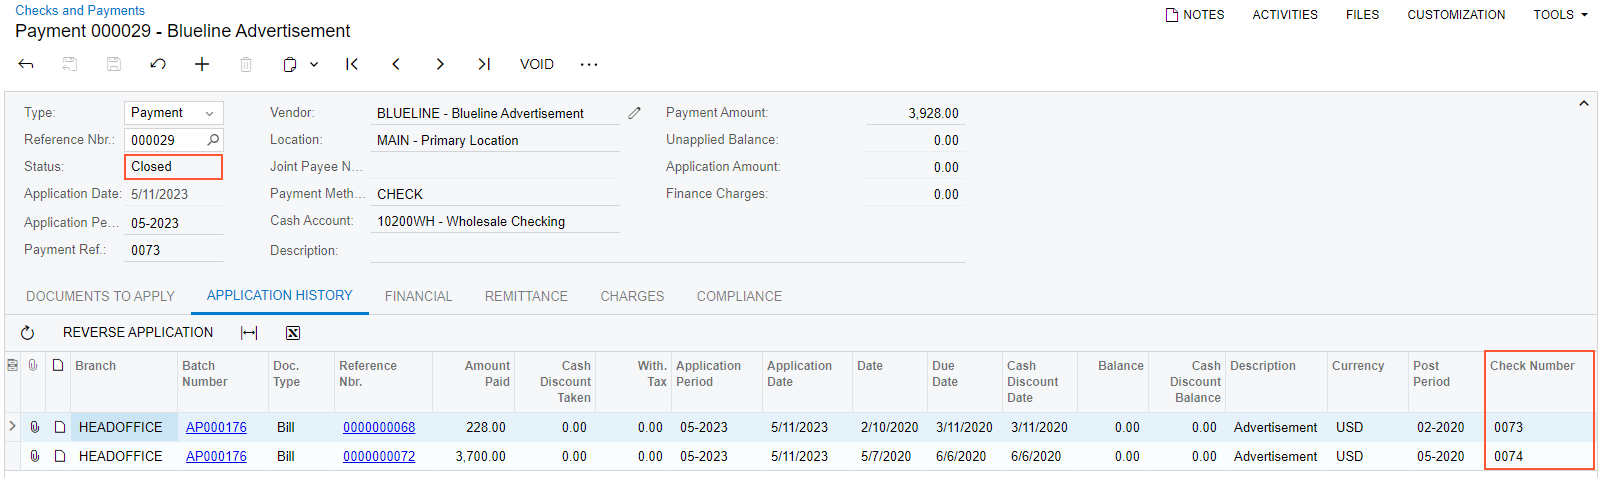
On the Checks and Payments (AP302000) form, the Check Number column has been added to the Documents to Apply and Application History tabs to show all check numbers used by the system if a check was printed with multiple stubs. The new column is filled in for payments with payment methods for which the Print Checks option button is selected on the Settings for Use in AP tab of the Payment Methods (CA204000) form.
The Check Number column appears on the Documents to Apply tab for payments with the Printed status, as shown in the following screenshot.

The Check Number column appears on the Application History tab for payments with the Open, Closed, Voided, and Reserved statuses, as shown in the following screenshot.
Ability to Modify a Branch for Recognized Documents
In MYOB Acumatica 2024.1.1, a user can now modify the branch of a document recognized on the Incoming Documents (AP301100) form. The Branch box has been added to the Summary area of the form, as shown in the following screenshot.
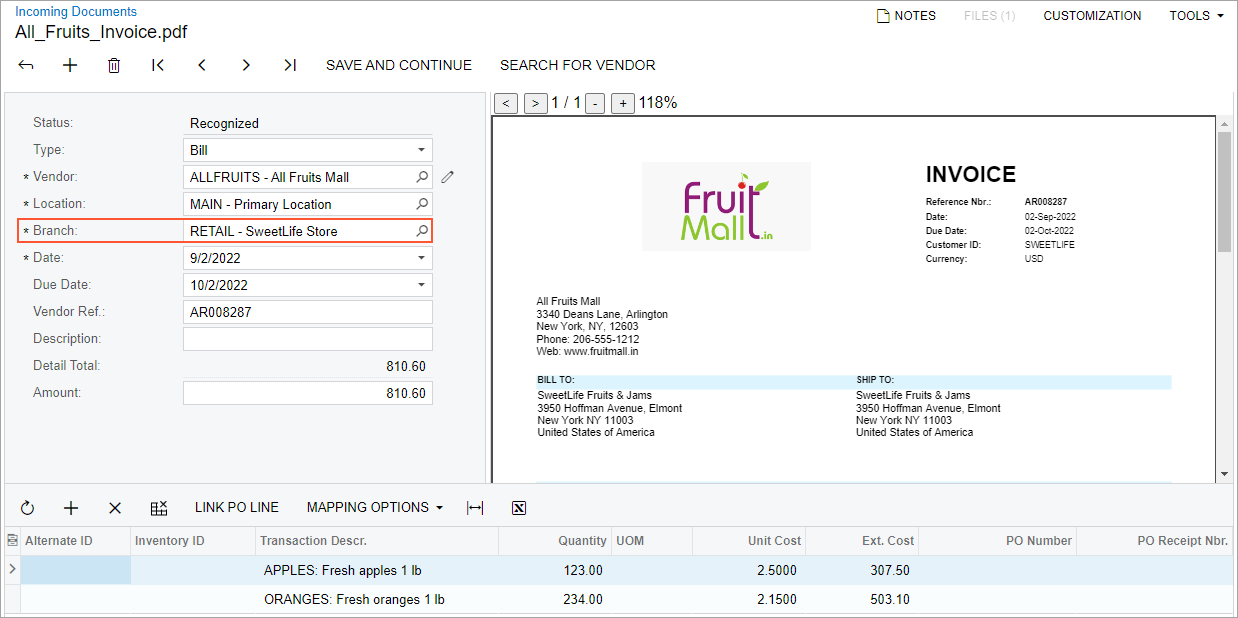
By default, the Branch box displays the current branch under which the user is signed in to the system, but the user can override this setting. When the user clicks Save and Continue on the toolbar of the Incoming Documents form, the system generates an AP bill from the recognized document on the Bills and Adjustments (AP301000) form, and the selected branch is inserted in the Branch column on the Details tab for the document lines and in the Branch box on the Financial tab for the document.
Extended List of Entities on the Approval Maps Form
In previous versions of MYOB Acumatica, on the Approval Maps (EP205015) form, there were three entities to map approval rules for the Cash Sales entity type (Approval, AR Address, and AR Contact). This set of entities did not provide sufficient flexibility. In MYOB Acumatica 2024.1.1, the entity list has been extended to also include the following entities, which are shown in the screenshot below:
- AR Bill-To Address
- AR Bill-To Contact
- AR Ship-To Address
- AP Ship-To Contact
- Customer Payment Method Details
- AR Transactions
- Cash Sale
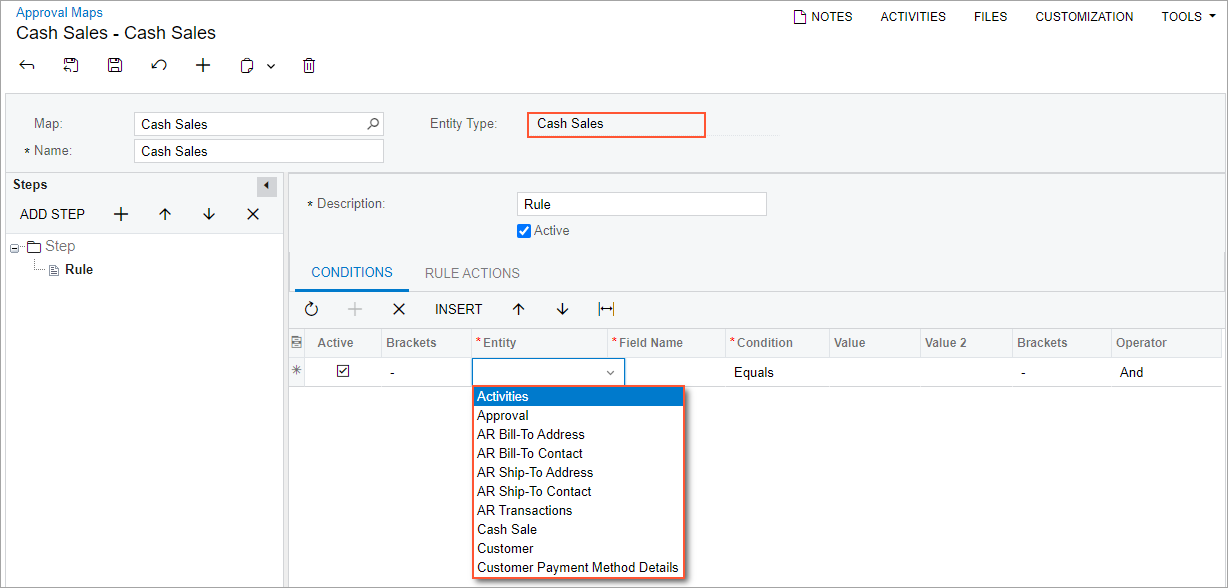
The updated list of entities will give users the ability to create conditions based on amounts and customer details.
Ability to Add Branch Column to Processing Forms
In previous versions of MYOB Acumatica, on multiple processing forms, the Branch column was not available for selection in the Column Configuration dialog box. Also, the Source Branch and Destination Branch columns were not available in the Column Configuration dialog box in the Funds Transfers (CA3010PL) list of records.
In MYOB Acumatica 2024.1.1, the Branch column has been added to the Column Configuration dialog box on the following forms:
- Release Transactions (GL501000)
- Post Transactions (GL502000)
- Run Allocations (GL504500)
- Release Vouchers (GL501500)
- Release AP Documents (AP501000)
- Check Register (AP404500)
- Process Payments / Print Checks (AP505000)
- Release Payments (AP505200)
- Bills Pending Payments (AP403000)
- Approve Bills for Payment (AP502000)
- Checks Pending Printing (AP404000)
- Batch Payments (AP305000)
- Release AR Documents (AR501000)
- Calculate Overdue Charges (AR507000)
- Print/Email AR Documents (AR508000)
- Commission Details (AR403000)
- Generate Payments (AR511000)
- Capture Payments (AR511500)
- Bank Deposits (CA305000)
- Release Cash Transactions (CA502000)
- Corporate Cards (CA202500)
- Card Payments Pending Review (CA403000)
- Release FA Transactions (FA503000)
- Delete Unreleased Transactions (FA508000)
By default, this column is hidden on these forms, but can be added by using the Column Configuration dialog box.
The Source Branch and Destination Branch columns have been added to the Column Configuration dialog box in the Funds Transfers (CA3010PL) list of records.
On these forms, users can more easily perform processes for documents related to a particular company or branch.
The Branch, Source Branch, and Destination Branch columns appear in the Column Configuration dialog box if the Multicompany Support or Multibranch Support feature is enabled (or if both features are enabled on the Enable/Disable Features (CS100000) form).
The following screenshot illustrates the availability of the Branch column in the Column Configuration dialog box on the Print/Email AR Documents form.
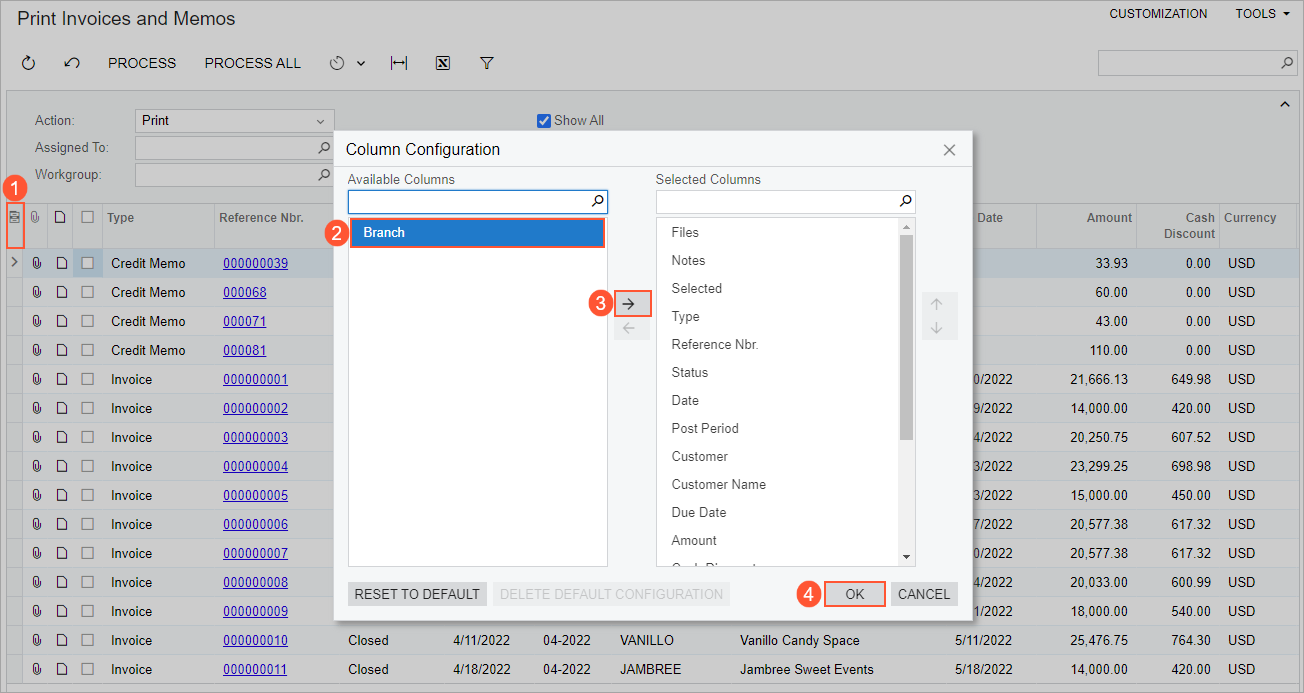
To add the Branch column to the table shown on the form, the user does the following:
- Clicks the Column Configuration button (Item 1 in the screenshot above).
- In the Column Configuration dialog box, which is opened, selects Branch (Item 2) in the Available Columns list.
- Clicks the Add Column button (Item 3) to move the Branch column to the Selected Columns list.
- Clicks OK to apply the changes and make the Branch column visible in the table.
Redesigned Bank Transaction Rules Form and Dialog Box
In MYOB Acumatica 2024.1.1, the Bank Transaction Rules (CA204500) form has been redesigned as follows:
- The Matching Criteria section has been removed and the Matching Criteria tab has been added instead (see Item 1 in the first screenshot below).
- The Output section has been removed and the Output tab has been added instead (Item 2; the tab is also shown in the second screenshot below).
- The Payee/Payer section has been added to the Matching Criteria tab with the Payee/Payer box and the Use Wildcards (*, ?) check box (Item 3). Users can specify a payee or payer as a criterion so that a cash transaction with a certain entry type can be created for bank transactions with the specified payee or payer.
- The Amount section has been added to the Matching Criteria tab (Item 4). The Amount Matching Mode box has been renamed to Matching Mode.
The following screenshot illustrates the redesigned Bank Transaction Rules form and the Matching Criteria tab.
The following screenshot shows the elements of the Output tab.
The same UI changes have been introduced in the Bank Transaction Rules dialog box, which is opened when a user clicks Create Rule on the Create Payment tab of the Process Bank Transactions (CA306000) form. The setting in the Payee/Payer box will be copied from the bank transaction to the bank transaction rule.
On the Import Bank Transactions (CA306500), Process Bank Transactions, and Bank Transactions History (CA402000) forms, the Payee Name column has been renamed to Payee/Payer.
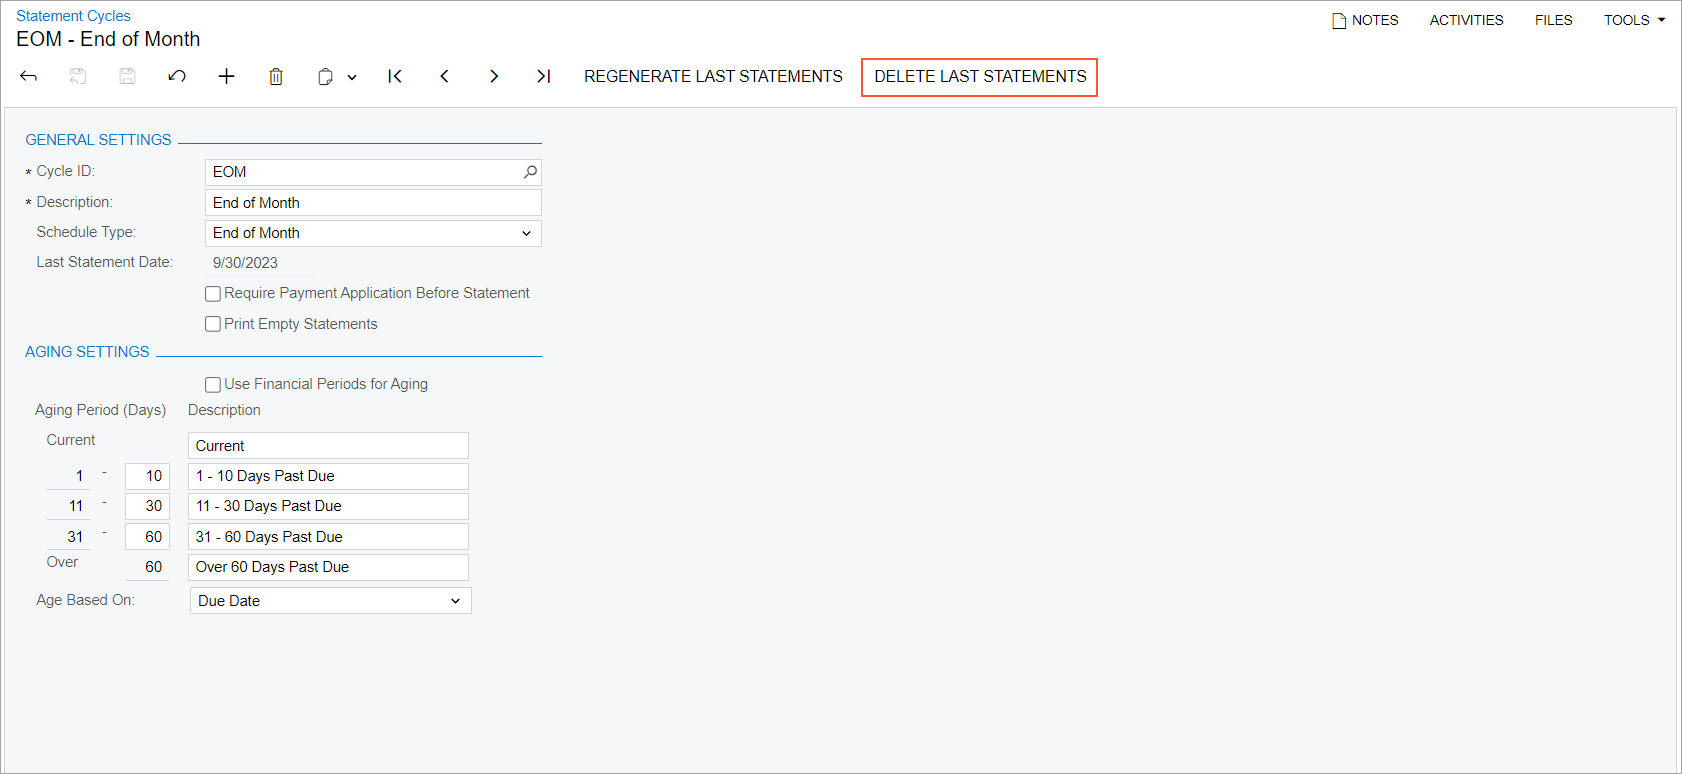
Ability to Delete Customer Statements
In previous versions of MYOB Acumatica, users could not delete any customer statements that had been generated.
MYOB Acumatica 2024.1.1 introduces the ability to delete the most recent customer statements. On the form toolbar of the Statement Cycles (AR202800) form, the new Delete Last Statements button has been added (as the following screenshot shows). This button is available only for users with the Financial Supervisor role assigned on the Users (SM201000) form.
When a user clicks the Delete Last Statements button (Item 1 in the following screenshot), a dialog box with the message asking for confirmation of deletion is displayed (Item 2). Once a user clicks Delete in the dialog box, the system deletes the last generated customer statements.
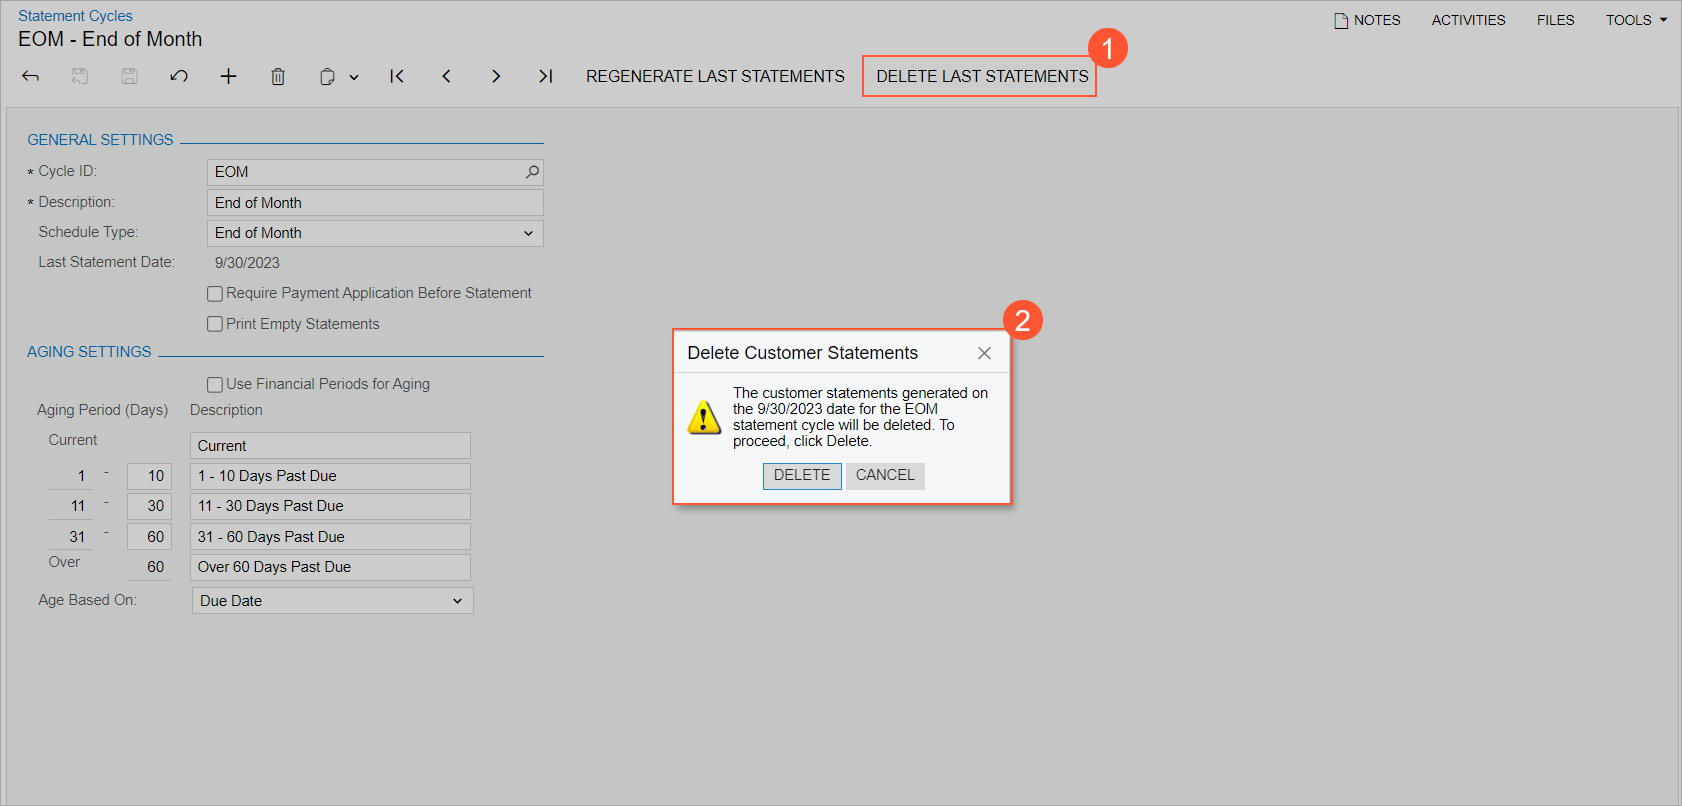
Once the last customer statements are deleted, a user can delete the statements that now have the latest date (which became the most recent statements after the later customer statements were deleted).
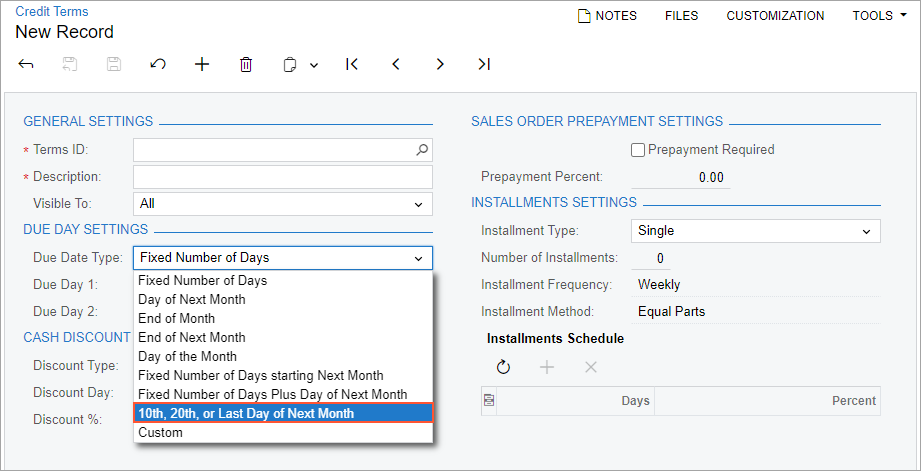
The New Due Date Calculation Method in Credit Terms
In the accounts receivable and accounts payable documents of MYOB Acumatica, the document due date is calculated based on the document's creation date and on the credit terms applied to the document.
In MYOB Acumatica 2024.1.1, a new due date type has been implemented. On the Credit Terms (CS206500) form, in the Due Date Type box (Due Date Settings section), the new 10th, 20th, or Last Day of Next Month option, which defines the method of due date calculation, has been added (shown in the following screenshot).
The 10th, 20th, or Last Day of Next Month due date type defines the day when the document is due. If this type is specified in the credit terms in the Due Date Type box on the Credit Terms form, and this credit terms are applied to the document, the due date of the document will be determined according to the ten-day range of the month of the document creation (the first ten-day range, the second ten-day range, or the third ten-day range of the month) as follows:
- If the document creation date is in the range of the 1st to 10th day of the month, then the due date is the 10th day of the next month.
- If the document creation date is in the range of the 11th to 20th day of the month, then the due date is the 20th day of the next month.
- If the document creation date is in the range of the 21st day of the month to the end of the month, then the due date is the last day of the next month.
The following table shows examples of the due date calculation:
| Document Creation Date | Due Document Date |
|---|---|
| 01/01/2023 | 02/10/2023 |
| 01/10/2023 | 02/10/2023 |
| 01/11/2023 | 02/20/2023 |
| 01/20/2023 | 02/20/2023 |
| 01/21/2023 | 02/28/2023 |
| 01/31/2023 | 02/28/2023 |
| 02/21/2023 | 03/31/2023 |
| 02/28/2023 | 03/31/2023 |
If the 10th, 20th, or Last Day of Next Month option is specified in the Due Date Type box, the following limitations are applied to the UI elements on the Credit Terms form:
- All boxes of the Due Date Settings section become unavailable for editing.
- Only the End of Month, Day of the Month, and Day of Next Month options can be selected in the Discount Type box in the Cash Discount Settings section. If an administrative user selects any other option in the list, the system displays a warning message.
Release of Retainage for Migrated Documents in Migration Mode
Starting in MYOB Acumatica 2024.1.1, when migration mode is turned on in the AR or AP subledger, a user can initiate creation of the retainage AR documents or AP documents for the migrated documents with retainage as follows:
- By running the process on the Release AR Retainage (AR510000) form, which causes the creation of the retainage invoices or credit memos on the Invoices and Memos (AR301000) form. The system assigns the created documents the Balanced status or the On Hold status, depending on whether the Hold Documents on Entry check box is cleared or selected on the Accounts Receivable Preferences (AR101000) form. The created retainage invoices or credit memos are not released automatically regardless of the state of the Automatically Release Retainage Documents check box on the Accounts Receivable Preferences form.
- By running the process on the Release AP Retainage (AP510000) form. This causes the creation of the retainage bills or debit adjustments on the Bills and Adjustments (AP301000) form. The system assigns the created documents the Balanced status or the On Hold status, depending on whether the Hold Documents on Entry check box is cleared or selected on the Accounts Payable Preferences (AP101000) form. The created retainage bills or debit adjustments are not released automatically regardless of the state of the Automatically Release Retainage Documents check box on the Accounts Payable Preferences form.
During the process of creating these retainage documents, the general ledger accounts are not affected.
The system automatically creates a consolidated retainage AR invoice or credit memo if multiple documents are selected for processing and special conditions are met. For details, see Finance: Consolidated Retainage Invoices in AR.
On the Invoices and Memos or Bills and Adjustments form, before releasing a retainage document, a user can reduce its balance, if needed.
Note that payments by lines are not supported for migrated documents, so the Pay by Line check box is cleared and unavailable in the Summary area of the Invoices and Memos and Bills and Adjustments forms for these documents, regardless of the Pay by Line setting on the Customers (AR303000) or Vendors (AP303000) form. Also note that in migration mode, retainage cannot be released for regular (non-migrated) documents.