
Inventory and Order Management: Other Improvements
In MYOB Acumatica 2024.1.1, improvements to inventory and order management processes and the UI have been introduced, as described below.
Additional Configuration of Picking Direction by Path
The location of items in the warehouse can significantly affect the picking priority for shipping. For example, if heavier items are placed closer to the shipping area, picking is more efficient if pickers always start picking from the closest point, so they can load heavier items onto the cart first, followed by lighter ones.
To expand companies' picking options, in MYOB Acumatica 2024.1.1, the new Allow Bidirectional Pick Lists check box has been added to the Warehouse Management tab of the Sales Orders Preferences (SO101000) form, as shown in the following screenshot.
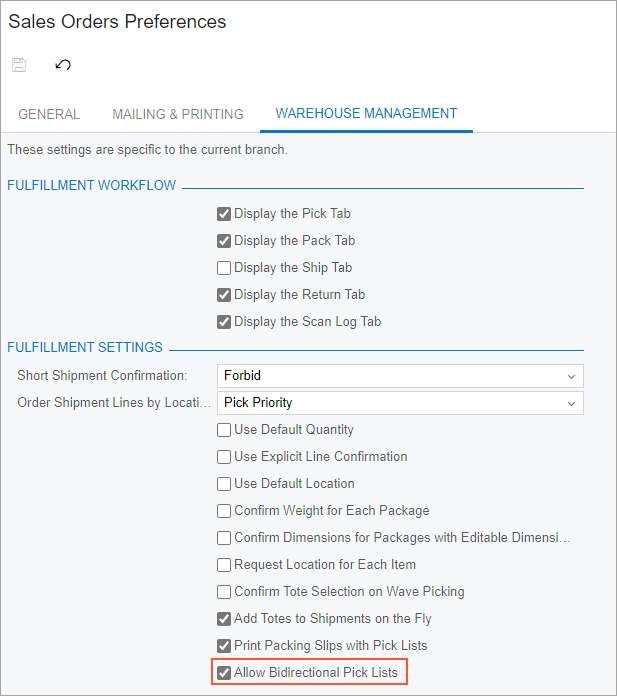
The new check box affects only the mechanism of finding the nearest pick list for the picker when they click the Next List button on the form toolbar of the Pick, Pack, and Ship (SO302020) form. The Next List button is applicable when the Paperless Picking feature is enabled on the Enable/Disable Features (CS100000) form.
If the check box is selected, the system can suggest picking goods for a pick list with warehouse locations that have either a lower value or a higher value in the Path column on the Locations tab of the Warehouses (IN204000) form than the current location has. If the check box is cleared, the system will suggest the next pick list in only one direction of locations: from the lowest value to the highest one.
Manual Input of GS1 Barcodes on the Automated Warehouse Management Forms
In previous versions of MYOB Acumatica, users could not enter GS1 barcodes manually on forms related to automated warehouse management. This could be a problem if a user needed to scan a GS1 barcode that was damaged and could not be scanned.
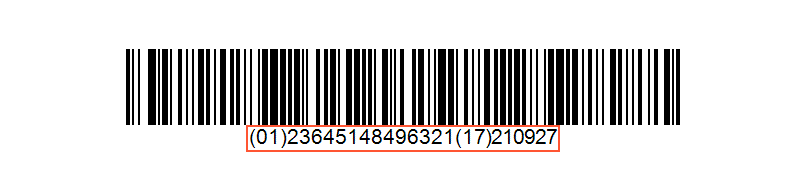
MYOB Acumatica 2024.1.1 introduces the ability to manually enter the Human Readable Interpretation (HRI) characters for GS1 barcodes, such as the one shown in the following screenshot. Users can enter the HRI characters in the Scan box on any form related to automated warehouse management. The characters must be entered with all brackets as they are shown in the barcode—for example, (01)23645148496321(17)210927.
Specifying the Aggregated Quantity for Picked Lines
MYOB Acumatica 2024.1.1 introduces the ability to set the aggregated quantity for lines with the same item and location on the Pick, Pack, and Ship (SO302020) form. The new ability can be used to speed up the picking of shipments that incorporate lines of multiple sales orders with identical items.
Suppose that a picker starts picking up a shipment that has three lines with the APPLES item from different sales orders. All three lines should be picked from the MAIN location. These lines have the quantities of 5, 10, and 7, respectively. Instead of processing each line with the APPLES item one by one, the picker can scan the barcodes of the MAIN location and the APPLES item, click Set Qty on the form toolbar of the form, and enter 22, which is the aggregated quantity of these three lines. The system will automatically distribute the entered quantity among the lines with the APPLES item.
Enhancements to the Efficiency of Picking and Packing Form
MYOB Acumatica 2024.1.1 provides enhanced tracking of picking and packing efficiency on the Efficiency of Picking and Packing (SO402020) form. New elements have been added to the Selection area, and new columns have been added to the table.
If a user selects the Expand by Pick List check box in the Selection area, the user can click the Shipment Nbr. or Worksheet Nbr. option button. The user then proceeds as follows:
- When the Shipment Nbr. option button is selected, the user can select a shipment in the adjacent box (see Item 1 in the screenshot below).
- When the Worksheet Nbr. option button is selected, the user can select a picking worksheet in the adjacent box.
If the Shipment Nbr. option button is selected, the lookup table for the box shows only shipments for single-shipment pick lists. The following shipments are not shown:
- For a wave pick list, shipments included in the wave
- For a batch pick list, shipments included in the batch
The Number of Actual Operations and Number of Errors columns have been added to the table (Item 2).
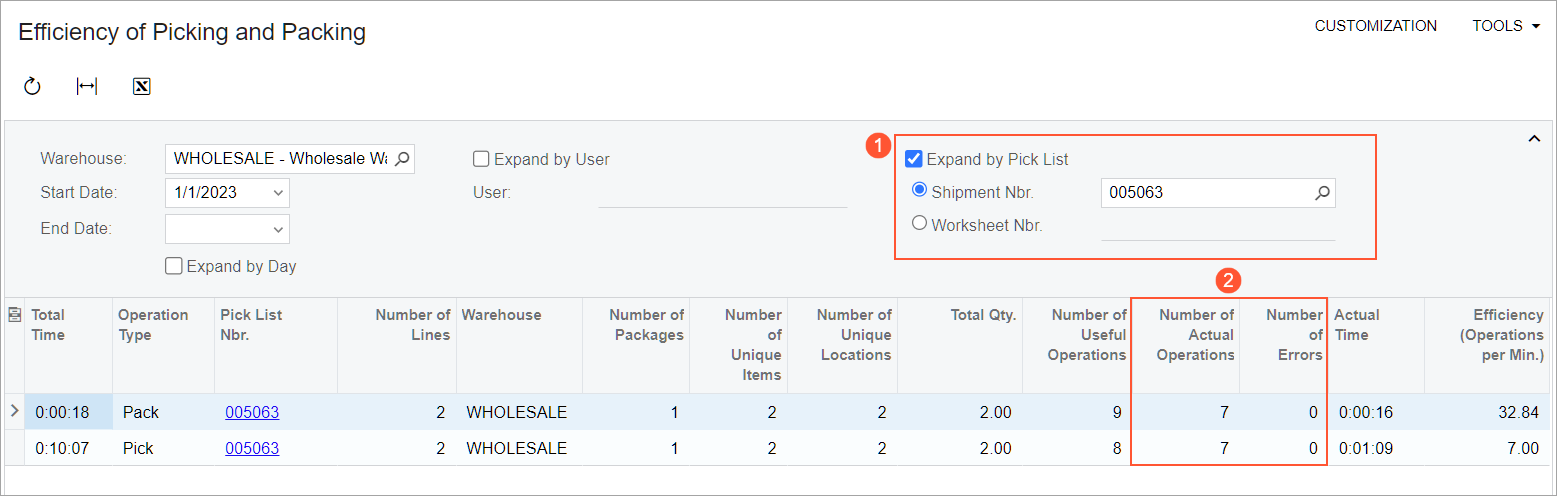
When a user performs operations on the Pick, Pack, and Ship (SO302020) form, the system counts all the scanning operations that a user performs for a pick list and shows this number in the Number of Actual Operations column. The system also counts the scanning operations that have resulted in an error. For example, if a user has erroneously scanned an item’s barcode, lot number, or serial number and an error message is shown with a request to scan the correct data, this error is counted. The system shows the resulting count per shipment or per pick list in the Number of Errors column.
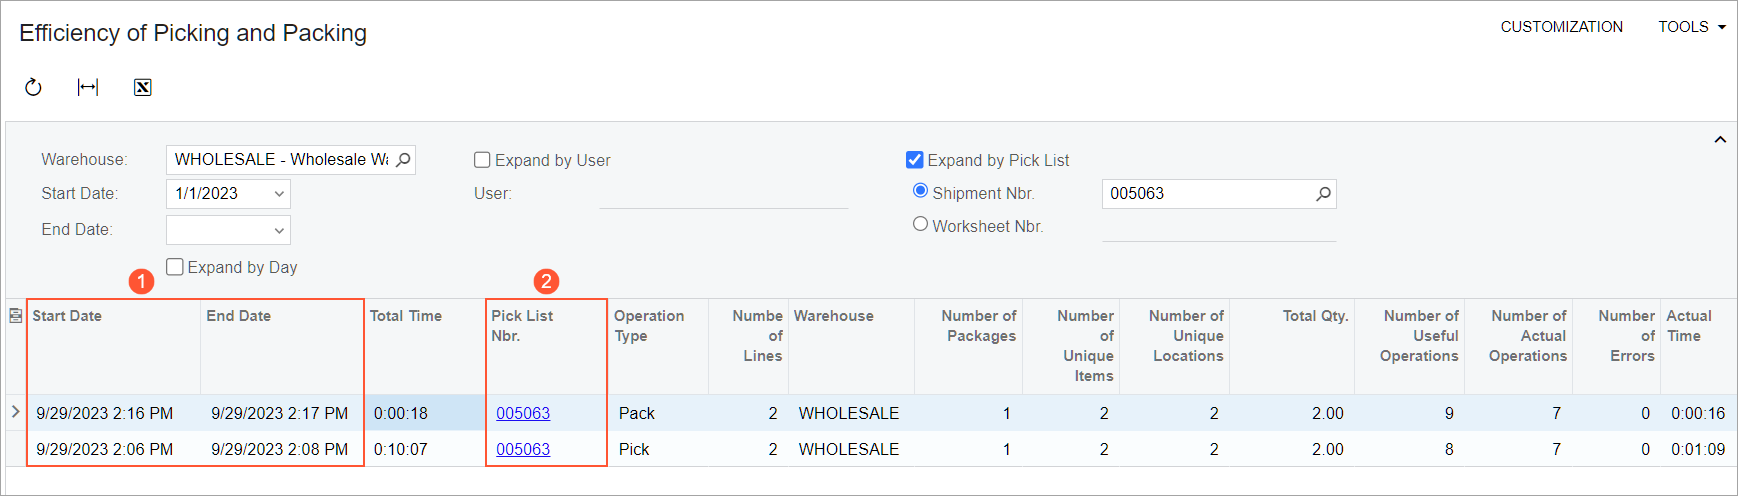
Also, some enhancements have been made to the data shown in the columns. The Start Date and End Date columns now show not only the date of each operation, but also the start time and end time (see Item 1 in the following screenshot).
The Pick List Nbr. column (Item 2) now shows links. By clicking this link, a user can open one of the following documents related to the pick list:
- The shipment for a single-shipment pick list
- The picking worksheet for a wave pick list
- The picking worksheet for a batch pick list
Improved Control of Removing Sales Orders from Credit Hold
In previous versions, if a payment was applied to the full order amount, a sales order on the Sales Orders (SO301000) form was automatically removed from credit hold. (That is, the system changed the order's status from Credit Hold to the next status, which depends on the company's workflow for these documents.) This happened for all sales orders if both of the following conditions were met:
- The customer specified in the sales order had exceeded the credit limit.
- On the General tab of the Order Types (SO201000) form, the sales order type had the following check box selected: Hold Documents on Failed Credit Check.
In MYOB Acumatica 2024.1.1, the Remove Credit Hold on Payment Application check box has been added to the General tab of the Order Types form (see the following screenshot).
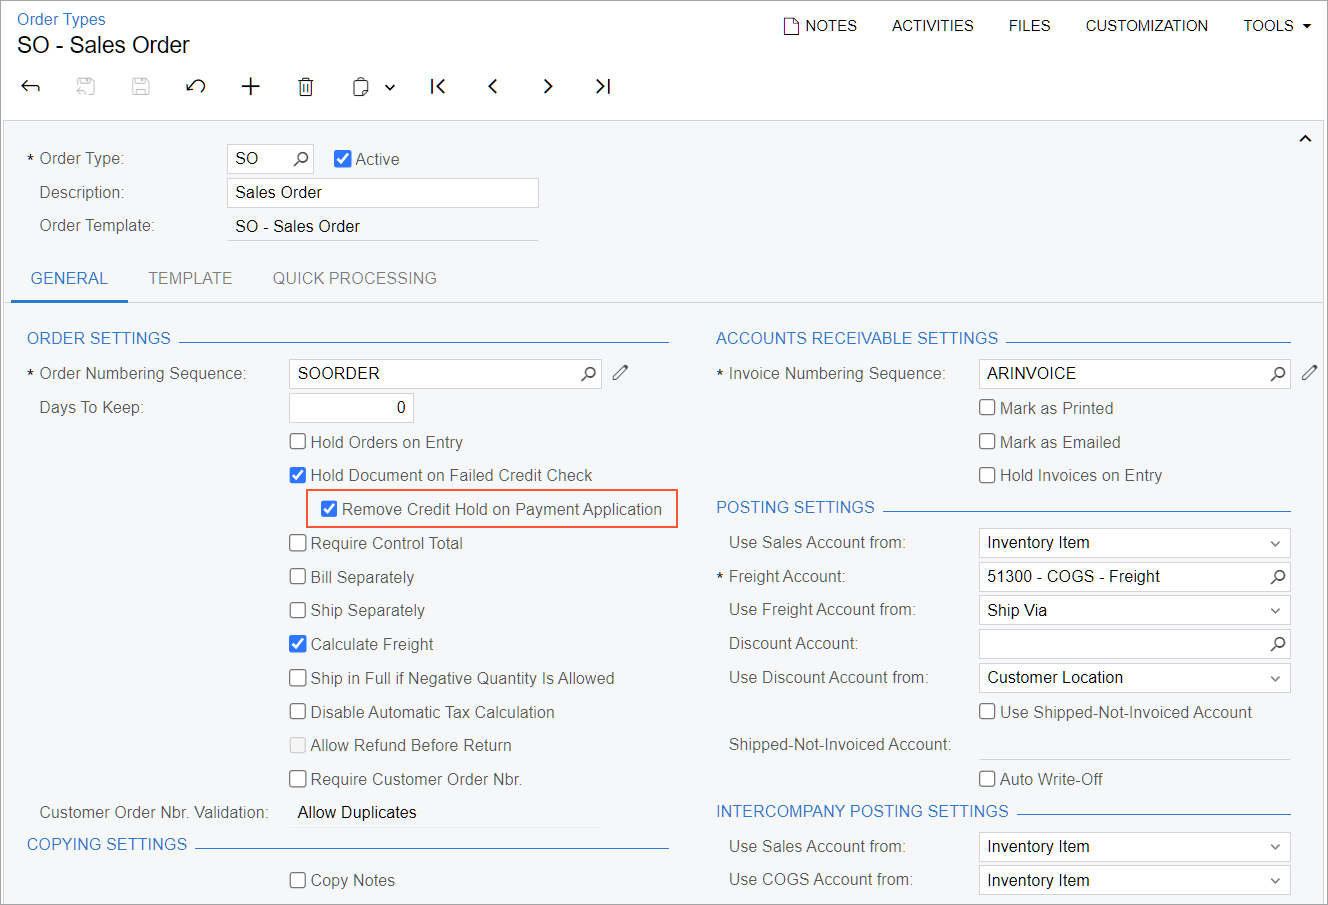
With Hold Documents on Failed Credit Check selected for an order type, the Remove Credit Hold on Payment Application check box is automatically selected. This means that the system will automatically remove a sales order of the type from credit hold when a payment has been applied to the full sales order amount. If a user clears the Remove Credit Hold on Payment Application check box for the order type, the Credit Hold status will remain unchanged in the sales order when the payment was applied to the full sales order amount. In this case, the user can change the Credit Hold status in either of the following ways:
- For an individual order by opening the order on the Sales Orders form and clicking Remove Credit Hold
- For any number of sales orders by selecting the Remove Credit Hold action on the Process Orders (SO501000) form and processing the needed sales orders
Also, starting in MYOB Acumatica 2024.1.1, if a customer has the Credit Hold status on the Customers (AR303000) form, a user can select the customer in the Customer box on the Sales Orders form and save the changes. When the user removes the sales order from hold, the order's status changes to Credit Hold because of the customer's status, regardless of the customer's credit limit and the state of the Hold Documents on Failed Credit Check check box on the Order Types form.
Improvements to Payments and Prepayments in Blanket Sales Orders
Starting in MYOB Acumatica 2024.1.1, a user can apply a payment or prepayment from a blanket sales order to a child order that has been linked to the blanket order through the Add Blanket Sales Order Line dialog box. The user opens the dialog box by clicking Add Blanket SO Line on the table toolbar of the Details tab on the Sales Orders (SO301000) form.
Suppose that on the Sales Orders form, a user created an order with the Blanket Order automation behavior, followed by a payment for this blanket order. After that, they created a sales order with the Sales Order automation behavior and linked the sales order to the blanket order by selecting lines in the Add Blanket Sales Order Line dialog box. Finally, on the Payments tab, the user added a payment from the blanket order to the created child sales order. In previous versions of MYOB Acumatica, the user could use only the available balance of the payment. When the user saved the changes after performing the described actions, the system did not consider the balance taken from the blanket order, and the amount in the Transferred to Child Orders column of the blanket order remained unchanged.
In MYOB Acumatica 2024.1.1, the user can change the payment or prepayment application amount in the Applied to Order column of the Payments tab of the Sales Orders form for a child order. This amount will be transferred from the blanket order to the child order (see Item 1 in the following screenshot, which shows the child order). The Blanket SO Ref. Nbr. column has been added on the Payments tab of the Sales Orders form (Item 2). By default, the column is hidden.
On the Payments tab of the Sales Orders form for the blanket order, the system updates the amount in the Applied to Order column for the payment. Also, the payment amount that is applied to the child order is updated in the Transferred to Child Orders column on the Payments tab for the blanket order.
Suppose that a payment is applied to multiple blanket orders, and a child order has lines from these multiple blanket orders. The system will use the payment application from only the blanket order whose link is the first one in the Blanket SO Ref. Nbr. column on the Details tab for the child order at the time a user adds the payment on the Payments tab for the child order. A user can apply to the child order the payment application amount that is equal to the payment application amount in the blanket order plus the available payment balance, which is the Available Balance amount on the Payments and Applications (AR302000) form for the payment.
If a nonzero payment application has been transferred from a blanket order to a child order, and a user deletes the blanket order line from the Details tab of the Sales Orders form for the child order, the system does the following:
- Leaves only the Available Balance of a payment in the Applied to Order column on the Payments tab for the child order.
- Deletes the blanket order number from the Blanket SO Ref. Nbr. column on the Payments tab for the child order.
- Transfers the payment application amount back to the blanket sales order. This amount is shown in the Applied To Order column of the blanket order.
Enhancements to the Purchase Orders Form
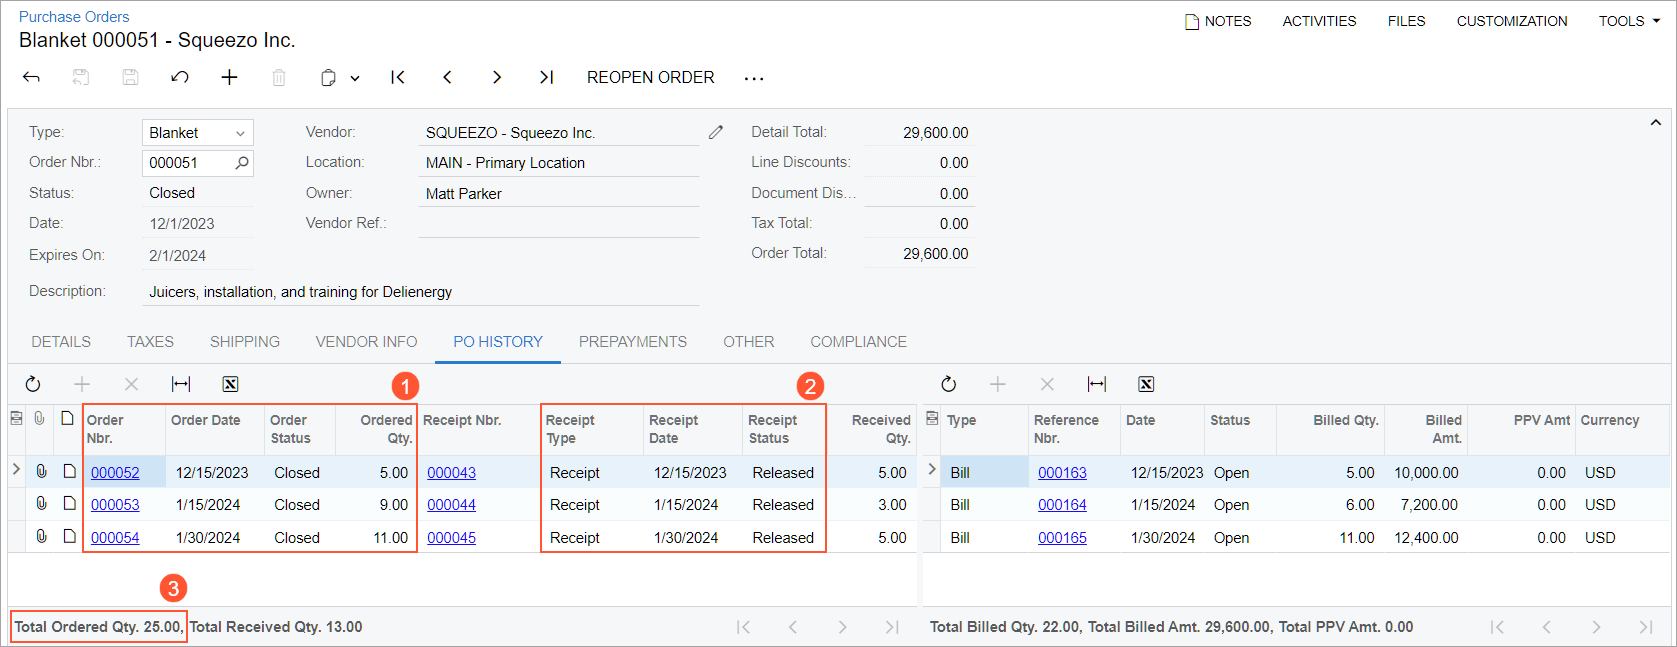
In MYOB Acumatica 2024.1.1, on the Purchase Orders (PO301000) form, the PO History tab (shown in the screenshot below) has been reworked for purchase orders of the Blanket type. The redesigned tab increases the visibility of child orders—that is, purchase orders of the Normal or Drop-Ship type—that have been created for the blanket purchase order. Now users can review information about the child orders and their related purchase receipts and returns, AP bills, and debit adjustments for purchase returns in a single place.
The following columns (see Item 1 in the screenshot below) have been added to the left table on the PO History tab: Order Nbr., Order Date, Order Status, and Ordered Qty. These new columns show the settings of the existing child orders.
The following columns (Item 2) have been renamed in the left table on the PO History tab:
- Type to Receipt Type
- Date to Receipt Date
- Status to Receipt Status
Also, the Total Ordered Qty. has been added to the table footer (Item 3).
In the columns that existed previously in the left table on the PO History tab, for blanket purchase orders, the system now shows the settings of purchase receipts and returns created for child orders. Also, in the right table of the PO History tab, for blanket sales orders, the settings of AP bills and debit adjustments created for child orders and related purchase receipts or returns are now shown.
UI Enhancements and Workflow Changes in Picking Worksheets
In previous versions of MYOB Acumatica, a user could not cancel a wave or batch picking worksheet that had the Picking status on the Picking Worksheets (SO302500) form.
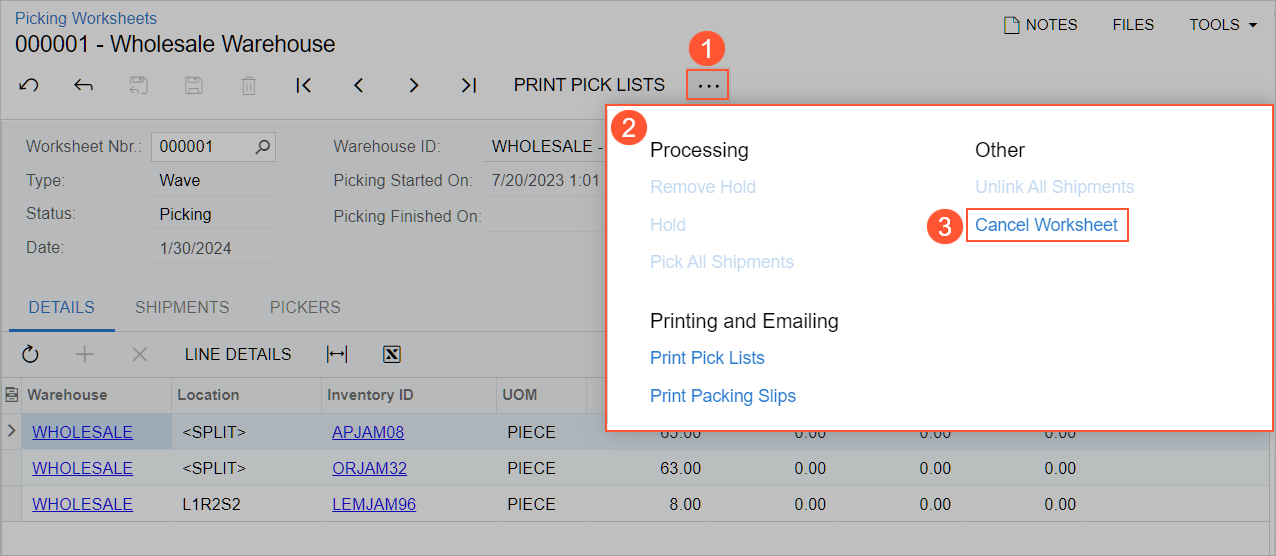
Starting in MYOB Acumatica 2024.1.1, the following changes have been made to the Picking Worksheets form:
- The More button and the More menu have been added (see Items 1 and 2 in the following screenshot).
- The new Cancel Worksheet command has been added to the More menu (Item 3).
A user can click Cancel Worksheet if the selected worksheet is one of the following:
- A wave picking worksheet with the Picking status.
- A batch picking worksheet with the Picking status, if no shipments of this batch worksheet have been completely picked yet (that is, if the Picked check box is cleared for all the shipments included in this batch worksheet on the Shipments tab of the form).
When a picking worksheet is canceled, the system assigns the Canceled status to it, cancels all the created pick lists, and removes all the related shipments from the picking worksheet. The value in the Picked Qty. column for all table rows in the worksheet becomes 0.
The process of physically distributing already-picked goods back to their storage locations is not covered by the picking workflow; this should be done manually according to the pick lists of the canceled worksheet.
Processing of Shipments for Non-Stock Items on the Pick, Pack, and Ship Form
In previous versions of MYOB Acumatica, if on the Shipments (SO302000) form, a location was not specified for a non-stock item that required shipment, a user could not pick this item on the Pick, Pack, and Ship (SO302020) form.
Starting in MYOB Acumatica 2024.1.1, the new Picking Location for Non-Stoсk Items box has been added to the Locations tab of the Warehouses (IN204000) form (see the following screenshot).
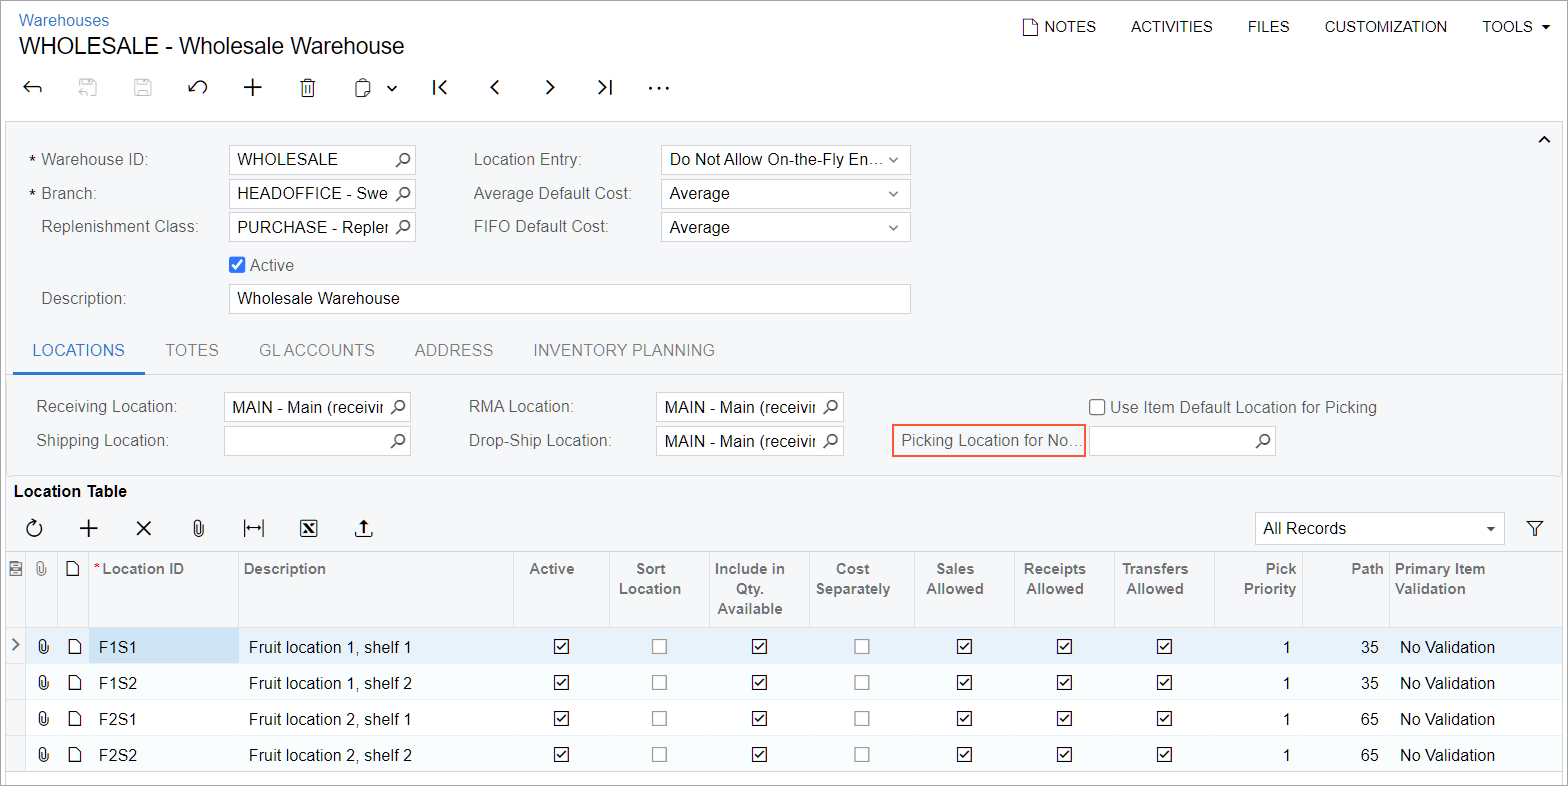
This box appears if the Warehouse Management feature is enabled on the Enable/Disable Features (CS100000) form. In the Picking Location for Non-Stoсk Items box, the default warehouse location for the picking of non-stock items should be specified. When a shipment is created, the value in the Location column on the Details tab will be copied from the Picking Location for Non-Stoсk Items box for a non-stock item that requires shipping. This location will be used for picking the non-stock item when a pick list is created for the shipment.
On-the-Fly Editing of Package Dimensions in Pack and Pack-Only Modes
MYOB Acumatica 2022 R2 introduced the ability to update box dimensions on the fly on multiple forms related to packaging. While this workflow was added for Ship mode of the Pick, Pack, and Ship (SO302020) form, a user could not change the dimensions of boxes in Pack or Pack-only mode of the form.
In MYOB Acumatica 2024.1.1, a new Confirm Dimensions for Packages with Editable Dimensions check box has been added to the Warehouse Management tab of the Sales Orders Preferences (SO101000) form (shown in the following screenshot).
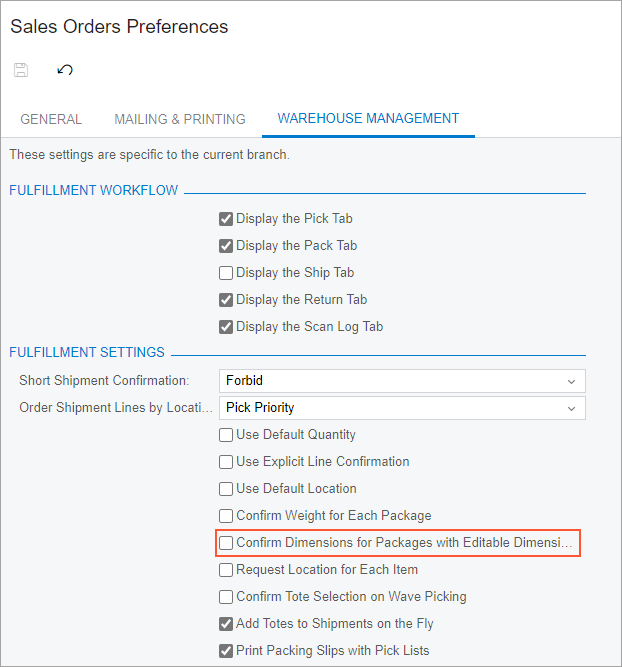
If this check box is selected, the system adds a new step to the processing of a shipment in Pack and Pack-Only modes on the Pick, Pack, and Ship form. When the user confirms a package that includes a box with the Editable Dimensions check box selected on the Boxes (CS207600) form, the system requires the user to confirm the existing dimensions or enter different dimensions for the box (as shown in the following screenshot).
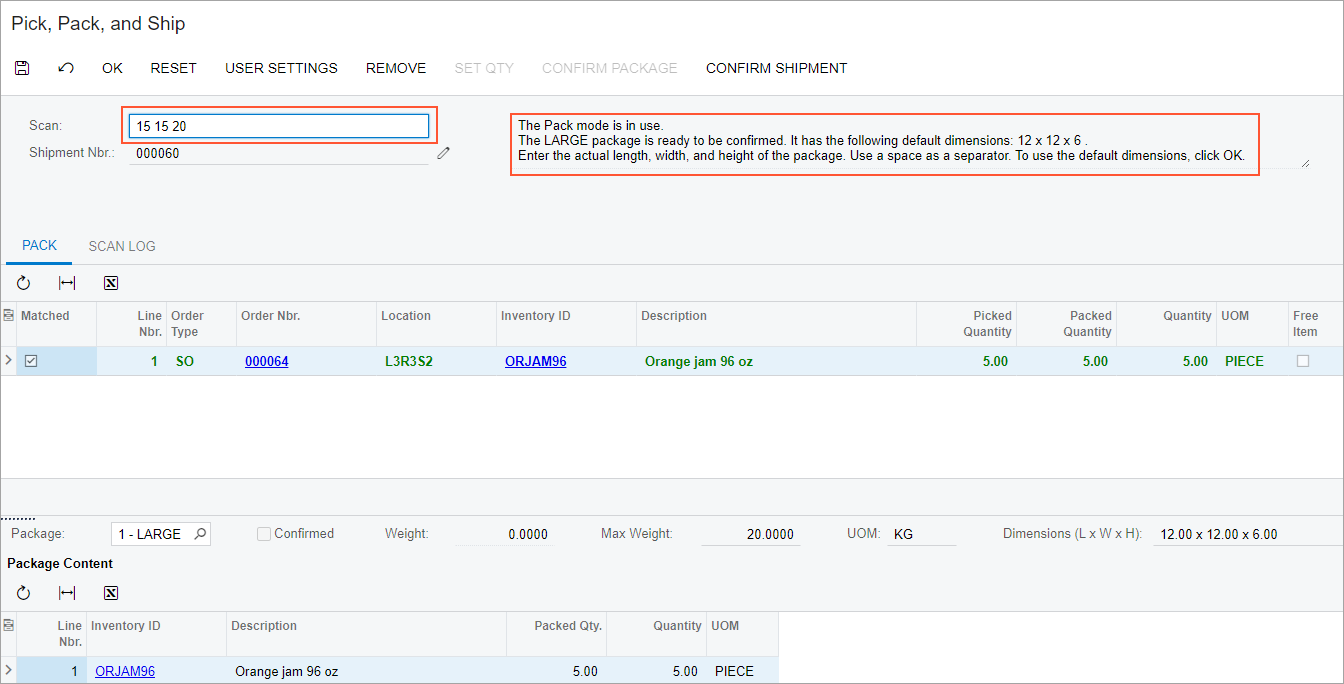
If the user wants to accept the default dimensions of the box, they can do that by clicking OK on the form toolbar or by scanning the *OK command. If the user wants to change the dimensions of the box, they need to enter the length, width, and height (in this order) in one string with a space as a separator. The following example shows the entry of dimensions: 20 15 40.
When the user enters new values, the dimensions of the box are overridden for the package of the shipment and can be validated on the Packages tab of the Shipments (SO302000) form.
Visibility of Billing Options and Creation of Separate Invoices During the Processing of Shipments
In previous versions of MYOB Acumatica, if shipments had been created for sales orders, and then a user prepared invoices for these shipments by using the Process Shipments (SO503000) form, the user could not see whether multiple invoices (one for each sales order in a shipment) or an aggregated invoice would be created for each listed shipment. Also, the user could not create a separate invoice for a particular shipment on this form.
Starting in MYOB Acumatica 2024.1.1, if a user selects the Prepare Invoice action on the Process Shipments form, the user can see the billing option for each shipment. The Billing in Orders column has been added to this form (see the following screenshot). This column indicates how the sales orders in the shipment are defined to be billed: in an aggregated invoice, in separate invoices, or a mix of these billing options.
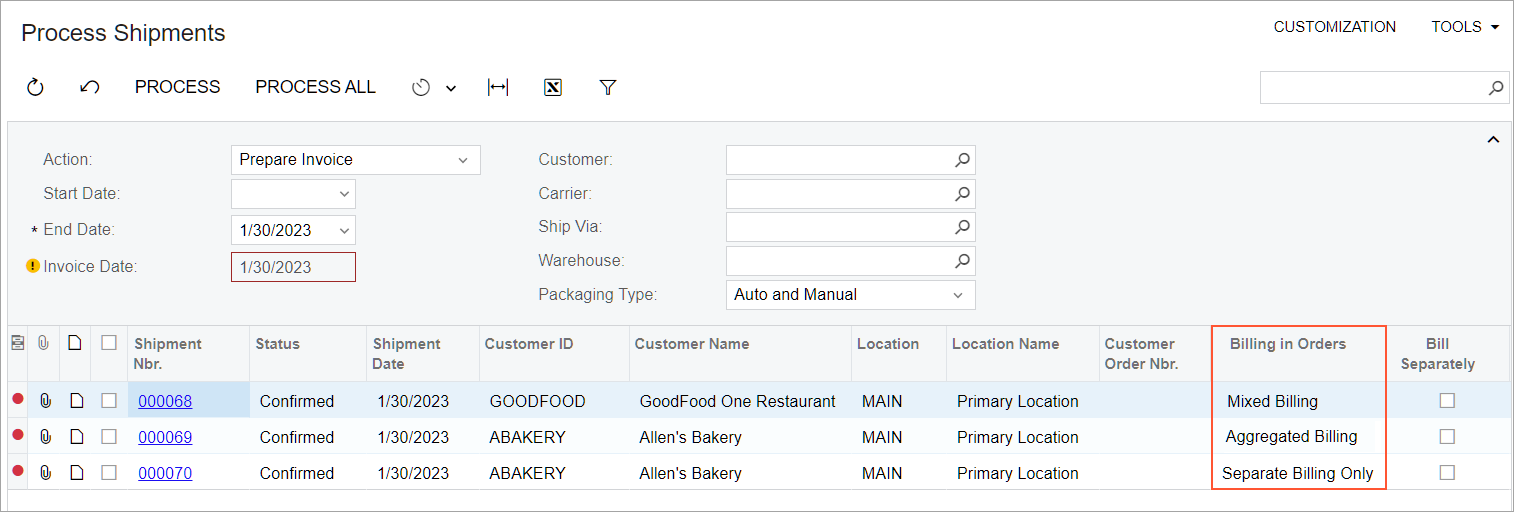
In the Billing in Orders column, one of the following options is shown:
- Aggregated Billing: The shipment includes only sales orders that have the Bill Separately check box cleared on the Financial tab of the Sales Orders (SO301000) form. In this case, if other conditions for aggregated billing are met (for details, see Sales of Stock Items: Mass-Processing of Documents), one invoice will be created for all the sales orders included in the shipments that have this option.
- Mixed Billing: The shipment includes both of the following types of sales
orders:
- Sales orders with the Bill Separately check box cleared
- Sales orders with the Bill Separately check box selected
In this case, for each sales order with this check box selected, a separate invoice will be created, and for all sales orders with this check box cleared, one invoice will be created if the conditions are met for aggregated billing.
- Separate Billing Only: This option means that the shipment includes only sales orders for which the Bill Separately check box is selected. In this case, a separate invoice will be created for each sales order in the shipment.
For any shipment, a user can select or clear the check box in the Bill Separately column on the Process Shipments form. If the user selects the check box for a shipment that has Aggregated Billing or Mixed Billing in the Billing in Orders column, and processes this shipment, a separate invoice will be created for this particular shipment. Thus, this shipment will not be aggregated in the same invoice with other shipments for the same customer.
UI Changes on the Non-Stock Items, Template Items, and Item Classes Forms
In order to improve the user experience, the following UI changes related to accrual cost calculation have been made:
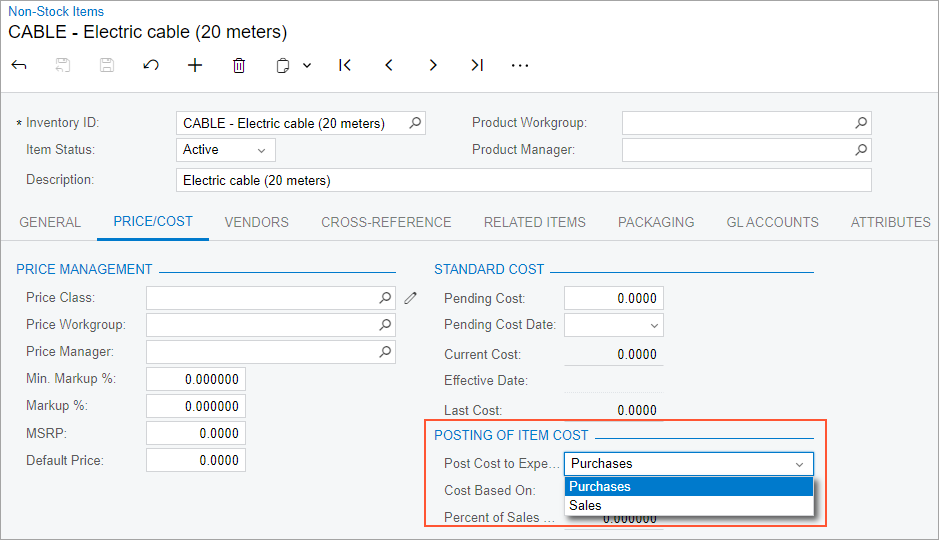
- On the Price/Cost tab of the Non-Stock Items (IN202000) form (shown in the screenshot below) and Template Items form, the Accrue Cost check box has been reworked into the Post Cost to Expenses On drop-down box. The Cost Accrual section has been renamed to Posting of Item Cost.
- On the General tab of the Item Classes (IN201000) form, the Accrue Cost check box has been reworked into the Post Cost to Expenses On drop-down box.
The Post Cost to Expenses On box has the following options:
- Purchases: If this option is selected, the system works in the same way it did when the Accrue Cost check box was cleared.
- Sales: If this option is selected, the system works in the same way it did when the Accrue Cost check box was selected.
No other changes have been made to the functionality and default values of the accrual cost calculation.