
Acumatica Add-In for Outlook: Business Account Management
When you work with an email in Outlook, the Acumatica add-in for Outlook lets you quickly find any related business accounts in MYOB Acumatica and create new ones without leaving your mailbox.
The Acumatica add-in searches for business accounts that have email addresses matching the sender or any recipient of the email on the following forms:
- Business Accounts (CR303000)
- Customers (AR303000) if the business account has been extended as a customer
- Vendors (AP303000) if the business account has been extended as a vendor
If matching accounts are found, they appear in the Profiles section of the Related Records form. You can:
- Link the email to the related account record. For details, see Acumatica Add-In for Outlook: Email Activity Management.
- Click a business account’s name (which is a link) to review it. The record opens on the corresponding data entry form of your MYOB Acumatica instance.
- Quickly create a related account and link it to the email, as described in the next section.
Business Account Creation
You can create a new business account with the email address selected in the Filter box of the Related Records form. If the Customer Management feature is enabled on the Enable/Disable Features (CS100000) form, you can click Add Account in the Profiles section—either directly or through the More menu.
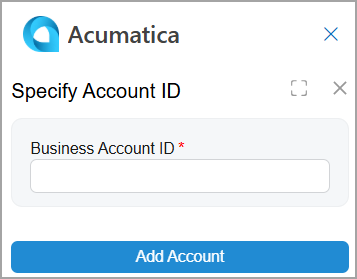
The BIZACCT segmented key may require manual entry of a key segment. In this case, when you click Add Account, the Specify Account ID dialog box opens (shown below). Enter the business account ID and then click Add Account to proceed.
The Account form opens (see below), and the following boxes may be filled in automatically:
- Business Account: The business account ID that you’ve entered in the Specify Account ID dialog box (if applicable).
- Account Name: The display name of the email address, such as Mill Gibson <mill.gibson.mail.com>; otherwise, the box is empty.
- Account Email: The email address selected in the filter box.
- First Name (Primary Contact section): The first word of the email address if it consists of two or more parts separated by spaces (for example, Mill Gibson <mill.gibson.mail.com>); otherwise, the box is empty.
- Last Name (Primary Contact section): The second word of the email address if it consists of two or more parts separated by spaces (for example, Mill Gibson <mill.gibson.mail.com>). If a last name can’t be derived, the email address selected in the Filter box is inserted.
- Email (Primary Contact section): The email address selected in the Filter box.
- Link Email to Contact: Selected.
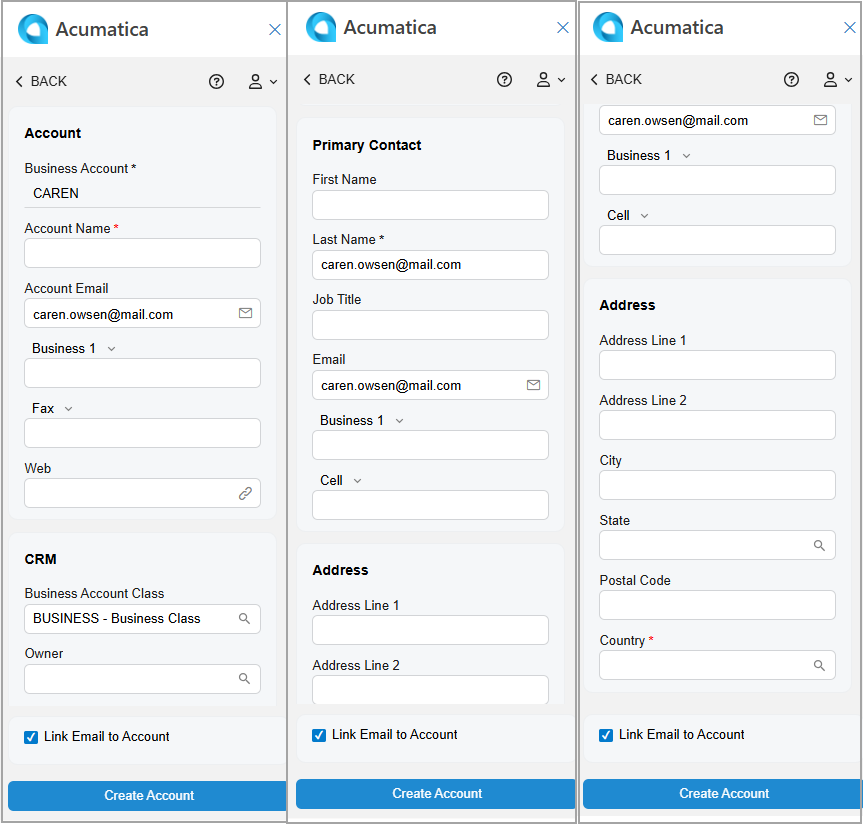
After you click Create Account, the form you go to depends on the state of the Link Email to Contact check box:
- If it’s cleared, you return to the Related Records form. The system refreshes the Contacts section and shows the newly created business account and its primary contact (if the Primary Contact section on the Account form is filled in).
- If it’s selected, you go to the Email Activity form. The system fills in the Related Account and Related Entity boxes with the business account you created and inserts Business Account in the Related Entity Type box. The email is linked to the newly created business account in MYOB Acumatica. For details, see Acumatica Add-In for Outlook: Email Activity Management.
Access Rights
Users with the following user roles have the Delete access rights to the Account form:
- AcumaticaSupport
- Administrator
- CR Marketing Manager
- CR Sales & Marketing Admin
- CR Sales Representative
- CR Support Admin
- CR Support Representative
- Customer Data Manager
- Vendor Data Manager