
Projects and Construction: Easily Prepare GAAP-Compliant Financial Statements
Construction projects often have timing gaps between revenue and costs. Now you can close these gaps, streamline GAAP compliance, and eliminate manual GL adjustments for construction projects.
MYOB Acumatica 2025.2.1 introduces a new document—the project WIP adjustment, which you create on the Project WIP Adjustment (PM305600) form. With project WIP adjustments, you can:
- Easily adjust revenue for the reporting period without manually modifying GL transactions
- Automatically calculate overbilling and underbilling amounts
- Post auto-reversing GL transactions to record the current revenue
- Ensure GAAP compliance for construction project reporting
Setup: Select the Default Accounts
As an administrator setting up the WIP adjustment capabilities, you first select the default overbilling, underbilling, and revenue accounts on the new WIP Adjustment Settings tab of the Projects Preferences (PM101000) form. The system copies these accounts to each newly created project WIP adjustment.
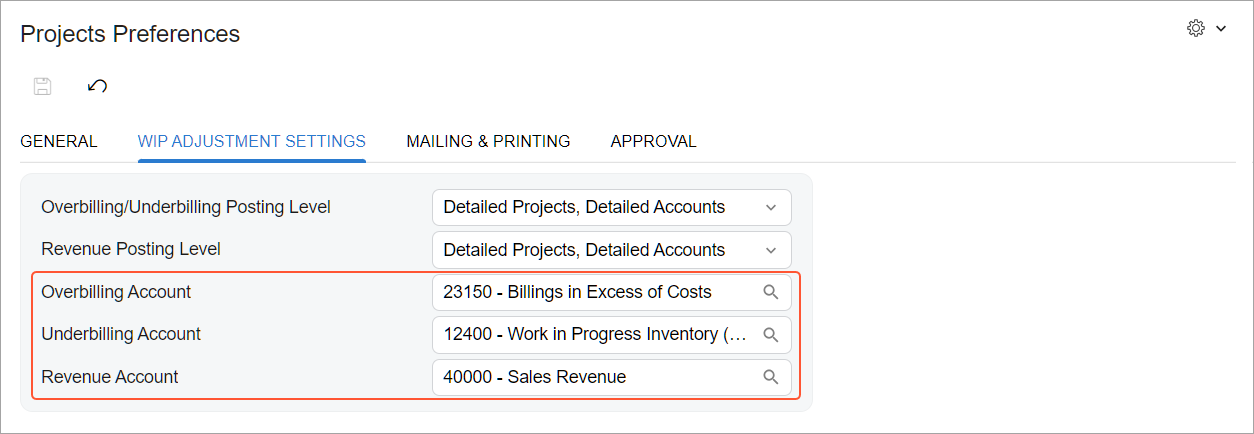
Also, if subaccounts are in use in your system, you enter the Overbilling Subaccount and Underbilling Subaccount.
Setup: Select the Overbilling and Underbilling Posting Level
Next, choose how the system will post GL transactions on release of a project WIP adjustment. In the Overbilling/Underbilling Posting Level box of the Projects Preferences (PM101000) form, select a detail level. The system will copy this level to each new project WIP adjustment. Here’s a summary of these levels.
| Level | Detail Level | Use For | What the System Creates |
|---|---|---|---|
| Detailed Projects, Detailed Accounts (default) | Project + account from the project line | Maximum cost tracking detail | A GL transaction for each project, using the overbilling or underbilling account from each project line on the Details tab of the Project WIP Adjustment (PM305600) form |
| Detailed Projects, Default Accounts | Project + default account | Cost tracking by project with default accounts used | A GL transaction for each project, using the default overbilling or underbilling account from the Financial tab of the Project WIP Adjustment (PM305600) form |
| Non-Project, Detailed Accounts | Account only | Account-level tracking without project codes | One GL transaction for each overbilling or underbilling account from each project line on the Details tab of the Project WIP Adjustment (PM305600), using the non-project code |
| Non-Project, Default Accounts | Minimal | An adjustment without project-level detail | Two GL transactions—one for overbilling and one for underbilling—using the default accounts from the Financial tab of the Project WIP Adjustment (PM305600) form and the non-project code |
| Non-Project, Total Adjustment | Summary only | A summarized adjustment entry | One GL transaction for the total adjustment amount, using the default account from the Financial tab of the Project WIP Adjustment (PM305600) form and the non-project code |
Setup: Select the Revenue Posting Level
You also need to select the level of detail at which the system will post revenue for each WIP adjustment created for a financial period. In the Revenue Posting Level box of the Projects Preferences (PM101000) form, you select the needed detail level (described below). The system will copy it to each new project WIP adjustment.
| Level | Detail Level | Use For | What the System Creates |
|---|---|---|---|
| Detailed Projects, Detailed Accounts (default) | Project + account from the project line | Maximum revenue tracking detail | A GL transaction for each project, using the revenue account from each project line on the Details tab of the Project WIP Adjustment (PM305600) form |
| Detailed Projects, Default Account | Project + default account | Revenue tracking by project with default revenue accounts used | A GL transaction for each project, using the default revenue account from the Financial tab of the Project WIP Adjustment (PM305600) form |
| Non-Project, Detailed Accounts | Account only | Account-level tracking without project codes | A GL transaction for each revenue account on the Details tab of the Project WIP Adjustment (PM305600) form, using the non-project code |
| Non-Project, Default Account | Summary only | Simple revenue tracking without project-level detail | One GL transaction, using the default revenue account from the Financial tab of the Project WIP Adjustment (PM305600) form and the non-project code |
Process the Project WIP Adjustment: General Workflow
Here are the typical actions in the general workflow of reporting the current project costs by using a project WIP adjustment:
- Project manager: Creates a date-sensitive cost projection for each project on the Cost Projection by Date (PM305500) form
- Project accountant: Creates a project WIP adjustment on the Project WIP Adjustment (PM305600) form based on the latest released date-sensitive cost projections
- Project accountant: Releases the project WIP adjustment
- Project accountant: Reviews the generated GL batch; ensures that for each project whose
overbilling and underbilling amounts weren’t manually changed, the Sales Revenue account
shows:
- A credit amount equal to the overbilling amount in the cost projection
- A debit amount equal to the underbilling amount in the cost projection
- Project accountant (optional): Generates the needed WIP report for stakeholders
Adjust WIP for Multiple Projects: An Example
Imagine that during May 2025, four project managers released date-sensitive cost projections for four different projects. On May 30, you—the project accountant—prepare a project WIP adjustment to reflect the current revenue associated with the costs for these projects. You do the following:
- Load the projects from the released projections
- Review the overbilling and underbilling amounts
- Manually adjust one project's overbilling amount
- Release the adjustment
- In the resulting GL batch, confirm that for projects where underbilling wasn’t manually adjusted, the Sales Revenue account’s debit matches the expected revenue from their cost projections
Create a Project WIP Adjustment
You create a project WIP adjustment on the new Project WIP Adjustment (PM305600) form. In the Summary area, you review the owner, projection date, financial period, branch, currency, and project status that the system has inserted; you also add the description. Then you click Load Lines on the form toolbar. Based on the latest date-sensitive cost projections created on the Cost Projection by Date (PM305500) form, the system adds a line for each project to the Details tab.
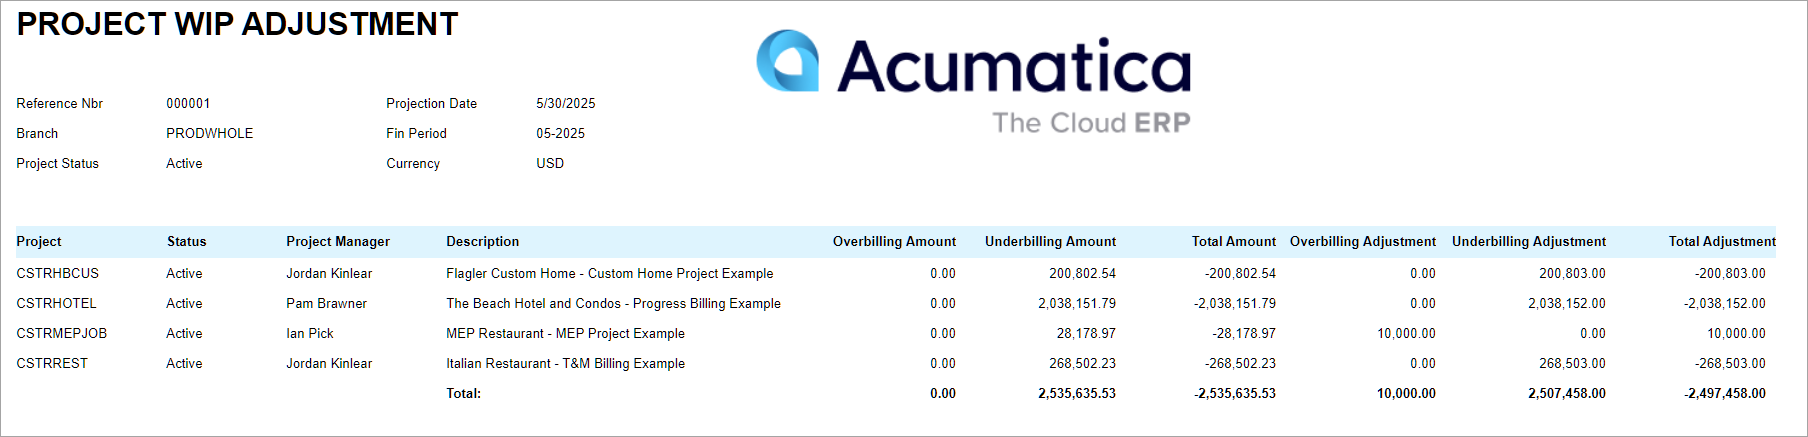
Each line on the Details tab shows the overbilling and underbilling amounts for each project, as shown below. If a cost projection hasn't been released, in the added line, columns for amounts contain 0. In the Summary area, the system shows the sum of these amounts and the total adjustment amount for all the projects in the current project WIP adjustment (see below).
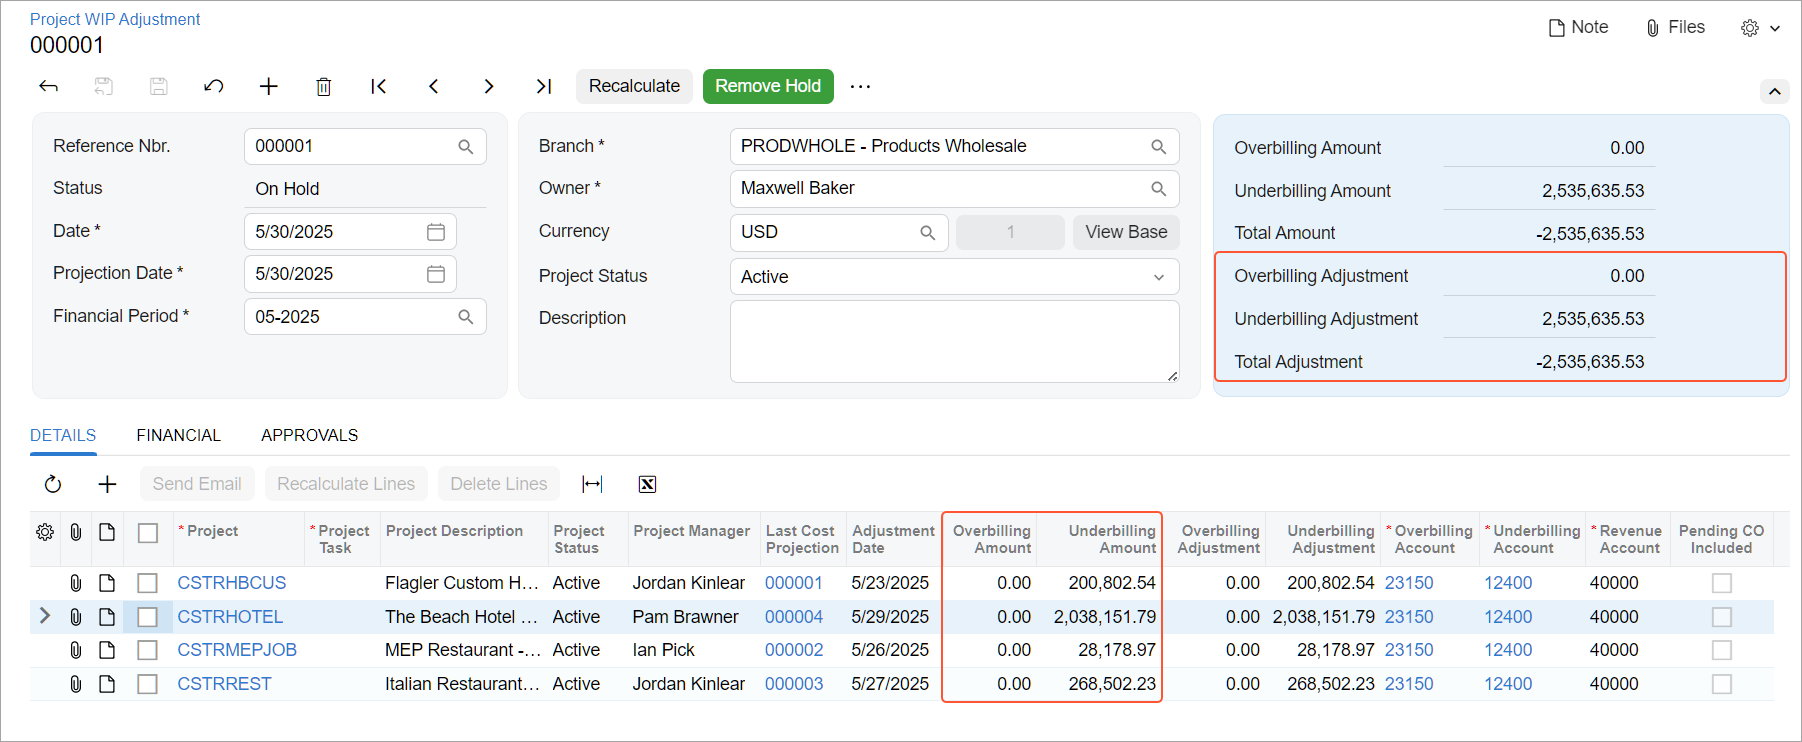
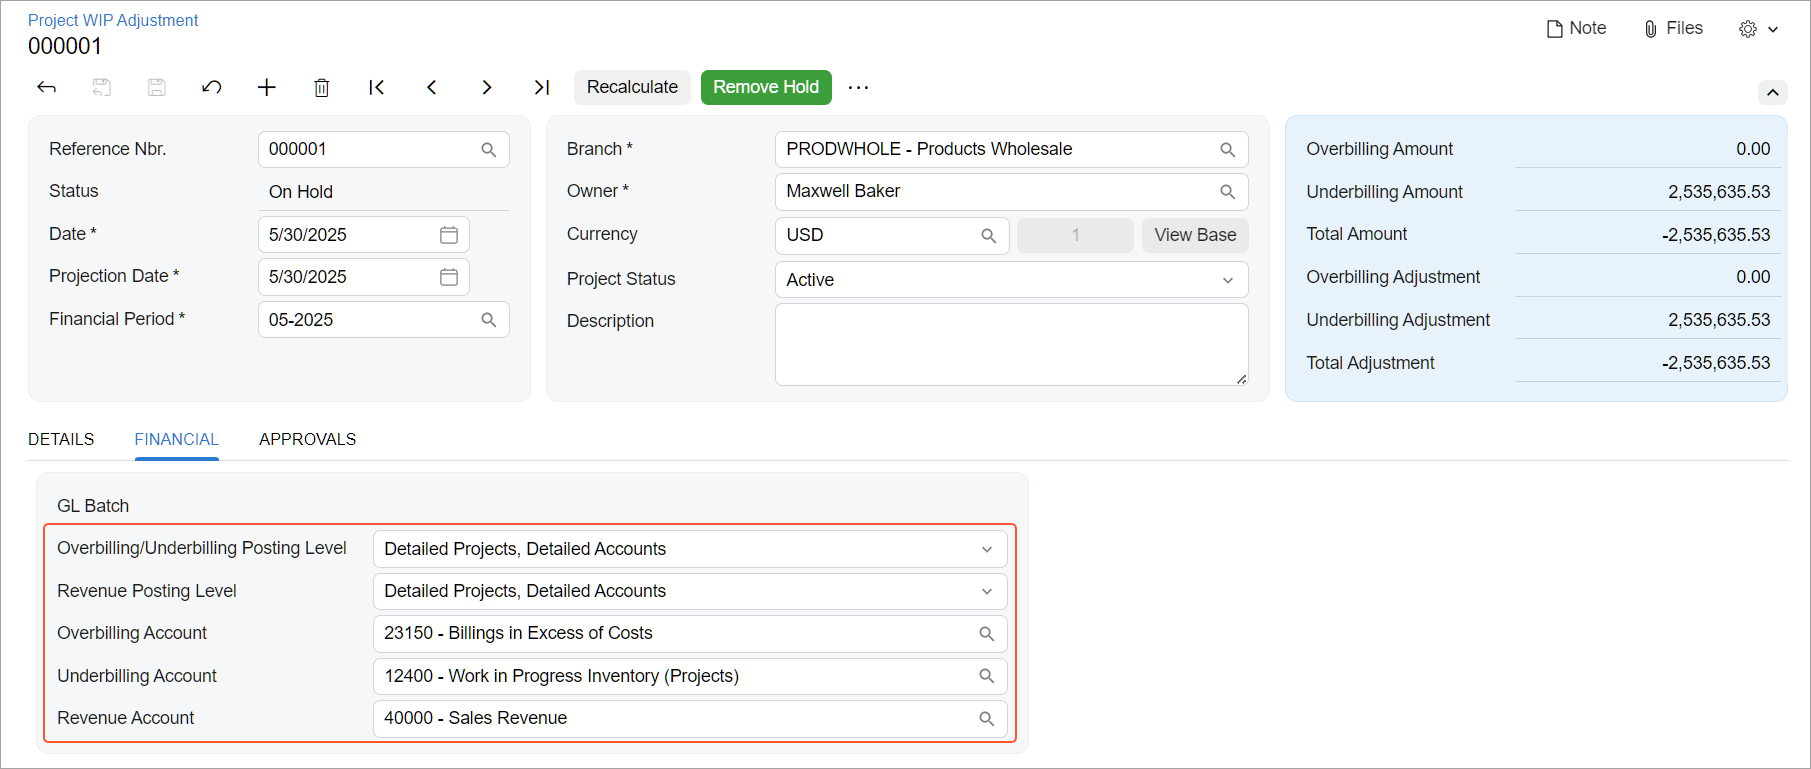
On the Financial tab, the system copies the default posting levels and accounts from the WIP Adjustment Settings tab on the Projects Preferences (PM101000) form. Notice that Detailed Projects, Detailed Accounts is selected in the Overbilling/Underbilling Posting Level and Revenue Posting Level boxes. The system will use the posting levels and accounts when it generates a batch of GL transactions on release of the project WIP adjustment. You can override these settings, if needed.
Process the Project WIP Adjustment
In the project WIP adjustment, you review all the data to prepare the document for the release. Then you click Release on the form toolbar of the Project WIP Adjustment (PM305600) form. The system posts a batch of auto-reversing GL transactions on the Journal Transactions (GL301000) form, as shown below. The Auto-Reversing check box is selected for the batch, meaning that in the next financial period, the transactions will be automatically reversed.
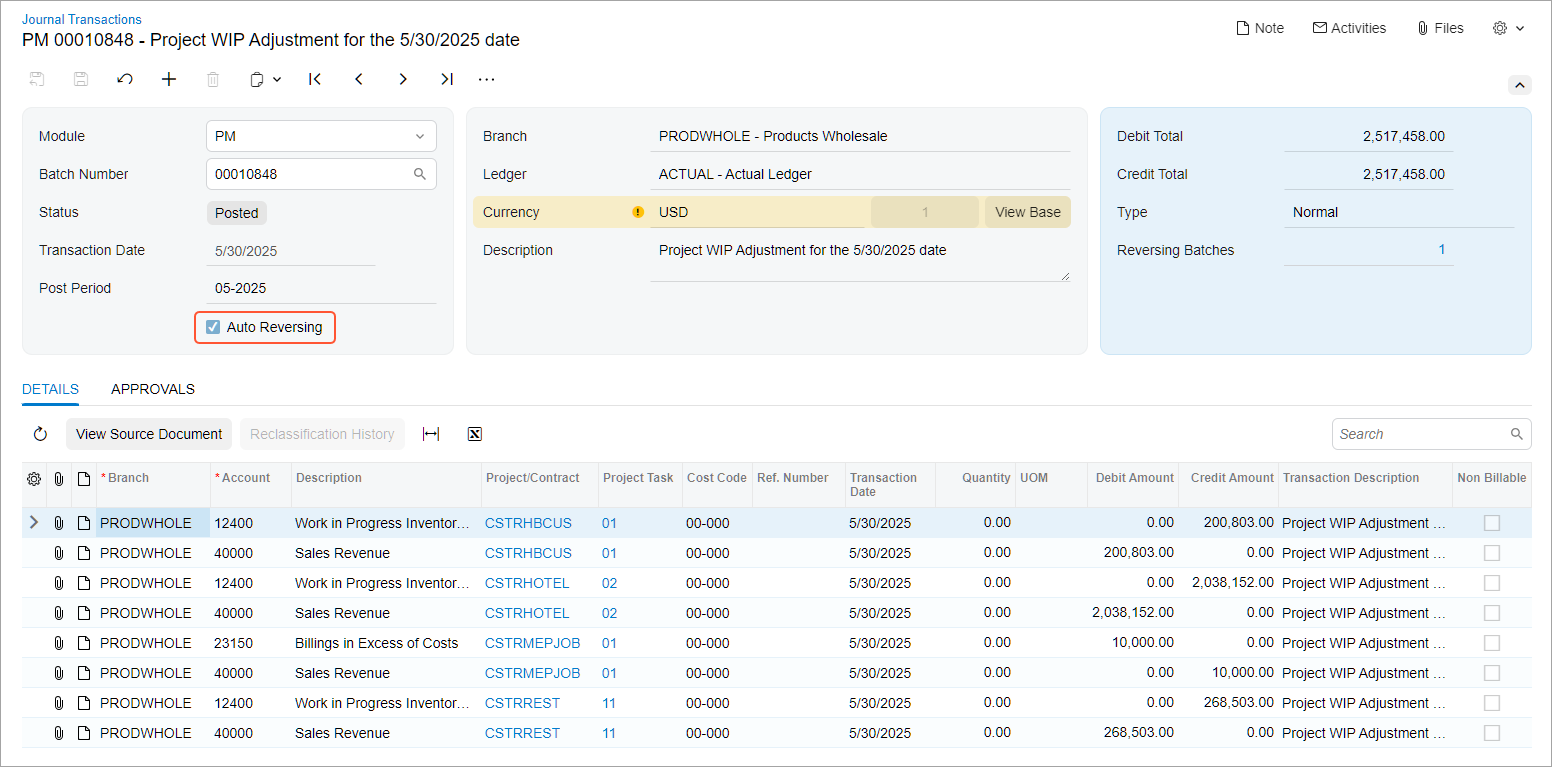
Based on the posting levels that you’ve specified for the project WIP adjustment (Detailed Projects, Detailed Accounts in both boxes), you see the maximum level of detail in the generated batch:
- A separate entry for each project with the overbilling or underbilling account of the project line
- A separate entry for each project with the revenue account of the project line
Generate the Needed WIP Report
From the Project WIP Adjustment (PM305600) form, you can generate the following reports:
- The Project WIP (PM651500) report: Click Print WIP Report on the More menu.
- The new Project WIP Adjustment (PM651850) report, shown below: Click Print WIP Adjustment on the More menu.
Modify a Project WIP Adjustment Before Release
If you need to update project costs before releasing the project WIP adjustment, here’s what you can do.
Recalculate Amounts
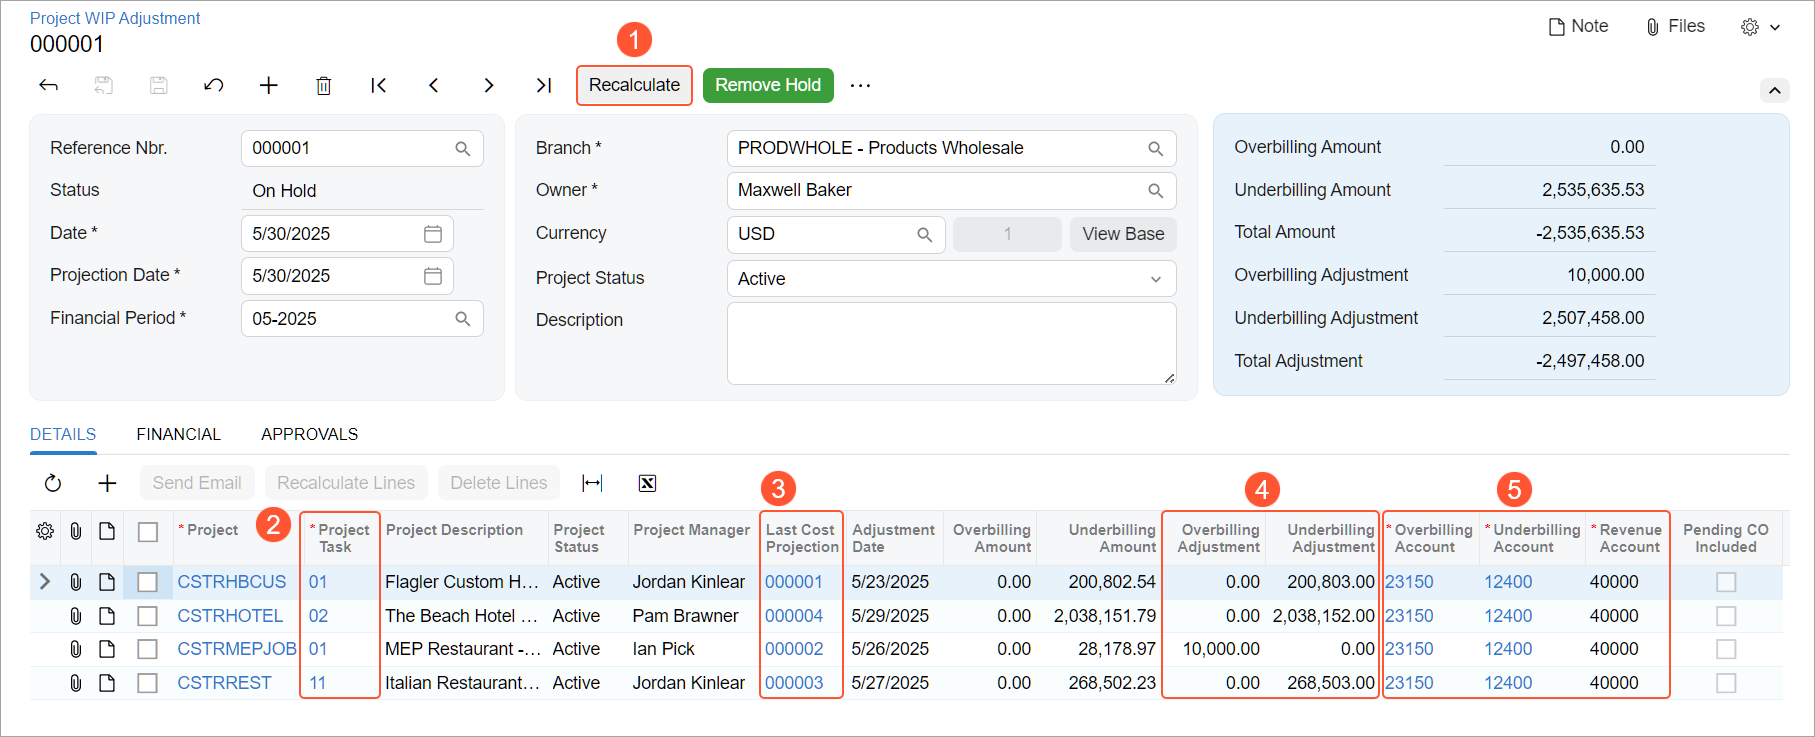
Once lines have been added to the Details tab of the Project WIP Adjustment (PM305600) form, the Load Lines button disappears on the form toolbar and Recalculate appears (Item 1 below). If you click this button, the system recalculates all the amounts and reloads all the lines. If a newer date-sensitive cost projection exists, the system inserts its amounts and its link in the needed columns.
On the Details tab, for each project line of a released date-sensitive cost projection, you can modify these columns:
- Project Task (Item 2): You must specify the task if the posting levels include detailed projects because the task is required for project transactions.
- Last Cost Projection (Item 3): Select another released cost projection, if needed.
- Overbilling Adjustment and Underbilling Adjustment (Item 4): When you manually change one of them, another becomes 0.
- Overbilling Account, Underbilling Account, and Revenue Account (Item 5).
Include the Amounts from Change Orders
Suppose that your project uses change orders. In this case, the system will copy the state of the Pending CO Included check box from the Include Pending CO in Calculations check box on the Cost Projection by Date (PM305500) form. If it’s selected, the project WIP adjustment includes the pending amounts from change orders whose amounts are specified in the cost projection.
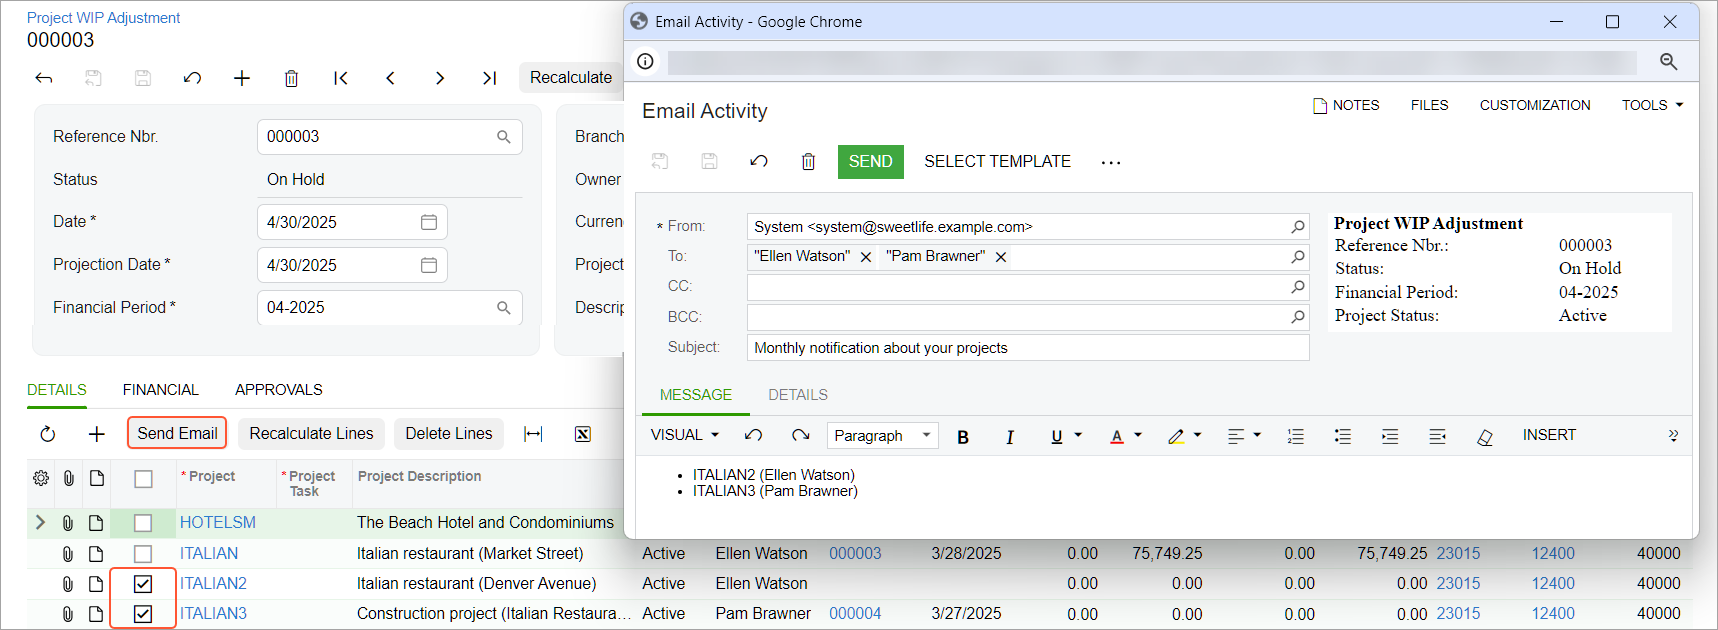
Send Emails to Project Managers
You can select any number of project lines and click Send Email on the table toolbar (see below) to create and send an email to the project managers.
Void a Project WIP Adjustment
If a project WIP adjustment has incorrect data—such as an incorrect amount, account, or posting level—you can cancel it. To do this, you click Void on the form toolbar of the Project WIP Adjustment (PM305600) form. The system:
- Assigns the On Hold status to the project WIP adjustment so that you can correct the mistakes
- Creates a reversal batch for the batch that has been canceled
- Clears the GL Batch box on the Financial tab
Additional Setup Capabilities
During setup of the project WIP adjustment functionality, you can also do the following:
- Select a numbering sequence in the WIP Adjustment Numbering Sequence box on the Projects Preferences (PM101000) form. The system inserts a default sequence, but you can change it if you have a specific numbering format for documents.
- Configure approvals by creating an approval map for project WIP adjustments on the Approval Maps (EP205015) form and selecting it on the Approvals tab of the Projects Preferences form. This helps ensure that a responsible person reviews and approves the adjustment before it affects the general ledger and financial statements. You can also create an email notification about project WIP adjustments pending approval. For details, see Configuring Approvals.
- Be sure all needed users have access to the new form and report. By default, the Project WIP Adjustment (PM305600) form and the Project WIP Adjustment (PM651850) report are available to the Project Accountant, Administrator, and AcumaticaSupport user roles, which have the Delete restriction level.
- Set up default accounts on the project template and project level so that users
can quickly create projects with a predefined set of accounts already in place. You
specify these accounts in the Overbilling Account and
Underbilling Account boxes on the Defaults
tab of the Project Templates (PM208000) form, as shown below.
Figure 8. The overbilling and underbilling accounts in a project template 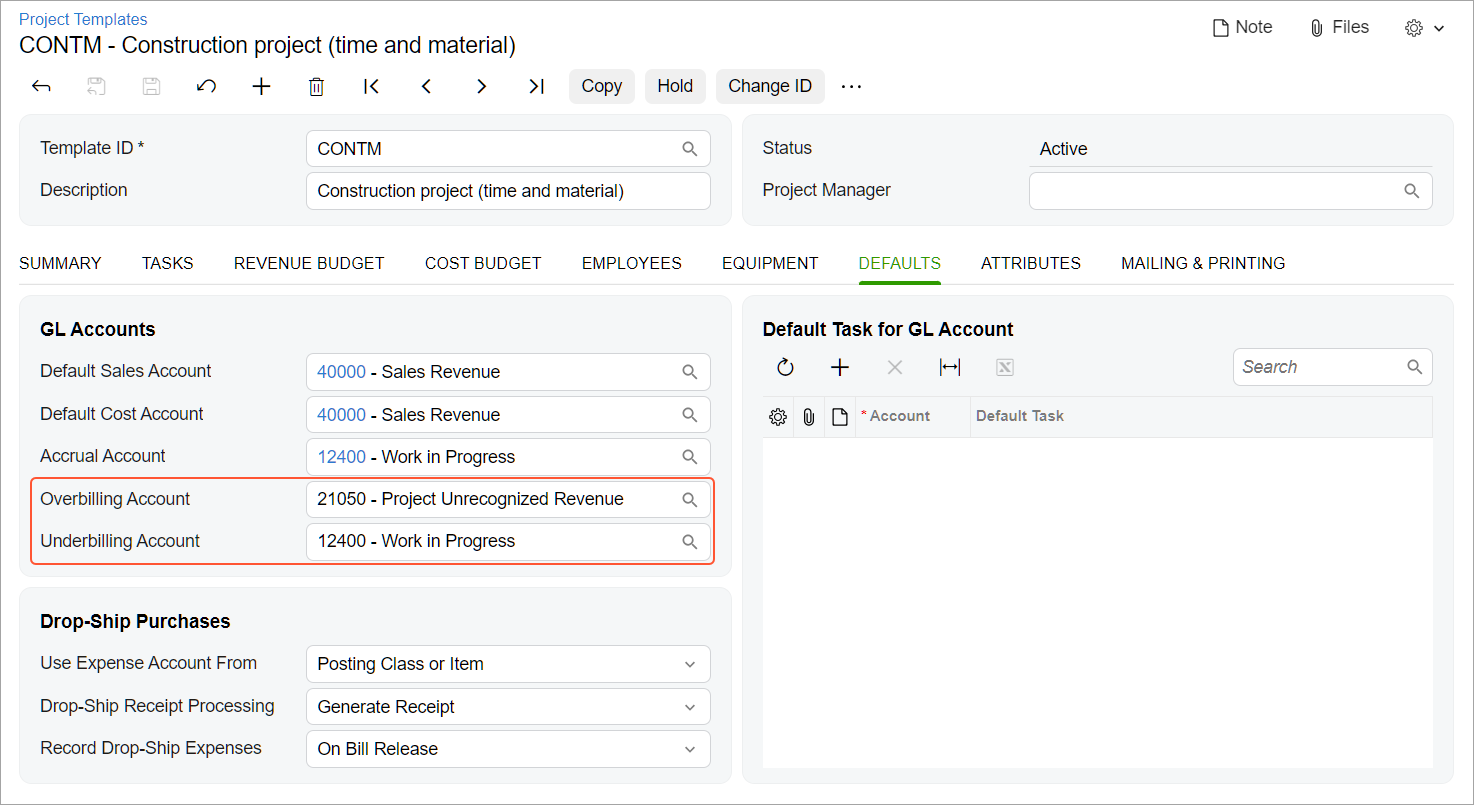
When a user creates a project from this template, the system copies these accounts to the boxes with the same names on the Defaults tab of the Projects (PM301000) form.
Figure 9. The overbilling and underbilling accounts in a project 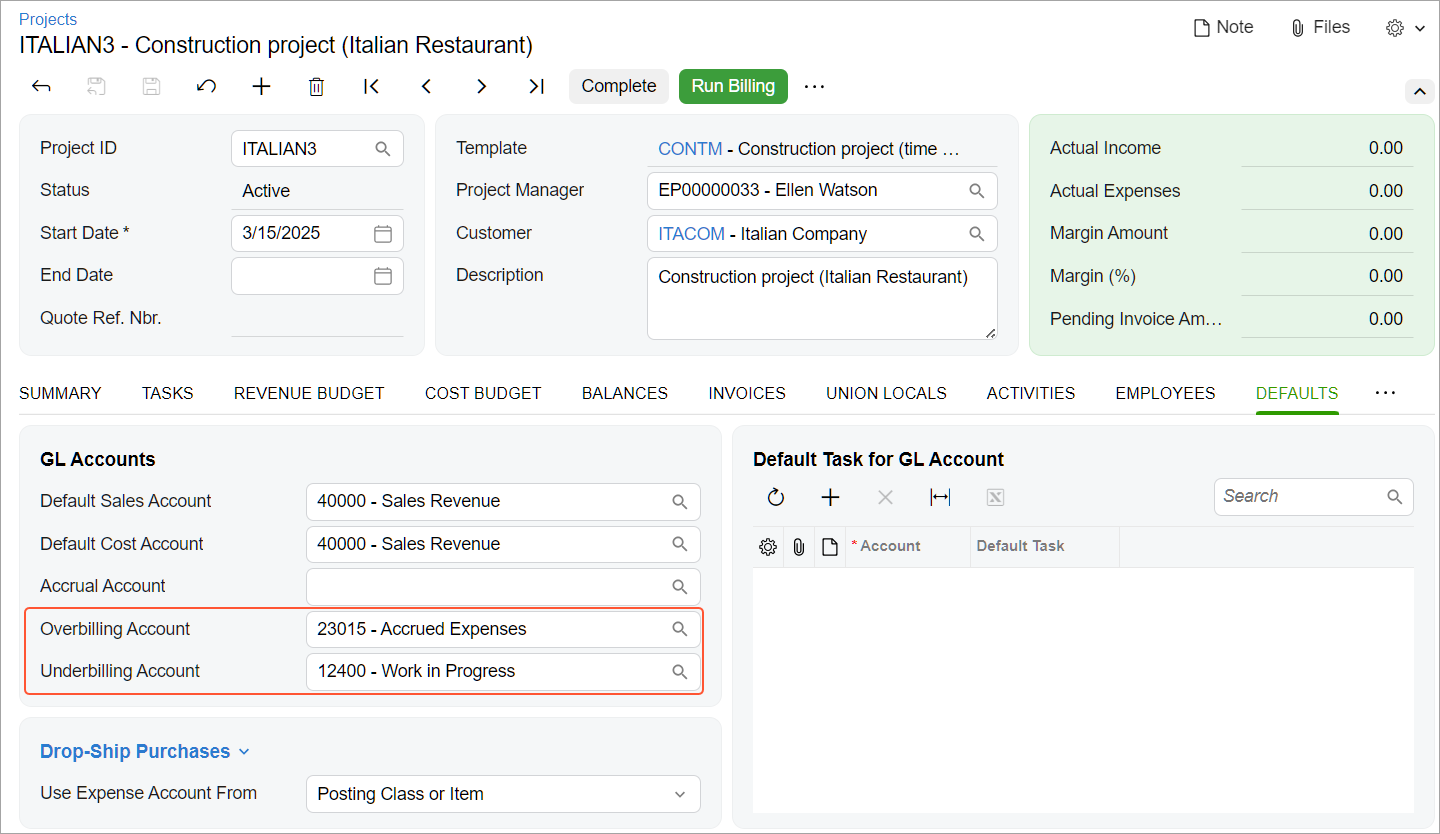
Key Capabilities
- Create WIP adjustments directly from date-sensitive cost projections so you can easily reflect changes in your financial statements.
- Gain visibility into project costs and revenue by reviewing the most recent projections before preparing adjustments.
- Fine-tune overbilling and underbilling amounts to reflect the actual project costs.
- Send quick email reminders to project managers to update outdated projections or add missing ones.
- Control the level of detail at which GL transactions are posted with flexible options for using detailed or default accounts—at the project or summary level.