
Customization: The Modern UI Editor
In MYOB Acumatica 2025.2.1, the Customization Project Editor now includes the much-anticipated Modern UI Editor—a powerful tool that simplifies the customization of Modern UI forms. Now you can view, edit, and compare HTML and TypeScript code directly in the customization environment and then automatically generate the customization files, which can later be published to another instance.
Overview of the Modern UI Editor
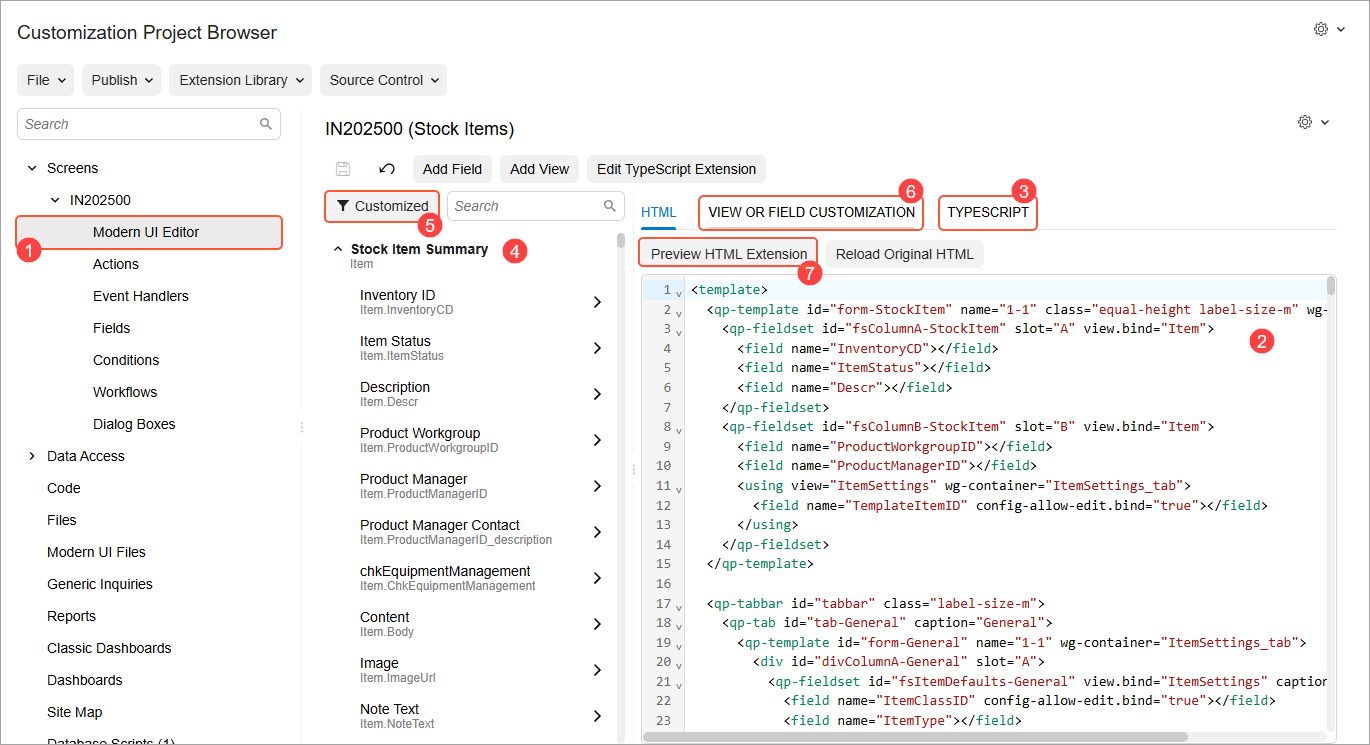
The Modern UI Editor fits seamlessly into your customization process, as shown in the example below of customizing the Stock Items (IN202500) form. To open the editor, click Modern UI Editor (Item 1) in the navigation pane, under Screens.
Here’s what you can do for any form that’s been migrated to the Modern UI:
- View code directly: See HTML and TypeScript files (Items 2 and 3).
- Navigate easily: Browse all view classes and fields relevant to the form in the element tree (Item 4) or click Customized (Item 5) to show only the customized ones.
- Customize a view or a field: Select a view or field in the element tree; then view its original TypeScript properties or add new ones on the View or Field Customization tab (Item 6).
- Customize the HTML Code: Edit the HTML code to add your customized fields and views. The system generates an HTML extension that implements the differences between the original and customized HTML code. You can preview these changes by clicking Preview HTML Extension on the tab toolbar (Item 7).
But that’s not all: The page toolbar of the Modern UI Editor provides the following useful capabilities for quickly customizing any form that has been migrated to the Modern UI:
- Add a field or view: Add a field or view to your form (Items 1 and 2 below). When you save your changes, the system generates a TypeScript extension for new views and fields. These extensions have the _generated suffix in their file names.
- Create and edit a custom TypeScript extension: Click Edit TypeScript Extension (Item 3) to quickly create or edit a custom TypeScript extension. You can also view the code of system-generated TypeScript extensions, but you can’t edit them.
- Quickly save or cancel changes: Use the Save and Cancel buttons on the page toolbar (Item 4) to quickly save or discard changes that you’ve made to an HTML or TypeScript extension on the HTML or View or Field Customization tabs.
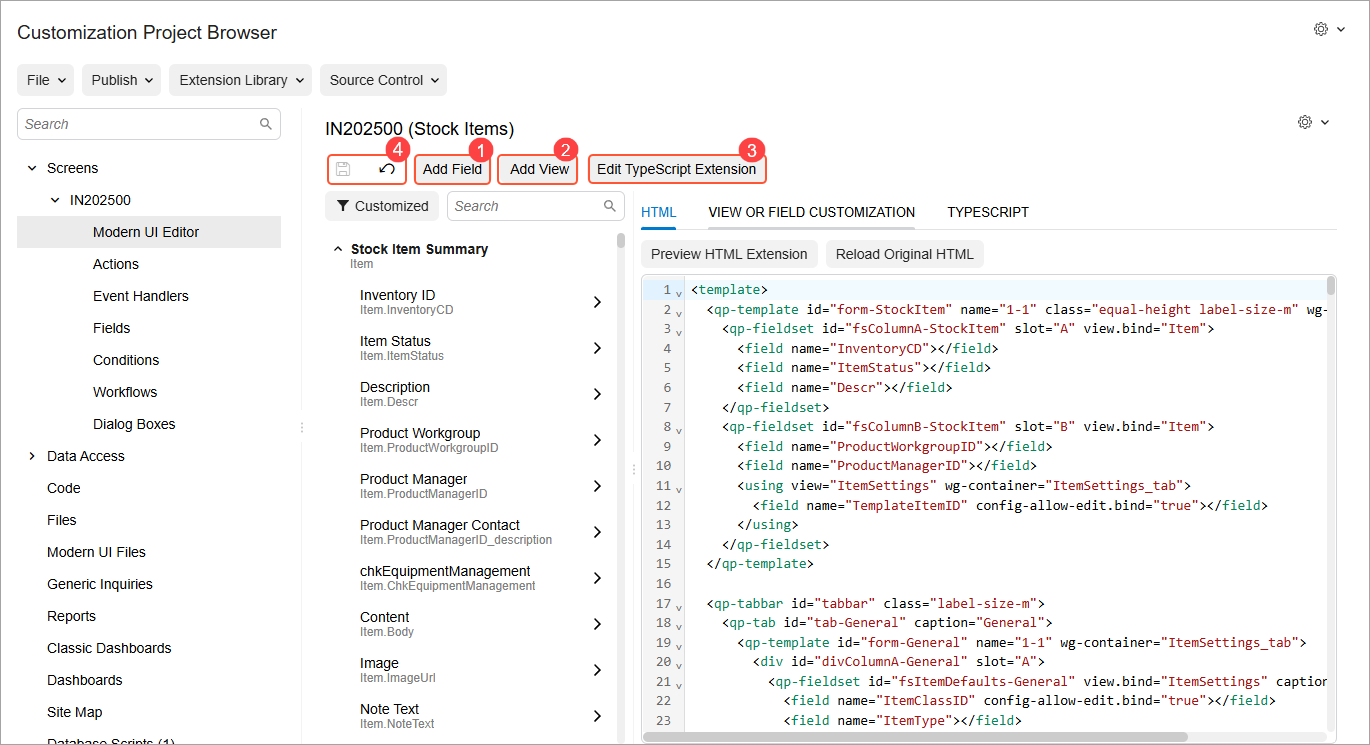
The generated TypeScript and HTML extensions are automatically added to your customization project.
For more details about the features of the Modern UI Editor, see Modern UI Editor.
Adding a Field
To add a custom field to a fieldset, you need to create TypeScript and HTML extensions of a form. Now you can use the Modern UI Editor to generate those extensions. The generated files are automatically saved to the customization project and can later be built and published.
For example, suppose that you need to add a custom field, UsrRepairItem,
to the Item Settings section on the General
tab of the Stock Items (IN202500) form. After adding the
column to the corresponding database table and creating a DAC extension, you’d do the
following:
- Open the Modern UI Editor for this form.
- On the page toolbar, click Add Field (Item 1 below), which opens the Add Field dialog box.
- Specify the data view where the new field is accessible. The corresponding DAC is
selected automatically. Specify the field name in the Field or Display
Name box; the field appears automatically in the table as you start typing
its name (Item 2).
Figure 3. The Add Field dialog box 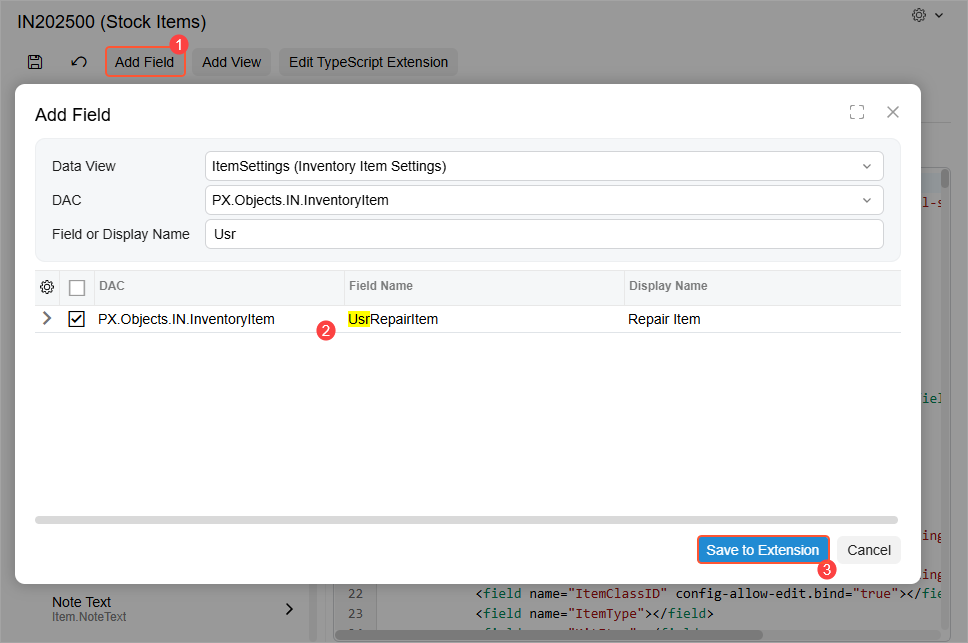
- Select the unlabeled check box for the field in the table.
- Click Save to Extension (Item 3).
The file with the generated TypeScript extension is added to your customization project and listed on the Modern UI Files page of the Customization Project Editor.
- To apply the changes, publish the customization project. The system validates and builds the frontend code, including the TypeScript extension.
Adding the Field to the HTML Code
To customize the HTML layout, you can use the Modern UI Editor to generate the HTML extension. The file is automatically saved to the customization project and can later be built and published.
To add the custom field to the Item Settings section on the General tab of the Stock Items (IN202500) form:
- Open the Modern UI Editor for the form.
- In the element tree, locate the custom field you want to add to the HTML template: Click
Customized (Item 1 below) to list all the custom views and
fields, or use the Search box (Item 2) to find the custom field.
Notice the blue Customized tag next to the
UsrRepairItemfield (Item 3), which indicates that this is a custom field. - On the HTML tab of the Modern UI
Editor, find the fieldset where the field should be. Place the cursor after the definition
of the element you want it to follow (Item 4).
Figure 4. Adding a field to the HTML code 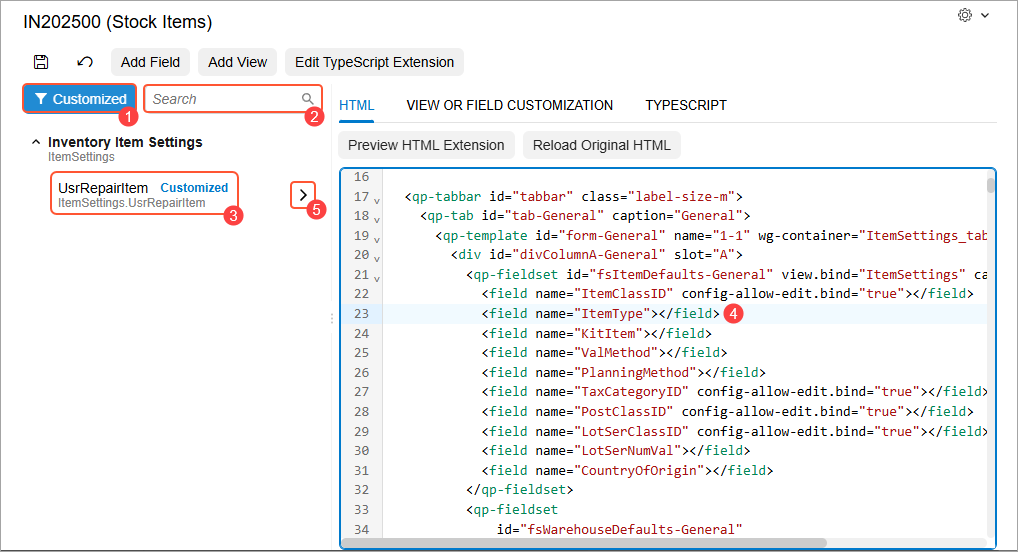
- In the element tree, click the arrow button next to the new field (Item 5 above).
The new field tag appears in the HTML code.
- On the page toolbar, click Save. The generated file is added to the Modern UI Files page.
- To apply the changes, publish the customization project.
The editor handles the technical details of creating properly formatted customization files—so that you can focus on your code changes rather than file management.
Adding a View
To add a view that you’ve declared in a graph or a graph extension of the form to the frontend code, you need to create a TypeScript extension of the form. You can use the Modern UI Editor to generate the extension by clicking Add View on the page toolbar.
For example, suppose that you need to add an existing view to the TypeScript code of a form. You’d perform the following general steps:
- Open the Modern UI Editor for the form.
- On the page toolbar, click Add View (Item 1 below), which opens the Add View wizard.
- In Step 1 of the wizard, specify the view that you want to add in the View
Name box (Item 2). The remaining boxes are filled in automatically. Verify
that their values are accurate and click Next (Item 3).
Figure 5. Step 1 of the Add View wizard 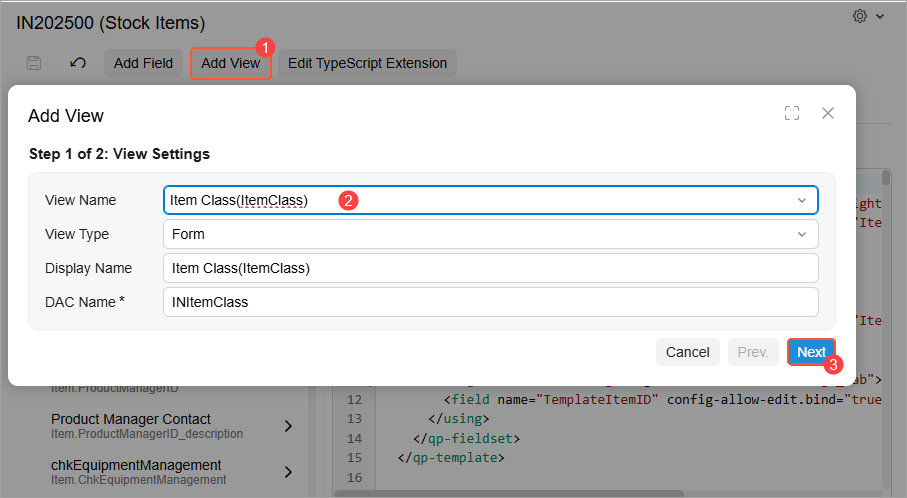
- In Step 2 of the wizard, a table shows the fields belonging to the view you selected in
Step 1. Select the unlabeled check box for the fields you want to add to the form (Items 1
and 2 below) and click Finish (Item 3).
Figure 6. Step 2 of the Add View wizard 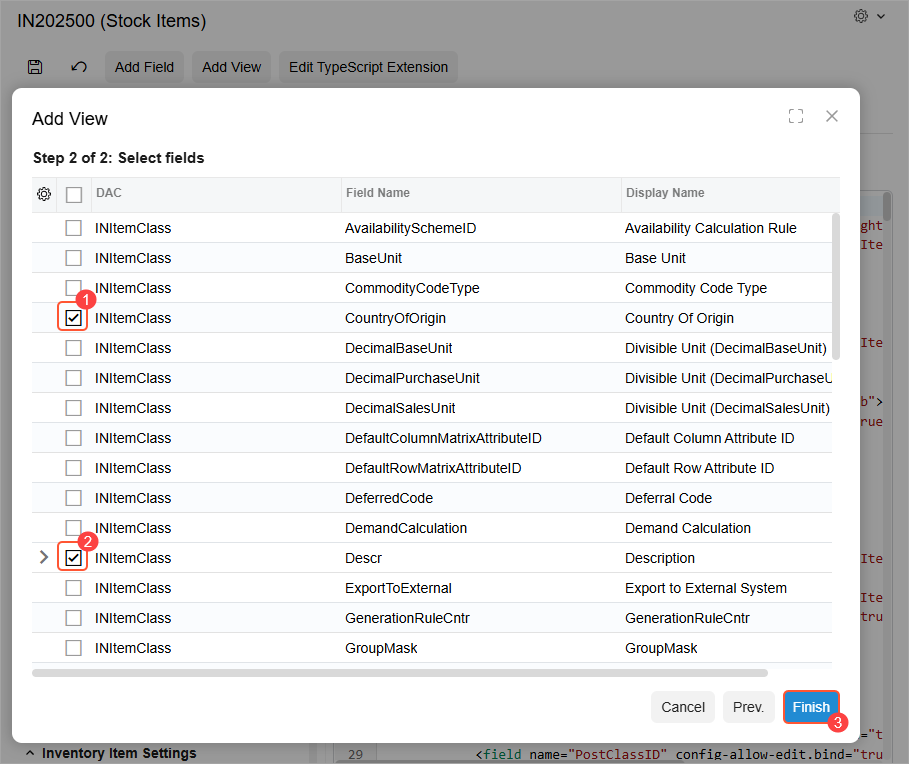
The file with the generated TypeScript extension is added to your customization project and listed on the Modern UI Files page of the Customization Project Editor.
Attention:If you’d previously generated a TypeScript extension for a form by clicking the Add Field or Add View buttons, the system will add the view and the selected fields to the existing extension file. - To apply the changes, publish the customization project. The system validates and builds the frontend code, including the TypeScript extension.
- To make the selected fields of the view available in the UI, customize the HTML layout of the form as described in the preceding Adding the Field to the HTML Code section.
Editing a TypeScript Extension
You use the Edit TypeScript Extension command on the page toolbar of the Modern UI Editor to create or edit custom TypeScript extensions. You can also use it to view the code of any system-generated TypeScript extension that you’ve have generated by clicking the Add Field or Add View buttons. However, you can’t edit these extensions.
For example, suppose that you need to create a new custom TypeScript extension for a form. You can perform the following general steps:
- Open the Modern UI Editor for the form.
- On the page toolbar, click Edit TypeScript Extension (Item 1 below), which opens the Edit TypeScript Extension dialog box.
- Optional: Click New Extension (Item 2) to clear any previously selected extension in the Extension Name box.
- Specify your extension’s name in the Extension Name box (Item 3).
As you start typing, a drop-down list appears showing existing custom and system-generated
extensions (Item 4).
Figure 7. The Edit TypeScript Extension dialog box 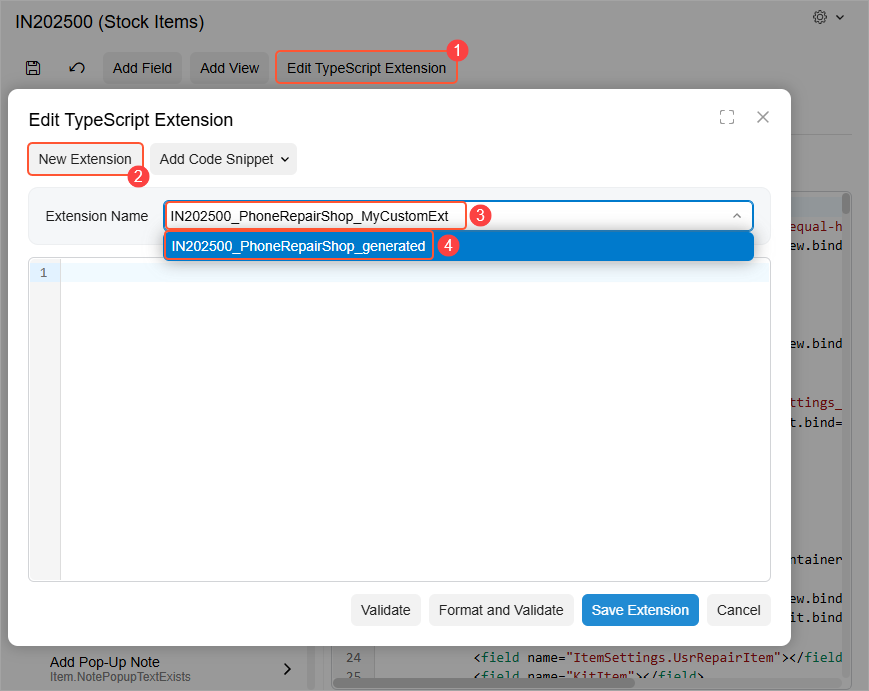
- Once you’ve finished typing the name for your extension, move the focus away from the Extension Name box. The system generates the boilerplate code for your extension, which is displayed in the code editor below the Extension Name box (Item 1 below).
- Modify the code in the code editor. You can also use the options of the Add Code Snippet drop-down menu (Item 2) to quickly add boilerplate code for a field, view, data view extension or grid view. For details, see the Modern UI Editor page reference.
- Click Save Extension (Item 3).
Figure 8. Generating a custom TypeScript extension 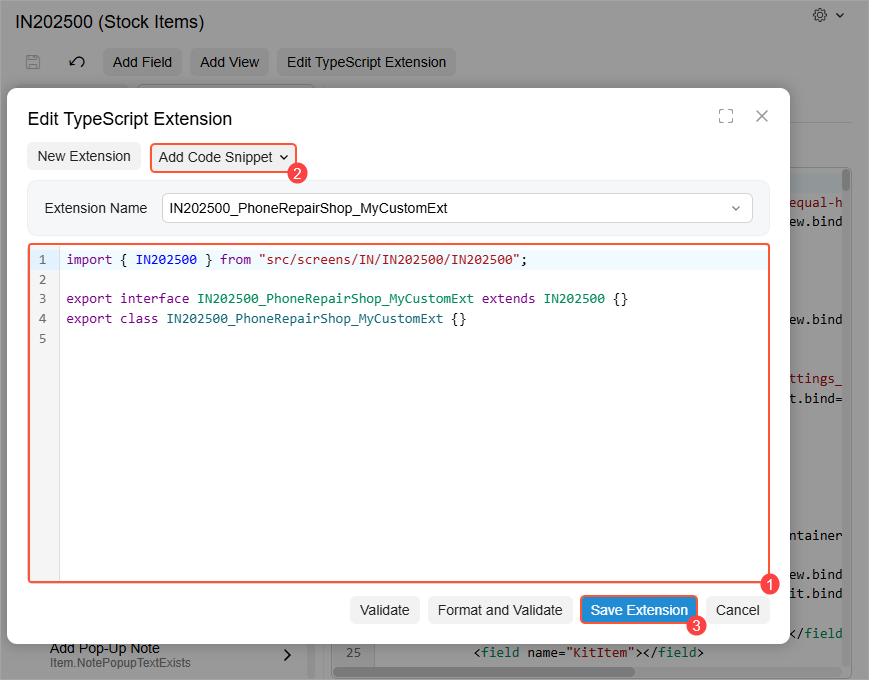
The system adds the file with the generated TypeScript extension to your customization project and lists it on the Modern UI Files page of the Customization Project Editor.
- To apply the changes, publish the customization project. The system validates and builds the frontend code, including the TypeScript extension.
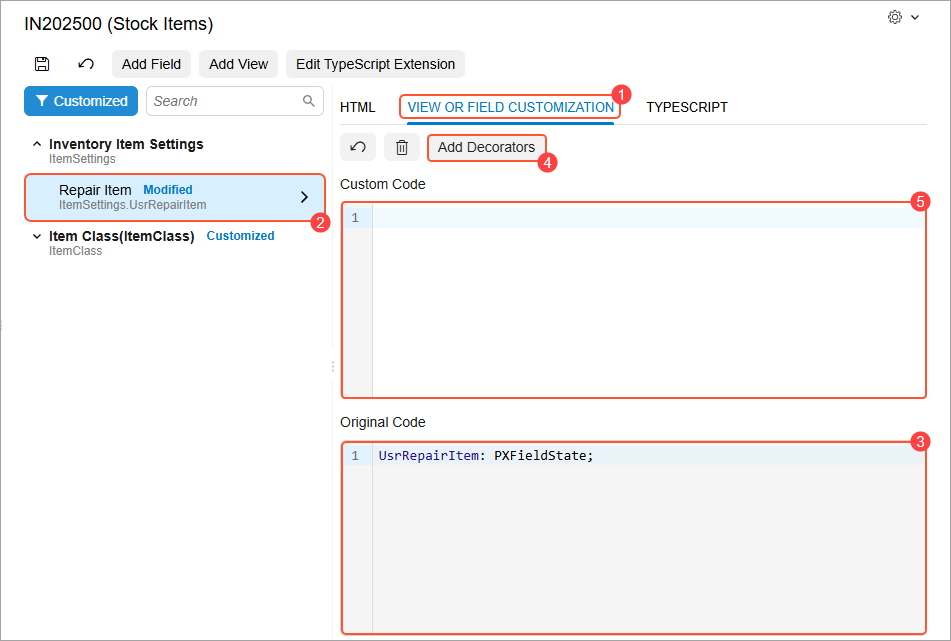
Adding Decorators to the Selected View or Field
You use the View or Field Customization tab (Item 1 below) of the Modern UI Editor page to view or customize the TypeScript properties of a view or field that is selected in the element tree (Item 2). The original code of the selected view or field is displayed in the Original Code area (Item 3).
You use the Add Decorators button (Item 4) on the tab toolbar to add new decorators to the selected view or field and customize the corresponding properties of each decorator. The added decorator code is displayed in the Custom Code area (Item 5). You can also manually write the code in this area to customize the TypeScript properties of a view or field.
For example, suppose that you need to specify that the UsrRepairItem field
should be disabled by default. This field is represented by the Repair
Item check box in the UI. You need to add the
@controlConfig<ICheckBoxControlConfig> decorator to this field and
set its enabled property to false. You’d perform the
following steps:
- Click the Add Decorators button on the tab toolbar (Item 1 below).
- In the dialog box that opens, in the left table, select the check box in the Selected column for the @controlConfig<ICheckBoxControlConfig> decorator (Item 2).
- In the right table, select the check box in the Selected column for the enabled property (Item 3) and clear the corresponding check box in the Value column (Item 4).
- Click Add (Item 5).
Figure 10. The Add Decorators dialog box 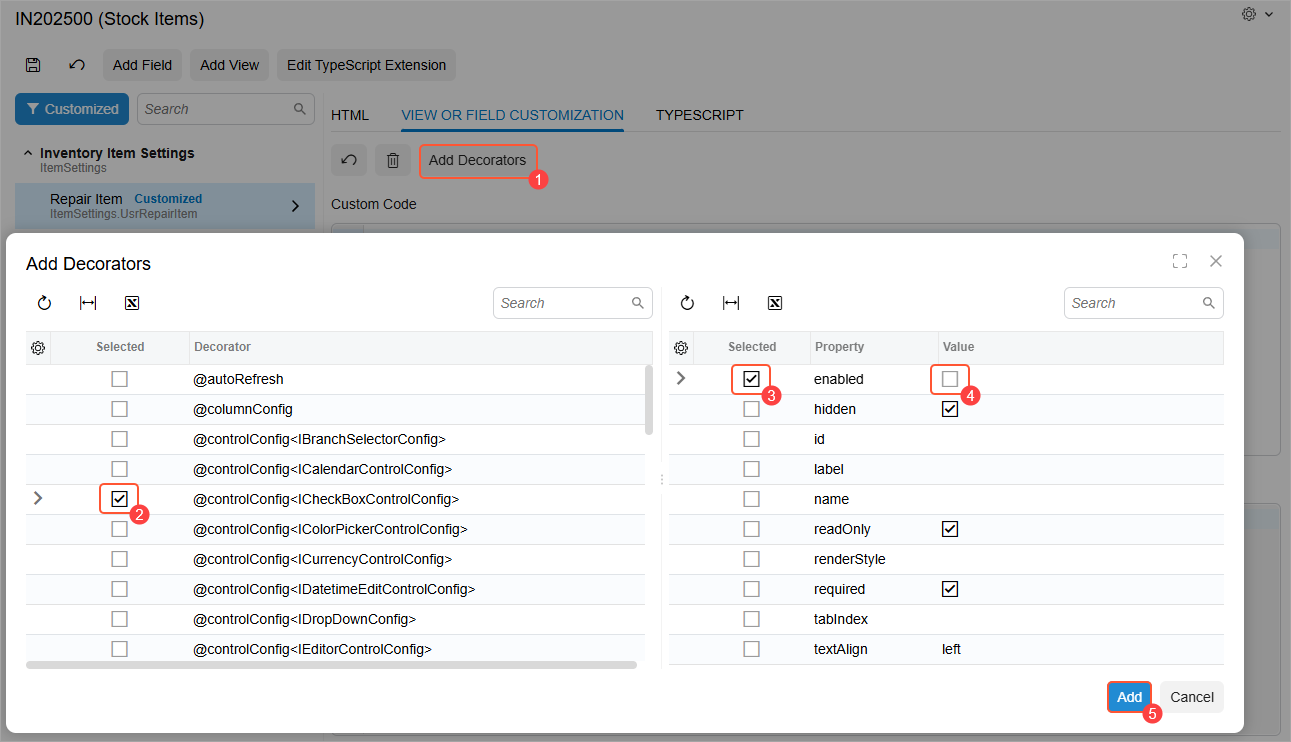
- The added decorator code is displayed in the Custom Code area (Item 1 below).
- Click Save on the page toolbar (Item 2).
Figure 11. The added decorator code 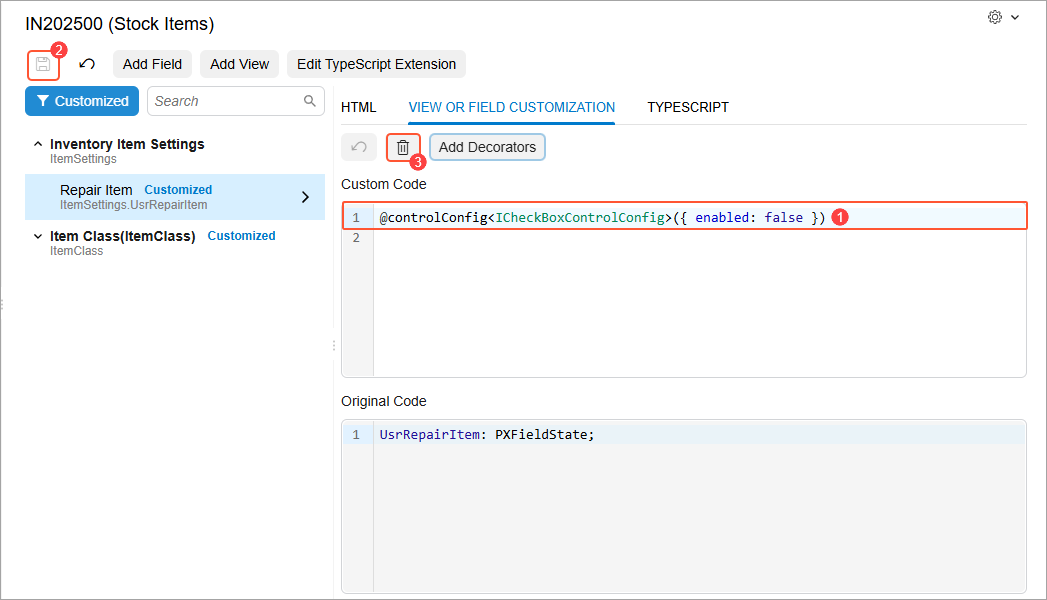
The system updates the corresponding TypeScript extension file with the added code.
- To apply the changes, publish the customization project.
To remove the decorator code at any time, you click Delete (Item 3 above) and then Save on the page toolbar. To apply the changes, publish the customization project again.
Learn More
For more details about writing TypeScript and HTML code, see our UI Developer Guide.