
MYOB IMS Payroll 6.52 release notes
Introduction
What’s New in this Release?
The release updates MYOB IMS Payroll to calculate Annual Leave in weeks. Annual Leave balances are displayed in weeks as well as hours/days, and a new Agreed Definition of a Week can be specified for each employee. This simplifies leave management, and means that daily/hourly balances can be automatically adjusted when an employee’s work schedule changes, to hold a consistent weekly balance.
For background information on these changes, and considerations when upgrading the system, see the document “Managing Annual Leave in Weeks” on the .
The changes in this release were introduced in the 6.51 release, which was a pilot release that was not made generally available.
Installing Your Upgrade
Desktop Installation
Before you install this version:
-
Close all “Open” payroll periods in your payroll companies.
-
Back up each of your payroll companies, via the Tools menu, after closing the last payroll period processed in each company.
-
Close all IMS applications on your PC.
Uninstalling an earlier version of IMS Payroll prior to installing this version is not recommended or required as any custom payroll software and modules will need to be reinstalled.
If you’re downloading the installer:
-
Double-click the executable file that you download (.exe as contained in the link).
-
You need to install the new version on every computer that has MYOB IMS Payroll installed.
IMS Payroll Cloud Installation
-
Log in to IMS Payroll Cloud.
-
Click the gold Upgrade button that appears at the bottom left of your screen. The Upgrade button will only appear when you click on a company with the “Closed” status.
-
Repeat for each payroll company you manage.
After installing, log in to a payroll company, go to Help > About IMS Payroll Partner and check that the version is Version July 2020.
If you have any issues, please call us on 0800 600 110.
New Features
Annual Leave Enhancements
MYOB IMS Payroll now calculates and reports Annual Leave in weeks. A number of changes have been made to options, record entry screens and reports to support these enhancements.
Before You Begin
Prior to adopting these changes, we recommend that you perform a backup and print the Annual Leave report for all employees.
You may also find it useful to review the impact of these changes on your data in a test copy of your database. To do this, wtestto p
create a test payroll company
-
ptest.
-
,e.g. C,a new,e.g. C.
-
.
-
the ,e.g.C
Enabling Weekly Annual Leave
After upgrading to this release, the option to use weekly Annual Leave rates is disabled—you can enable the option once you and your employees are ready. Make sure to read all of the documentation below before activating weekly Annual Leave.
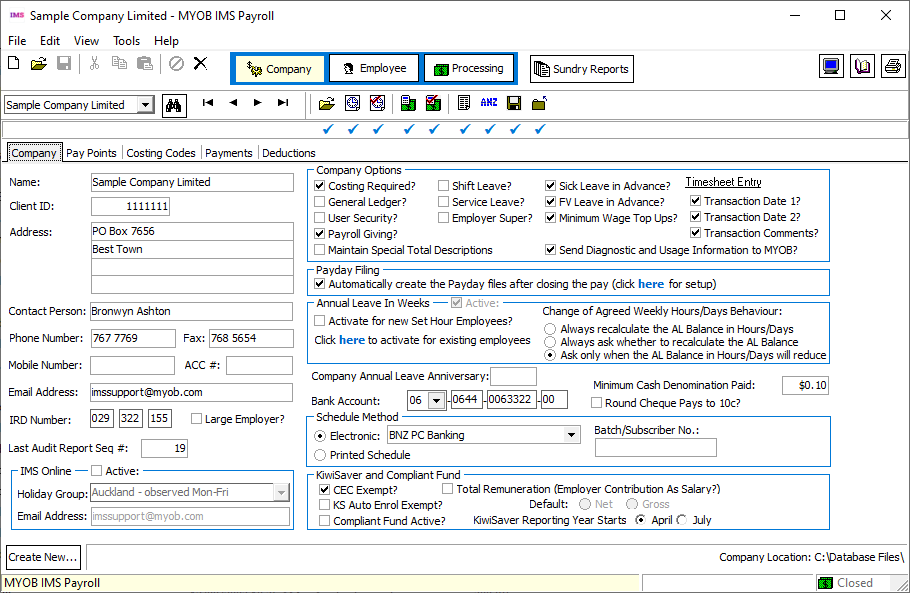
To activate the weekly Annual Leave method, make sure all pays are closed, then tick Active at the top of the new Annual Leave in Weeks section on the Company Information screen:
Ticking the Active option opens an information window with a message that you must accept before confirming the change:
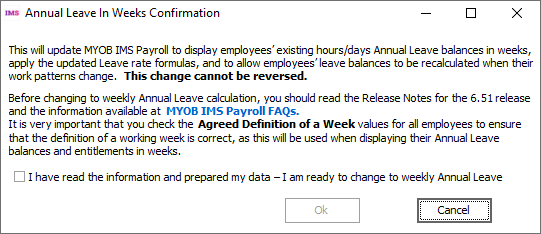
This change is irreversible. Once you have activated the weekly method, it cannot be deactivated.
The new Annual Leave in Weeks section contains options to set any new Set Hours employees to calculate Annual Leave weekly by default, and to update all existing Set Hours employees to weekly Annual Leave.
You do not have to set all employees to use weekly Annual Leave—the option to calculate Annual Leave in weeks can be set for each employee individually—see “Employee Settings” on page 4.
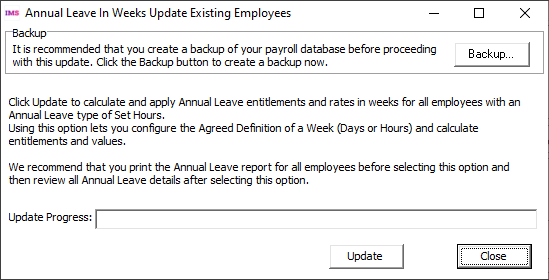
This second option opens a window that lets you confirm the operation and shows its progress:
The new section also contains options that affect the system’s behaviour when an employee’s Agreed Definition of a Week changes—see “Agreed Definition of a Week” on page 6.
Employee Settings
New settings are available on the Employee Information > Leave tab. To make room for these settings, the Leave tab has been separated into two sub-tabs: Annual Leave and Other Leave. The Other tab contains all existing settings related to Sick Leave, Family Violence Leave, Alternative Holiday Leave, Time in Lieu and Annual Leave cash-ups; the Annual Leave tab contains the existing Annual Leave settings, as well as new settings for calculating Annual Leave in weeks:
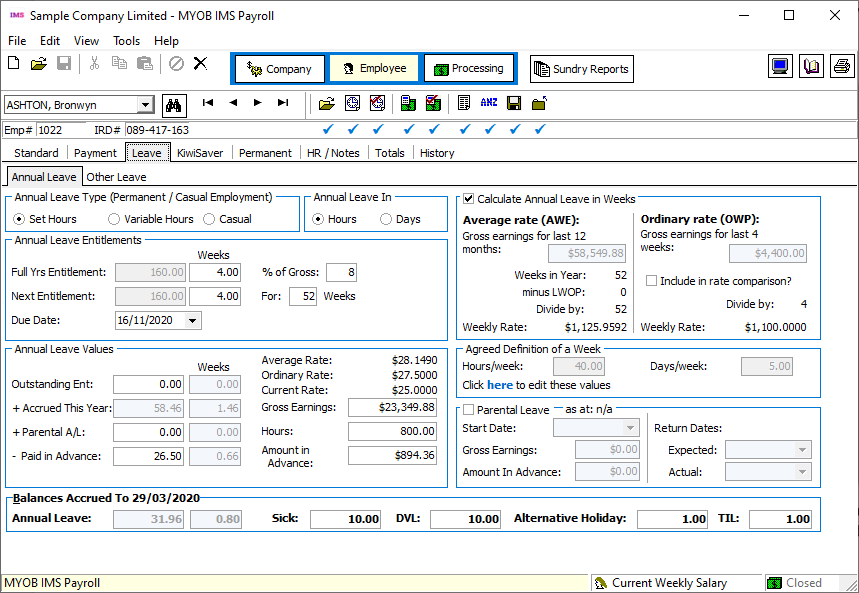
Ticking the Calculate Annual Leave in Weeks option has the following effects:
-
The settings in the Calculate Annual Leave in Weeks and Agreed Definition of a Week sections become active.
-
A Weeks column appears next to the Annual Leave entitlement and balance units on this tab, showing the units in weeks as well as hours/days.
-
The Average Weekly Earnings (AWE) and Ordinary Weekly Pay (OWP) rates for the employee use the new Agreed Definition of a Week values to calculate a daily or hourly rate.
A new Current Rate field has also been added to the Annual Leave Values section.
A new Include in rate comparison? option is available for the OWP rate. For monthly employees, the OWP divisor is always 4, which can cause the OWP rate to be inflated, since there are on average 4.33 weeks in a month. If this option is unticked (the default), the Ordinary Rate will be excluded from rate comparisons, i.e. the system will ignore the Ordinary Rate and use the higher of the Average Rate or Current Rate. If this option is ticked, the system will use the higher of the Average Rate, Ordinary Rate or Current Rate.
When employees are on weekly Annual Leave and the new AWE calculation is in use, you should not enter multiple pays into a single pay period, e.g. entering multiple weeks’ pay into one pay run over the Christmas shutdown period. Doing this will increase the Gross earnings in a pay period and could lead to an inflated AWE rate.
Agreed Definition of a Week
The fields in the Agreed Definition of a Week section are used to calculate the employee’s hourly or daily balances and entitlements. They represent what is agreed as constituting a working week for the employee—these values will be used when converting between weeks and days/hours. The default values are based on employees’ usual days/hours, but they should be reviewed for all employees.
For employees with variable hours that change from week to week, talk to an expert for advice on how to enter their Agreed Definition of a Week. Remember that the definition must be agreed on by the employer and employee.
Click the here link below these fields to open a window that lets you edit the Agreed Definition of a Week values:
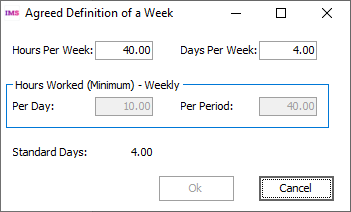
If an employee’s Agreed Definition of a Week values change at any time, this will cause their hourly or daily Annual Leave balance and entitlement to be recalculated to match the new Agreed Definition of a Week.
Options for how employees’ balances will be affected are available under Change of Agreed Weekly Hours/Days Behaviour on the Company Information tab:
Selecting Always recalculate the AL Balance in Hours/Days means that when an employee’s Agreed Definition of a Week changes, their hourly/daily Annual Leave balance will be recalculated automatically. This option ensures that balances are always adjusted whenever the Agreed Definition of a Week is edited.
An information window appears, showing the new balances and entitlements in weeks as well as in days/hours:
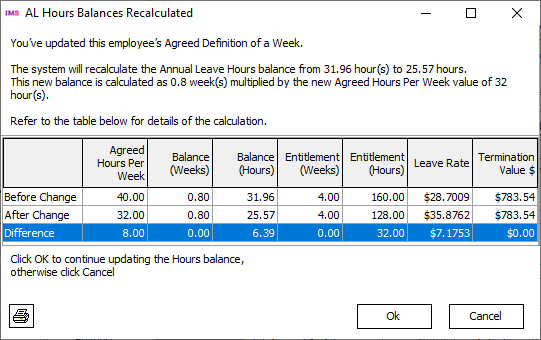
(The user has the option of clicking Cancel at this point if they do not want to make the changes to the Agreed Definition of a Week—the new balance and entitlement values are not applied until the user clicks OK.)
Selecting Always ask whether to recalculate the AL Balance means that users can choose to recalculate or not on a case by case basis. The following message window appears when an employee’s Agreed Definition of a Week changes:
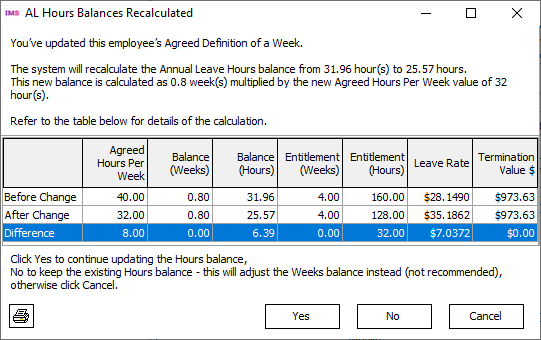
This window has the following options:
-
Yes – The employee’s hourly/daily balance and entitlement will be recalculated as displayed on the window.
-
No – The hourly/daily balance will remain the same and the employee’s weekly balance and entitlement will be recalculated. (This is not recommended.)
-
Cancel – The change to the employee’s Agreed Definition of a Week is not saved.
In all cases, you can click the Print Screen button in the bottom left of the window to print or save a capture of this window for your records.
Selecting Ask only when the AL Balance on Hours/Days will reduce means that the user is only asked if they want to update or keep the hours/days values if the change to the Agreed Definition of a Week would result in a reduction of the employee’s hour/daily balance and entitlement. If the change means the employee’s hourly/daily values would stay the same or increase, the system will behave the same as when the Always recalculate the AL Balance in Hours/Days option is selected. (This is the default.)
If you choose not to recalculate the AL Balance when an employee’s Agreed Definition of a Week changes, it will affect the employee’s leave balance and how leave is paid.
Employee Leave Earnings History
New columns have been added to the Employee Information > History > Leave Earnings tab to display historical information about the employee’s Agreed Definition of a Week, as well as any weeks of Leave Without Pay they have taken (see below).
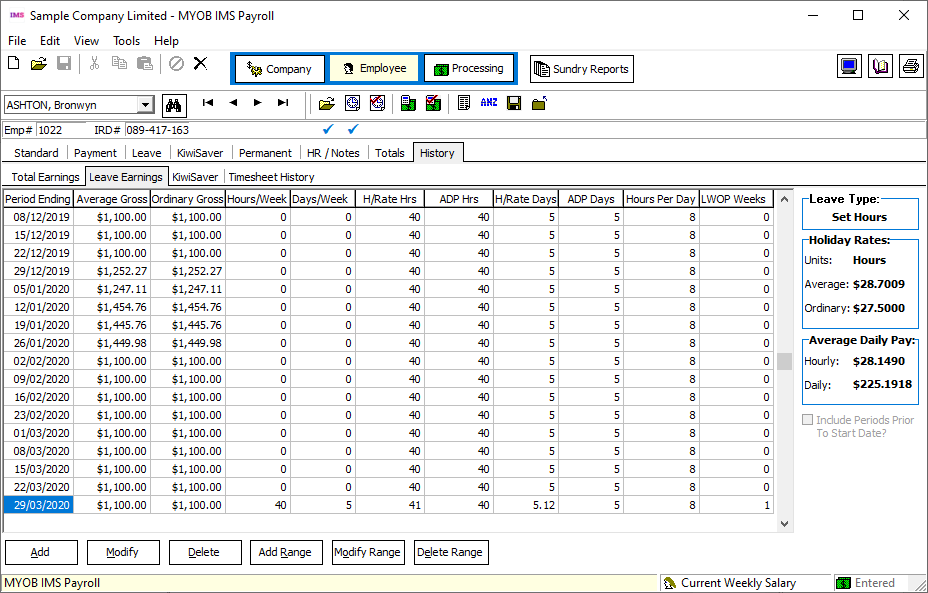
Processing Leave Without Pay
Leave Without Pay (LWOP) of more than one continuous week affects an employee's entitlement to Annual holidays. In this case, you must either:
-
move the employee's Holiday Pay anniversary date forward one week for each whole or partial week of LWOP taken beyond the first (e.g. two weeks of LWOP means that the anniversary date should be moved forward by one week), or when agreement exists to do so, you can
-
reduce the AWE divisor by one for each whole or partial week of LWOP taken beyond the first (e.g. three weeks of LWOP means the divisor should be reduced by two weeks, so gross earnings are divided by 50 weeks instead of the usual 52 to calculate AWE).
This does not apply to all kinds of unpaid leave, e.g. unpaid sick leave, unpaid parental leave, voluntary service or leave on ACC are exempt from this—see for more information.
This release contains several updates that let you process LWOP in this scenario.
These updates are only available when the Annual Leave in Weeks functions are enabled—see page 2.
If an employee has any LWOP weeks at the time they are moved to weekly Annual Leave, this should be entered into the Employee > Leave Earnings History tab (select the relevant week(s) and click Modify).
Updates to Payments
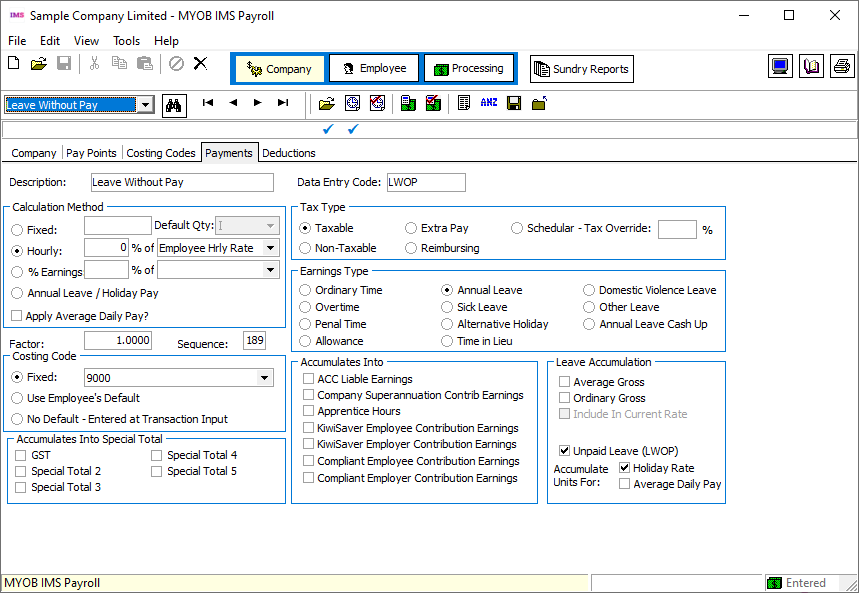
The Unpaid Leave setting on the Company Payments tab has been renamed to Unpaid Leave (LWOP) to indicate that any payment with this option will be treated as Leave Without Pay:
Updates to Timesheets
After adding a payment that has been marked as unpaid leave to an employee’s timesheet, a new Enter Units window opens:
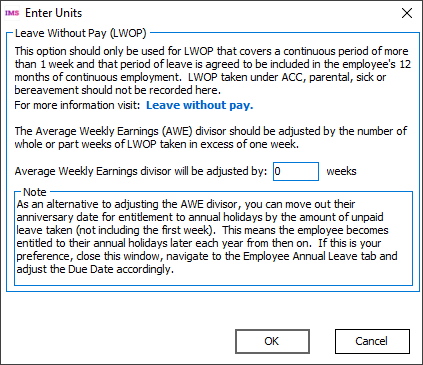
This window only appears when adding payments that have the Unpaid Leave (LWOP) option ticked, and do not have one of the exempt leave types selected under Earnings Type.
If you want to reduce the employee’s AWE divisor, enter the number of weeks to reduce it by on this window. Remember, the divisor should be reduced by one for each whole or partial week of LWOP taken beyond the first.
For example:
-
if the employee takes 1 week of LWOP only, the divisor does not need to be reduced
-
if the employee takes 1.5 continuous weeks of LWOP, the divisor should be reduced by 1 week
-
if the employee takes 2 continuous weeks of LWOP, the divisor should be reduced by 1 week
-
if the employee takes 3 continuous weeks of LWOP, the divisor should be reduced by 2 weeks
A new LWOP Weeks field on the Timesheets tab displays the number of weeks you entered on the Enter Units window:
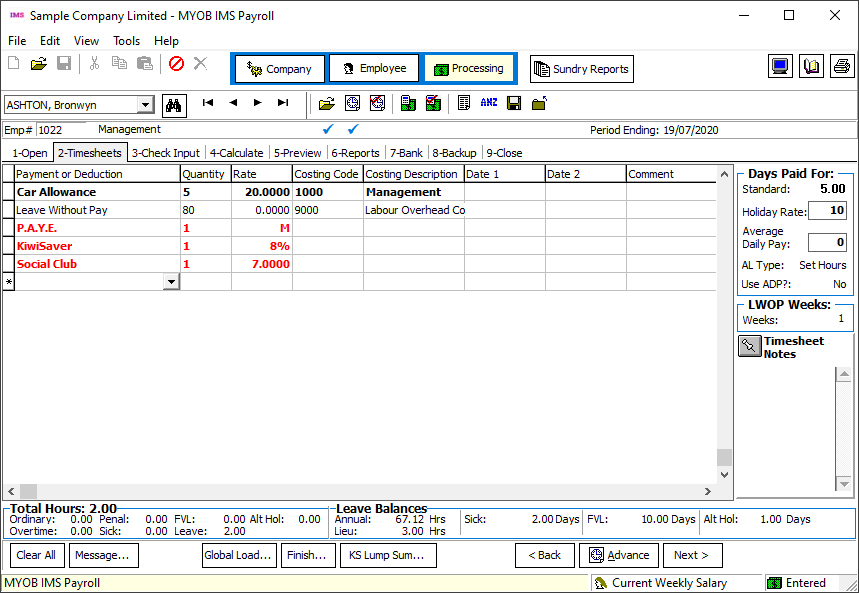
This number is also displayed in Average rate (AWE) section of the Employee Leave tab (see page 6) and on the Leave Earnings History tab (see page 8).
Reporting and Payslips
Weekly Annual Leave units are now shown on employee’s payslips, if the new AL In Weeks Balance? report option is selected.
Weekly units have also been added to the Annual Leave Reports and other places where employees’ Annual Leave units are shown, e.g. the Employee Inquiry window.
Public Holidays and Termination Pay
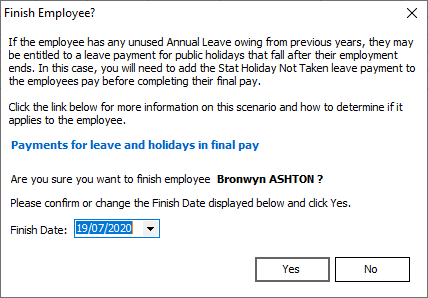
In some cases, a departing employee with unused Annual Leave may be entitled to for public holidays that fall after their employment ends—see for information on this scenario and how to determine if it applies to a departing employee.
When entering a Finish Date for an employee, a new message warns about this scenario and includes a link to the information on the Employment New Zealand website:
Task Checklist
Before you begin setting up your IMS Payroll you need to make some decisions about how you want to manage Annual Leave in the system. You may need to discuss some of these changes with employees before enabling them and collect the relevant information to allow the setup of employee records.
|
Task |
Completed |
|
|
1. |
Read and understand all product documentation. Where necessary seek legal advice prior to implementing changes. |
|
|
2. |
Decide whether you will switch all employees to using Weeks, or a subset of employees. Decide whether all new employees will use the Weeks function. |
|
|
3. |
Review employees’ current balances in Hours or Days and adjust if necessary. |
|
|
4. |
Decide as an employer how you will treat recalculation of leave balances and choose the relevant setting in If you have not recalculated leave balances in the past you may need discuss the implications of this change with your employees. |
|
|
5. |
Review and form agreement on each employees’ “Agreed Definition of a Week”. Where it is unclear, you may need to review historical work patterns to determine what this should be. |
|
|
6. |
Review which employees’ Ordinary Weekly earnings are not easily determined and therefore need the OWP 4 weekly average option turned on in the employee leave screen. |
|
|
7. |
Decide how you will manage periods of (i.e. moving the anniversary date or recording a period of Unpaid Leave). If you decide to begin recording Leave without Pay you may need to enter periods of Unpaid Leave into the Leave History screen. Identify any periods of Leave without Pay greater than 1 week which have occurred in the past year and which may need to be recorded in the Leave History. |
|
|
We recommend making your planned changes in a test database prior to making them in your live production payroll system. This will allow you to review the changes and address any issues you may identify prior to going live in your production payroll. |
We recommend making your planned changes in a test database prior to making them in your live production payroll system. This will allow you to review the changes and address any issues you may identify prior to going live in your production payroll. |
We recommend making your planned changes in a test database prior to making them in your live production payroll system. This will allow you to review the changes and address any issues you may identify prior to going live in your production payroll. |
|
8. |
Back up your data. |
|
|
9. |
Create a copy of your database to test the changes in prior to going live. Refer to . |
|
|
10. |
Print “Sundry Reports > Leave rate –Detail ” so you can compare any changes after switching any employee settings. |
|
|
11. |
Turn on the Weeks function in . |
|
|
12. |
Set the as per your decision at Task 4. |
|
|
13. |
Turn on for relevant employees as per task 2. |
|
|
14. |
Enter the for each employee as per task 5. |
|
|
15. |
Turn on the for any employee who requires it as per task 6. |
|
|
16. |
If required enter any periods of Unpaid Leave greater than 1 week in the screen (refer to Task 7). |
|
|
17. |
Review the Employee entitlements and Leave rates via the “Annual Leave – Accumulators” and “Sundry Reports > Leave rate – Detail ” reports. |
|
|
When you are satisfied with the changes you are ready to make these changes to your live IMS Payroll data. Be sure to allow sufficient time to complete these changes prior to your next pay period. |
When you are satisfied with the changes you are ready to make these changes to your live IMS Payroll data. Be sure to allow sufficient time to complete these changes prior to your next pay period. |
When you are satisfied with the changes you are ready to make these changes to your live IMS Payroll data. Be sure to allow sufficient time to complete these changes prior to your next pay period. |
|
18. |
Back up your data. |
|
|
19. |
Print “Sundry Reports > Leave rate – Detail” so you can compare any changes after switching any employee settings. |
|
|
20. |
Turn on the Weeks function in . |
|
|
21. |
Set the as per your decision at Task 4. |
|
|
22. |
Turn on for relevant employees as per task 2. |
|
|
23. |
Enter the for each employee as per task 5. |
|
|
24. |
Turn on the average for any employee who requires it as per task 6. |
|
|
25. |
If required enter any periods of Unpaid Leave greater than 1 week in the screen (refer to Task 7). |
|
|
26. |
Review the Employee entitlements and Leave rates via “Annual Leave – Accumulators” and “Sundry Reports > Leave rate –Detail ” report. |