
Sales of Stock Items: Process Activity
The following activity demonstrates how to prepare and process to completion a sales order with manual allocation of stock items.
Video Tutorial
This video shows you the general process but may contain less detail than the activity has. If you want to repeat the activity on your own or you are preparing to take the certification exam, we recommend that you follow the instructions in the steps of the activity. This video shows the Classic UI and may not match the system's current appearance.
Story
Suppose that you are Grace Norman, a sales manager of the SweetLife Fruits & Jams company. On January 30, 2026, the GoodFood One Restaurant wholesale customer has ordered a large amount of orange and apple jams in 96-ounce jars from the main office of SweetLife, where you are employed, for the café's baking needs. The ordered jams are stored in the warehouse of the SweetLife’s main office. You, as a sales manager, need to enter and process the appropriate documents.
Configuration Overview
In the U100 dataset, for the purposes of this activity, the following tasks have been performed:
- On the Enable/Disable Features (CS100000) form, the following features
have been enabled:
- Inventory and Order Management, which provides the standard functionality of inventory and order management
- Inventory, which gives you the ability to maintain stock items by using forms related to the inventory functionality and to create and process sales and purchase documents that include stock items
- On the Order Types (SO201000) form, the SO order type has been configured and activated.
- On the Customers (AR303000) form, the GOODFOOD (GoodFood One Restaurant) customer has been configured.
- On the Stock Items (IN202500) form, the APJAM96 and ORJAM96 stock items have been configured.
- On the Warehouses (IN204000) form, in the WHOLESALE warehouse, which has been configured, sufficient quantities of the APJAM96 and ORJAM96 items are on hand.
Process Overview
To perform a sale of stock items with manual allocation, you create a sales order on the Sales Orders (SO301000) form, select the customer to which the items are being sold, add items to the order, and reserve the items in inventory. Then you create a shipment document on the Shipments (SO302000) form. On this form, you confirm the settings that the system has inserted automatically based on the sales order, and then confirm the shipment. After shipment confirmation, you use the Invoices (SO303000) form to prepare a corresponding invoice to the customer and release it.
System Preparation
Before you start performing a sale of stock items with manual allocation, you should do the following:
- Launch the MYOB Acumatica website with the U100 dataset preloaded, and sign in to the system as sales manager Grace Norman by using the norman username and the 123 password.
- In the info area at the upper-right corner of the top pane of the MYOB Acumatica screen, make sure that the business date is set to 1/30/2026. If a different date is displayed, click the Business Date menu button and select 1/30/2026 from the calendar. For simplicity, you'll create and process all documents in this activity using this business date.
- On the Company and Branch Selection menu, in the top pane of the MYOB Acumatica screen, make sure the SweetLife Head Office and Wholesale Center branch is selected.
Step 1: Creating a Sales Order
To create a sales order, do the following:
- On
the Sales Orders
(SO301000) form, create a sales order, and specify
the following settings:
- Order Type: SO
- Customer: GOODFOOD
- Date: 1/30/2026
- Requested On: 1/30/2026
- Description: Orange and apple jams
Tip: To open the form for creating a new record, type the form ID in the Search box, and on the Search form, point at the form title and click New right of the title. - On the table toolbar of the Details tab, click Add Row.
- Specify the following settings in the added row:
- Inventory ID: APJAM96
- Warehouse: WHOLESALE
- Quantity: 20
- Unit Price: 45.15
- On the table toolbar, click Add Row.
- Specify the following settings in the added row:
- Inventory ID: ORJAM96
- Warehouse: WHOLESALE
- Quantity: 20
- Unit Price: 35.99
- On the form toolbar, click Save.
The sales order is saved with the Open status.
Step 2: Allocating Inventory Items
To manually allocate the inventory items for the sales order you have created, while you are still viewing the sales order on the Sales Orders (SO301000) form, do the following:
- On the Details tab, click the APJAM96 line, and review the Allocated quantity for the APJAM96 inventory item in the table footer (which is currently equal to 0 because the system does not automatically allocate stock items for SO orders).
- On the table toolbar, click Line Details.
- In the Line Details dialog box, which opens, make sure that WHOLESALE is selected in the Alloc. Warehouse column of the only row.
- Select the Allocated check box for the allocation line.
- Click OK to save the created allocation and close the dialog box.
- In the table footer, review the Allocated quantity, and notice that it is now equal to the quantity specified in the line, which means that the item has been allocated in inventory.
- On the form toolbar, click Save.
- Click the ORJAM96 line, and review the Allocated quantity for the ORJAM96 stock item in the table footer (which is currently equal to 0 because the system does not automatically allocate stock items for SO orders).
- On the table toolbar, click Line Details.
- In the Line Details dialog box, which opens, make sure that WHOLESALE is selected in the Alloc. Warehouse column of the only row.
- Select the Allocated check box for the allocation line.
- Click OK to save the created allocation and close the dialog box.
- In the table footer, review the Allocated quantity, and notice that it is now equal to the quantity specified in the line, which means that the item has been allocated in inventory.
- On the form toolbar, click Save.
You have manually allocated the inventory items for the sales order. Now you need to create a shipment document for the sales order.
Step 3: Creating a Shipment
To create a shipment, do the following:
- While you are still viewing the sales order you have created on the Sales Orders (SO301000) form, on the form toolbar, click Create Shipment.
- In the Specify Shipment Parameters dialog box, which opens, make sure that the 1/30/2026 date and the WHOLESALE warehouse are selected, and click OK. The system closes the dialog box, creates a shipment, and opens it on the Shipments (SO302000) form.
Step 4: Confirming the Shipment
To confirm the shipment, do the following:
- While you are still viewing the shipment on the Shipments (SO302000) form, review the lines on the Details tab. Make sure that both order lines have been included in the shipment and that the shipped quantity in both lines is equal to the ordered quantity.
- In both lines, specify Main in the Location column.
- On the form toolbar, click Confirm Shipment.
The shipment is assigned the Confirmed status. Now you can prepare the invoice to bill the customer and increase the customer's debt in the system.
Step 5: Processing the Invoice
To prepare and release the invoice, do the following:
- While you are still viewing the shipment on the Shipments (SO302000) form, on the form toolbar, click Prepare Invoice. The system prepares the invoice and opens it on the Invoices (SO303000) form.
- On this form, review the details of the prepared invoice. The invoice has two lines, as the initial sales order does. In the Shipment Nbr. and Order Nbr. columns of the Details tab, notice that the system has inserted the reference number links to the related shipment and sales order.
- On the form toolbar, click Release to release the invoice. Wait for the system to complete the operation.
- Return to the Sales Orders (SO301000) form, and open the sales order that you have processed.
- On the Shipments tab, in the only row, click the link in the Inventory Ref. Nbr. column to view the inventory issue that was generated when you released the invoice.
- On the Issues (IN302000) form, which
opens in a pop-up window,
review the details of
the inventory issue, shown in the following
screenshot. Make sure that
the issue has the
Released status, which means that the issue has been released and the
quantities of items in inventory have been decreased
appropriately.
Figure 1. Inventory issue generated on release of the invoice 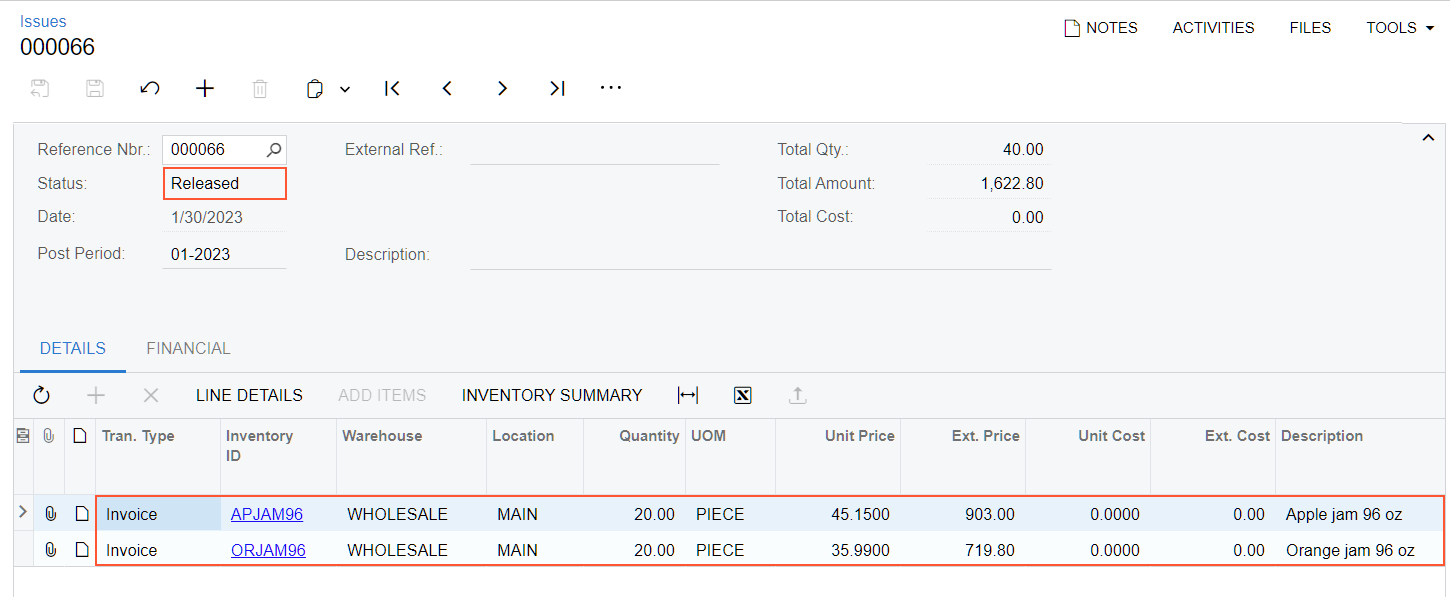
The sales order processing is now complete.
Activity Recap
In this activity, we have illustrated how the sales manager has done the following:
- Created a sales order for the items to be sold
- Manually allocated the inventory items for the sales order
- Created and confirmed the shipment of the items
- Prepared the invoice for the customer and has released it