
Multiple Bill Payments: Process Activity
The following activity will walk you through the process of creating and releasing a payment of multiple bills.
Video Tutorial
This video shows you the general process but may contain less detail than the activity has. If you want to repeat the activity on your own or you are preparing to take the certification exam, we recommend that you follow the instructions in the steps of the activity.
Story
Suppose that the SweetLife Fruits & Jams company occasionally buys glass jars and packaging for its products from the Jar Co. company (JARCO). Several bills for Jar Co. were entered in the system and the company wants to pay all of them with one payment. Also, another vendor, Frontsource Ltd. (FRONTSRC), has asked SweetLife to pay its bills in separate payments, and there are two bills in the amount of $153 and $62 that should be paid along with the Jar Co. bills.
Acting as a SweetLife accountant, you need to prepare a payment to pay bills in the amount of $45.50, $207, and $173.50 for the JARCO vendor and the two $153 and $62 bills for the FRONTSRC vendor.
Configuration Overview
For the purposes of this activity, the following features have been enabled on the Enable/Disable Features (CS100000) form:
- Standard Financials, which provides the standard financial functionality
- Multibranch Support, which supports multiple branches in your instance of MYOB Acumatica
- Multicompany Support, which supports multiple companies within one tenant.
On the Accounts Payable Preferences (AP101000) form, the Hold Documents on Entry check box has been selected in the Data Entry Settings section.
On the Vendors (AP303000) form, the JARCO (Jar Co.) and FRONTSRC (Frontsource Ltd.) vendors have been defined. These vendors have the CHECK payment method specified as the default one.
Process Overview
In this activity, you will use the Prepare Payments (AP503000) form to prepare one payment for multiple bills for each vendor, and review the available balance of the bank account. You will then print the payments on the Process Payments / Print Checks (AP505000) form and release the payments on the Release Payments (AP505200) form.
System Preparation
To prepare the system, do the following:
- Launch the MYOB Acumatica website, and sign in to a company with the U100 dataset preloaded. To
sign in as an accountant, use the following credentials:
- Username: johnson
- Password: 123
- In the info area, in the upper-right corner of the top pane of the MYOB Acumatica screen, click the Business Date menu button and select 2/1/2025. For simplicity, in this process activity, you will create and process all documents in the system on this business date.
- On the Company and Branch Selection menu, also on the top pane of the MYOB Acumatica screen, make sure that the SweetLife Head Office and Wholesale Center branch is selected. If it is not selected, click the Company and Branch Selection menu to view the list of branches that you have access to, and then click SweetLife Head Office and Wholesale Center.
Step 1: Selecting the Bills to be Paid
To select the bills to be paid, do the following:
- Open the Prepare Payments (AP503000) form.
- In the Summary area of the form, specify the following selection criteria to
filter the data shown in the table:
- Branch: HEADOFFICE (inserted by default based on the selected branch)
- Payment Method: CHECK
- Cash Account: 10200WH - Wholesale Checking
- Payment Date: 2/1/2025 (the current business date, which is inserted by default)
- Vendor: Empty
- Pay Date Within: Cleared
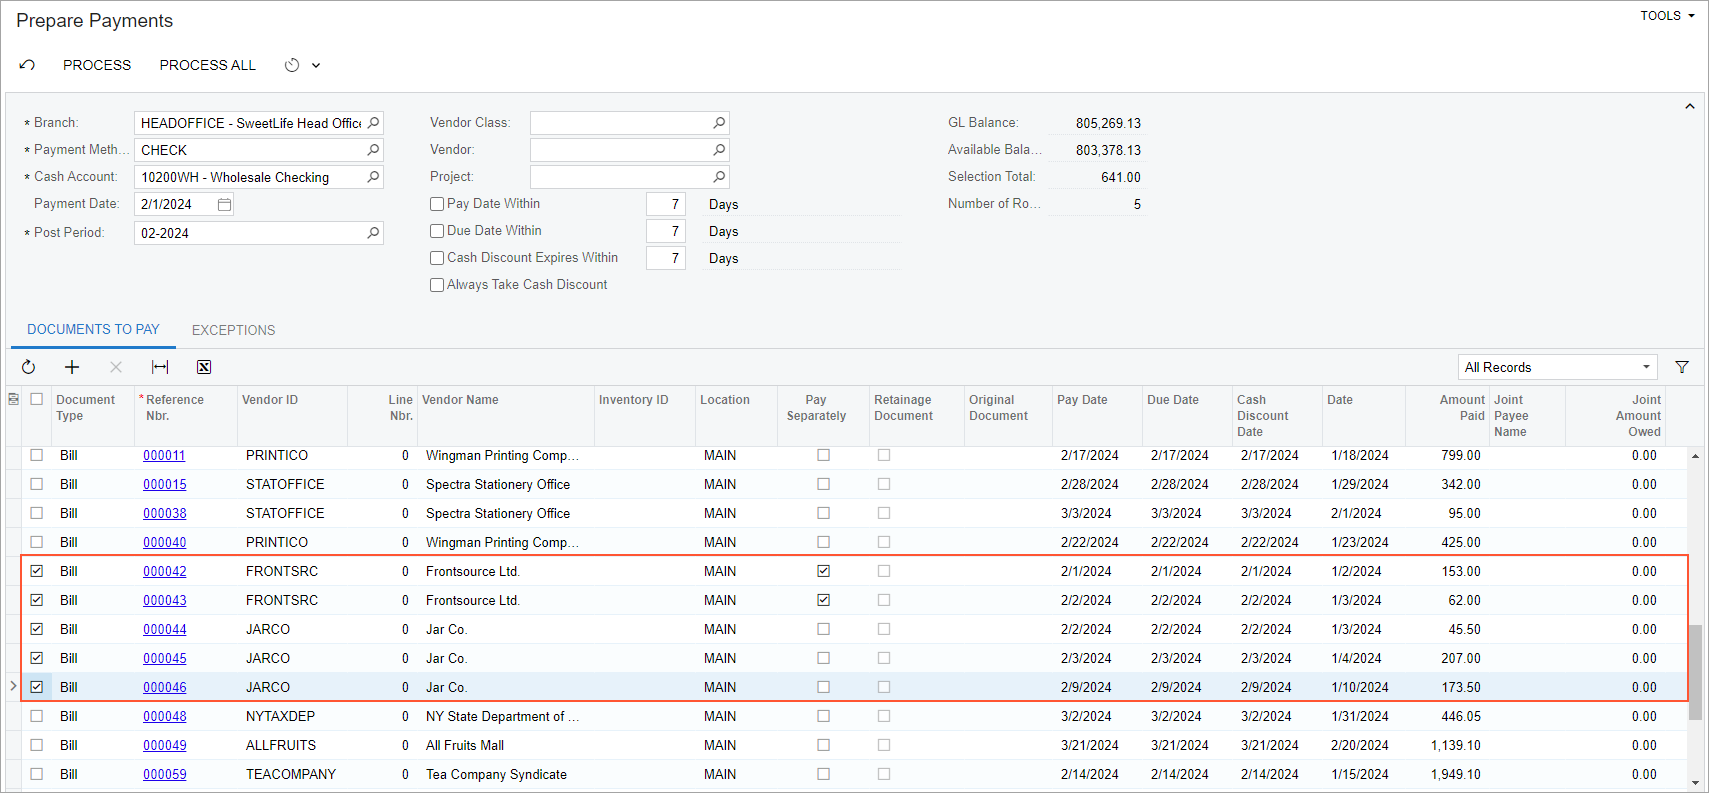
- In the table, review the three AP bills of the JARCO vendor in the amounts of $45.50, $207, and $173.50, as well as the two bills for the FRONTSRC vendor in the amounts of $153 and $62. Notice that the two bills for FRONTSRC have the check box selected in the Pay Separately column.
- Click the unlabeled check box in the row of each of the bills, and review the informational Selection Total and Number of Rows Selected boxes in the Summary area. These values show that there are 5 rows selected to be paid in the total amount of $641, as shown in the following screenshot.
Step 2: Preparing the Payments
To prepare the payments, do the following:
- While you are still on the Prepare Payments (AP503000) form, click Process on the form toolbar.
- On the Process Payments / Print Checks
(AP505000) form, which is opened with the payments
listed in the table and selected,
click
Process.
A separate browser tab is opened showing the printable version of the checks. Notice that the JARCO bills are paid with one payment and the bills for FRONTSRC are paid by two separate payments.
- Review the printable version of the checks, and close
the browser tab. (For the purposes of this process
activity, you do not need to actually print the
checks.)Tip:In a production setting, you would click Print on the form toolbar to print the checks before closing the browser tab.
Step 3: Releasing the Payments and Reviewing the GL Batches
To release the payments and review the GL batches, do the following:
- On the Release Payments (AP505200) form, which the system has opened, notice that the system has added rows with the payments and selected the unlabeled check boxes for them. On the form toolbar, click Process.
- In the Processing pop-up window, which is opened, click the Processed tab, and click the link in the Reference Nbr. column for the JARCO payment to open the payment on the Checks and Payments (AP302000) form.
- On the Application History tab of the Checks and Payments form, make sure the three bills to which the payment has been applied are listed in the table.
- On the Financial tab, click the link in the Batch Nbr. box to review the consolidated batch generated by the system, which is opened on the Journal Transactions (GL301000) form.
- In the Processing pop-up window, click the link in the Reference Nbr. column for one of the FRONTSRC payments.
- On the Application History tab of the Checks and Payments form, notice that the payment has been applied to one bill.