Assets with Depreciation: To Transfer Assets
The following activity will walk you through the process of transferring an asset with depreciation from one branch to another branch.
Story
Suppose that now that the software license has been split, you need to transfer one computer and one office software license from the Administrative department of the Head Office branch to the Development department of the Retail branch of SweetLife Fruits & Jams. Acting as a SweetLife accountant, you need to perform this transfer.
Configuration Overview
In the U100 dataset, the following tasks have been performed to support this activity:
- On the Enable/Disable Features (CS100000) form, the Fixed Asset Management feature has been enabled.
- On the Chart of Accounts (GL202500) form, the needed GL accounts have been created.
- On the Fixed Assets Preferences (FA101000) form, the Automatically Release Transfer Transactions check box has been selected.
Process Overview
In this activity, you will transfer assets to another branch on the Transfer Assets (FA507000) form and review the generated transactions on the Transactions tab of this form. On the Asset Balance by Accounts (FA403000) form, you will review the settings of one of the transferred assets, and on the Asset Transaction History (FA404000) form, you will review the transactions that updated this fixed asset.
System Preparation
Before you begin transferring assets with depreciation, do the following:
- Launch the MYOB Acumatica website with the U100 dataset preloaded, and sign in as an accountant by using the johnson username and the 123 password.
- In the info area, in the upper-right corner of the top pane of the MYOB Acumatica screen, click the Business Date menu button, and select 7/15/2025 on the calendar.
- In the company to which you are signed in, be sure that you have implemented the fixed asset functionality by performing the following prerequisite activities: Fixed Assets: To Configure the System for Fixed Asset Management, Fixed Assets: To Configure the Fixed Asset Functionality, and Fixed Assets: To Create Fixed Asset Classes.
- Make sure that you have created the fixed assets by performing the following prerequisite activities: Conversion of a Purchase: To Convert a Purchase to an Asset, Conversion of a Purchase: To Convert a Purchase to Multiple Assets, Fixed Asset Creation: To Create and Reconcile an Asset, Fixed Asset Creation: To Create an Asset with Multiple Units, and Non-Default Asset Settings: Process Activity.
- Make sure that you have created the Office software asset by performing the Fixed Asset Creation: To Create an Asset with Multiple Units prerequisite activity.
- Make sure that you have split the Office software asset by performing the Assets with Depreciation: To Split an Asset prerequisite activity.
- On the Company and Branch Selection menu on the top pane of the MYOB Acumatica screen, select the SweetLife Head Office and Wholesale Center branch.
Step 1: Reviewing the Fixed Asset Preferences
To review the fixed asset preferences, do the following:
- Open the Fixed Assets Preferences (FA101000) form.
- In the Posting Settings section, make sure that the Automatically Release Transfer Transactions check box is selected.
- On the form toolbar, click Save.
Step 2: Transferring the Assets
To transfer the assets from the Head Office branch to the Retail branch, do the following:
- Open the Transfer Assets (FA507000) form.
- In the Selection area, specify the following settings:
- Company: SWEETLIFE
- Transfer Date: 7/15/2025
- Transfer Period: 07-2025
- In the Asset Transfer From section, specify the following
settings:
- Branch: HEADOFFICE
- Department: ADMIN
- Asset Class: Cleared
- In the Asset Transfer To section, specify the following
settings:
- Branch: RETAIL
- Department: DEV
- Asset Class: Cleared
The system narrows the fixed assets displayed in the table based on the values specified in the Branch, Department, and Asset Class boxes of the Asset Transfer From section. After you specify these settings, the system displays the fixed assets that belong to the Administrative department of the HEADOFFICE branch.
- In the table, select the unlabeled check boxes in the rows of a Desktop computer asset and the Office software - split from 00000013 asset.
- On the form toolbar, click Process. The system generates the transfer transactions; it also releases them because the Automatically Release Transfer Transactions check box is selected on the Fixed Assets Preferences (FA101000) form.
- On the Fixed Assets (FA303000) form, open the Desktop
computer asset and review the Transactions tab,
as shown in the following screenshot.
Figure 1. Transfer transactions on the Transactions tab 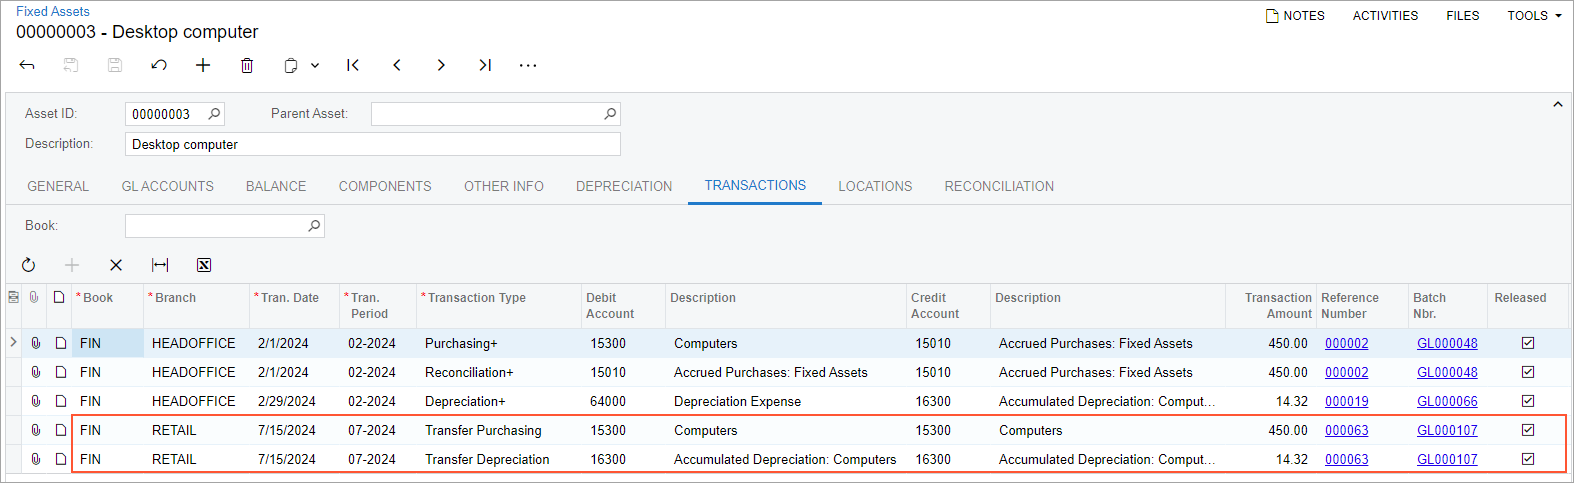
The system has created and released two transactions:
- A Transfer Purchasing transaction that records the transfer of the asset from one branch to another branch. This transaction debits the Fixed Asset account (15300) in the amount of the asset's current cost, and credits the Fixed Asset account (15300) in the same amount.
- A Transfer Depreciation transaction that transfers the accumulated depreciation between the branches. This transaction credits the Accumulated Depreciation account (16300) in the amount of the depreciation accumulated for the asset, and debits the Accumulated Depreciation account (16300) in the same amount.
Step 3: Reviewing the Account Balances for an Asset
To review the account balances for one of the transferred assets, do the following:
- Open the Asset Balance by Accounts (FA403000) form.
- In the Selection area, specify the following settings:
- Asset ID: Office software - split from 00000013
- Fin Period: 07-2025
- Book: FIN
In the selected period, the values in the Period to Date column convey that the amount of $150 (the asset's cost) was depreciated in the amount of $8.33 (the accumulated depreciation).
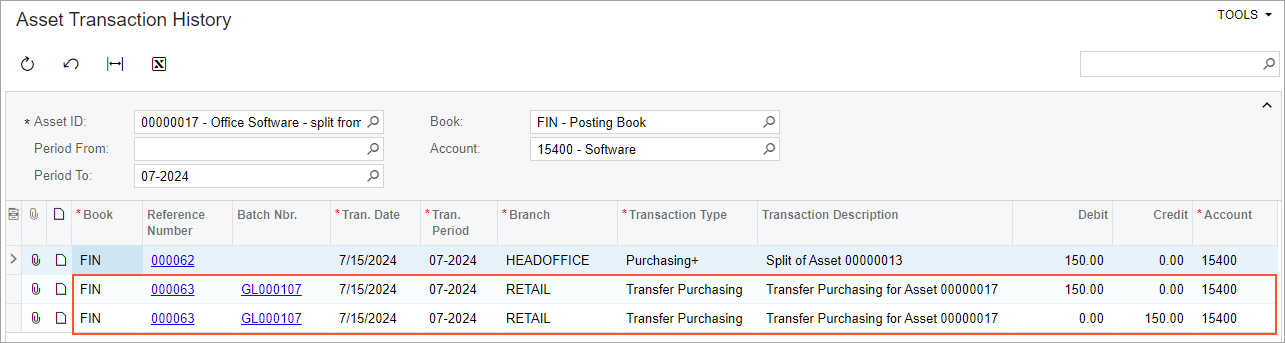
- In the table, click the line for the 15400 account, and on the form toolbar, click Asset Transaction History.
- On the Asset Transaction History (FA404000) form, which the system has
opened, review the transactions that update the selected account through the
07-2025 period, as shown in the following screenshot.
Figure 2. Transactions for the selected account