Conversion of a Purchase: To Convert a Purchase to Multiple Assets
The following activity will walk you through the process of converting a purchase to multiple fixed assets.
Story
Suppose that on February 1, 2025, SweetLife Fruits & Jams purchased three desktop computers for the HEADOFFICE branch, one server, and five anti-virus software licenses. Acting as a SweetLife accountant, you need to convert this purchase to multiple fixed assets.
Configuration Overview
In the U100 dataset, the following tasks have been performed to support this activity:
- On the Enable/Disable Features (CS100000) form, the Fixed Asset Management feature has been enabled.
- On the Chart of Accounts (GL202500) form, the needed GL accounts have been created.
- On the Vendors (AP303000) form, the COMPULINK vendor has been created.
- On the Fixed Assets Preferences (FA101000) form, the Automatically Release Acquisition Transactions check box has been cleared. With this check box cleared, acquisition transactions are created with the On Hold status, and you will have to release these transactions manually on the Release FA Transactions (FA503000) form.
Process Overview
In this activity, on the Bills and Adjustments (AP301000) form, you will create an AP bill with three lines for the purchase of computer equipment. On the Convert Purchases to Assets (FA504500) form, you will convert the bill lines to fixed assets. On the Release FA Transactions (FA503000) form, you will release the purchasing transactions. Finally, on the Fixed Assets (FA303000) form, you will review one of the created assets; then you will review the settings of its depreciation method on the Depreciation Table Methods (FA202600) form.
System Preparation
Before you begin converting a purchase to multiple fixed assets, do the following:
- Launch the MYOB Acumatica website with the U100 dataset preloaded, and sign in as an accountant by using the johnson username and the 123 password.
- In the info area, in the upper-right corner of the top pane of the MYOB Acumatica screen, click the Business Date menu button, and select 2/1/2025 on the calendar.
- In the company to which you are signed in, be sure that you have implemented the fixed asset functionality by performing the following prerequisite activities: Fixed Assets: To Configure the System for Fixed Asset Management, Fixed Assets: To Configure the Fixed Asset Functionality, and Fixed Assets: To Create Fixed Asset Classes.
- On the Company and Branch Selection menu on the top pane of the MYOB Acumatica screen, select the SweetLife Head Office and Wholesale Center branch.
Step 1: Creating a Purchasing Transaction
In this step, you will create an AP bill to record the purchase of the items. This bill causes the purchasing transaction to be generated. To create the bill, do the following:
- On the Bills and Adjustments (AP301000) form, add a new record.
- In the Summary area, specify the following settings:
- Type: Bill
- Vendor: COMPULINK
- Date: 2/1/2025
- Post Period: 02-2025 (inserted automatically)
- Description: Purchased computers and software
- On the Details tab, click Add Row
on the table toolbar, and specify the following settings in the first row:
- Branch: HEADOFFICE
- Transaction Descr.: Desktop computer
- Quantity: 3
- Unit Cost: 450
- Account: 15010 (Accrued Purchases: Fixed Assets)
- Click Add Row on the table toolbar again, and specify the
following settings in the second row:
- Branch: HEADOFFICE
- Transaction Descr.: Server
- Quantity: 1
- Unit Cost: 915
- Account: 15010 (Accrued Purchases: Fixed Assets)
- Click Add Row on the table toolbar again, and specify the
following settings in the third row:
- Branch: HEADOFFICE
- Transaction Descr.: Anti-virus software
- Quantity: 5
- Unit Cost: 330
- Account: 15010 (Accrued Purchases: Fixed Assets)
- On the form toolbar, click Save to save your changes.
- On the form toolbar, click Remove Hold, and then click Release to release the AP bill.
Step 2: Converting Fixed Assets
To covert the lines of the AP bill to fixed assets, do the following:
- Open the Convert Purchases to Assets (FA504500) form.
- In the Department box of the Selection area, select ADMIN.
- In the
Purchase
Transactions
table, in the row with an Orig. Amount of
3,915.00, select COMPUTERS in the Asset
Class column, and then select the unlabeled check box for the
row.
The system adds a line in the Fixed Assets table with the Create Asset check box selected.
- In the Fixed Assets table, in the Transaction Amount column, specify 450.
- In the Transaction Description column for the new row, specify Desktop computer.
- In the
Fixed
Assets
table, click Add Row on the table toolbar, and specify
the following settings in the row:
- Asset Class: COMPUTERS (inserted automatically)
- Transaction Amount: 450
- Transaction Description: Desktop computer
- Click Add Row again on the table toolbar to add the third
row, and specify the following settings for the row:
- Asset Class: COMPUTERS (inserted automatically)
- Transaction Amount: 450
- Transaction Description: Desktop computer
Notice that in the Purchase Transactions table, the Selected Amount is now 1,350.00. The following screenshot shows the three converted fixed assets.
Figure 1. A bill converted into three fixed assets 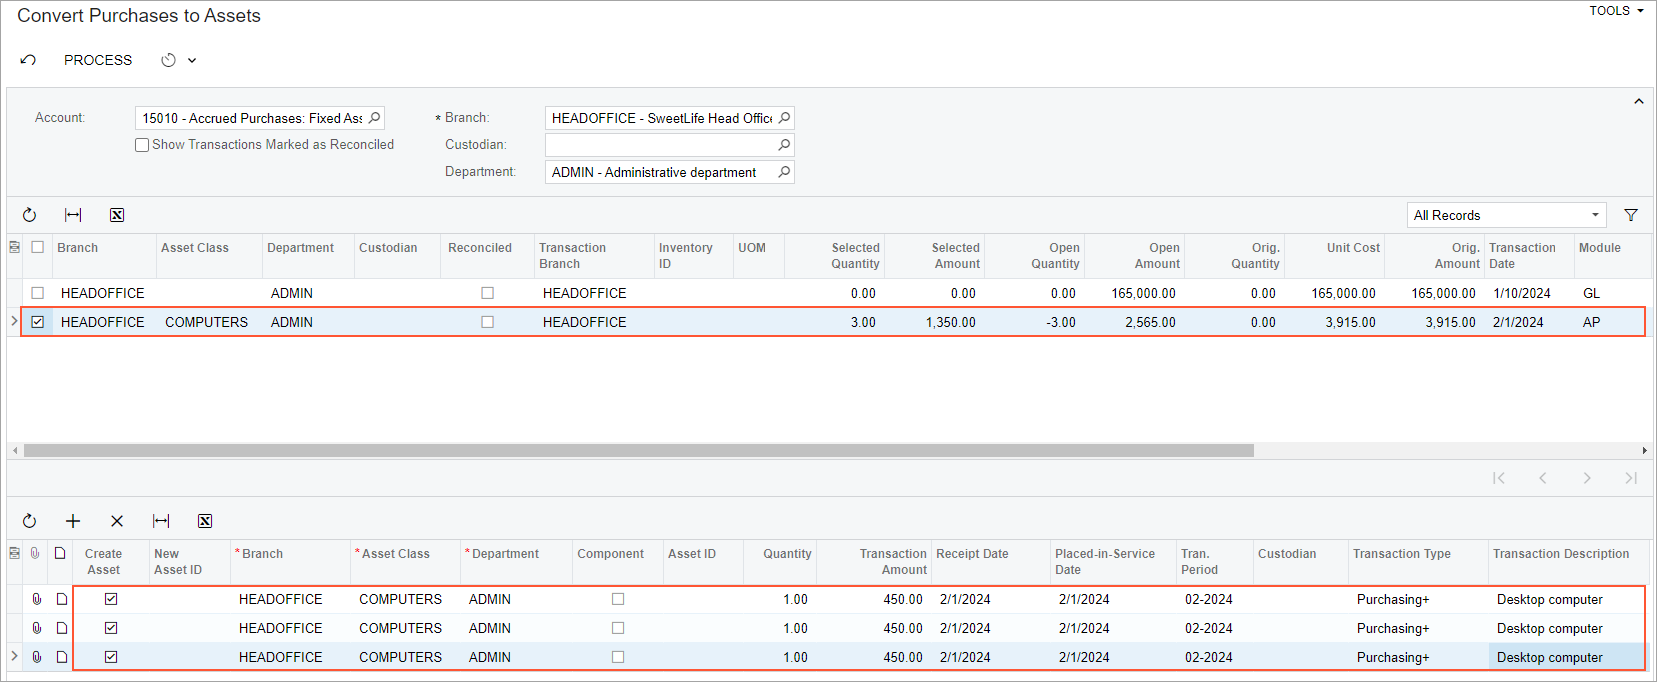
- To convert the server to a fixed asset, in the
Fixed
Assets
table, click Add Row on the table toolbar, and specify
the following settings in the added row:
- Asset Class: COMPUTERS (inserted automatically)
- Transaction Amount: 915
- Transaction Description: Server
- To convert the five software licenses to fixed assets, perform the following
instruction five times: Click Add Row on the table
toolbar, and specify the following settings in each row:
- Asset Class: SOFTWARE
- Transaction Amount: 330
- Transaction Description: Anti-virus software
The following screenshot shows all the purchased items converted to fixed assets.
Figure 2. List of converted fixed assets 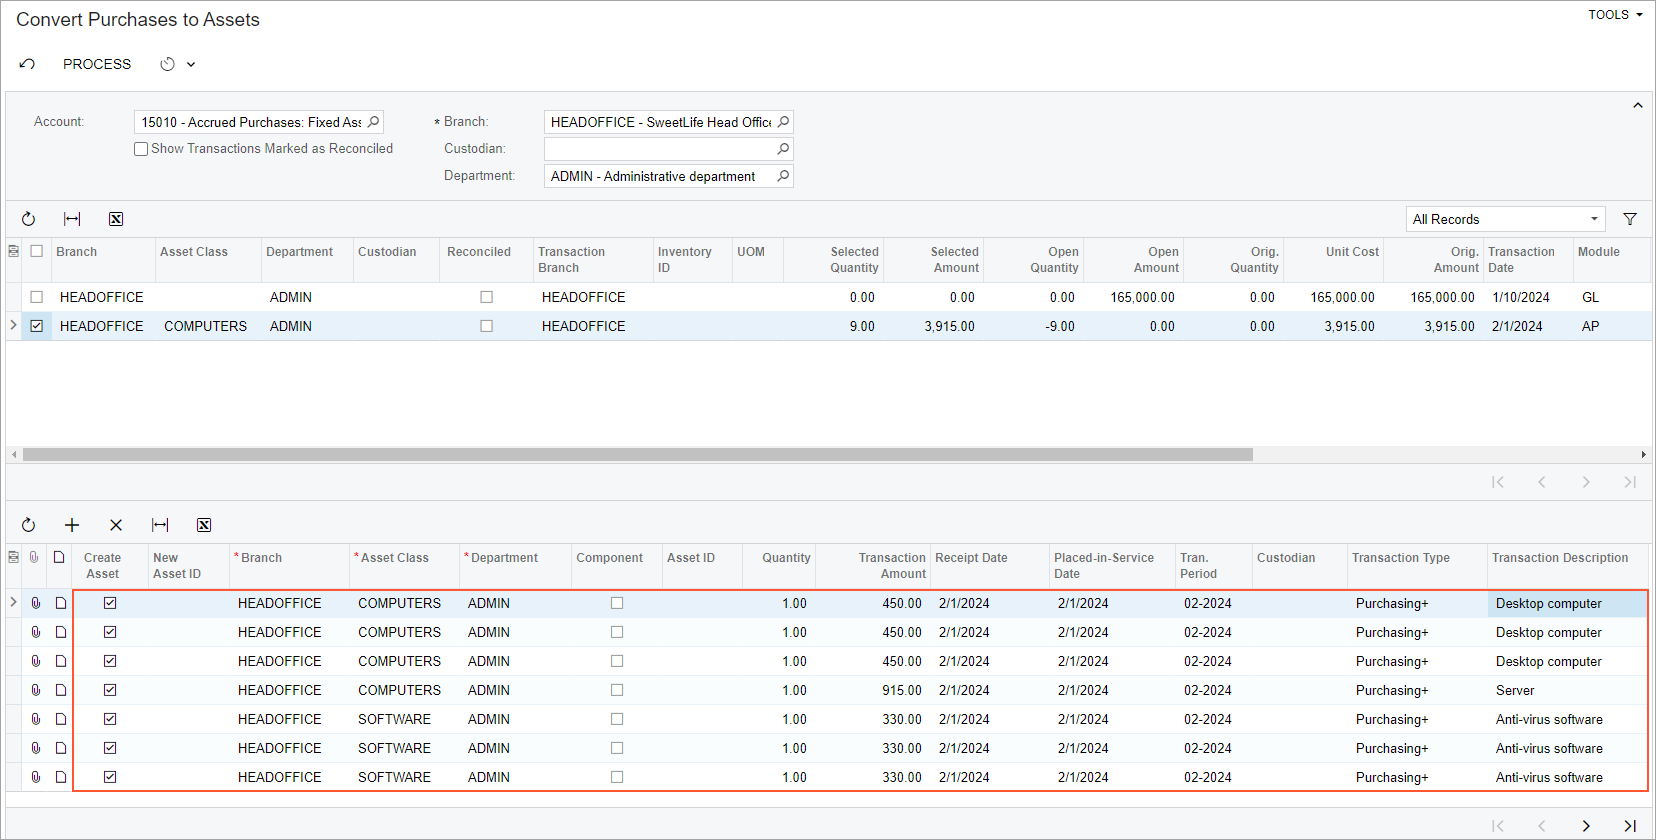
- On the form toolbar, click Process.
- Open the Asset Summary (FA402000) form to review the converted assets.
Step 3: Releasing the Purchasing Transactions
To release the purchasing transactions, do the following:
- Open the Release FA Transactions (FA503000) form.
- Select the unlabeled check box for the only Purchasing transaction in the table and on the form toolbar, click Release.
Step 4: Reviewing the Fixed Asset Settings
To review the settings of one of the new fixed assets, do the following:
- On the Fixed Assets (FA303000) form, open the Server fixed asset.
- On the Balance tab, review the asset's depreciation
method.
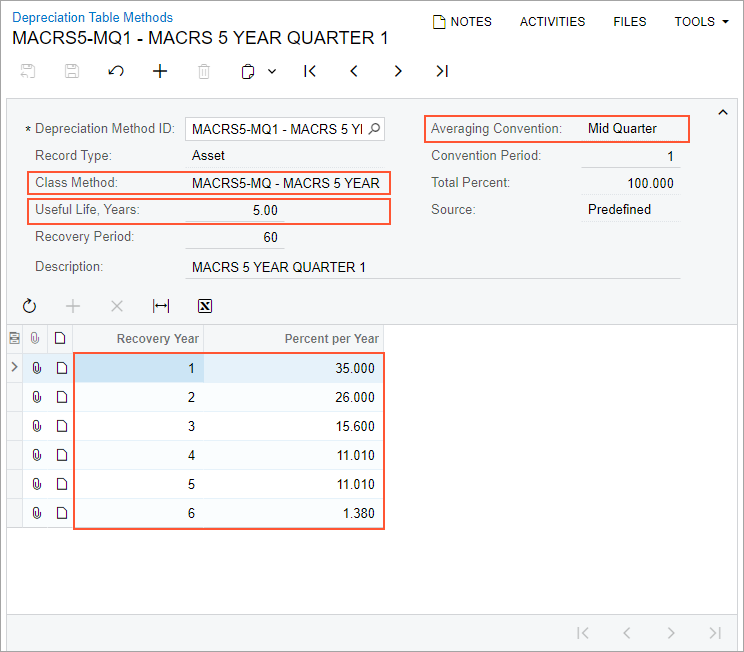
For the assets of the COMPUTERS class, you have selected the MACRS5-MQ table method as the depreciation method. Depreciation amounts calculated by the table methods depend on the date when the asset was acquired. The MACRS5-MQ method is the class method that groups four MACRS5 methods that are used based on the quarter in which the asset was acquired.
The Server asset was acquired in the first quarter; that is why MACRS5-MQ1 is specified as the depreciation method for this asset.
- Click the link in the Depreciation Method column, and on
the Depreciation Table Methods (FA202600) form, which the system has
opened, review the settings of the depreciation method, as shown in the
screenshot below.
The averaging convention for this method is Mid Quarter; it defines the depreciation percent for the first and last year of the asset's life based on the quarter in which the asset was acquired. The Class Method box shows the class for this depreciation method, which is MACRS5-MQ. The Useful Life for each method of the MACRS5-MQ class is 5 years. The Recovery Period is the useful life in months.
The table at the bottom of the form lists fixed deprecation percents for each recovery year. Year 1 is the year when the asset is acquired, and Year 6 is the year when the asset will be disposed of.
Figure 3. Settings of the MACRS5 table method