
Non-Default Asset Settings: Process Activity
The following activity will walk you through the process of changing the default settings of a fixed asset when you are creating the fixed asset.
Story
Suppose that on March 12, 2025, SweetLife Fruits & Jams purchased materials to use them for repairs in the office building. In March, the Frontsource Ltd. company repaired the roof by using part of the purchased materials; the company also installed downspouts. SweetLife paid for this work on March 30, 2025. The accountants have decided to capitalize the roof repair expense—that is, to create a fixed asset of the BUILDING class and depreciate it for five years.
Acting as a SweetLife accountant, you need to create a fixed asset for the roof repair, with some settings that differ from those that the system copies from the BUILDING fixed asset class.
Configuration Overview
In the U100 dataset, the following tasks have been performed to support this activity:
- On the Enable/Disable Features (CS100000) form, the Fixed Asset Management feature has been enabled.
- On the Chart of Accounts (GL202500) form, the needed GL accounts have been created.
- On the Vendors (AP303000) form, the FRONTSRC vendor has been created.
- On the Fixed Assets Preferences (FA101000) form, the Automatically Release Acquisition Transactions check box has been selected.
Process Overview
In this activity, on the Bills and Adjustments (AP301000) form, you will create two AP bills: one for repair materials, and one for work. You will then release the bills on the Release AP Documents (AP501000) form. On the Fixed Assets (FA303000) form, you will create a fixed asset and change a default setting that has been copied from the asset class. Finally, on the same form, you will reconcile the fixed asset with the purchasing transaction.
System Preparation
Before you begin creating a fixed asset, do the following:
- Launch the MYOB Acumatica website with the U100 dataset preloaded, and sign in as an accountant by using the johnson username and the 123 password.
- In the info area, in the upper-right corner of the top pane of the MYOB Acumatica screen, click the Business Date menu button, and select 3/12/2025 on the calendar.
- In the company to which you are signed in, be sure that you have implemented the fixed asset functionality by performing the following prerequisite activities: Fixed Assets: To Configure the System for Fixed Asset Management, Fixed Assets: To Configure the Fixed Asset Functionality, and Fixed Assets: To Create Fixed Asset Classes.
- Be sure that you have created a purchasing transaction for the building by performing the Fixed Asset Creation: To Create and Reconcile an Asset prerequisite activity.
- On the Company and Branch Selection menu on the top pane of the MYOB Acumatica screen, select the SweetLife Head Office and Wholesale Center branch.
Step 1: Creating Purchasing Transactions
To create the purchasing transactions (that is, the needed AP bills), do the following:
- On the Bills and Adjustments (AP301000) form, add a new record.
- In the Summary area, specify the following settings for the new AP bill:
- Type: Bill
- Vendor: FRONTSRC
- Date: 3/12/2025 (inserted automatically)
- Post Period: 03-2025
- Description: Materials for repair work
- On the Details tab, click Add Row
on the table toolbar, and specify the following settings in the added row:
- Branch: HEADOFFICE
- Transaction Descr.: Materials for repair work
- Ext. Cost: 6750
- Account: 62950 (Repairs)
- On the form toolbar, click Remove Hold and then click Save to save the bill with the Balanced status.
- On the form toolbar, click Add New Record.
- In the Summary area, specify the following settings for the new bill:
- Type: Bill
- Vendor: CSEMBLY
- Date: 3/30/2025
- Post Period: 03-2025
- Description: Repair work
- On the Details tab, click Add Row
on the table toolbar, and specify the following settings in the added row:
- Branch: HEADOFFICE
- Transaction Descr.: Roof repair
- Ext. Cost: 4400
- Account: 15010 (Accrued Purchases: Fixed Assets)
- Click Add Row on the table toolbar again, and specify the
following settings in the second row:
- Branch: HEADOFFICE
- Transaction Descr.: Downspout installation
- Ext. Cost: 1400
- Account: 15010 (Accrued Purchases: Fixed Assets)
- On the form toolbar, click Remove Hold and then click Save to save the bill with the Balanced status.
- Open the Release AP Documents (AP501000) form and select the unlabeled check boxes in the rows of the $6,750 bill for FRONTSRC and the $5,800 bill for CSEMBLY.
- On the form toolbar, click Release to release the two AP bills and create purchasing transactions.
Step 2: Entering and Reconciling a Fixed Asset
To create a fixed asset record for roof repair and reconcile the fixed asset, do the following:
- On the Fixed Assets (FA303000) form, add a new record.
- In the Summary area, enter Roof repair (Head Office building) in the Description box.
- On the General tab, specify the following settings:
- Asset Class: BUILDING
- Asset Type: BUILDING (inserted automatically based on the asset class)
- Depreciable: Selected (inserted automatically based on the asset class)
- Receipt Date: 3/30/2025
- Placed-in-Service Date: 3/30/2025
- Orig. Acquisition Cost: 8000
- Branch: HEADOFFICE
- Department: ADMIN
- While you are still on the General tab, change the Useful Life, Years to 5 and save the fixed asset.
- On the Balance tab, review the asset's settings. The recovery period for the asset is five years, so the fixed asset will be depreciated from the 03-2025 period to the 03-2030 period.
- On the form toolbar, click Save to save the asset.
- On the form toolbar, click Remove Hold to remove the fixed asset from hold, and then click Save. The system releases the acquisition transaction, and now you can reconcile the cost of the asset.
- On the Reconciliation tab, make sure that 15010 is selected in the Account box.
- In the table, select the unlabeled check box in the row of the $5,800 entry.
- On the table toolbar, click Process.
- On the form toolbar, click Save. The unreconciled amount is reduced to $2,200.
- In the Account box, select 62950 to process the rest of the amount by using another account.
- In the table, select the unlabeled check box in the row of the $6,750
transaction. The system automatically fills the Selected
Amount column with 2,200.00.Attention:The Selected Amount is the amount to be reconciled with the cost of the asset; the Reconciliation+ transaction is generated for this amount. You can change the Selected Amount to any needed value. If the amount you specify exceeds the unreconciled amount of the asset, the system will automatically create an addition to the cost of the asset.
- On the table toolbar, click Process.
- On the form toolbar, click Save.
- On the Transactions tab, review the generated
reconciliation transactions (see the following screenshot).
With the Reconciliation+ transaction, the system updates the FA Accrual account and the account debited by the fixed asset purchase to reconcile the asset's cost with the corresponding GL transactions. For the $4,400 and $1,400 transactions, these accounts are the same, so these transactions are combined into one $5,800 transaction. For the $2,200 transaction, the system debits the 15010 account and credits the 62950 account to link the existing roof repair asset with the purchasing transaction.
Figure 1. Reconciliation transactions 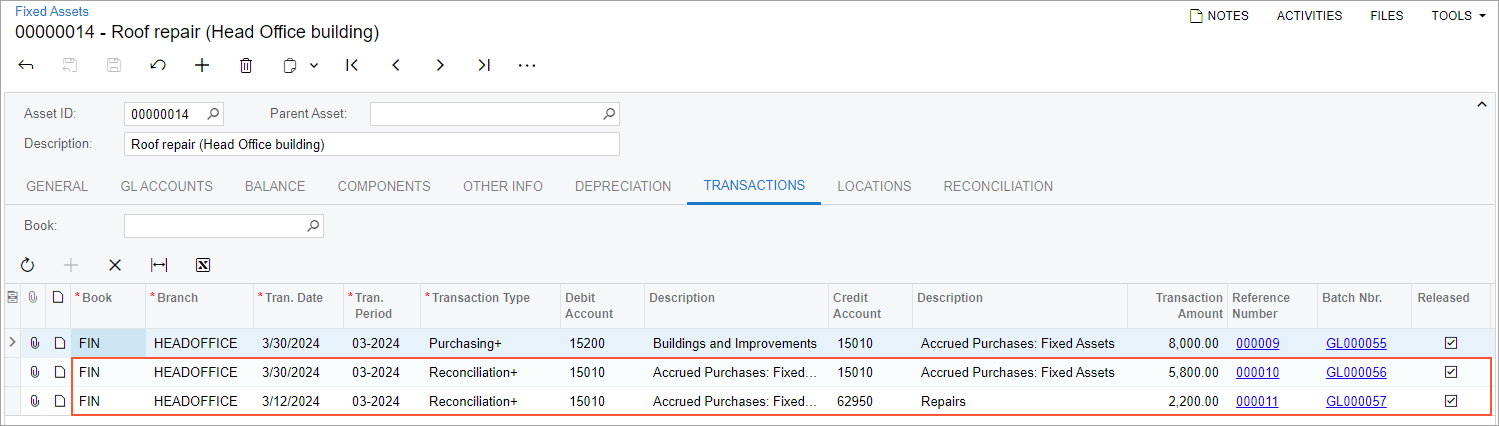
- On the Reconciliation tab, review the Unreconciled Amount. Now it is equal to 0.00, indicating that the asset has been reconciled.