Using a Composite State with the Workflow Editor
This topic describes an example of the customization of a composite state through the use of the Workflow Editor.
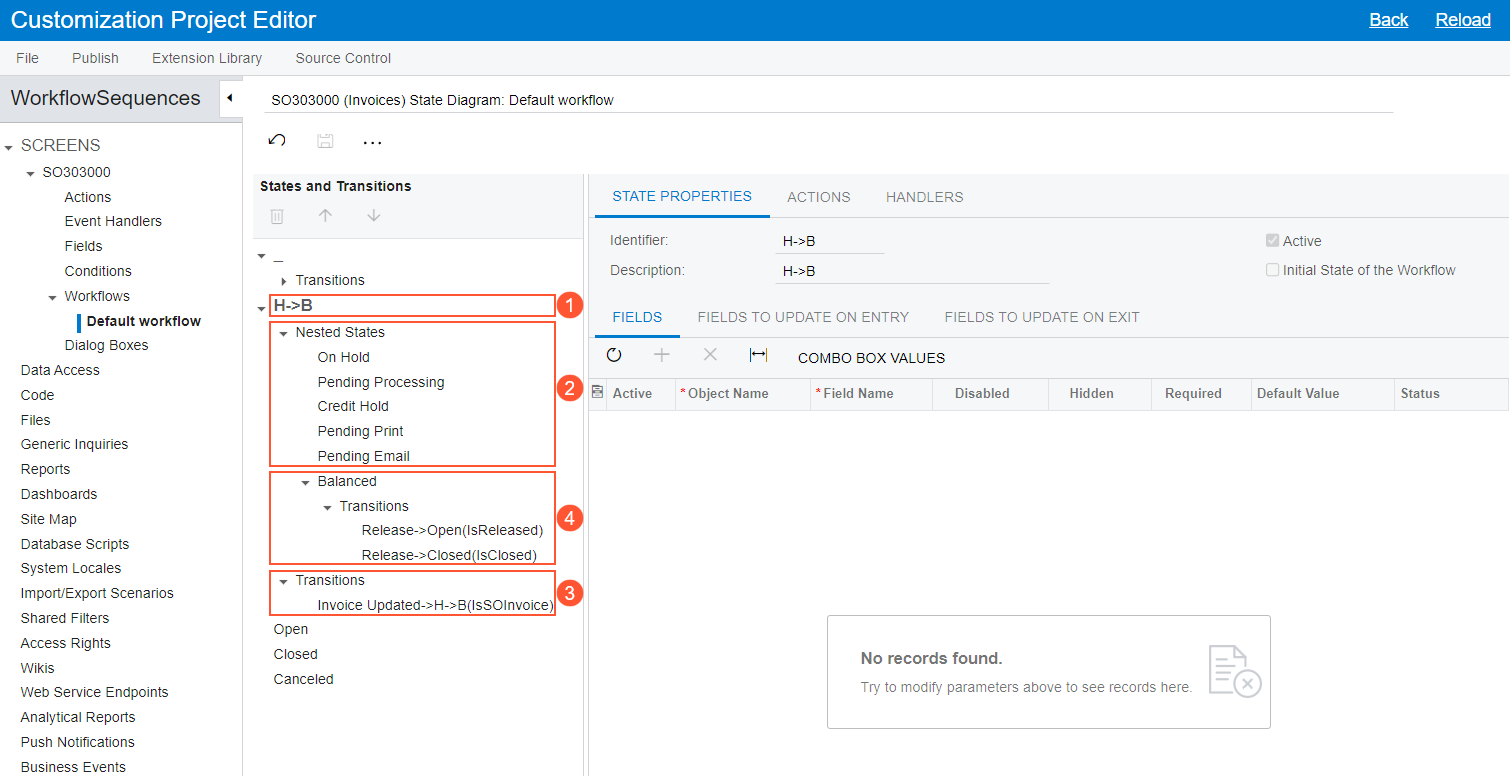
The screenshot below shows the default workflow of the Invoices (SO303000) form on the State Diagram: Default Workflow page of the Customization Project Editor. The composite state (see Item 1 in the screenshot) contains nested states (Item 2) that are part of a typical invoice workflow, as well as transitions (Item 3) to and from the composite state and the nested states. Notice that the Balanced nested state also contains transitions (Item 4).
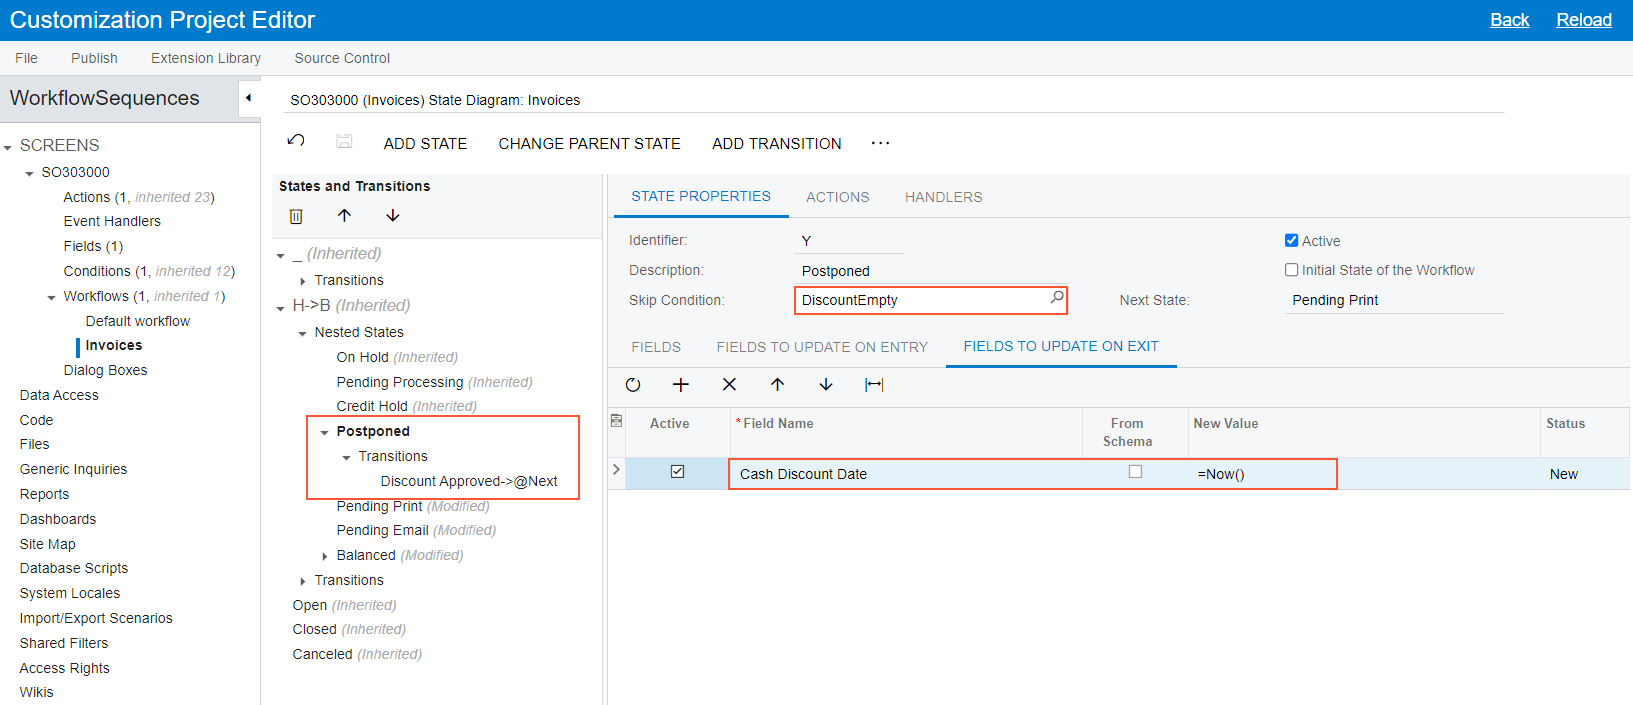
Suppose that you want to add a new state, Postponed, to the workflow for the Invoices form after the Credit Hold state, specify a skip condition for it, and add a transition from this state to the next state in the workflow. The example in this topic demonstrates how you can do this.
To Modify a Workflow with Composite States
To modify the default workflow of the Invoices (SO303000) form, which contains composite states, you would perform the following steps:
- Open the Customization Project Editor for a new or existing customization project, and add the Invoices form to the list of customized screens.
- On the SO303000 (Invoices) Workflows page, create a workflow named Invoices for the Invoices form.
- On the Conditions: SO303000 (Invoices) page, create a condition to make sure that the
value in the Cash Discount box equals 0.
For details on conditions, see Workflow Elements: General Information
- Open the SO303000 (Invoices) State Diagram: Invoices page, and on the More menu, click Add State.
- In the Add State dialog box, which opens, specify the following
settings:
- Identifier: Y
- Description: Postponed
- Parent State: H->B
- Click OK to close the dialog box.
In the States and Transitions pane, the system adds the Postponed state after the last nested state (Balanced in this case).
- With Postponed selected in the pane, use the arrows on the pane toolbar to move the added state after the Credit Hold state.
- With the Postponed state still selected, select the created condition in the
Skip Condition box of the State Properties
tab.
If the condition is fulfilled (that is, if the value in the Cash Discount box equals 0) and a document is ready to enter the Postponed state, it then skips this state and automatically moves to the next state (Pending Print in this case).
- On the More menu, click Add Transition.
- In the Add Transition dialog box, which is opened, click Create.
- In the New Action dialog box, which is opened, specify the
following settings for the action:
- Action Name: DiscountApproved
- Display Name: Discount Approved
- Category: Processing
- Click OK to close the New Action dialog box.
- In the Target State box of the Add
Transition dialog box, select @Next.
This setting indicates that the transition will lead to the next state in the sequence (Pending Print in this case).
- Click OK to close the dialog box.
The system adds the transition to the Transitions node of the Postponed state.
- In the States and Transitions pane, click the Postponed state.
- On the Fields to Update on Exit tab (in the lower part of the
State Properties tab) for this state, add the Cash Discount
Date field, and set its value to =Now().
Each time a document leaves the Postponed state—that is, when the document moves to another state because a transition has been triggered (in this case, the transition triggered by the Discount Approved action)—the value of the Cash Discount Date field changes to the current date.
- Save your changes.
The workflow with the added state is shown in the following screenshot.