Customizing a Predefined Workflow from Code
You can customize a workflow in Visual Studio or in the Code Editor with the help of MYOB Acumatica Framework.
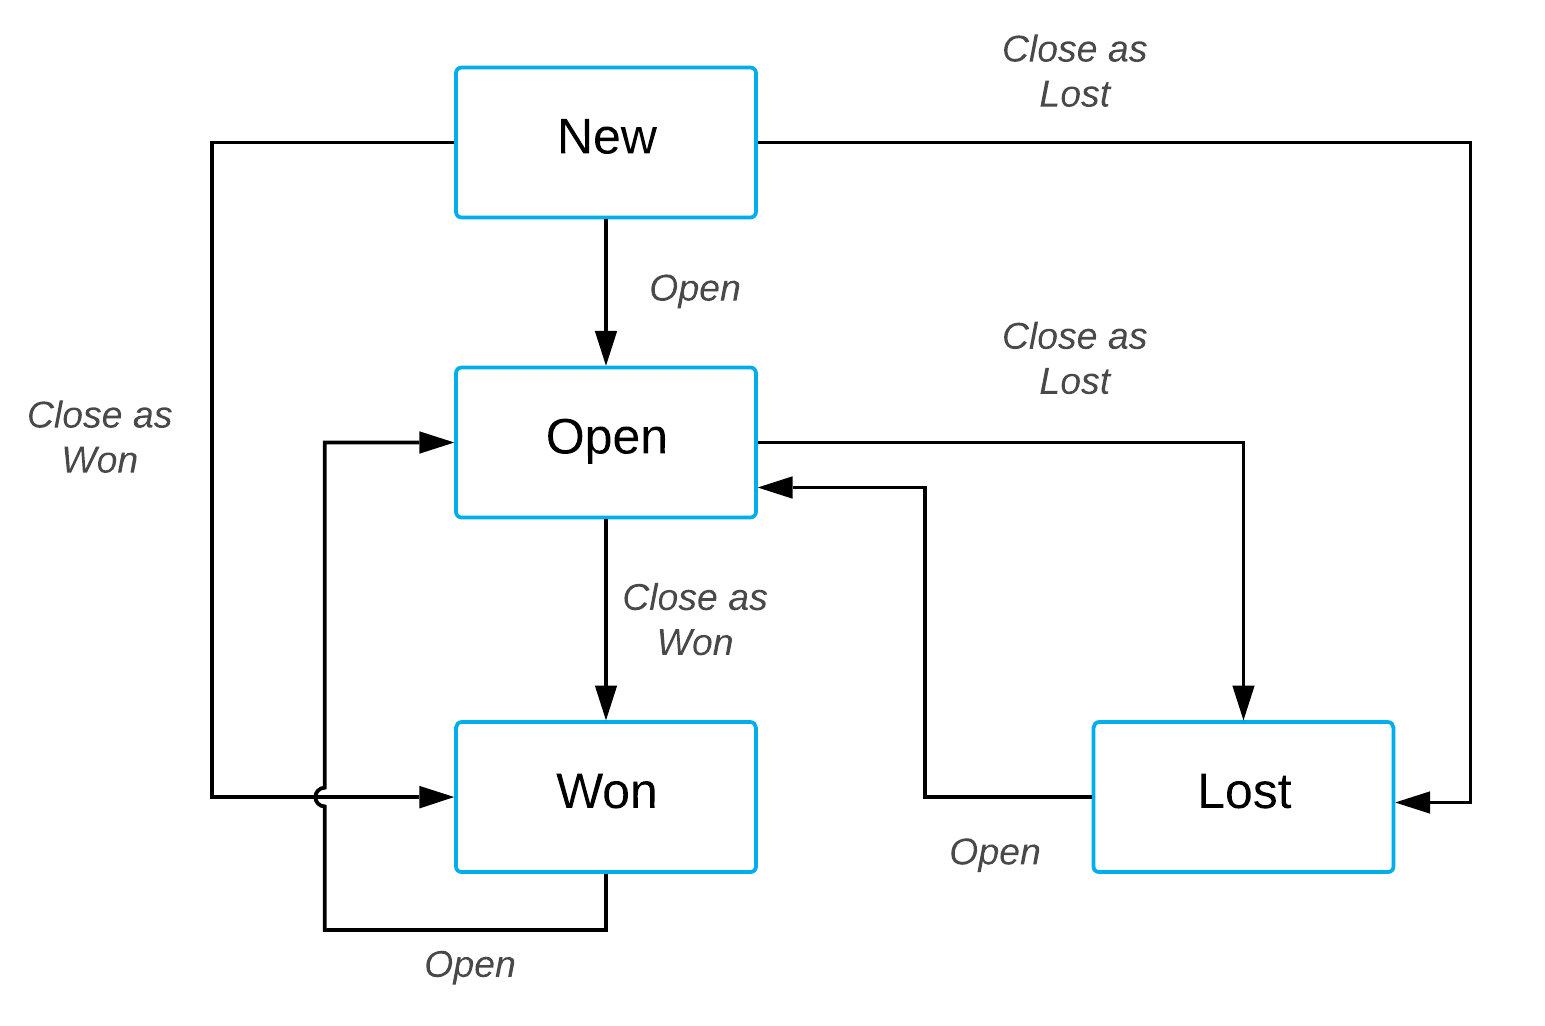
This example demonstrates the extending of the workflow for working with an opportunity by using Visual Studio. The predefined workflow for the Opportunities (CR304000) form includes the states (shown in the blue rectangles and representing statuses) and actions shown in the following diagram.

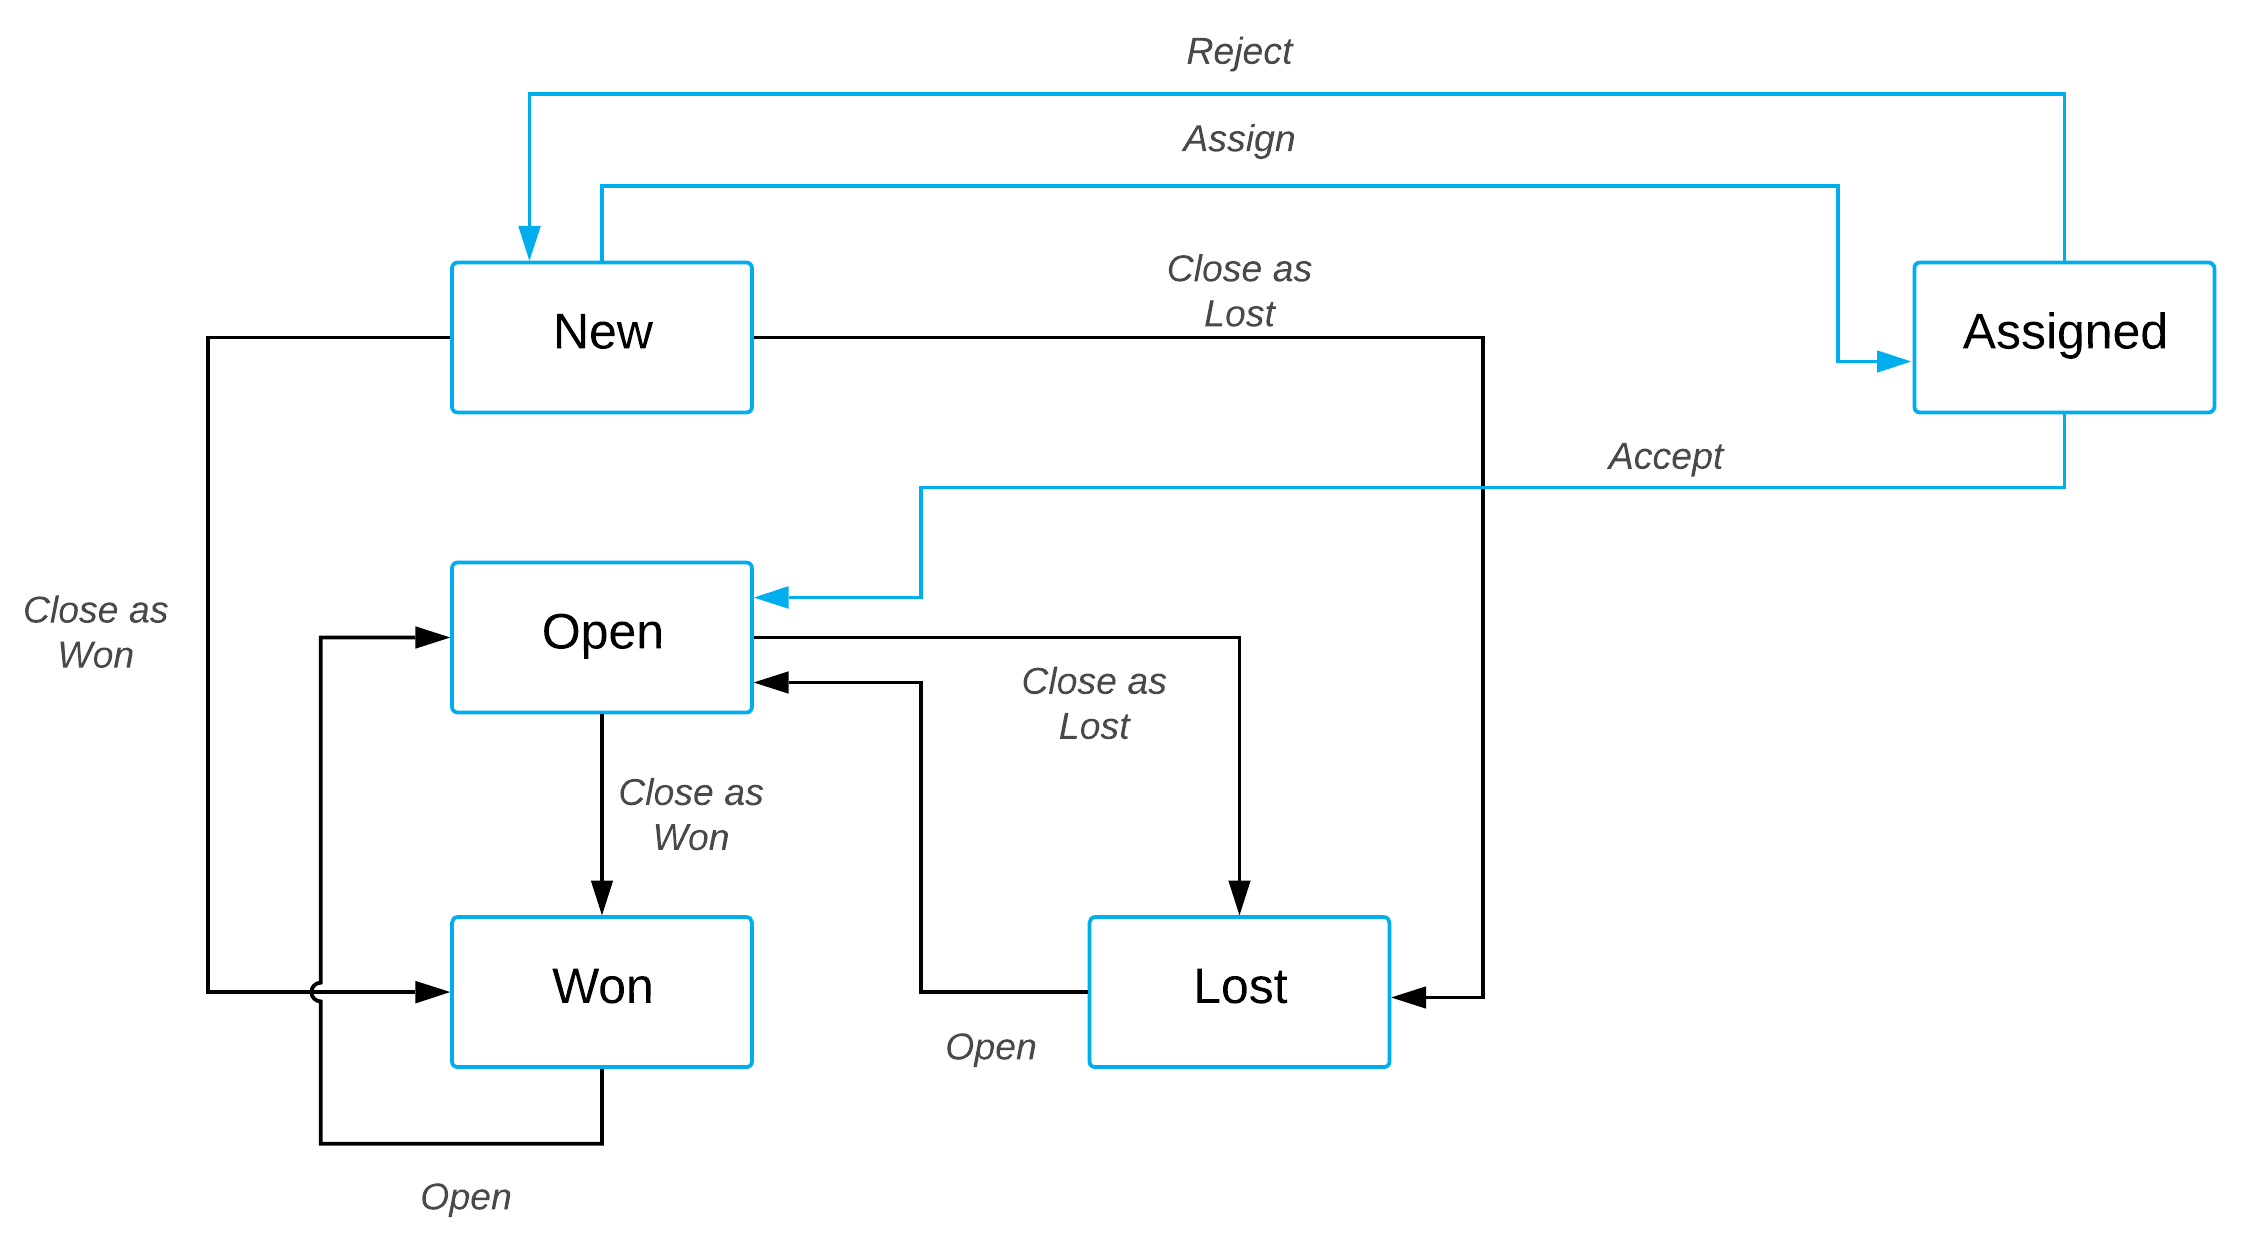
Suppose that in your customization efforts you need to incorporate a process of assigning a
new opportunity before opening it. You need a new status for opportunities called
Assigned. A user should be able to change a status from New to
Assigned by clicking the Assign action, change the status
from Assigned to Open by clicking the predefined Accept
action, and change the status from Assigned to New by clicking the
Reject action, which you will add. For an opportunity to be
assigned, a user must be selected in the Owner box. Also, you need to
add an auto-run action named Auto-Assign that is performed if a new
opportunity is created and the Owner box is not empty. The
Auto-Assign action changes the status of the opportunity to
Assigned.
When a user clicks the Accept or Reject action, the user should provide the reason for changing the state. When a user clicks the Assign action, the user should specify the Owner of the opportunity. In both of these situations, you will use a dialog box to obtain this information.
The following diagram presents the possible statuses after customization and the actions that change statuses.

Based on these specifications, you will implement the new workflow for opportunities by performing the following general tasks, which are described in greater detail in the sections that follow:
- Adding a new state named
Assigned, as described in Add a New State Named Assigned. - Adding the following actions:
Assign, which changes the state from New to AssignedAccept, which changes the state from Assigned to OpenReject, which changes the state from Assigned to NewAutoAssign, which is performed if the Owner box is not empty
For details, see Add Actions.
- Adding the
OwnerNotEmptycondition for theAutoAssignaction, as described in Add the OwnerNotEmpty Condition. - Adding dialog boxes for the actions so that a user can provide the required field values. (For instructions, see Add the Dialog Boxes.)
- Removing the transition from the New to Open status.
- Updating the New state with the following changes:
- Update the list of values for the
ResolutionandStatusfield - Adding the
AssignandAutoAssignactions - Removing the
Openaction
- Update the list of values for the
- Updating the
Openstate to make theOwnerfield required. - Defining transitions from the New to Assigned states, from Assigned
to New and Open states.
For details on implementing Tasks 5–8, see Update the Workflow Configuration.
Before You Proceed
To be able to customize a workflow in Visual Studio, you need to create an extension library for your customization project. For details, see To Create an Extension Library.
Prepare the Graph Extension
To prepare the graph extension, do the following:
- Add the following using directives.
using PX.Data.WorkflowAPI;
using PX.Objects.CR.Workflows;
You need the PX.Data.WorkflowAPI namespace to get access to workflow API, and the PX.Objects.CR.Workflows to get access to the OpportunityWorkflow and OpportunityMaint classes.
- Declare the graph extension, as the following code
shows.
public class OpportunityWorkflowExt : PX.Data.PXGraphExtension<OpportunityWorkflow, OpportunityMaint> { } - In the graph extension, add the following service members. You will use them to declare
fields, dialog boxes, and actions.
private const string _fieldReason = "Reason", _fieldStage = "Stage", _fieldOwnerID = "OwnerID", _fieldDetails = "Details", _formAccept = "FormAccept", _formAssign = "FormAssign", _formReject = "FormReject", _actionAccept = "Accept", _actionReject = "Reject", _actionAssign = "Assign", _actionAutoAssign = "AutoAssign", _reasonUnassign = "UA", _reasonRejected = "RJ", _reasonTechnology = "TH", _reasonRelationship = "RL", _reasonPrice = "PR", _reasonOther = "OT", _reasonAssign = "NA", _reasonInProcess = "IP", _reasonFunctionality = "FC", _reasonCompanyMaturity = "CM", _reasonCanceled = "CL"; - Override the Configure method, as the following code
shows.
public override void Configure(PXScreenConfiguration config)
{
  var context = config.GetScreenConfigurationContext<OpportunityMaint, CROpportunity>();
}
Add a New State Named Assigned
To add the new Assigned state, do the following:
- In the graph extension, declare the
Statesclass, as the following code shows.public static class States { public const string New = "N", Open = "O", Won = "W", Lost = "L", Assigned = "A"; } - In the overridden Configure method, declare the following
variable.
var assignedState = context.FlowStates.Create(States.Assigned, state => state
	.WithFieldStates(fields =>
	{
		fields.AddField<CROpportunity.resolution>(field =>
			field.ComboBoxValues(_reasonAssign));
		fields.AddField<CROpportunity.ownerID>(field =>
			field.IsRequired());
	})
	.WithActions(actions =>
	{
		actions.Add(g => g.createSalesOrder);
		actions.Add(g => g.createInvoice);
		actions.Add(g => g.validateAddresses);
		actions.Add<OpportunityMaint.Discount>(e => e.recalculatePrices);
		actions.Add(actionReject, a => a.IsDuplicatedInToolbar());
		actions.Add(actionAccept, a => a.IsDuplicatedInToolbar());
	}));
In the code above, you define the Assigned state, field values to be assigned in this state, and actions available in this state.
Add the Dialog Boxes
You need to add dialog boxes that will prompt users for more information when they invoke
the Accept, Reject, and Assign actions.
The following instructions describe how to declare a dialog box for the Accept action; you
will add the other two dialog boxes by performing similar actions.
To accept an opportunity, a user should provide the Resolution and
Stage field values. To declare a dialog box for the
Accept action, declare a variable for the dialog box in the overridden
Configure method:
var formAccept = context.Forms.Create(_formAccept, form => form
	.Prompt("Details")
	.WithFields(fields =>
	{
		fields.Add(_fieldReason, field => field
		  .WithSchemaOf<CROpportunity.resolution>()
		  .IsRequired()
		  .Prompt("Reason")
		  .DefaultValue(_reasonInProcess)
		  .OnlyComboBoxValues(_reasonInProcess));

              fields.Add(_fieldStage, field => field
		  .WithSchemaOf<CROpportunity.stageID>()
		  .Prompt("Stage"));
	}));
In the code above, you create a dialog box with the Details title and add to it the following boxes:
- A box based on the CROpportunity.resolution field, which is required in the dialog box. The title of the corresponding box is Reason.
- A box based on the CROpportunity.stageID field. The title of the corresponding box is Stage.
For the Assign and Reject actions, you can declare
similar dialog boxes named formAssign and formReject. You
need to add the Owner field based on the
CROpportunity.ownerID field to the formAssign dialog
box, and you need to add the Resolution field and the
Details field based on the CROpportunity.details
field to the formReject dialog box.
Add the OwnerNotEmpty Condition
To define a new condition, in the overridden Configure method, declare the following variable.var ownerNotNullCondition = context.Conditions.FromExpr(
opp => opp.OwnerID != null).WithSharedName("OwnerNotEmpty");Add Actions
To add the Assign action, declare the following variable in the overridden
Configure method.
var actionAssign = context.ActionDefinitions.CreateNew(_actionAssign, action => action
	.WithFieldAssignments(fields =>
	{
		fields.Add<CROpportunity.resolution>(f => f.SetFromValue(_reasonAssign));
		fields.Add<CROpportunity.ownerID>(f => f.SetFromFormField(formAssign, _fieldOwnerID));
	})
	.DisplayName("Assign")
	.WithForm(formAssign)
	.InFolder(FolderType.ActionsFolder, "Lost")
	.MassProcessingScreen<UpdateOpportunityMassProcess>());
In the code above, you are creating a new action; you are also specifying which field
values should change after the action is performed and which dialog box should be shown to
provide these values. Also, you are specifying the location of the action on the form
toolbar (ActionsFolder), the title of the action (Assign),
and the graph of the processing form where the action should also be displayed
(UpdateOpportunityMassProcess).
For the Accept and Reject actions, you can add similar
variables named actionAccept and actionReject.
Auto-Assign , which is performed if the
OwnerNotEmpty condition is true, declare the following variable in the
overridden Configure method. var actionAutoAssign = context.ActionDefinitions.CreateNew(_actionAutoAssign, action => action
.WithFieldAssignments(fields =>
{
fields.Add<CROpportunity.resolution>(f => f.SetFromValue(_reasonAssign));
})
.DisplayName("Auto-Assign")
.IsHiddenAlways()
);Update the Workflow Configuration
To apply all the entities you have declared, you need to call the UpdateScreenConfigurationFor method in the overridden Configure method, as the following code shows.
context.UpdateScreenConfigurationFor(screen =>
{
  return screen
    .UpdateDefaultFlow(config1 => config1.WithFlowStates
    (states =>
    {
      states.Update(States.New, state => state
       .WithFieldStates(fields =>
       {
         fields.UpdateField<CROpportunity.resolution>(field =>
          field.WithDefaultValue(_reasonUnassign)
            .ComboBoxValues(_reasonUnassign, _reasonCanceled, _reasonOther, _reasonRejected));
       })
      .WithActions(actions =>
      {
        actions.Add(actionAssign, a => a
            .IsDuplicatedInToolbar());

        actions.Add(actionAutoAssign, a => a
        .IsAutoAction(ownerNotNullCondition));
        actions.Remove("Open");
      }));
      states.Add(assignedState);
      states.Update(States.Open, state => state
        .WithFieldStates(fields =>
        {
          fields.AddField<CROpportunity.ownerID>(field =>
            field.IsRequired());
        }));
    })
    .WithTransitions(transitions =>
    {
      transitions.Remove(transition =>
        transition.From(States.New).To(States.Open).IsTriggeredOn("Open"));

      transitions.Add(transition => transition
        .From(States.New)
        .To(States.Assigned)
        .IsTriggeredOn(actionAssign));
      transitions.Add(transition => transition
        .From(States.New)
        .To(States.Assigned)
        .IsTriggeredOn(actionAutoAssign));
      transitions.Add(transition => transition
        .From(States.Assigned)
        .To(States.New)
        .IsTriggeredOn(actionReject)
        .WithFieldAssignments(fields =>
        {
          fields.Add<CROpportunity.ownerID>(f => f.SetFromExpression(null));
        })
        );
      transitions.Add(transition => transition
        .From(States.Assigned)
        .To(States.Open)
        .IsTriggeredOn(actionAccept));
    })
    )
    .WithActions(actions =>
    {
      actions.Add(actionAssign);
      actions.Add(actionAccept);
      actions.Add(actionReject);
      actions.Add(actionAutoAssign);
    })
    .WithForms(forms =>
    {
      forms.Add(formAssign);
      forms.Add(formReject);
      forms.Add(formAccept);
    })
    .WithFieldStates(fields =>
    {

      fields.Add<CROpportunity.status>(field => field
          .SetComboValues(
            (States.Assigned, "Assigned"),
            (States.New, "New"),
            (States.Open, "Open"),
            (States.Won, "Won"),
            (States.Lost, "Lost")));

      fields.Replace<CROpportunity.resolution>(field => field
        .SetComboValues(
                (_reasonTechnology, "Technology"),
                (_reasonRelationship, "Relationship"),
                (_reasonPrice, "Price"),
                (_reasonOther, "Other"),
                (_reasonAssign, "Assigned"),
                (_reasonInProcess, "In Process"),
                (_reasonFunctionality, "Functionality"),
                (_reasonCompanyMaturity, "Company Maturity"),
                (_reasonCanceled, "Canceled"),
                (_reasonRejected, "Rejected"),
                (_reasonUnassign, "Unassign")));
    })
    .WithSharedConditions(conditions => conditions.Add(ownerNotNullCondition));
});
In the code above, you are updating the workflow by doing the following:
- Updating the list of states as follows:
- Updating the New state by adding new combo box values to the
CROpportunity.resolution field, adding the
AssignandAutoAssignactions, and removing the Open action - Adding the Assigned state
- Updating the Open state by making the Owner field required
- Updating the New state by adding new combo box values to the
CROpportunity.resolution field, adding the
- Updating the list of transitions as follows:
- Removing the transition of the New state to the Open state
- Adding the transition from the New state to the Assigned state
triggered by the
Assignaction - Adding the transition from the New state to the Assigned state
triggered by the
AutoAssignaction - Adding the transition from the Assigned state to the New state
triggered by the
Rejectaction - Adding the transition from the Assigned state to the Open state
triggered by the
Acceptaction
- Adding the
Assign,Accept,Reject, andAutoAssignactions - Adding the
formAssign,formReject, andformAcceptdialog boxes - Updating fields as follows:
- Adding new combo box values to the CROpportunity.status field
- Replacing the values of the CROpportunity.resolution field with new ones
Test the Customized Workflow
To test the customized workflow, do the following:
- Build the extension library.
- In MYOB Acumatica, open the Opportunities (CR304000) form.
- Create a new opportunity with the Owner box empty.
- On the form toolbar, click .
- In the Assign dialog box, which opens, select an owner of the opportunity and a reason, and click OK.
- Notice that the status of the opportunity is changed to Assigned. The Owner box now contains the owner you specified in the dialog box.
- On the form toolbar, click .
- In the Accept dialog box, which opens, specify a reason and a stage, and click OK.
- Notice that the status of the opportunity is changed to Open.
- Create a new opportunity with the Owner box filled in.
- Notice that when the new record is saved, its status is Assigned instead of New.
- On the form toolbar, click .
- In the Reject dialog box, which opens, specify the reason and details, and click OK.
- Notice that the status of the opportunity is changed to New.
