Customizing the Release Process for CA Documents
You can use customize the release process for several forms in the following ways:
- By overriding the Insert***Transaction methods. This way you will be able to manage the process of inserting a line to the General Ledger.
- By subscribing to the RowPersisting and
RowPersisted events. This way you will be able to access the
following caches of the CAReleaseProcess
class:
public PXSelect<CAAdj> CAAdjastments;
public PXSelect<CATransfer> CAtransfers;
public PXSelect<CATaxTran> TaxTrans;
public PXSelect<CAExpense> TransferExpenses;
public PXSelect<SVATConversionHist> SVATConversionHist;
public PXSelect<CADailySummary> DailySummary;
Such customization is available for actions which include the ReleaseDocProc<TCADocument> method cal. These action are the following:
- The Release action on the Release Cash Transactions (CA502000) form
- The Release action on the Transactions (CA304000) form
- The Release action on the Funds Transfers (CA301000) form
- The Process action on the Process Bank Transactions (CA306000) form
- The Release action on the Journal Vouchers (GL304000) form
- The Release action on the Bank Deposits (CA305000) form
Overriding the Insert***Transaction methods
The following methods are available for customization:
-
public virtual GLTran InsertDocumentTransaction(
JournalEntry, GLTran, GLTranInsertionContext)
The method inserts the content of the form header.
-
public virtual GLTran InsertSplitTransaction(
JournalEntry, GLTran, GLTranInsertionContext)
The method inserts the lines of the Document Details tab of the form.
-
public virtual GLTran InsertRoundingTransaction(
JournalEntry, GLTran, GLTranInsertionContext)
The method processes the rounding of the document lines sum and document total.
-
public virtual GLTran InsertDepositChargeTransaction(
JournalEntry, GLTran, GLTranInsertionContext)
The method is available only for the Bank Deposits form and inserts the lines of the Charges tab of the form.
The GLTranInsertionContext context parameter of the methods contains the
context of the release process. That means the kind of record being released is the field of
the GLTranInsertionContext class instance, which is not null. The
context parameter is assigned the corresponding value by the system.
The class members are presented below.
public class GLTranInsertionContext
{
	public virtual CAAdj CAAdjRecord { get; set; }
	public virtual CASplit CASplitRecord { get; set; }
	public virtual CATaxTran CATaxTranRecord { get; set; }

	public virtual CATransfer CATransferRecord { get; set; }
	public virtual CAExpense CAExpenseRecord { get; set; }

	public virtual CADeposit CADepositRecord { get; set; }
	public virtual CADepositDetail CADepositDetailRecord { get; set; }
	public virtual CADepositCharge CADepositChargeRecord { get; set; }

	public virtual CATran CATranRecord { get; set; }
}
Customizing the Release of a Transaction (an Example)
Suppose you have a custom field on the Transactions form, and you need to display it on the separate column in the lines of the Journal Transaction form. Then you need to complete the following steps:
- Add a custom field to the Transactions form. See example in the Adding Input Controls topic.
For example, add the CreatedDateTime field of the Transactions data view. The customized screen in the Screen Editor is shown on the screenshot below.
Figure 1. The customized Transactions screen 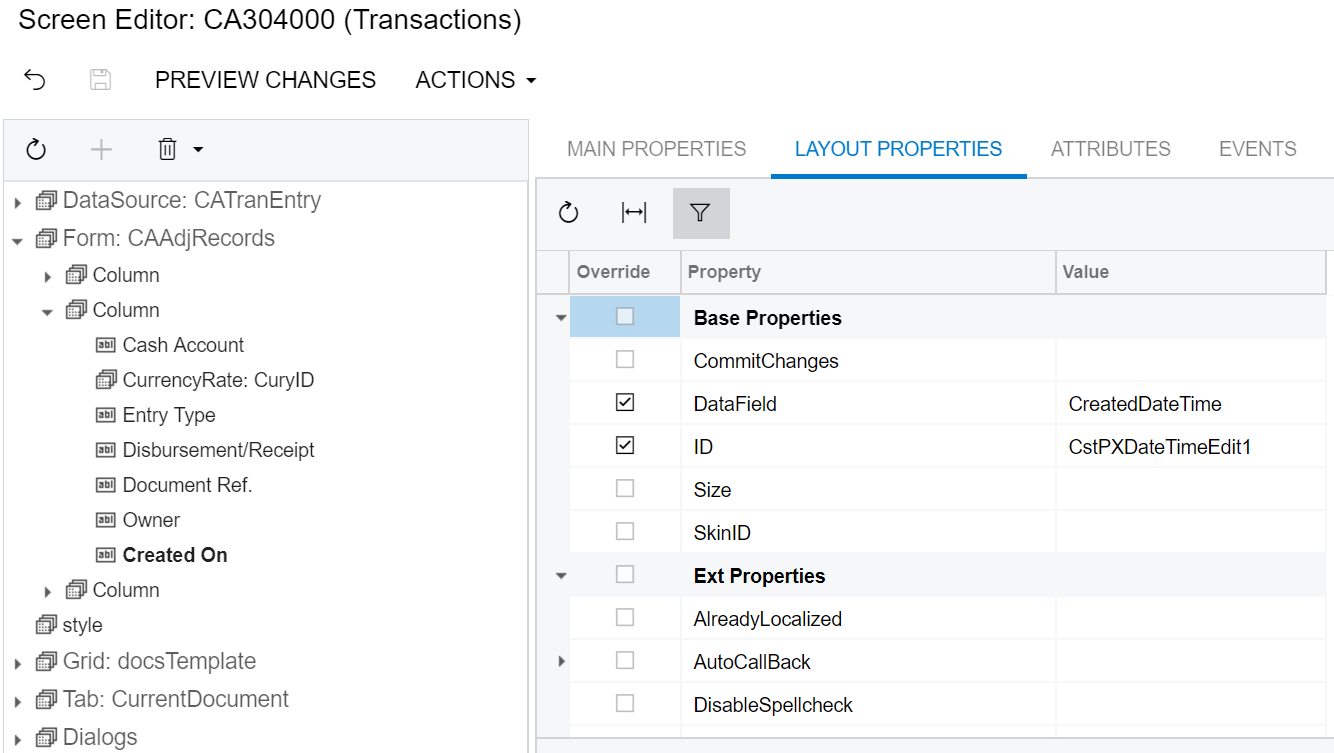
- Add a custom column to the grid on the Journal Transactions form. See example in the
Adding Columns to a Grid topic.
For example, add the corresponding CreatedOn field to the form grid. The corresponding Data Access is shown on the screenshot below.
Figure 2. The GLTran DAC extension 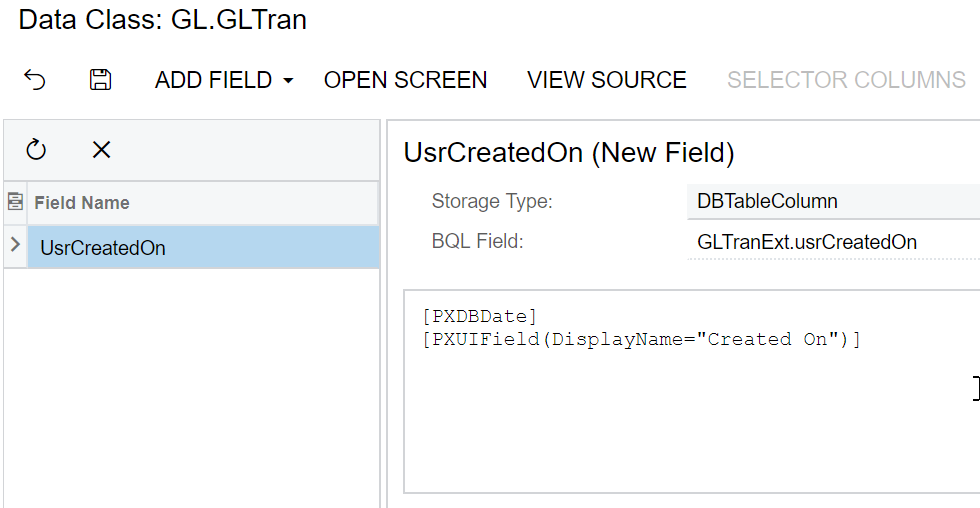
- Customize the business logic of the Transactions form by overriding the
InsertDocumentTransaction method as follows:
- Before you start overriding the InsertDocumentTransaction, you
should understand which field of the GLTranInsertionContext class
is changed depending on which form is used. You are overriding the Release action on
the Transactions form, so open Element Inspector for this form's header and see which
Data Class and View Name it has. Their names correspond to types and fields of the
GLTranInsertionContext class.
So, for the Transactions form, you need the CAAdj DAC as shown on the following screenshot.
Figure 3. The Element Properties dialog box of the Transactions form 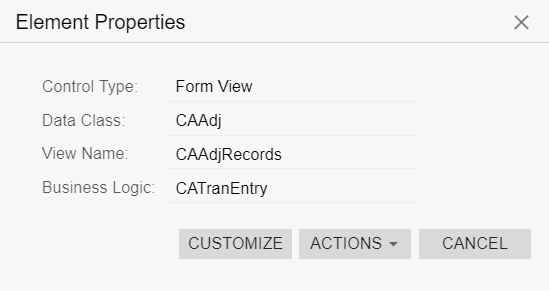
- In the Code Editor of the Customization Project Editor, select Add New Record.
- In the Create Code File dialog box that opens, specify the
following values and click OK.
- File Template: Graph Extension
- Class Name: CAReleaseProcess
The Code Editor: CAReleaseProcess page opens.
- On the Code Editor: CAReleaseProcess page, select Override Method.
- On the Select Methods to Override panel, select the
InsertDocumentTransaction method, and click
Save.
The code for overriding the InsertDocumentTransaction method is generated as follows.
public delegate GLTran InsertDocumentTransactionDelegate( JournalEntry je, GLTran tran, CAReleaseProcess.GLTranInsertionContext context); [PXOverride] public GLTran InsertDocumentTransaction( JournalEntry je, GLTran tran, CAReleaseProcess.GLTranInsertionContext context, InsertDocumentTransactionDelegate baseMethod) { return baseMethod(je,tran,context); } - In the method's body, insert the following code where you detect whether the current
context (a record of the CAAdj type that was found in paragraph a)
is not empty.
if (context.CATranRecord!= null)
{
    var adj = PXSelect<CAAdj, Where<CAAdj.tranID, Equal<Required<CAAdj.tranID>>>>.Select(Base, context.CATranRecord.TranID);
    if(adj!=null)
    {
      // some code
    }
}
Now you can work with the record's fields inside the if statement.
- As the original task requires, assign the custom field
(CreatedDateTime) to the released transaction's custom field
(UsrCreatedOn) as shown in the code
below.
GLTranExt tranExt = Base.Caches[typeof(GLTran)].GetExtension<GLTranExt>(tran);
tranExt.UsrCreatedOn = context.CATranRecord.CreatedDateTime;
The complete code of the CAReleaseProcess_Extension class should look as follows.
public class CAReleaseProcess_Extension : PXGraphExtension<CAReleaseProcess>
{
    #region Event Handlers
    public delegate GLTran InsertDocumentTransactionDelegate(
    JournalEntry je, GLTran tran, CAReleaseProcess.GLTranInsertionContext context);
    [PXOverride]
    public GLTran InsertDocumentTransaction(
       JournalEntry je,
       GLTran tran,
       CAReleaseProcess.GLTranInsertionContext context,
       InsertDocumentTransactionDelegate baseMethod)
    {
	if (context.CATranRecord!= null)
	{
           var adj = PXSelect<CAAdj, Where<CAAdj.tranID, Equal<Required<CAAdj.tranID>>>>.Select(Base, context.CATranRecord.TranID);
           if(adj!=null)
	    {
	      GLTranExt tranExt = Base.Caches[typeof(GLTran)].GetExtension<GLTranExt>(tran);
	      tranExt.UsrCreatedOn = context.CATranRecord.CreatedDateTime;
	    }
	}
	return baseMethod(je,tran,context);
    }
    #endregion
}
- Before you start overriding the InsertDocumentTransaction, you
should understand which field of the GLTranInsertionContext class
is changed depending on which form is used. You are overriding the Release action on
the Transactions form, so open Element Inspector for this form's header and see which
Data Class and View Name it has. Their names correspond to types and fields of the
GLTranInsertionContext class.
- Publish the customization project.
- Open the Transactions form. Note the Created On field in the
form's header. Create a transaction and release it. The released transaction is shown on
the screenshot below.
Figure 4. The released transacrion on the customized Transactions form 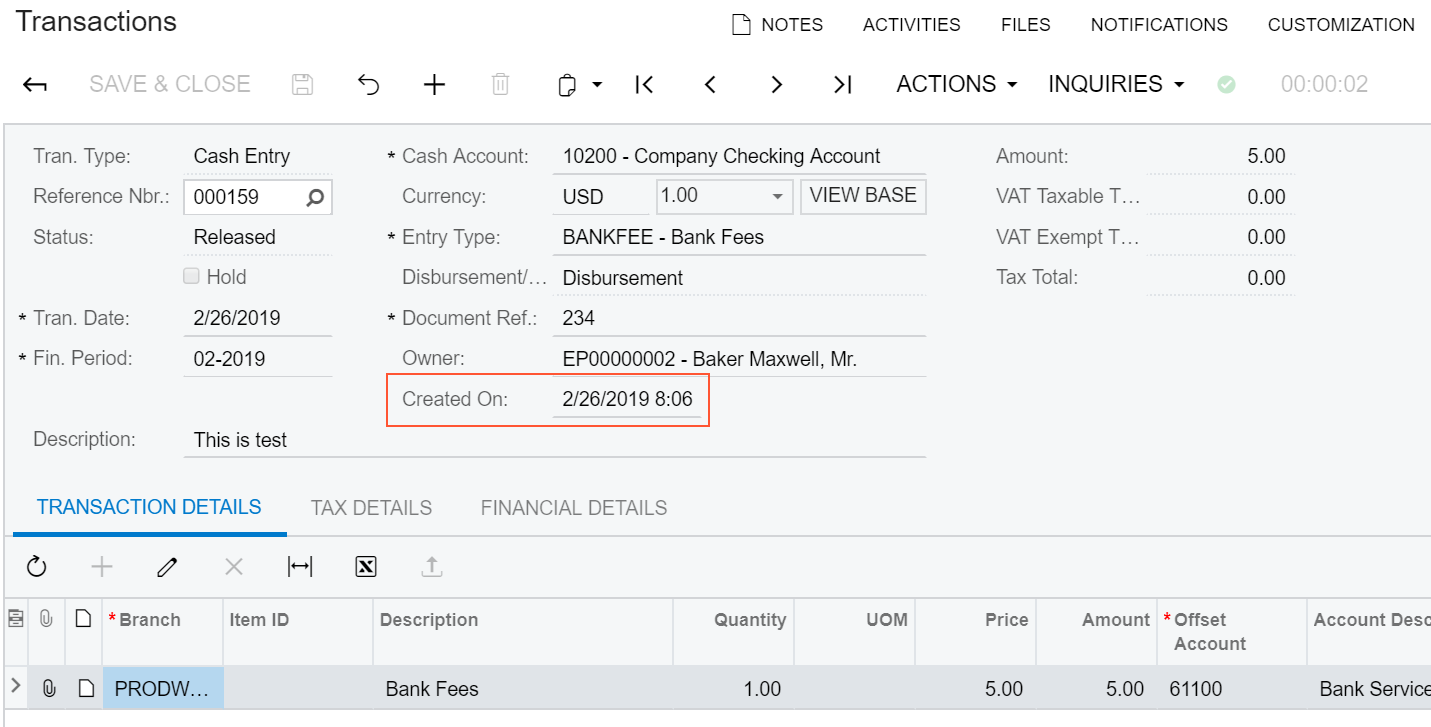
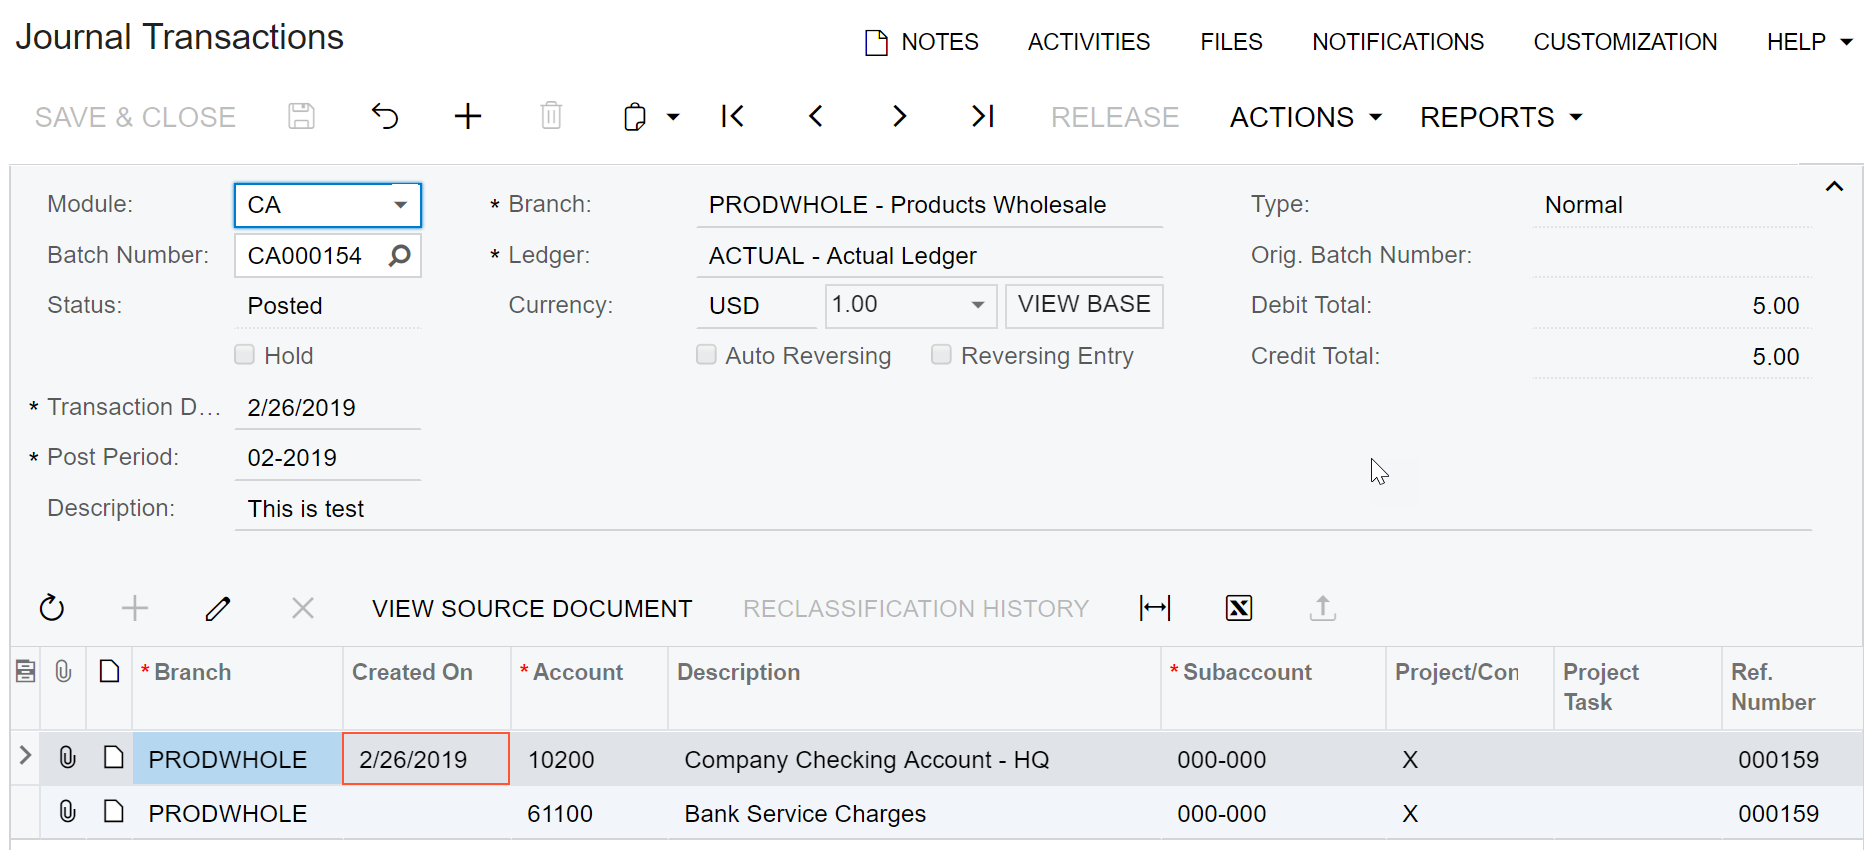
- In the Financial Details tab, click the generated batch number.
- The Journal Transactions form opens. Note the Created On column
in the form's grid. Only the first line corresponding to the transaction's header has
the Created On column value filled.
Figure 5. The customized Journal Transactions form