Adding or Altering BLC Event Handlers
The following examples of customization tasks demonstrate how you can implement custom handlers for events in extension classes to business logic controllers (BLCs, also referred to as graphs).
Implementing a Handler That is Appended to the Collection of Base Handlers
When you define an event handler in the BLC extension class with the same declaration, as it is defined in the base (original) BLC, this handler is added to the appropriate event handler collection. Depending on the event type, the event handler is appended to either the end of the collection or the start of it. When the event occurs, all event handlers in the collection are executed, from the first one to the last one. For details, see Event Handlers.
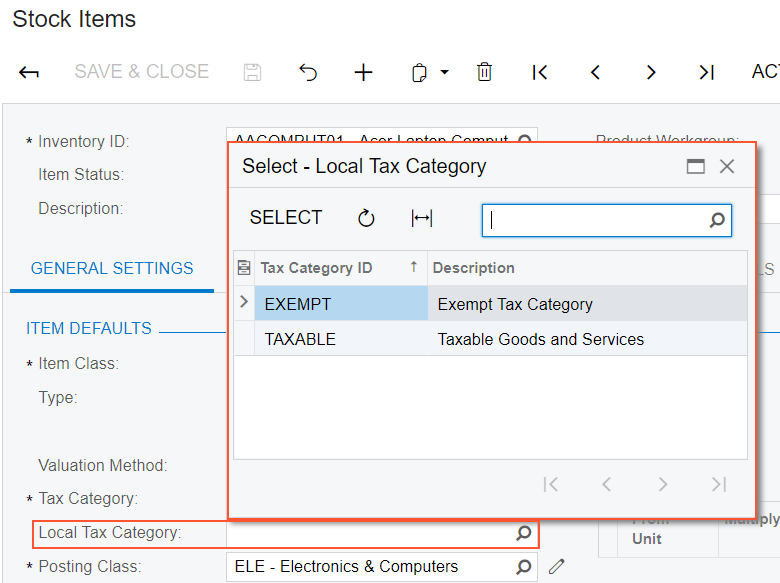
Suppose that you need to add validation of Local Tax Category on the
General tab of the Stock Items (IN202500) form.
Local Tax Category that is shown in the screenshot below is a
custom field that has been added to the form, as described in the example of Adding Data Fields. Local Tax Category is linked to the
custom UsrLocalTaxCategoryID data field defined in the DAC extension for
the InventoryItem data access class.
Your task is to check whether the selected Local Tax Category is the same as the selected Tax Category of the item and add a warning message that appears for the Local Tax Category box if they are the same.
To resolve the task, you implement validation of fields on the RowUpdating event handler that you will add to the BLC extension for the Stock Items form. In this variant of implementation, the validation will occur when the user attempts to save the InventoryItem record. In the handler, you compare the TaxCategoryID and UsrLocalTaxCategoryID fields and return an error message that displays for the Local Tax Category box if the values are equal. Do the following:
- Select the business logic controller for customization by clicking and clicking the Warehouses tab on the Stock Items
form. The system should retrieve the following information that appears in the
Element Properties dialog box:
- Business Logic: InventoryItemMaint. The business logic
controller that provides the logic for the Stock Items form.
Select in the Element Properties dialog box. In the Select Customization Project dialog box, specify the project to which you want to add the customization item for the business logic controller of the form and click OK.
The Code Editor opens for customization of the business logic code of the form (see the screenshot below). The system generates the BLC extension class in which you can develop the customization code. (See Graph Extensions for details.)
Figure 2. The BLC extension class generated for customization of the business logic code executed for the Stock Items form 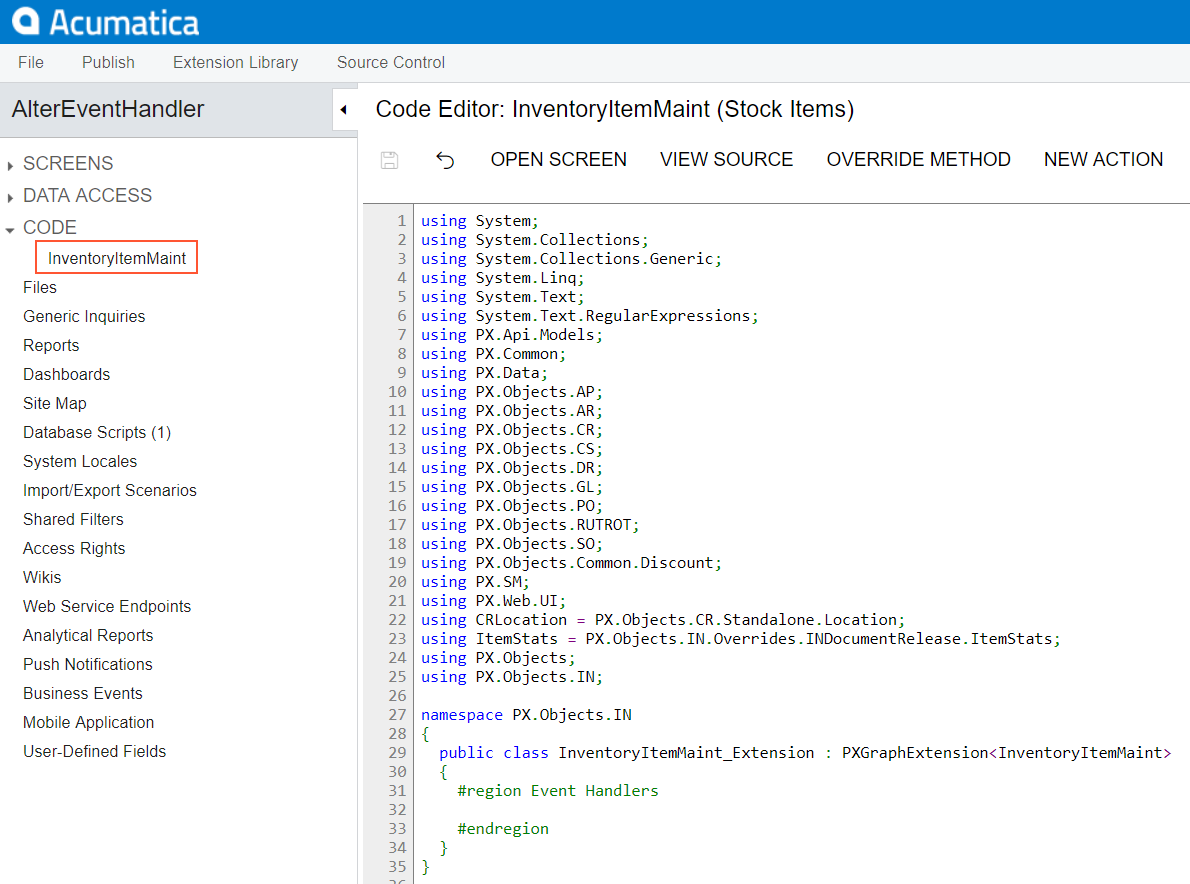
- Business Logic: InventoryItemMaint. The business logic
controller that provides the logic for the Stock Items form.
- Add the following code to the BLC extension class for
InventoryItemMaint:
#region Event Handlers
protected void InventoryItem_RowUpdating(PXCache sender, PXRowUpdatingEventArgs e)
{
      InventoryItem row = e.NewRow as InventoryItem;
      InventoryItemExt rowExt = sender.GetExtension<InventoryItemExt>(row);
      if (row.TaxCategoryID != null && rowExt.UsrLocalTaxCategoryID != null &&
         row.TaxCategoryID == rowExt.UsrLocalTaxCategoryID)
      {
         sender.RaiseExceptionHandling<InventoryItemExt.usrLocalTaxCategoryID>(
             row,
             rowExt.UsrLocalTaxCategoryID,
             new PXSetPropertyException("Tax category and local tax category should differ",
                 PXErrorLevel.Warning));
      }
}
#endregion
The event handler checks whether the TaxCategoryID and UsrLocalTaxCategoryID field values are not null and do not equal each other. If these conditions are not satisfied, the handler issues the warning that will be shown on the Local Tax Category box in the UI, which corresponds to the UsrLocalTaxCategoryID field.
Note:The field is accessed by its string name by using theGetValue()method on the cache. There is a number of ways how you can access customization objects from code. See Access to a Custom Field for details. - Click Save in the Code Editor to save the changes.
The system adds the customization to the business logic code to the Code list of project items. See Code Editor for details.
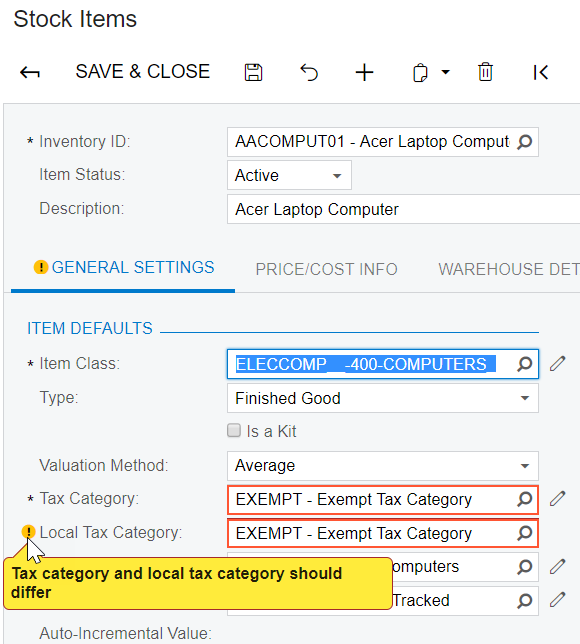
To view the result of the customization, publish the customization project and open the Stock Items form. To test the validation, select an item on the form, set the Local Tax Category the same as the Tax Category of the item and click Save. The warning message appears for the Local Tax Category box, as it was required by the task. To view the warning message, point the mouse to the warning icon, as shown on the screenshot below.
Implementing a Handler That Replaces the Collection of Base Handlers
In a BLC extension, you can define an event handler so that the handler replaces the base BLC event handler collection. To do this, you declare the event handler with an additional parameter, as described below. When the event is raised, the system calls the event handler with an additional parameter of the highest-level BLC extension. The system passes the link to the event handler with an additional parameter from the extension of the previous level, if such an event handler exists, or to the first item in the event handler collection (also described in Event Handlers). In the event handler that replaces the collection of handlers of the base BLC, you can invoke the collection of base handlers as well as implement the logic to be executed before and after the base collection.
Suppose that you need to resolve the same customization task, as described above—that is,
you have to add validation of Local Tax Category on the
General tab of the Stock Items form. To resolve the task, you
implement validation in the RowUpdating event handler that you define in
the BLC extension for the InventoryItemMaint class.
If you define the event handler, as listed below, the handler will replace the collection of handlers of the base BLC. The code of the replacing handler that is given below introduces the same behavior of the Stock Items form as the code of the event handler that is added to the collection, as described above in Adding a Handler to the Collection of Base Handlers. In the handler below, you invoke the base handlers first and then validate the TaxCategoryID and UsrLocalTaxCategoryID fields and return an error message that displays for the Local Tax Category box if the validation fails.
#region Event Handlers
protected void InventoryItem_RowUpdating(
    PXCache cache, PXRowUpdatingEventArgs e, PXRowUpdating InvokeBaseHandler){
    //execute the collection of base handlers
    if(InvokeBaseHandler != null) InvokeBaseHandler(cache, e);
    //add the validation of Local Tax Category
    InventoryItem row = e.NewRow as InventoryItem;
    InventoryItemExt rowExt = cache.GetExtension<InventoryItemExt>(row);
    if (row.TaxCategoryID != null && rowExt.UsrLocalTaxCategoryID != null &&
        row.TaxCategoryID == rowExt.UsrLocalTaxCategoryID)
    {
        cache.RaiseExceptionHandling<InventoryItemExt.usrLocalTaxCategoryID>(
            row,
            rowExt.UsrLocalTaxCategoryID,
            new PXSetPropertyException("Tax category and local tax category should differ",
                PXErrorLevel.Warning));
    }
}
#endregion
InvokeBaseHandler() to invoke the
collection of event handlers defined in the base BLC. Depending on a customization task, you
can skip the execution of base handlers or implement the needed logic before the base
handlers are invoked.Adding an Event Handler From the Screen Editor
To add a custom handler for a row or field event to the customization project, you can use the Screen Editor, as described below.
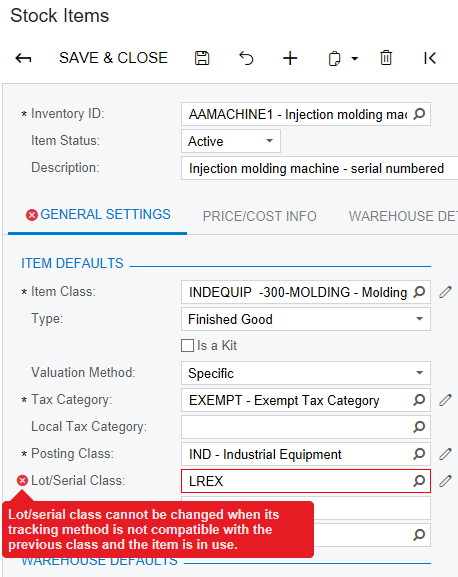
Suppose that on the Stock Items form you need to replace the warning message that appears on the Lot/Serial Class box for an incompatible class selected in the box (see the screenshot below) with an error message.
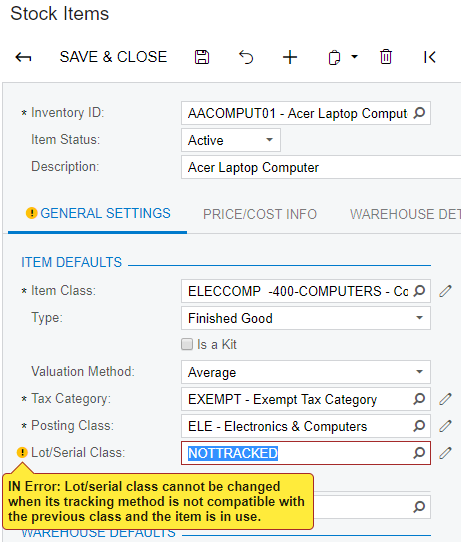
To resolve the task, you have to modify the logic of validation of the DAC field that
corresponds to the Lot/Serial Class box. You have to implement a
custom handler for the FieldVerifying event on the DAC field. Do the
following:
- Find the DAC field and add the event handler to the customization project for it, open
the form in the Screen Editor. To do this, on the Customization
menu, select Inspect Element and click the label or the box area of
the Lot/Serial Class control. The system should retrieve the
following information that appears in the Element Properties dialog
box:
- Control Type: Selector. The type of the inspected UI control.
- Data Class: InventoryItem. The data access class that contains the field corresponding to the inspected control.
- Data Field: LotSerClassID. The data field that is linked to the inspected control.
- Business Logic: InventoryItemMaint. The business logic controller that provides the logic for the Stock Items form.
- Click Customize in the Element Inspector. In the
Select Customization Project dialog box, specify the project to
which you want to add the customization item for the business logic controller of the form
and click OK.
The Screen Editor opens for the form already navigated to the inspected control, as the screenshot below shows.
Figure 5. The Screen Editor opened for the inspected element 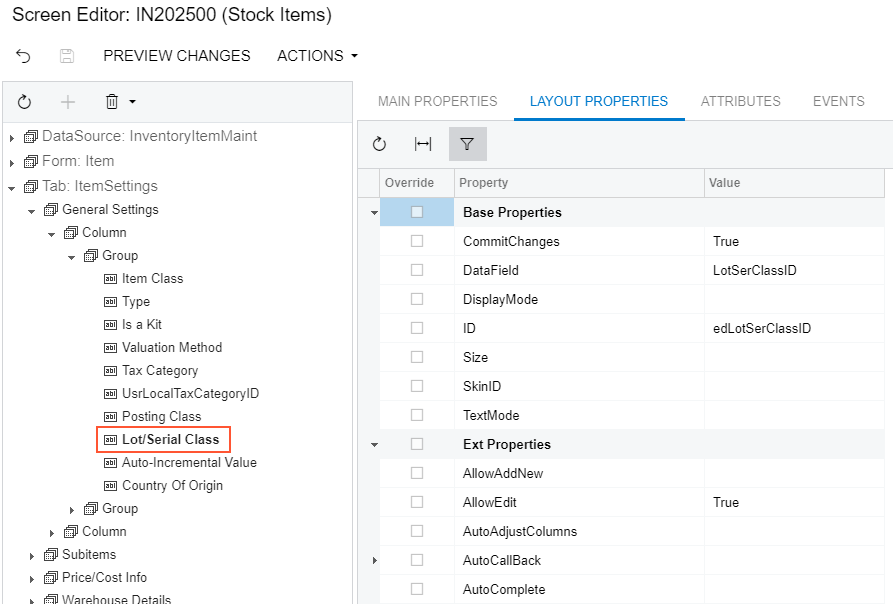
- Add the
FieldVerifyingevent handler for data field underlying the Lot/Serial Class control. To do this, first select the Events tab and find theFieldVerifyingevent in the grid. The selected check box in the Handled in Source column means that theFieldVerifyingevent is already handled for theLotSerClassIDfield in the original business logic controller,InventoryItemMaintclass.Note:The Events tab displays the events depending on the control selected in the tree. The tab shows the field events f you select a control that is linked to a data field (that is, has theDataFieldproperty specified) and the row events of the parent container that is linked to a data view (that is, has theDataMemberproperty specified). If you select a container that is not linked to a data view or data field, the tab shows no events.Add a custom handler for the
LotSerClassIDfield to the customization project by clicking the FieldVerifying event in the table and then clicking Add Handler on the toolbar (see the screenshot below).Figure 6. Adding an event handler to the customization project 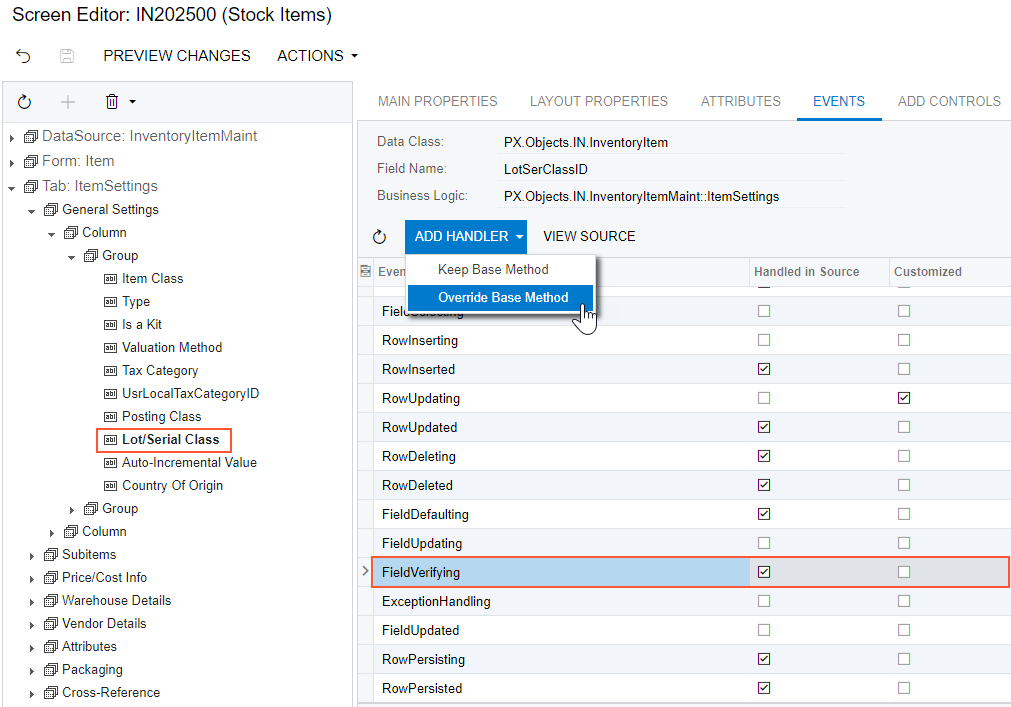
The system generates the definition of the event handler, adds the definition to the BLC extension class for the form, and opens the Code Editor with the generated code as shown below. The system generates handlers with three input parameters; a handler with such definition replaces the collection of event handlers implemented in the original BLC, which is described in Implementing a Handler That Replaces the Collection of Base Handlers. You can modify the generated code as needed.
protected void InventoryItem_LotSerClassID_FieldVerifying( PXCache cache, PXFieldVerifyingEventArgs e, PXFieldVerifying InvokeBaseHandler) { if(InvokeBaseHandler != null) InvokeBaseHandler(cache, e); var row = (InventoryItem)e.Row; } - Modify the generated code, as listed below, and click Save in
Code Editor to save the changes to the customization project. In the code, you catch the
exception that could be thrown from the original handlers and create another exception
with the error message instead of the original
one.
protected void InventoryItem_LotSerClassID_FieldVerifying( PXCache cache, PXFieldVerifyingEventArgs e, PXFieldVerifying InvokeBaseHandler) { try { if(InvokeBaseHandler != null) InvokeBaseHandler(cache, e); } catch (PXSetPropertyException ex) { cache.RaiseExceptionHandling<InventoryItem.lotSerClassID>( e.Row, e.NewValue, new PXSetPropertyException( ex.MessageNoPrefix, PXErrorLevel.Error)); } } - Publish your customization project.
To view the result of the customization, publish the customization project and open the Stock Items form. To test the validation, select an incompatible class in the Lot/Serial Class box, as shown in the screenshot below. The error message appears for the box instead of a warning message.