
IMS Online Express - Administrators (Changing Employee Rosters)
What is a roster?
A roster is simply a standard, or expected, working pattern assigned to employees.
IMS Online Express has a go at working out the employee’s roster based on Standard Weekly and Daily Hours in IMS Payroll.
This standard logic may not apply to all employees, so it is important to check derived employee rosters, and update if necessary.
You only need to assign a roster template, or an individual roster to an employee IF the derived roster generated from IMS Payroll is not correct.
What is the impact of the roster in IMS Online Express?
-
Employees will only be paid for leave that has been applied for on a rostered day of work.
-
Let’s say the employee is rostered to work Monday to Friday, and applies for leave spanning from Monday for two weeks until the following Friday.
-
Since the employee is only rostered to work Monday to Friday, leave days will not be generated for Saturday and Sunday within the two week leave request.
-
If the employee applies for leave that does not include any rostered days, warnings will be generated to advise the leave request will not result in a payment.
In IMS Online Max, the roster may also form the starting point for the timesheet. This means that the employee and/or manager only need to enter exceptions to the scheduled rostered hours of work.
-
Roster information will be seen in the Leave Request calendar screens, providing visibility to both employees and managers regarding scheduled hours/days of work.
-
This makes it easier for employees to choose leave days – and easier for managers to decide whether leave should be approved or declined by being able to see the whole team’s roster for the day.
Roster templates
Roster Templates define a standard working pattern that can then be applied to employees.
Note that Roster Templates do not have to be used; it may be easier to simply assign individual roster patterns to employees (see next section).
View existing templates
Roster Templates are viewed from the Masterfiles page via Employee Permanent Rosters:
-
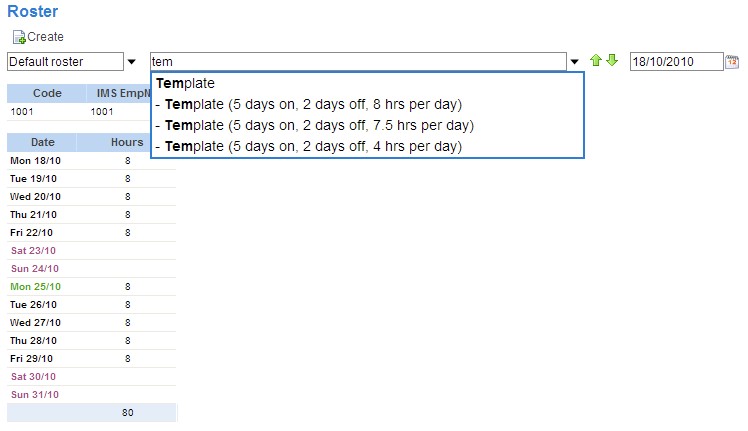
Start typing “template” into the Name field; a list of templates that have already been set up will be displayed:
-
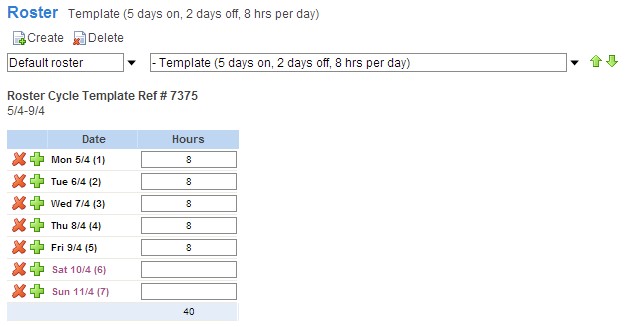
To view the roster for an existing template, simply arrow down to the relevant template to highlight it, and then press Enter (or click on the template using your mouse):
-
The above template is seven days in length. The roster pattern is made up of five working days of eight hours per day; followed by two days off.
-
When assigning the roster template to an employee, the employee can start on any day of the roster pattern. For example, let’s say the employee starts on a Wednesday. The employee will start on day three of the roster, which means the employee works for two days, has two days off, and then goes onto the normal pattern of five days on and two days off.
Create a new template
New templates only need to be generated if you wish to assign generic roster templates to employees.
Roster Templates are created from the Employee Permanent Rosters link on the MasterFiles page:
-
Start typing “template” into the Name field; a list of templates that have already been set up will be displayed (as per above screenshot).
-
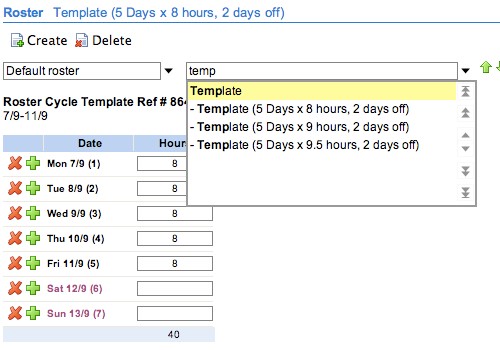
Highlight Template, and press Enter:
-
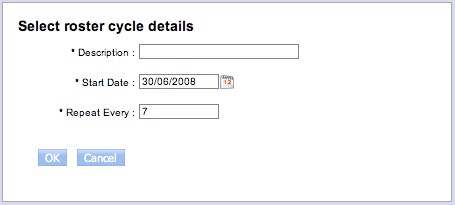
To add a new Roster Template, click on the Create button:
|
Field |
Explanation |
|---|---|
|
Description |
Type in a meaningful description for the Roster Template. |
|
Start date |
Enter a start date for the roster cycle. |
|
Repeat every |
This is the number of days that makes up the roster pattern. For example five days on and two days off is a seven-day pattern, whereas a four-on and four-off pattern is an eight-day pattern. |
-
Click OK to save the Roster Template.
Assigning roster templates to employees
This step only needs to be taken if derived rosters sourced from IMS Payroll are not correct, and you wish to apply a generic roster pattern to employees.
-
Use the dropdown list to navigate to the applicable employee on the Employee Permanent Rosters page (on Masterfiles tab page), and then click the Create button.
-
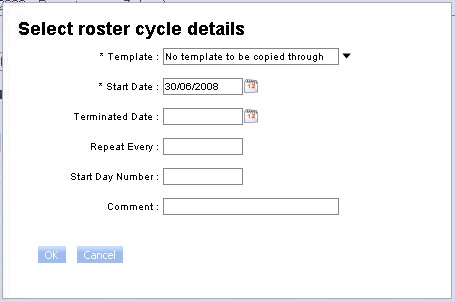
You will be presented with the following screen:
|
Field |
Explanation |
|---|---|
|
Template |
Click on the drop-down arrow to view a list of previously configured roster templates. If the work pattern you wish to apply to the employee is not on the list, then you will set up an individual roster pattern (see next section for more information). |
|
Start date |
Type in the start date for the new roster pattern. Important Note – this date cannot be earlier than the employee’s start date with the organisation. |
|
Terminated date |
• This field would normally be left blank, however if this roster pattern has a fixed end date, type in the finish date for the roster pattern. |
|
Repeat every |
• Leave this field blank (this value is determined from the roster template). |
|
Start day number |
This field specifies the day within the cycle on which the employee will start. For example a new starter may commence employment on Monday 7 April, so for a seven-day pattern, this is likely to be Day One of the roster cycle. However if the employee starts work on a Wednesday, this is likely to be Day Three of a seven-day pattern. |
|
Comment |
• Enter a comment for the roster cycle pattern, if required |
Once a roster template has been assigned to an employee, there is no further linkage to it. For example if the roster template changes in the future, these changes do not flow through to employees previously set up with a roster sourced from the template.
-
Press OK to generate the roster pattern for the employee.
-
You are able to make changes to the roster if it is slightly different to the roster template at this stage.
-
You only need to save the roster pattern if you have made changes at employee level after generating the roster from the roster template.
Assigning individual rosters to employees
This step only needs to be taken if derived rosters sourced from IMS Payroll are not correct, and you wish to apply individual roster patterns to employees.
-
Use the dropdown list to navigate to the applicable employee on the Employee Permanent Rosters page (on Masterfiles tab page), and then click the Create button.
-
You will be presented with the following screen:
|
Field |
Explanation |
|---|---|
|
Template |
• Leave this field blank since you are setting up a roster pattern that is not generic. |
|
Start date |
Type in the start date for the new roster pattern. Important Note – this date cannot be earlier than the employee’s start date with the organisation. |
|
Terminated date |
• This field would normally be left blank, however if this roster pattern has a fixed end date, type in the finish date for the roster pattern. |
|
Repeat every |
This field holds the number of days in the roster cycle. For example, 7 days (ie 5 on, 2 off); 8 days (ie 4 on, 4 off) |
|
Start day number |
• Leave this field blank. |
|
Comment |
• Enter a comment for the roster pattern, if required |
-
Click OK. A blank roster form will be created.
-
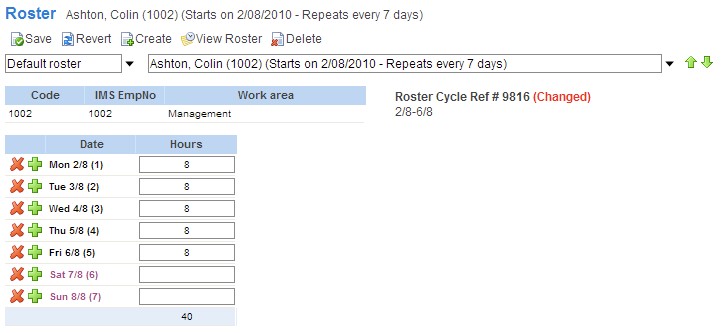
Fill in the rostered hours for each day:
-
Click Save to save the individual employee roster pattern.