Business Events: To Configure the Monitoring of Condition Fulfillment on a Schedule
This activity will walk you through the process of configuring a business event to monitor condition fulfillment on schedule.
Story
Suppose that the accounting team needs to inform customers by email about invoices that are due tomorrow. The system should also attach the invoice in PDF format to the email. Additionally, the system should send a copy of the email to the owner of invoice and create a task for the owner to follow up with the customer regarding the payment of the invoice. The task's due date should be two days after the due date of the invoice.
Acting as the system administrator, you need to configure the business event to automate the sending of notifications about the invoices that are due and the creation of follow-up tasks for the owners of the invoices. As the data source, you will use the BE_InvoiceDueTomorrow (BE403010) form, which is a custom generic inquiry that lists invoices. The inquiry contains all the data fields that are needed for monitoring the due invoices.
Configuration Overview
In the U100 dataset, on the Enable/Disable Features (CS100000) form, the Scheduled Processing feature has been enabled.
Process Overview
First, on the Generic Inquiry (SM208000) form, you will upload the BE_InvoiceDueTomorrow.xml generic inquiry.
Next, you will define the notification and task templates to be used as the event subscribers by using the Email Templates (SM204003) and Task Templates (SM204003) forms, respectively.
On the Business Events (SM302050) form, you will create the needed business event. You will specify trigger conditions, add subscribers, and add a schedule for the event.
To verify that the business event works correctly, you will change a due date of an invoice to tomorrow. After the system executes the inquiry based on the specified schedule, you will verify that the notification email appears on the All Records tab of the All Emails (CO409070) form. Also, you will sign in as the owner of the invoice and verify that the related task appears on the My Tasks tab of the Tasks (EP4040PL) form.
System Preparation
Launch the MYOB Acumatica website, and sign in to a tenant with the U100 dataset preloaded as system administrator Kimberly Gibbs. You should sign in by using the gibbs username and the 123 password.
Step 1: Uploading the Needed Generic Inquiry
To upload the BE_InvoiceDueTomorrow generic inquiry so that you can use the corresponding generic inquiry form as a data source for the business event, do the following:
- Open the Generic Inquiry (SM208000) form.
- On the form toolbar, click .
- In the Upload XML File dialog box, select BE_InvoiceDueTomorrow.xml, and click Upload. You may need to wait a bit until the system uploads the inquiry.
- On the form toolbar, click View Inquiry. The systems opens the BE_InvoiceDueTomorrow (BE403010) generic inquiry form in a new browser tab.
Step 2: Creating a Notification Template
To create a notification template to be used as a subscriber to the business event you will configure, do the following:
- While you are still viewing the BE_InvoiceDueTomorrow (BE403010) generic inquiry form, on the form title bar, click .
- In the Notifications dialog box, click Add Email Template. The system opens the Email Templates (SM204003) form in a new browser tab. Notice that the system has populated the Screen Name box with BE_InvoiceDueTomorrow.
- In the Description box, type Invoice Due Tomorrow.
- In the From box, select system@sweetlife.com.
- In the To box, open the selection dialog box, switch to the Screen Fields tab, select Entity -> ARInvoice-> Owner-> Email and click Select.
- In the To box, type ((CustomerContact_eMail));.
- In the CC box, type ((OwnerContact_eMail));.
- In the Subject box, type The ((ARInvoice_refNbr)) invoice is due tomorrow.
- On the Message tab, type the following text:
Dear ((CustomerContact_fullName)),
The ((ARInvoice_refNbr)) invoice is due tomorrow. The invoice amount is ((ARInvoice_curyOrigDocAmt)).
Please see the attached invoice.
- Go to the Attached Reports tab.
- On the table toolbar of the Reports Attached by Report ID table (left pane), click Add Row.
- In the Report ID column, select the Invoice/Memo (AR641000) report, which is a printed form for the selected invoice or memo.
- On the right pane of the tab, select the Use Event as Data Source check box. The system automatically inserts ARInvoice in the Source Table box, based on the intersection of the tables used for the inquiry and for the report.
- In the Report Parameters table, add two rows with the
following values:
Parameter Name Parameter Value Document Type ARInvoice.docType Reference Number ARInvoice.refNbr The system will use these parameters to generate an invoice attachment for each customer.
- On the form toolbar, click Save.
Step 3: Configuring the Task Template
To configure the task template to be used as the event subscriber, do the following:
- On the Task Templates (SM204003) form, add a new
record.Tip:To open the form for creating a new record, type the form ID in the Search box, and on the Search form, point at the form title and click New right of the title.
- In the Description box, type Invoice Due Tomorrow.
- In the Screen ID box, select BE_InvoiceDueTomorrow.
- In the Owner box, select the Entity -> ARInvoice-> Owner option.
- In the Summary box, type The ((ARInvoice_refNbr)) invoice is due tomorrow.
- In the Body area, type the following text:
Dear ((OwnerContact_displayName)),
The ((ARInvoice_refNbr)) invoice is due tomorrow. The invoice amount is ((ARInvoice_curyOrigDocAmt)).
Please follow up with ((CustomerContact_fullName)).
- On the form toolbar, click Save.
- Go to the Task Settings tab.
- In the row with Start Date in the Field Name column, in the Value column, type the following formula : =DateAdd( [Results.ARInvoice_dueDate], 'day', 1 ). The system will calculate the start date for the task by using the data from the inquiry. The start date will be the day after the due date of the invoice.
- In the row with Due Date in the Field Name column, in the Value column,type the following formula: =DateAdd( [Results.ARInvoice_dueDate], 'day', 2 ). The system will calculate the due date for the task by using the data from the inquiry. The due date will be two days after the due date of the invoice.
- In the row with Priority in the Field Name column, in the From Schema column, select the check box, and in the Value column, select the High option.
- On the form toolbar, click Save.
Step 4: Creating a Business Event Monitored on Schedule
To create a business event that is monitored on a schedule, do the following:
- On the Business Events (SM302050) form, add a new record.Tip:To open the form for creating a new record, type the form ID in the Search box, and on the Search form, point at the form title and click New right of the title.
- In the Event ID box, type InvoiceDueTomorrow.
- In the Screen Name box, select BE_InvoiceDueTomorrow.
- In the Type box, select Trigger by Schedule.
- In the Raise Event box, leave the For Each Record option, which is selected by default.
- In the Description box, type InvoiceDueTomorrow.
- On the Trigger Conditions tab, add three rows with the
following values:
-
Row 1:
- Table Name: ARInvoice
- Field Name: Type (docType)
- Condition: Equals
- Value 1: Invoice
- Operator: And
-
Row 2:
- Table Name: ARInvoice
- Field Name: Status (status)
- Condition: Equals
- Value 1: Open
- Operator: And
-
Row 3
- Table Name: ARInvoice
- Field Name: Due Date (dueDate)
- Condition: Equals
- Value 1: @Today+1
-
- On the Subscribers tab, add two rows with the following
values:
-
Row 1:
- Type: Email Notification
- Subscriber ID: Invoice Due Tomorrow
-
Row 2:
- Type: Task
- Subscriber ID: Invoice Due Tomorrow
-
- On the Schedules tab, on the table toolbar, click Create Schedule. The Automation Schedules pop-up window opens.
- In the Description box, type Invoice Due Tomorrow Check.
- On the Details tab, in the Starts On box, select the current date.
- Select the No Execution Limit check box.
- Select the Keep Full History check box.
- On the Schedule tab (Schedule Type section), select Daily.
- In the Schedule Details section, in the Every box, type 1.
- In the Execution Time section, in the Starts On box, select 1:00 AM.
- In the Next Execution Date box, type your current time plus five minutes (you need this time to finish the configuration).
- In the Stops On box, select 11:30 PM.
- Optional: In the Every box, type 00:02. This setting will make the system execute the inquiry every 2 minutes, in case you want to test the event multiple times.
- On the form toolbar, click Save & Close.
- On the form toolbar of the Business Events form, to which you return, click Save.
Step 5: Verifying the Configuration of the Business Event
You have configured a business event that is triggered when the inquiry returns an invoice that is due tomorrow. The system monitors the inquiry results based on the specified schedule. When the event occurs, the system should send an email notification to a customer and owner of the due invoice. Also, the system must create a task for the owner to follow up with the customer.
To test the configuration, you change a due date for an invoice, wait for the system to execute the inquiry based on the schedule, and verify that the notification and the task have been created. Do the following:
- Open the Invoices and Memos (AR301000) form.
- In the Reference Nbr. box, select 00001.
- In the Due Date box, select tomorrow's date.
- On the form toolbar, click Save.
- On the Financial tab, notice that Nenad Pasic is specified in the Owner box.
- Open the All Emails (CO409070) form.
- On the All Records tab of the form, locate the record with The 00001 invoice is due tomorrow in the Summary column.
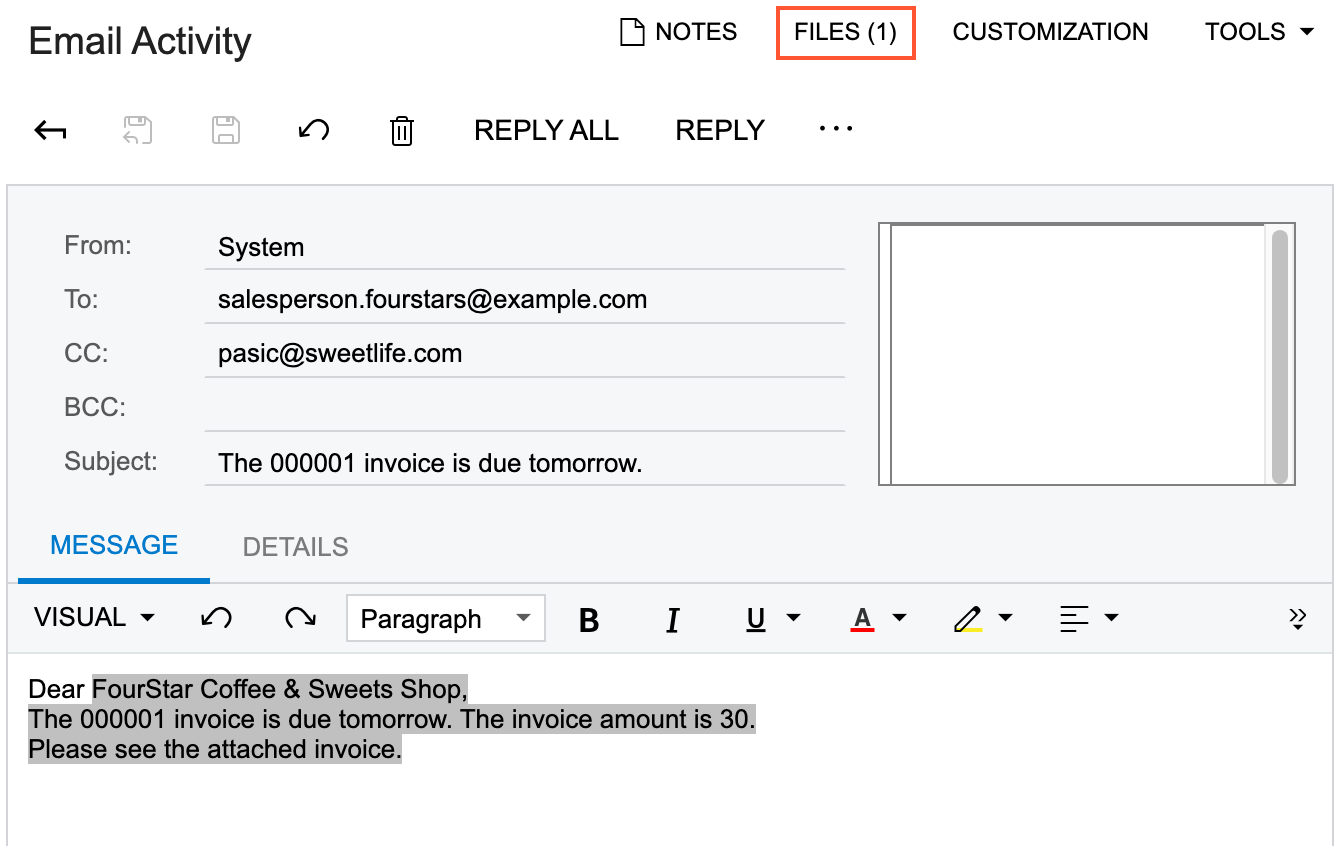
- Click the email to view its details on the Email Activity
(CR306015) form. Notice that the system has replaced the placeholders with the
data copied from the invoice and attached the invoice in PDF format (see the
following screenshot).
Figure 1. An email generated by the business event 
- Sign out, and sign back in as Nenad Pasic by using the pasic username and the 123 password.
- Open the Tasks (EP4040PL) form.
- On the My Tasks tab of the form, locate the record with The 00001 invoice is due tomorrow in the Summary column.
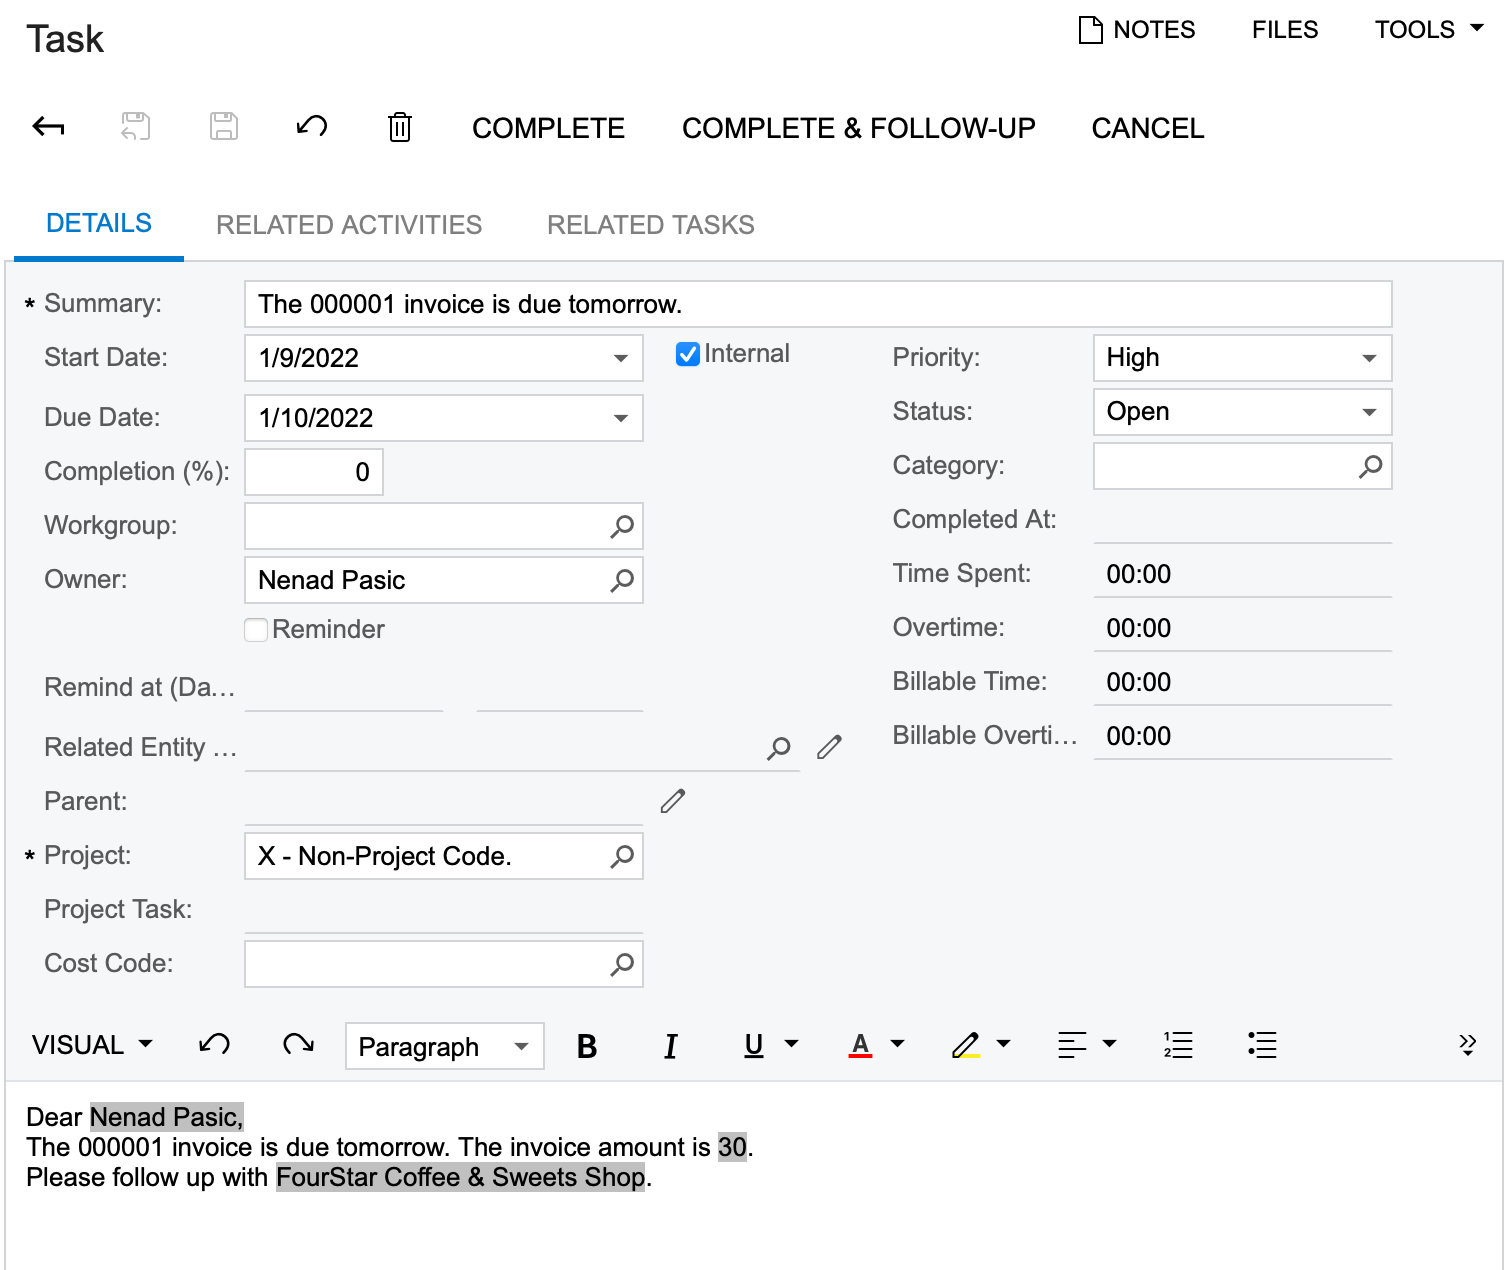
- Click the task to view its details on the Task
(CR306020) form. Notice that the system has replaced the placeholders with the
data copied from the invoice (see the following screenshot).
Figure 2. A task generated by the business event 
