
Purchase Requests and Requisitions: To Process a Requisition Without Requests
The following activity demonstrates how to process a purchase requisition that is not based on purchase requests.
Story
Suppose that you are Joshua Mueller, an office manager in the SweetLife Fruits & Jams company who orders office supplies and furniture. You need to order new computer chairs for your company's employees: 15 high-back computer chairs, and 20 high-back mesh computer chairs. You need to send the related requests for proposals to the Compulink and Co and Space Computers Ltd. vendors. When you have the vendor bids, you need to select the vendor or vendors the company will buy from. You also need to purchase the new computer chairs and process them through their issuing.
Configuration Overview
In the U100 dataset, the following tasks have been performed to support this activity:
- On the Enable/Disable Features (CS100000) form, the
following features have been enabled:
- Inventory and Order Management
- Inventory
- Purchase Requisitions
- On the Mailing & Printing tab of the Purchase Requisitions Preferences (RQ101000) form, the RQPROPOSAL predefined mailing has been listed and will be used for sending proposal requests to vendors by email.
- On the Stock Items (IN202500) form, the following stock items have been created: COMPCHAIR (high-back computer chair) and COMPCHAIRM (high-back mesh computer chair).
- On the Vendors (AP303000) form, the COMPULINK and SPACECOMP vendors have been created.
- On the Warehouses (IN204000) form, the WHOLESALE warehouse has been created.
Process Overview
In this activity, you will do the following:
- On the Requisitions (RQ302000) form, create a purchase requisition and send it to the vendors that will participate in bidding.
- On the Bidding Responses (RQ303000) form, enter bids from vendors into the system.
- On the Complete Bidding (RQ503000) form, initiate automatic bidding among the vendors and review the bidding results.
- On the Requisitions form, initiate the creation of the purchase orders for the selected vendor.
- On the Purchase Orders (PO301000) and the Purchase Receipts (PO302000) form, prepare and process the purchase receipt for the ordered stock items.
- On the Issues (IN302000) form, create the inventory issue to reflect the items being issued to the employees who requested the items.
System Preparation
Before you start processing a purchase requisition without requests, do the following:
- Launch the MYOB Acumatica website, and sign in to a company with the U100 dataset preloaded. You should sign in as office manager Joshua Mueller with the mueller username and the 123 password.
- In the info area, in the upper-right corner of the top pane of the MYOB Acumatica screen, make sure that the business date in your system is set to 1/30/2025. If a different date is displayed, click the Business Date menu button and select 1/30/2025 on the calendar. For simplicity, in this activity, you will create and process all documents in the system on this business date.
- On the Company and Branch Selection menu, in the top pane of the MYOB Acumatica screen, make sure the SweetLife Head Office and Wholesale Center branch is selected.
Step 1: Creating a Purchase Requisition
To create a requisition, do the following:
- On the Requisitions (RQ302000) form, add a new record.
- In the Description box of the Summary area, type Purchase of computer chairs for employees.
- On the Details tab, do the following:
- On the table toolbar, click Add Row.
- Specify the following settings for this row:
- Inventory ID: COMPCHAIR
- Order Qty.: 15
- Est. Unit Cost: 139
- On the table toolbar, click Add Row.
- Specify the following settings for this row:
- Inventory ID: COMPCHAIRM
- Order Qty.: 20
- Est. Unit Cost: 99
- On the form toolbar, click Save.
- On the Bidding tab, add the bidding vendors as
follows:
- On the table toolbar, click Add Row.
- In the Vendor column, select SPACECOMP
- On the table toolbar, click Add Row.
- In the Vendor column, select COMPULINK
- On the form toolbar, click Remove Hold. The system saves the requisition and assigns the requisition the Pending Bidding status.
- On the table toolbar, click Send Requests for Proposal.
The system creates a PDF file that contains a request for proposal for each
vendor, generates an email to each vendor, attaches the files to the emails, and
adds the emails to the outgoing mail. If a schedule has been configured in the
system, the emails will be sent automatically the next time this schedule is
executed.Tip:You could refresh the webpage and click Activities on the title bar of the Requisitions form. The system opens the Tasks & Activities dialog box, from which you can open the emails to the vendors.
You have created a purchase requisition and sent the requests for proposal to the vendors.
Step 2: Entering the Vendor Responses into the System
Suppose that you have received bids from both vendors. The COMPULINK vendor can provide the 15 computer chairs that you need, but at a higher price than that of the SPACECOMP vendor, and 10 mesh computer chairs (you need 20) at a lower price than that of SPACECOMP. The SPACECOMP vendor can provide the requested quantities of both kinds of chairs (15 computer chairs and 20 mesh computer chairs), but its price for mesh computer chairs is higher than that of COMPULINK.
To add the responses from the vendors to the system, do the following:
- Open the Bidding Responses (RQ303000) form.
- In the Summary area, do the following:
- In the Requisition box, select the identifier of the only requisition with the Pending Bidding status.
- In the Vendor box, select COMPULINK.
- On the Bidding Details tab, specify the listed settings
in the following table rows:
- The row with COMPCHAIR in the Inventory ID
column:
- Min. Qty.: 0.00
This is the minimum quantity of the item that the vendor can supply.
- Bid Qty.:
15.00
This is the total quantity of items that the vendor can supply, according to the bidding response.
- Bid Unit Cost:
149.00
This is the unit cost of the item from this vendor, according to the bidding response.
- Min. Qty.: 0.00
- The row with COMPCHAIRM in the Inventory
ID column:
- Min. Qty.: 0.00
- Bid Qty.: 10.00
- Bid Unit Cost: 99.00
- The row with COMPCHAIR in the Inventory ID
column:
- On the form toolbar, click Save.
- In the Vendor box of the Summary area, select SPACECOMP.
- On the Bidding Details tab, specify the listed settings
in the following table rows:
- The row with COMPCHAIR in the Inventory ID
column:
- Min. Qty.: 0.00
- Bid Qty.: 15.00
- Bid Unit Cost: 139.00
- The row with COMPCHAIRM in the Inventory
ID column:
- Min. Qty.: 0.00
- Bid Qty.: 20.00
- Bid Unit Cost: 119.00
- The row with COMPCHAIR in the Inventory ID
column:
- On the form toolbar, click Save.
Step 3: Selecting the Best Bids from Vendors
To perform automatic bidding and review the bidding results, do the following:
- On the Complete Bidding (RQ503000) form, in the Ref. Nbr. box, select the reference number of the only requisition with the Pending Bidding status.
- On the form toolbar, click Update Result. The system
selects vendors automatically and updates the information on the
Bidding Results tab.
Notice that in the Selection area, the Splittable check box is selected, which means that the system can split the order between multiple vendors.
- On the form toolbar, click Save.
- On the Bidding Results tab, analyze the results of the
automatic bidding as follows:
- In the Requisition Details table, click the
COMPCHAIR row.
In the Bidding Details table, in the unlabeled column, the check box for the SPACECOMP vendor is selected. The SPACECOMP vendor offered the best price for the COMPCHAIR item and can provide the entire needed quantity of this item. Thus, you will order these chairs from this vendor.
- In the Requisition Details table, click the
COMPCHAIRM row.
In the Bidding Details table, notice the following:
- In the unlabeled column, the check boxes are selected for both vendors.
- In the Order Qty. column, 10 is specified for both vendors.
The COMPULINK vendor offered a lower price but can provide only 10 chairs. Thus, you will have to purchase the other 10 chairs from the SPACECOMP vendor.
- In the Requisition Details table, click the
COMPCHAIR row.
- On the form toolbar, click Complete Bidding. The status of the requisition is changed to Open.
Step 4: Creating the Purchase Orders
To create the purchase orders for the vendors, do the following:
- On the Requisitions (RQ302000) form, open the requisition with the Open status that you have earlier created in this activity.
- On the More menu, click Create Orders. The system creates purchase orders for the COMPULINK and SPACECOMP vendors and assigns the requisition the Released status.
- On the Purchase Orders tab, make sure that purchase orders with the Open status are listed for the COMPULINK and SPACECOMP vendors, as shown in the following screenshot.
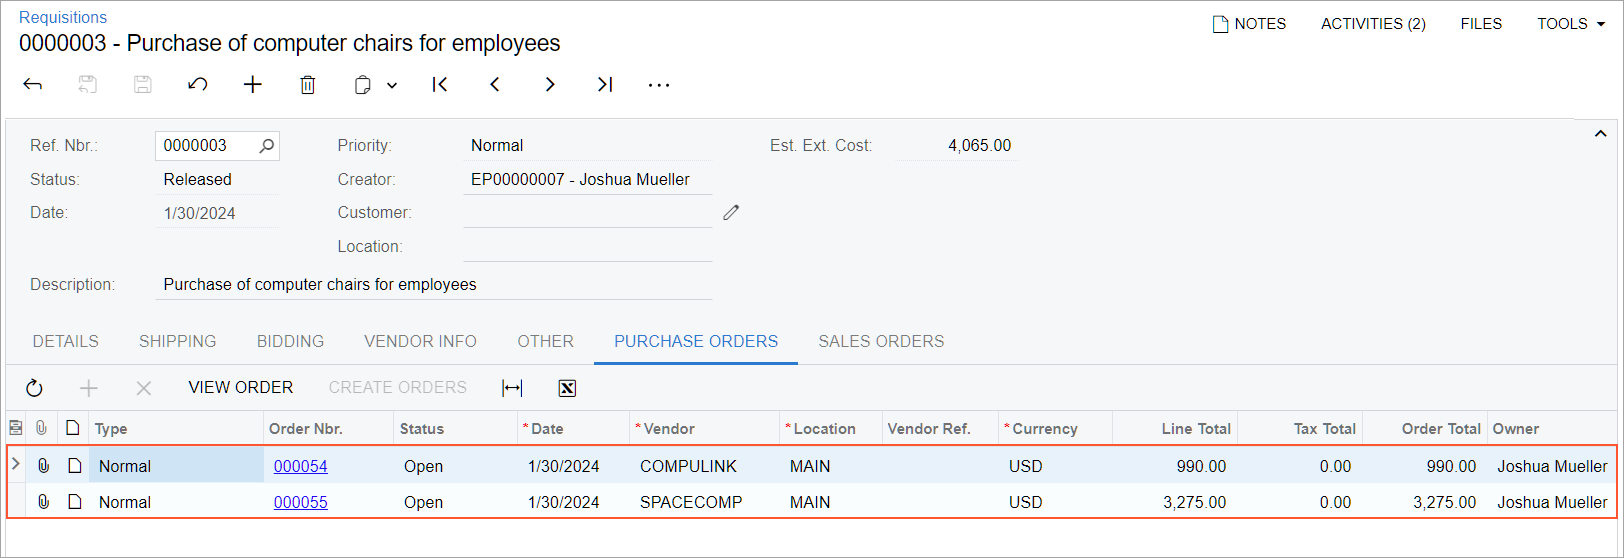
Suppose that you have emailed the purchase orders to the vendors.
Step 5: Receiving the Items from the Vendors
Suppose that the vendors have delivered the ordered chairs to the WHOLESALE warehouse. To create the documents that reflect the receipt of the items in the warehouse, do the following:
- While you are still viewing the Purchase Orders tab of the Requisitions (RQ302000) form for the requisition, click the link in the Order Nbr. column in the row with the COMPULINK vendor. The system opens the purchase order on the Purchase Orders (PO301000) form in a new browser window.
- On the form toolbar, click Enter PO Receipt. The system navigates to the Purchase Receipts (PO302000) form with the new receipt. Notice that the receipt has the Balanced status and the data copied from the linked purchase order.
- On the form toolbar, click Release. The system releases the purchase receipt as well as creating the corresponding inventory receipt and releasing it. On the Other tab, you can view the reference number of the created inventory receipt. The reference number is also a link that you can click to view the inventory receipt on the Receipts (IN301000) form.
- Close the browser window with the Purchase Receipts form.
- On the Purchase Orders tab of the Requisitions form, in the row that has SPACECOMP in the Vendor column, click the link in the Order Nbr. column. The system opens a purchase order on the Purchase Orders form in a new browser window.
- On the form toolbar, click Enter PO Receipt. The system opens the Purchase Receipts form with the new receipt. The receipt has the Balanced status and the data copied from the linked purchase order.
- On the form toolbar, click Release. The system releases the purchase receipt; it also creates the inventory receipt and releases it. On the Other tab, you can view the reference number of the created inventory receipt. The reference number is also a link that you can click to view the inventory receipt on the Receipts form.
- Close the browser window with the Purchase Receipts form.
- On the Inventory Allocation Details (IN402000) form, do the
following in the Selection area:
- In the Inventory ID box, select COMPCHAIR.
- In the Warehouse box, select WHOLESALE.
- Make sure that the quantity in the Available for Issue box is 15.
- In the Inventory ID box, select COMPCHAIRM.
- Make sure that the quantity in the Available for Issue box is 20.
You have received the computer chairs in the warehouse, and now you can issue the items to the employees that ordered them.
Step 6: Issuing Inventory Items from the Warehouse
Suppose that you have provided the chairs that you ordered to the employees. To create and process the needed documents for issuing the items from the WHOLESALE warehouse, do the following:
- On the Issues (IN302000) form, add a new record.
- In the Description box of the Summary area, type Issue of computer chairs to employees.
- On the Details tab, click Add Items on the table toolbar.
- In the Summary area of the Inventory Lookup dialog box, which opens, select WHOLESALE in the Warehouse box.
- Make sure that the Show Available Items Only check box is selected.
- To select the required items, do the following:
- In the Inventory box, type chair to filter the list of stock items.
- In the unlabeled column, select the check box in the row with the COMPCHAIR item.
- Copy the value in the Qty. Available column of the same row to the Qty. Selected column.
- In the unlabeled column, select the check box in the row with the COMPCHAIRM item.
- Copy the value in the Qty. Available column of the same row to the Qty. Selected column.
- Click Add & Close to add the selected items to the issue and close the dialog box.
- On the form toolbar, click Release. The system changes the status of the issue to Released.
- Open the Inventory Allocation Details (IN402000) form.
- In the Selection area, do the following:
- In the Inventory ID box, select COMPCHAIR.
- In the Warehouse box, select WHOLESALE.
- Make sure that the value of the Available for Issue box is 0.
- In the Inventory ID box, select COMPCHAIRM.
- Make sure that the value of the Available for Issue box is 0.
You have issued the items from the WHOLESALE warehouse to the company's employees.