
Purchase Requests and Requisitions: To Process Customer Requests
The following activity demonstrates how to process a purchase requisition that is based on customer requests.
Story
Suppose that you are Matt Parker, a purchasing manager in the SweetLife Head Office and Wholesale Center branch, and you are responsible for processing requests from customers who order fruit in your company. The company works with two fruit vendors: All Fruits Mall and Good Fruits. SweetLife's sales managers have received the following requests for fruit from the FourStar Coffee & Sweets Shop and HM's Bakery & Cafe customers:
- 30 pounds of tangerines and 43 pounds of lemons for a cocktail party from FourStar Coffee & Sweets Shop
- 200 pounds of oranges and 80 pounds of apples for a big birthday party from HM's Bakery & Cafe
You need to enter these requests into the system, create a purchase requisition, and request bids from the vendors. You will select the best vendors to fulfill the requests. The selected vendors will ship fruits to your company's warehouse. You will then process the needed documents to receive the fruits and ship them to the customers.
Configuration Overview
In the U100 dataset, the following tasks have been performed to support this activity:
- On the Enable/Disable Features (CS100000) form, the
following features have been enabled:
- Inventory
- Purchase Requisitions
- On the Warehouses (IN204000) form, the WHOLESALE warehouse has been created.
- On the Request Classes (RQ201000) form, the
CUSTOMER request class has been created with the following
settings:
- Customer Request: Selected, which indicates that this class is used for requests received from customers
- Allow Multiple Vendors per Request: Selected, which indicates that purchase orders can be split by multiple vendors
- On the Stock Items (IN202500) form, the following stock items have been created: APPLES, LEMONS, ORANGES, and TANGERINES.
- On the Customers (AR303000) form, the
following customers have been created:
- HMBAKERY (HM's Bakery & Cafe)
- COFFEESHOP (FourStar Coffee & Sweets Shop)
- On the Vendors (AP303000) form, the following vendors have been created: ALLFRUITS and GOODFRUITS.
- On the Purchase Requisitions Preferences (RQ101000) form, the Create Purchase Order on Hold check box is cleared, which means that purchase orders are created in the Open status.
Process Overview
In this activity, you will do the following:
- On the Requests (RQ301000) form, enter the customer requests into the system.
- On the Create Requisitions (RQ504000) form, initiate the creation of a purchase requisition based on the customer requests. Then on the Requisitions (RQ302000) form, send the requisition to the vendors that may participate in bidding.
- On the Bidding Responses (RQ303000) form, enter bids from vendors into the system.
- On the Complete Bidding (RQ503000) form, initiate automatic bidding among the vendors and manually select a vendor.
- On the Requisitions form, initiate the creation of the purchase orders for the selected vendors.
- On the Purchase Orders (PO301000) and Purchase Receipts (PO302000) forms, prepare and process the purchase receipts for the ordered stock items.
- On the Sales Orders (SO301000) form, prepare the sales order and the related shipment of the stock items to the customer.
System Preparation
Before you start performing the steps of this activity, do the following:
- Launch the MYOB Acumatica website, and sign in to a company with the U100 dataset preloaded. You should sign in as purchasing manager Matt Parker with the parker username and the 123 password.
- In the info area, in the upper-right corner of the top pane of the MYOB Acumatica screen, make sure that the business date in your system is set to 1/30/2025. If a different date is displayed, click the Business Date menu button and select 1/30/2025 on the calendar. For simplicity, in this activity, you will create and process all documents in the system on this business date.
- On the Company and Branch Selection menu, in the top pane of the MYOB Acumatica screen, make sure the SweetLife Head Office and Wholesale Center branch is selected.
Step 1: Creating the Customer Requests in the System
To create the customer requests from the COFFEESHOP and HMBAKERY customers, do the following:
- On the Requests (RQ301000) form, add a new record.
- In the Summary area, do the following:
- In the Request Class box, make sure that CUSTOMER is selected.
- In the Requested By box, select COFFEESHOP.
- In the Description box, type Order for tangerines and lemons.
- On the Details tab, do the following:
- On the table toolbar, click Add Row.
- In the row, specify the following settings:
- Inventory: TANGERINES
- Order Qty.: 30
- On the table toolbar, click Add Row.
- In the row, specify the following settings:
- Inventory: LEMONS
- Order Qty.: 43
- On the form toolbar, click Remove Hold. The system saves the request and assigns the request the Open status.
- While you are still on the Requests form, add another new record.
- In the Summary area, do the following:
- In the Request Class box, make sure that CUSTOMER is selected.
- In the Requested By box, select HMBAKERY.
- In the Description box, type Order for oranges and apples.
- On the Details tab, do the following:
- On the table toolbar, click Add Row.
- In the row, specify the following settings:
- Inventory: ORANGES
- Order Qty.: 200
- On the table toolbar, click Add Row.
- In the row, specify the following settings:
- Inventory: APPLES
- Order Qty.: 80
- On the form toolbar, click Remove Hold. The system saves the request and assigns it the Open status.
Step 2: Creating a Purchase Requisition
To create a combined requisition for the customers' requests that you have created in the previous step, do the following:
- On the Create Requisitions (RQ504000) form, make sure that all four request lines are displayed in the table.
- On the form toolbar, click Process All.
- In the Confirmation dialog box, which opens, click Yes. On the Requisitions (RQ302000) form, the system opens the requisition that it has created based on the requests.
- On the Bidding tab, in the Bidding Vendors table, make sure that ALLFRUITS is specified.
- Add the GOODFRUITS vendor as follows:
- On the table toolbar, click Add Row.
- In the Vendor column, select GOODFRUITS.
The ALLFRUITS and GOODFRUITS vendors will be invited to take part in bidding.
- On the form toolbar, click Remove Hold. The system saves the requisition and assigns it the Pending Bidding status.
Suppose that you have sent the requisition to these vendors by email. In a system where email functionality has been configured, you would click Send Requests for Proposal on the table toolbar of the Requisitions form to send all the requests to the vendors or send each request by clicking the vendor on the Bidding tab and clicking Send Request on the table toolbar.
Step 3: Entering the Vendor Responses into the System
Suppose that you have received bids from both vendors. The ALLFRUITS vendor can deliver only 150 pounds of oranges, and a minimum of 50 pounds must be purchased from this vendor. This vendor does not have tangerines in stock but can provide the requested quantity of lemons and apples. Also, this vendor provides you a discount if you purchase more than two items in one order.
The GOODFRUITS vendor can deliver the requested quantity of oranges but at a higher price than the one offered by ALLFRUITS. The GOODFRUITS vendor has tangerines in stock and can deliver the requested quantity of lemons and apples.
To add the responses from the vendors to the system, do the following:
- Open the Bidding Responses (RQ303000) form.
- In the Summary area, do the following:
- In the Requisition box, select the identifier of the only requisition with the Pending Bidding status.
- In the Vendor box, select ALLFRUITS.
- On the Bidding Details tab, specify the listed settings
in the following table rows:
- The row with TANGERINES in the Inventory
ID column:
- Min. Qty.:
0.00
This is the minimum quantity of the item that the vendor can supply.
- Bid Qty.:
0.00
This is the total quantity of items that the vendor can supply, according to the bidding response.
- Bid Unit Cost:
0.00
This is the total cost of items that the vendor can supply, according to the bidding response.
- Min. Qty.:
0.00
- The row with LEMONS in the Inventory ID
column:
- Min. Qty.: 0.00
- Bid Qty.: 43.00
- Bid Unit Cost: 2.60
- The row with ORANGES in the Inventory ID
column:
- Min. Qty.: 50.00
- Bid Qty.: 150.00
- Bid Unit Cost: 2.00
- The row with APPLES in the Inventory ID
column:
- Min. Qty.: 0.00
- Bid Qty.: 80.00
- Bid Unit Cost: 2.20
- The row with TANGERINES in the Inventory
ID column:
- On the form toolbar, click Save.
- In the Vendor box of the Summary area, select GOODFRUITS.
- On the Bidding Details tab, specify the listed settings
in the following table rows:
- The row with TANGERINES in the Inventory
ID column:
- Min. Qty.: 0.00
- Bid Qty.: 30.00
- Bid Unit Cost: 1.60
- The row with LEMONS in the Inventory ID
column:
- Min. Qty.: 0.00
- Bid Qty.: 43.00
- Bid Unit Cost: 2.55
- The row with ORANGES in the Inventory ID
column:
- Min. Qty.: 0.00
- Bid Qty.: 200.00
- Bid Unit Cost: 2.20
- The row with APPLES in the Inventory ID
column:
- Min. Qty.: 0.00
- Bid Qty.: 80.00
- Bid Unit Cost: 2.30
- The row with TANGERINES in the Inventory
ID column:
- On the form toolbar, click Save.
Step 4: Selecting the Best Bids from Vendors
To perform automatic bidding and then correct the bidding results manually, do the following:
- On the Complete Bidding (RQ503000) form, in the Ref. Nbr. box, select the reference number of the only requisition with the Pending Bidding status.
- On the form toolbar, click Update Result. The system
selects vendors automatically and updates the information on the
Bidding Results tab.
Notice that in the Selection area, the Splittable check box is selected because the Allow Multiple Vendors per Request check box has been selected on the Request Classes (RQ201000) form for the class of the request based on which the requisition has been created. This setting means that the system can split the order between multiple vendors.
- On the form toolbar, click Save.
- On the Bidding Results tab, analyze the results of the
automatic bidding as follows:
- In the Requisition Details table, click the
TANGERINES row.
In the Bidding Details table, the GOODFRUITS vendor is selected because only this vendor can supply tangerines.
- In the Requisition Details table, click the
ORANGES row.
In the Bidding Details table, in the unlabeled column, the check boxes for both vendors are selected. This means that the quantity of the oranges is split between these two vendors. The ALLFRUITS vendor offered the best price for the oranges, but the vendor can provide only 150 pounds of oranges, whereas the needed quantity is 200 pounds. Thus, you will order another 50 pounds of oranges from the GOODFRUIT vendor at a higher cost.
- In the Requisition Details table, click the
APPLES row.
In the Bidding Details table, in the unlabeled column, the check box for the row with the ALLFRUITS vendor is selected because this vendor offered a lower price and can provide the required amount of apples.
- In the Requisition Details table, click the
LEMONS row.
In the Bidding Details table, in the unlabeled column, the row with the GOODFRUITS vendor is selected because this vendor offered a lower price. However, the ALLFRUITS vendor provides you a discount if you purchase more than two items in one order.
- In the Requisition Details table, click the
TANGERINES row.
- In the Bidding Details table, select the ALLFRUITS
vendor for the LEMONS stock item as follows:
- Clear the unlabeled check box for the GOODFRUITS vendor.
- On the form toolbar, click Save.
- Select the unlabeled check box for the ALLFRUITS vendor.
- On the form toolbar, click Save.
- On the form toolbar, click Complete Bidding. The status of the requisition is changed to Open.
Now that you have selected the vendors, you can create the needed purchase orders to be sent to the vendors.
Step 5: Creating the Purchase Orders
To create the purchase orders for the vendors, do the following:
- On the Requisitions (RQ302000) form, open the requisition with the Open status that you have earlier created in this activity.
- On the More menu, click Create Orders. The system creates purchase orders for the ALLFRUITS and GOODFRUITS vendors. Because the requisition is based on customer requests of these items, the system also creates sales orders for the HMBAKERY and COFFESHOP customers. Also, the requisition is assigned the Released status.
- On the Purchase Orders tab, make sure that purchase
orders with the Open status are listed for the ALLFRUITS and
GOODFRUITS vendors, as shown in the following
screenshot.Attention:If your system has a different set of purchase and sales documents than those in the initial U100 dataset, you may see different values in the screenshots.
Figure 1. The purchase orders for the vendors 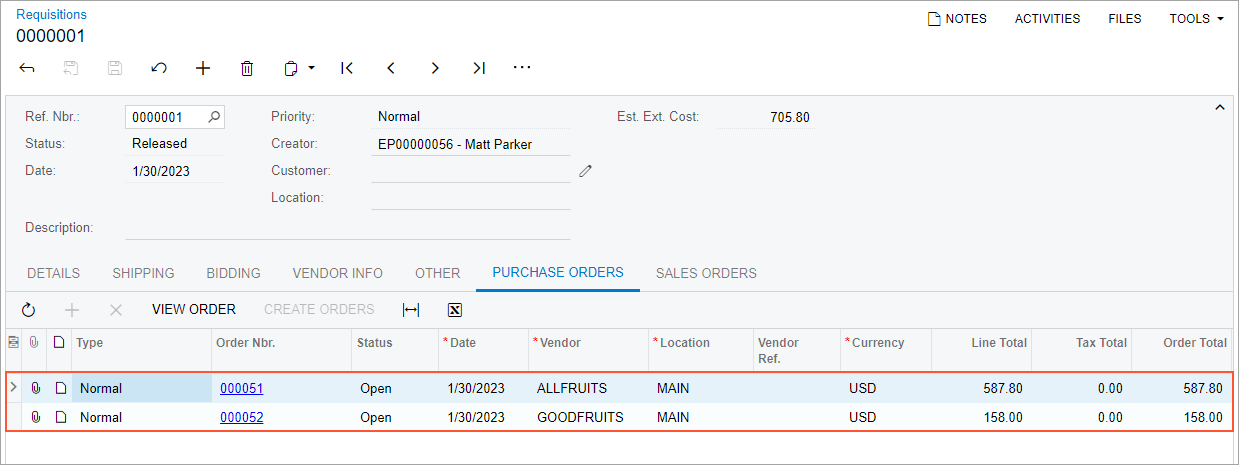
- On the Sales Orders tab, make sure that sales orders with
the Open status are listed for the COFFEESHOP and HMBAKERY
customers, as shown in the following screenshot.
Figure 2. The sales orders for the customers 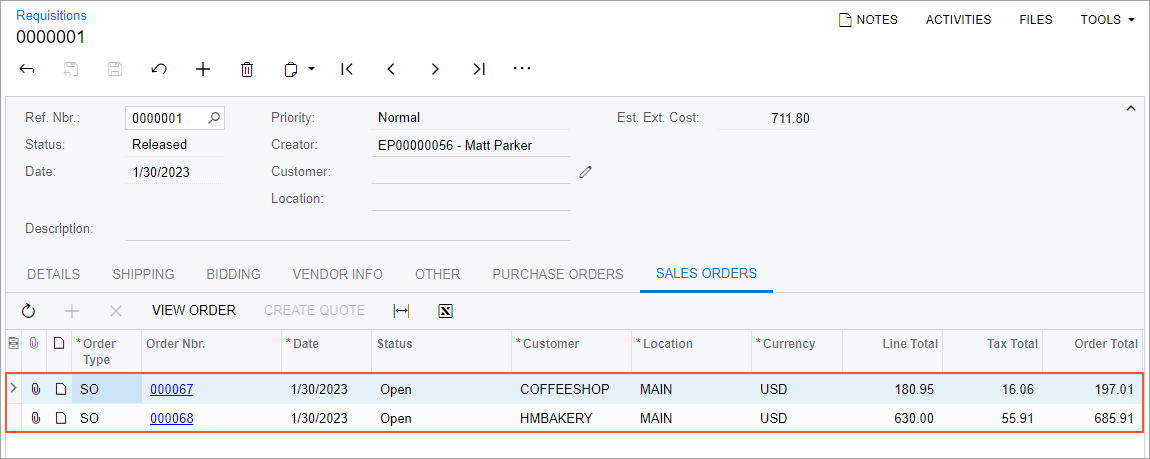
You have created purchase orders for both vendors. Suppose that you have emailed the purchase orders to the vendors.
Step 6: Receiving the Items from the Vendors
Suppose that the vendors have delivered the ordered fruits to the WHOLESALE warehouse. To create the documents that reflect the receipt of the items in the warehouse, do the following:
- On the Purchase Orders (PO301000) form, open the purchase order for the ALLFRUITS vendor that you have prepared earlier. (The purchase order contains the ORANGES, APPLES, and LEMONS stock items.)
- On the form toolbar, click Enter PO Receipt. The system opens the Purchase Receipts (PO302000) form with the new receipt. Notice that the receipt has the Balanced status and the data copied from the linked purchase order.
- On the form toolbar, click Release. The system releases the purchase receipt; it also creates the corresponding inventory receipt and releases it. On the Other tab, in the IN Ref. Nbr. box, you can view the reference number of the inventory receipt. (The reference number is also a link that you can click to view the inventory receipt on the Receipts (IN301000) form.) On the Orders tab, notice that the listed purchase order now has the Completed status.
- On the Inventory Allocation Details (IN402000) form, do the
following:
- In the Inventory ID box of the Selection area, select ORANGES.
- In the Warehouse box, select WHOLESALE.
- On the Qty by Plan Type tab, on the toolbar of the Deduction table, select All Records in the filter box.
- Make sure that the quantity in the SO Allocated row is 150 (the quantity on unconfirmed shipments) and the quantity in the SO to Purchase row is 50 (the quantity included in open purchase orders created for sales orders, this quantity will come from the other vendor).
- In the Inventory ID box, select APPLES.
- In the Deduction table, make sure that the quantity in the SO Allocated row is 80.
- In the Inventory ID box, select LEMONS.
- Make sure that the quantity in the SO Allocated row is 43.
- On the Purchase Orders form, open the purchase order for the GOODFRUITS vendor that you have prepared earlier. The purchase order has the Open status and contains the ORANGES and TANGERINES stock items.
- On the form toolbar, click Enter PO Receipt. The system opens the Purchase Receipts form with the new receipt, which has the Balanced status and the data copied from the linked purchase order.
- On the form toolbar, click Release. The system releases the purchase receipt; it also creates the corresponding inventory receipt and releases it. On the Other tab, in the IN Ref. Nbr. box, you can view the reference number of the inventory receipt. (The reference number is also a link that you can click to view the inventory receipt on the Receipts form). On the Orders tab, notice that the listed purchase order now has the Completed status.
- On the Inventory Allocation Details form, do the following:
- In the Inventory ID box of the Selection area, select ORANGES.
- In the Warehouse box, select WHOLESALE.
- In the Deduction table of the Qty by Plan Type tab, make sure that the quantity in the SO Allocated row is 200 (which is now the full amount to fulfill the customer's order).
- In the Inventory ID box, select TANGERINES.
- In the Deduction table, make sure that the quantity in the SO Allocated row is 30.
All fruits are allocated for sales orders, which means that these fruits are not available for other orders. Now you can prepare and process the documents for shipping the fruits to the customers, which you will do in the next step.
Step 7: Shipping the Fruits to the Customers
In this step, you will perform the needed actions to ship the fruits to the customers. You will process the sales orders, create and confirm shipments for them, create and release the related invoices, and generate the needed inventory transactions. Do the following:
- On the Sales Orders (SO301000) form, open the sales order with the Open status for the HMBAKERY customer that the system prepared earlier in this activity. (The sales order contains the ORANGES and APPLES stock items.)
- On the form toolbar, click Quick Process.
- In the Process Order dialog box, which opens, do the
following:
- In the Warehouse ID box, make sure that WHOLESALE is selected.
- In the Shipment Date section, make sure that Custom is selected and the date is 1/30/2025.
- In the Shipping section, make sure that the
following check boxes are selected:
- Create Shipment
- Confirm Shipment
- Update IN
With this check box selected, the system will generate the inventory transactions for confirmed shipments.
- In the Invoicing section, make sure that the Prepare Invoice check box is selected.
- Select the Release Invoice check box.
- Click OK. The system completes the sales order and creates and processes the documents related to the sales order. You can see the links to these documents in the Processing Results dialog box.
- Click OK to close the dialog box. Notice that the sales order now has the Completed status.
- On the Inventory Allocation Details (IN402000) form, do the
following:
- In the Inventory ID box of the Selection area, select APPLES.
- In the Warehouse box, select WHOLESALE.
- On the Qty by Plan Type tab, on the toolbar of the Deduction table, select All Records in the filter box.
- Make sure that the quantity in the SO Allocated row is 0.
- In the Inventory ID box, select ORANGES.
- Make sure that the quantity in the SO Allocated row is 0.
- On the Sales Orders form, open the sales order with the Open status for the COFFESHOP customer that the system created earlier in this activity. (The sales order contains the TANGERINES and LEMONS stock items.)
- On the form toolbar, click Quick Process.
- In the Process Order dialog box, which opens, do the
following:
- In the Warehouse ID box, make sure that WHOLESALE is selected.
- In the Shipment Date section, make sure that Custom is selected and the date is 1/30/2025.
- In the Shipping section, make sure that the
following check boxes are selected:
- Create Shipment
- Confirm Shipment
- Update IN
- In the Invoicing section, make sure that the Prepare Invoice check box is selected.
- Select the Release Invoice check box.
- Click OK. The system completes the sales order and creates and processes the documents related to the sales order. You can see the links to the documents in the Processing Results dialog box.
- Click OK to close the dialog box. Notice that the sales order now has the Completed status.
- On the Inventory Allocation Details form, do the following:
- In the Inventory ID box of the Selection area, select TANGERINES.
- In the Warehouse box, select WHOLESALE.
- On the Qty by Plan Type tab, on the toolbar of the Deduction table, select All Records in the filter box.
- Make sure that the quantity in the SO Allocated row is 0.
- In the Inventory ID box, select LEMONS.
- Make sure that the quantity in the SO Allocated row is 0.
You have performed the needed processing for shipping the ordered fruits to the customers.