
Purchase Requests and Requisitions: To Process Employee Requests
The following activity demonstrates how to process a purchase requisition initiated by employee requests within the company. These requests do not require approval.
Story
Suppose that you are an office manager in the SweetLife Fruits & Jams company who orders office supplies for all departments of the company. These supplies are ordered from a single preferred vendor, the Spectra Stationery Office vendor, and bidding is not involved in the requisition process. The company orders these items based on requests that employees enter into the system. Employees can select only items from a predefined list. Office supplies do not require approval from department leads due to their relatively low value.
You need to add the requests that employees have submitted over the past week into one purchase requisition and send the related purchase order to the vendor. You will then process the receipt and issuing of these items.
Configuration Overview
In the U100 dataset, the following tasks have been performed to support this activity:
- On the Enable/Disable Features (CS100000) form, the
following features have been enabled:
- Inventory and Order Management
- Inventory
- Purchase Requisitions
- On the Warehouses (IN204000) form, the WHOLESALE warehouse has been created.
- On the Stock Items (IN202500) form, the following stock items have been created: PEN, PENCIL, and PAPER.
- On the Request Classes (RQ201000) form, the
INTSUPPLY request class has been created as follows:
- The Restrict Requested Items to the Specified List check box has been selected, and the PEN, PENCIL, and PAPER items have been added to the Item List tab. Restricting the list of items in a request class reduces the probability of mistakes made during the data entry of requests of the class.
- The Allow Multiple Vendors per Request check box has been cleared. Per the company's business practices, all of the items in requests of the class are purchased from one vendor.
- On the Vendors (AP303000) form, the STATOFFICE vendor has been created.
Process Overview
In this activity, you will do the following:
- On the Requests (RQ301000) form, enter all employee requests into the system.
- On the Create Requisitions (RQ504000) form, initiate the creation of a purchase requisition based on the employees' requests.
- On the Requisitions (RQ302000) form, initiate the creation of a purchase order and send it to the selected vendor.
- On the Purchase Orders (PO301000) and Purchase Receipts (PO302000) forms, prepare and process the purchase receipt for the ordered stock items.
- On the Issues (IN302000) form, create the inventory issue to reflect the items being issued to the employees who requested the items.
System Preparation
Before you start processing a purchase requisition based on requests from employees, do the following:
- Launch the MYOB Acumatica website, and sign in to a company with the U100 dataset preloaded. You should sign in as office manager Joshua Mueller with the mueller username and the 123 password.
- In the info area, in the upper-right corner of the top pane of the MYOB Acumatica screen, make sure that the business date in your system is set to 1/30/2025. If a different date is displayed, click the Business Date menu button and select 1/30/2025 on the calendar. For simplicity, in this activity, you will create and process all documents in the system on this business date.
- On the Company and Branch Selection menu, in the top pane of the MYOB Acumatica screen, make sure the SweetLife Head Office and Wholesale Center branch is selected.
Step 1: Creating the Employee Requests
Suppose that you have received requests for pens, paper, and pencils from the Sales department and the Operations department of the company. To enter these requests, do the following:
- On the Requests (RQ301000) form, add a new record.
- In the Summary area, do the following:
- In the Request Class box, select INTSUPPLY.
- In the Requested By box, notice that the employee ID and name that corresponds to your user account is automatically inserted.
- In the Description box, type The Sales department's order for office supplies.
- On the Details tab, do the following:
- On the table toolbar, click Add Row.
- In the row, specify the following settings:
- Inventory: PEN
- Order Qty.: 15
- On the table toolbar, click Add Row.
- In the row, specify the following settings:
- Inventory: PAPER
- Order Qty.: 12
- On the table toolbar, click Add Row.
- In the row, specify the following settings:
- Inventory: PENCIL
- Order Qty.: 10
- On the form toolbar, click Remove Hold. The system saves the request and changes the status of the request to Open.
- While you are still on the Requests (RQ301000) form, add another new record.
- In the Summary area, do the following:
- In the Request Class box of the Summary area, select INTSUPPLY.
- In the Description box, type The Operations department's order for office supplies.
- On the Details tab, do the following:
- On the table toolbar, click Add Row.
- In the row, specify the following settings:
- Inventory: PEN
- Order Qty.: 25
- On the table toolbar, click Add Row.
- In the row, specify the following settings:
- Inventory: PAPER
- Order Qty.: 15
- On the table toolbar, click Add Row.
- In the row, specify the following settings:
- Inventory: PENCIL
- Order Qty.: 5
- On the form toolbar, click Remove Hold. The system saves the request and changes the status of the request to Open.
Step 2: Creating a Purchase Requisition
To create a requisition for the requests that you entered in the previous step, do the following:
- On the Create Requisitions (RQ504000) form, make sure that all six lines with the requested items are listed.
- In the Vendor box of the Summary area, select STATOFFICE. In this case, you will not request and process bids because you know that this vendor gives your company the best prices.
- On the form toolbar, click Process All. On the Requisitions (RQ302000) form, the system opens the requisition that it has created based on the requests.
- On the Details tab, do the following:
- For the two rows with the PEN inventory ID, select the check boxes in the unlabeled column.
- On the table toolbar, click Merge Lines to reduce the number of lines in the purchase documents.
- For the two rows with the PAPER inventory ID, select the check boxes in the unlabeled column.
- On the table toolbar, click Merge Lines.
- For the two rows with the PENCIL inventory ID, select the check boxes in the unlabeled column.
- On the table toolbar, click Merge Lines.
Now the requisition contains three lines.
- On the form toolbar, click Remove Hold. The system saves the requisition and changes its status to Open.
Step 3: Creating the Purchase Order
To create the purchase order for the STATOFFICE vendor, do the following:
- While you are still viewing the open requisition that you have created on the Requisitions (RQ302000) form, click Create Orders on the More menu. The system creates a purchase order for the requisition and assigns the requisition the Released status.
- On the Purchase Orders tab, notice that the system has
listed a purchase order with the Open status for the STATOFFICE
vendor, as shown in the following screenshot.Attention:If your system has a different set of purchase and sales documents than those in the initial U100 dataset, you may see different values in the screenshots.
Figure 1. The purchase order for the vendor 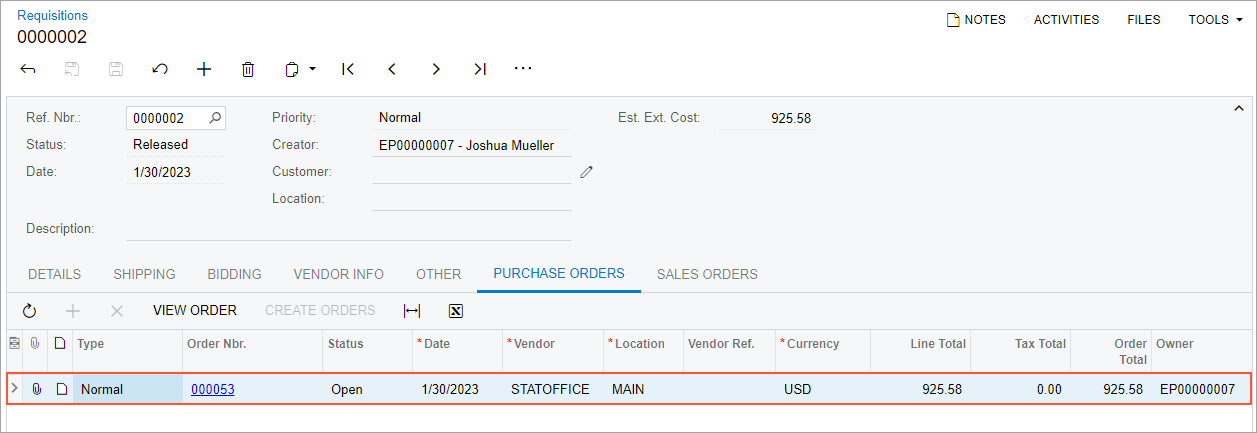
You have created the purchase order for the vendor. Suppose that you have sent the purchase order to the vendor.
Step 4: Receiving the Items from the Vendor
Suppose that the Spectra Stationery Office vendor has delivered the ordered items to the WHOLESALE warehouse. To create the documents that reflect the receipt of the items in the warehouse, do the following:
- While you are still viewing the Purchase Orders tab of the Requisitions (RQ302000) form for the requisition, click the link in the Order Nbr. column. The system opens the purchase order on the Purchase Orders (PO301000) form.
- On the form toolbar, click Enter PO Receipt. The system opens the Purchase Receipts (PO302000) form with the new receipt. The receipt has the Balanced status and the data copied from the linked purchase order.
- On the form toolbar, click Release. The system releases the purchase receipt; it also creates the corresponding inventory receipt and releases it. On the Other tab, you can view the reference number of the created inventory receipt. The reference number is also a link you can click to view the inventory receipt on the Receipts (IN301000) form.
- On the Inventory Allocation Details (IN402000) form, do the
following in the Selection area:
- In the Inventory ID box, select PEN.
- In the Warehouse box, select WHOLESALE.
- Make sure that the quantity in the Available for Issue box is 50.
- In the Inventory ID box, select PENCIL.
- Make sure that the quantity in the Available for Issue box is 22.
- In the Inventory ID box, select PAPER.
- Make sure that the quantity in the Available for Issue box is 62.
You have received the office supplies in the warehouse, and now you can issue the items to the departments that ordered them.
Step 5: Issuing Inventory Items from a Warehouse
Suppose that you have provided the office supplies that you ordered to the applicable departments. To create and process the needed documents for issuing the items from the WHOLESALE warehouse, do the following:
- On the Issues (IN302000) form, add a new record.
- In the Description box of the Summary area, type Issue of office supplies to the Sales and Operations departments.
- On the Details tab, click Add Items on the table toolbar.
- In the Summary area of the Inventory Lookup dialog box, which opens, select WHOLESALE in the Warehouse box.
- Make sure that the Show Available Items Only check box is selected.
- To select the required items, do the following:
- In the Inventory box, type pen to filter the list of items.
- In the unlabeled column, select the check box for the row with the PEN item.
- In the Qty. Selected column of the same row, type 40.
- In the unlabeled column, select the check box for the row with the PENCIL item.
- In the Qty. Selected column of the same row, type 15.
- In the Inventory box, type paper.
- In the unlabeled column, select the check box for the row with the PAPER item.
- In the Qty. Selected column of the same row, type 27.
- Click Add & Close to add the selected items to the issue and close the dialog box.
- On the form toolbar, click Release. The system changes the status of the issue to Released.
- Open the Inventory Allocation Details (IN402000) form.
- In the Selection area, do the following:
- In the Inventory ID box, select PEN.
- In the Warehouse box, select WHOLESALE.
- Make sure that the value of the Available for Issue box is 10.
- In the Inventory ID box, select PENCIL.
- Make sure that the value of the Available for Issue box is 7.
- In the Inventory ID box, select PAPER.
- Make sure that the value of the Available for Issue box is 35.
You have issued the items from the WHOLESALE warehouse to the company's departments.