
Asset Migration: To Migrate Fixed Assets
The following activity will walk you through the process of preparing an import scenario for data migration and using it to migrate fixed assets.
Story
Suppose that in the middle of 2025, SweetLife Fruits & Jams is migrating its fixed assets to MYOB Acumatica from a legacy system. The trial balances for the previous periods have already been imported into MYOB Acumatica.
Because the company has been maintaining its fixed assets since 2024, it has multiple fixed assets in the old database, and the depreciation of these assets has been accumulated from the start of their useful life through June 2025.
Acting as a SweetLife administrator, you need to import these assets along with the accumulated depreciation and start fully operating in MYOB Acumatica on 7/1/2025.
Configuration Overview
In the U100 dataset, the following tasks have been performed to support this activity:
- On the Enable/Disable Features (CS100000) form, the Fixed Asset Management feature has been enabled.
- On the Chart of Accounts (GL202500) form, the needed GL accounts have been created.
Process Overview
In this activity, you will do the following:
- On the Numbering Sequences (CS201010) form, you will disable the auto-numbering of fixed assets.
- On the Fixed Asset Classes (FA201000) form, you will update the settings of an asset class by adding a book to it. On the Generate Book Calendars (FA501000) form, you will generate book calendars for this book.
- On the Data Providers (SM206015) form, you will create a new data provider and upload the ACU_Import_Fixed_Assets_F310.xlsx file file for it.
- On the Import Scenarios (SM206025) form, you will create an import scenario based on an XML file.
- On the Import by Scenario (SM206036) form, you will migrate the fixed assets to the system.
- Finally, you will run the FA Balance (FA630000) report and review one of the imported assets on the Fixed Assets (FA303000) form.
System Preparation
Before you begin creating a partially depreciated fixed asset, do the following:
- Launch the MYOB Acumatica website with the U100 dataset preloaded, and sign in as an accountant by using the gibbs username and the 123 password.
- In the info area, in the upper-right corner of the top pane of the MYOB Acumatica screen, click the Business Date menu button, and select 7/1/2025 on the calendar.
- In the company to which you are signed in, be sure that you have implemented the fixed asset functionality by performing the following prerequisite activities: Fixed Assets: To Configure the System for Fixed Asset Management, Fixed Assets: To Configure the Fixed Asset Functionality, and Fixed Assets: To Create Fixed Asset Classes.
- On the Company and Branch Selection menu on the top pane of the MYOB Acumatica screen, select the SweetLife Head Office and Wholesale Center branch.
- Download the ACU_Import_Fixed_Assets_F310.xlsx file that you will import in Step 2 and the FA303000-Import_SweetLife_Fixed_Assets.xml file that you will import in Step 3.
Step 1: Disabling Auto-Numbering for Fixed Assets
To keep the original asset IDs as they have been specified in the imported file, you need to disable auto-numbering of the FASSET numbering sequence before you import the data. To disable auto-numbering, do the following:
- Open the Numbering Sequences (CS201010) form.
- In the Numbering ID box, select FASSET.
- Select the Manual Numbering check box.
- On the form toolbar, click Save to save the changes.
Step 2: Updating Class Settings and Generating a Calendar
Because the migrated assets have two books, you need to add book 2 (TAX) to the COMPUTERS fixed asset class. Also, for the TAX book, you need to generate a book calendar that matches that of the FIN book. To add the book and generate a calendar for it, do the following:
- On the Fixed Asset Classes (FA201000) form, open the COMPUTERS class.
- On the Depreciation tab, click Add
Row on the table toolbar and specify the following settings for
the new row:
- Book: TAX
- Posting Book: Cleared
- Class Method: MACRS5-MQ
- Useful Life, Years: 5 (inserted automatically)
- Averaging Convention: Mid Quarter (inserted automatically)
- Mid-Period Type: Fixed Day (inserted automatically)
- Mid-Period Day: 15 (inserted automatically)
- On the form toolbar, click Save to save your changes.
- On the Generate Book Calendars (FA501000) form, specify the following
settings in the Selection area:
- From Year: 2024
- To Year: 2064
- In the table, select the unlabeled check box for the TAX book and click Process on the form toolbar.
Step 3: Preparing the Data Provider
To create the data provider, do the following:
- On the Data Providers (SM206015) form, add a new record.
- In the Name box, type Import Fixed Assets.
- In the Provider Type box, select Excel Provider.
- On the form toolbar, click Save to save the changes.
- On the form title bar, click Files, and upload the ACU_Import_Fixed_Assets_F310.xlsx file, which you have downloaded earlier.
- Open the Schema tab, and in the table of the Source Objects pane, select the Active check box in the Template row.
- On the toolbar of the Source Objects pane, click Fill Schema Objects.
- On the toolbar of the Source Fields pane, click Fill Schema Fields. The system populates the schema fields copied from the uploaded file.
- On the form toolbar, click Save to save your changes.
Step 4: Preparing the Import SweetLife Fixed Assets Scenario
To import fixed assets, you will use a scenario that is based on the predefined ACU Import Fixed Assets scenario and defines how the data from the source file should be imported into the system as fixed asset records. To prepare the Import SweetLife Fixed Assets scenario, do the following:
- Open the Import Scenarios (SM206025) form and create a new record.
- On the form toolbar, click Clipboard and select Import from XML.
- In the Upload XML File dialog box, which is displayed, click Choose file and select the FA303000-Import_SweetLife_Fixed_Assets.xml file that you downloaded earlier.
- Click Open and click Upload to
upload the file.
The system uploads the import scenario from the XML file.
Step 5: Importing the Data
To import the data, do the following:
- Open the Import by Scenario (SM206036) form.
- In the Name box, select Import SweetLife Fixed Assets. This is the import scenario that you have created.
- On the form title bar, click Files, and upload the ACU_Import_Fixed_Assets_F310.xlsx file, which you have downloaded earlier.
- On the form toolbar, click Prepare to prepare the
already-uploaded list of fixed assets for import. The system uploads the data to
the table (see the following screenshot).
Figure 1. The prepared data 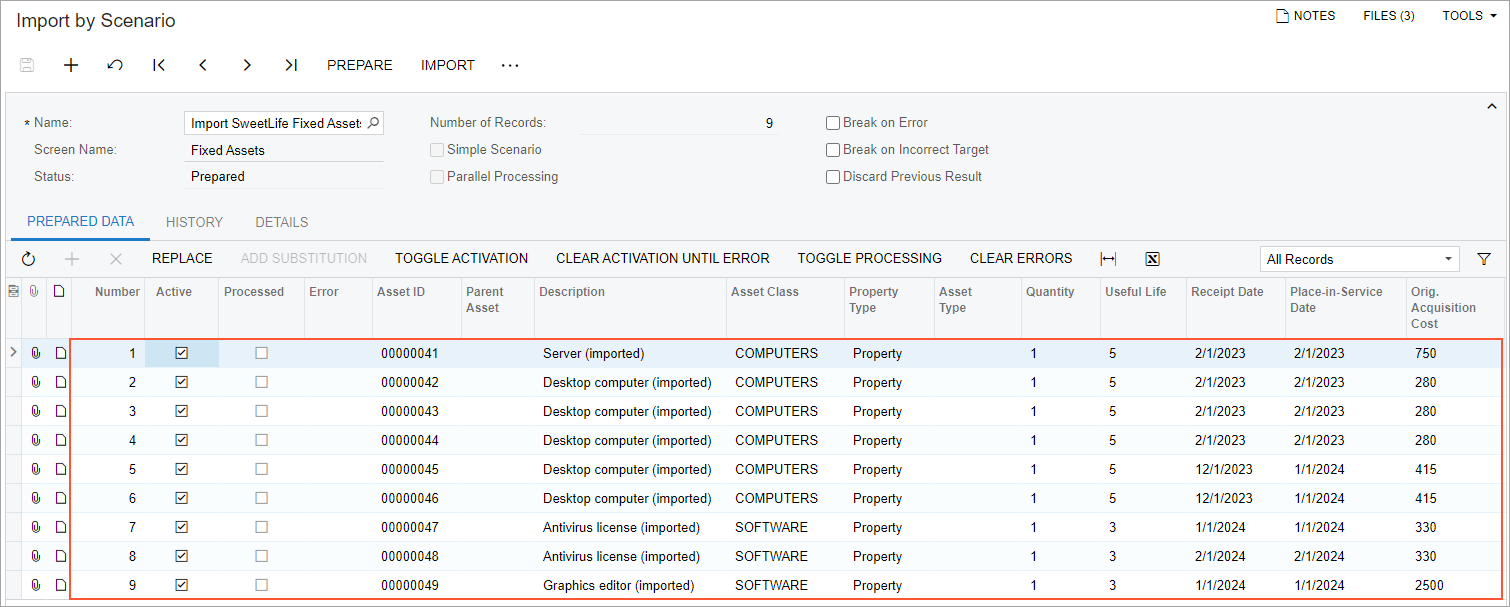
- On the form toolbar, click Import. The system processes the records and creates the fixed assets. The processed records have the Processed check boxes selected on the Prepared Data tab.
Step 6: Reviewing the Results of the Import
To review the results of the data import, do the following:
- Open the FA Balance (FA630000) report form.
- On the Report Parameters tab, specify the following
settings:
- Company/Branch: HEADOFFICE
- Book: FIN
- On the report form toolbar, click Run Report; review the report. The report lists the fixed assets that you have uploaded from the import scenario in the previous step.
- On the Fixed Assets (FA303000) form, open the Graphics
editor (imported) asset, and review the Balance
tab to make sure that the accumulated depreciation has been imported with all
other data, as shown in the following screenshot.
Figure 2. Imported accumulated depreciation 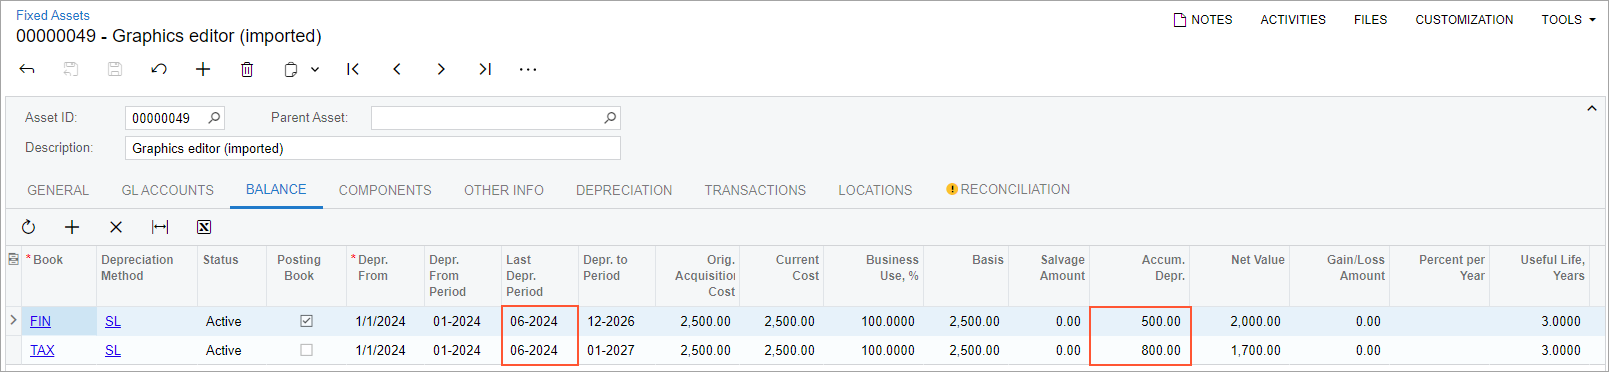
- On the Fixed Assets Preferences (FA101000) form, select the Update GL box.
- Click Save to save your changes. Now you can maintain the imported fixed assets.
- On the Numbering Sequences (CS201010) form, select FASSET in the Numbering ID box, and clear the Manual Numbering check box.
- On the form toolbar, click Save to save your changes.