
Interbranch Bills Without Balancing: Process Activity
In this activity, you will learn how to process a bill for branches that do not require balancing; you will then review the relevant account balances.
Story
The head office of the SweetLife company needs to process a $450 bill that it has received from the Spectra Stationery Office vendor on March 1, 2025. The bill is for stationery that was purchased for the head office branch in the amount of $300 and for the retail store branch in the amount of $150. (Transactions between these branches do not need to be balanced.)
Acting as a SweetLife accountant, you need to create a bill in the system to reflect the bill received from the vendor, and then release the bill, which causes a batch to be generated for it.
Configuration Overview
In the U100 dataset, the following tasks have been performed to support this activity:
- On the Companies (CS101500) form, the SWEETLIFE company has been defined.
- On the Branches (CS102000) form, the HEADOFFICE and RETAIL branches of the SWEETLIFE company have been created.
- On the Chart of Accounts (GL202500) form, multiple accounts have been created.
- On the Ledgers (GL201500) form, the ACTUAL ledger has been created.
- On the Vendors (AP303000) form, the STATOFFICE vendor has been created.
Process Overview
To process an interbranch bill for branches that do not require balancing, you will create and release the bill on the Bills and Adjustments (AP301000) form. You will then review the generated batch on the Journal Transactions (GL301000) form, check the account balances on the Account Summary (GL401000) form, and generate the trial balance report by using the Trial Balance Summary (GL632000) report form.
System Preparation
Before you begin performing the steps of this activity, do the following:
- Launch the MYOB Acumatica website with the U100 dataset preloaded, and sign in as an accountant Nenad Pasic by using the pasic username and the 123 password.
- In the info area, in the upper-right corner of the top pane of the MYOB Acumatica screen, click the Business Date menu button and select 3/1/2025.
- On the Company and Branch Selection menu on the top pane of the MYOB Acumatica screen, make sure that the SweetLife Head Office and Wholesale Center branch is selected. If it is not selected, click the Company and Branch Selection menu to view the list of branches that you have access to, and then click SweetLife Head Office and Wholesale Center.
Step 1: Reviewing the Account Balances Before Posting a Bill
To review the account balances for the branches of the SweetLife company in the 03-2025 financial period, do the following:
- Open the Account Summary (GL401000) form.
- To review the account balances in both branches, in the Summary area, make sure the
following settings are specified:
- Company/Branch: SWEETLIFE
- Ledger: ACTUAL - Actual Ledger
- Financial Period: 03-2025
- In the table, review the account balances.
For the HEADOFFICE branch, for the 62400 - Office Expense account, notice the amount in the Debit Total column is 0.00 and for the 20000 - Accounts Payable account, the amount in the Credit Total column is 0.00.
For the RETAIL branch, for the 20000 - Accounts Payable account, note that the amount in the Credit Total column is 0.00 and the 62400 - Office Expense account is not listed, meaning that the account balances are zero for the period.
Now you will create a bill between branches, which involves these accounts.
Step 2: Creating and Processing a Bill for Branches Not Requiring Balancing
To create and process an AP bill for stationery purchased for multiple branches (HEADOFFICE and RETAIL) that do not require balancing, do the following:
- Open the Bills and Adjustments (AP301000) form.Tip:To open the form for creating a new record, type the form ID in the Search box, and on the Search form, point at the form title and click New right of the title.
- Click Add New Record on the form toolbar, and specify the
following settings in the Summary area:
- Type: Bill
- Vendor: STATOFFICE
- Date: 3/1/2025 (inserted by default)
- Description: Stationery
- On the Details tab, click Add Row, and
enter the following settings in the row you have added:
- Branch: HEADOFFICE
- Transaction Descr.: Stationery
- Ext. Cost: 300
- Add another row with the following settings:
- Branch: RETAIL
- Transaction Descr.: Stationery
- Ext. Cost: 150
Notice the 62400 - Office Expense account specified in the Account column for both lines, which is the expense account associated with the vendor.
- On the form toolbar, click Save to save the bill.
- On the form toolbar, click Remove Hold and click Release to release the bill.
- On the Financial tab, notice the originating branch of the bill (HEADOFFICE), which is specified in the Branch box. The system has filled in the Branch box automatically with the branch to which you are signed in. Also, notice the AP account (20000 - Accounts Payable), which is specified in the AP Account box.
- Click the link in the Batch Nbr. box, and review the GL batch,
which the system has opened on the Journal Transactions (GL301000) form (see
the following screenshot).
Figure 1. GL transactions posted to different branches 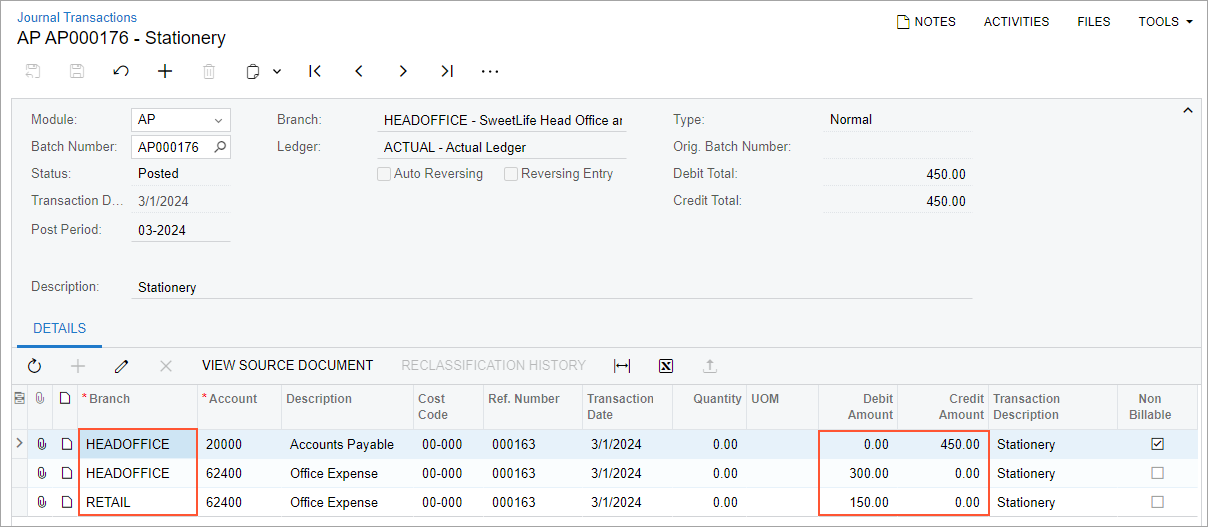
When you released the bill, the system generated and posted the related GL transaction. The AP account of the originating branch of the bill has been credited with the amount of the bill ($450) and accounts of the destination branches have been debited with the line amounts ($300 and $150).
In the next step, you will check the balances of these accounts.
Step 3: Reviewing the Account Balances
To review the account balances for the branches in the 03-2025 financial period, do the following:
- Open the Account Summary (GL401000) form.
- To review the account balances in the HEADOFFICE branch, in the Summary area,
make sure the following settings are specified:
- Company/Branch: HEADOFFICE
- Ledger: ACTUAL
- Period: 03-2025
- In the table, review the account balances. Notice the amount in the Debit Total column for the 62400 - Office Expense account ($300).
- In the Company/Branch box of the Summary area, select RETAIL to review the account balances in the RETAIL branch.
- In the table, review the account balances. Notice the amount in the Debit Total column for the 62400 - Office Expense account ($150).
Now you will review the balances for the financial period for the company as a whole.
Step 4 (Optional): Reviewing the Balances for the Financial Period
To review the balances for the 03-2025 financial period, do the following:
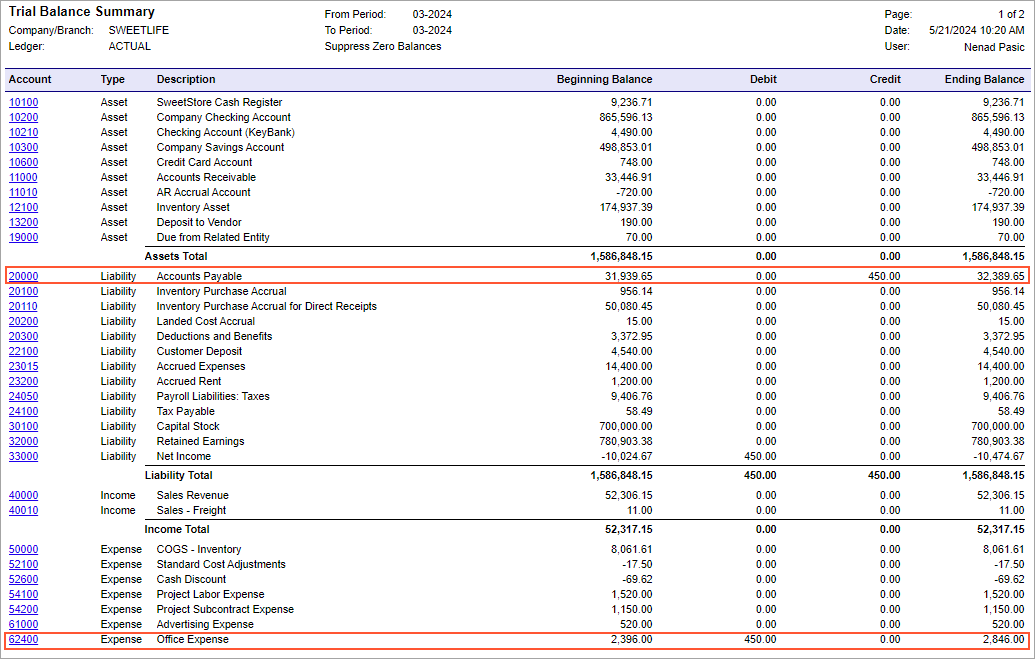
- Open the Trial Balance Summary (GL632000) report form.
- On the Report Parameters tab, specify the following
parameters:
- Company/Branch: SWEETLIFE
- Ledger: ACTUAL
- From Period: 03-2025
- To Period: 03-2025
- Suppress Zero Balances: Selected
- On the report form toolbar, click Run Report.
- In the generated report, review the account balances. The amount in the Credit column for the 20000 - Accounts Payable account equals the amount in the Debit column for the 62400 - Office Expense account, as shown in the following screenshot.
In this activity, you have created and processed a bill between branches that do not require balancing, and you have learned how to review the relevant account balances.