
Bank Reconciliation: To Process a Bank Statement in OFX Format (Part 2)
In this activity, you will learn how to upload the second bank statement (after the one that you worked with in Bank Reconciliation: To Process a Bank Statement in OFX Format (Part 1)) and match the uploaded transactions to the existing documents or transactions in the system. This bank statement is also in OFX format.
Story
Suppose that on February 28, 2026, the accounting department of SweetLife Fruits & Jams received another bank statement in Open Financial Exchange (OFX) format from KeyBank in the amount of $4,659.
Acting as a SweetLife accountant, you need to perform bank statement reconciliation for February 2026 as you prepare to close the 02-2026 financial period in the general ledger. During reconciliation, you will match the records in the system (the book balance) and in the statement for the bank account (the bank balance).
Configuration Overview
For the purposes of this lesson, the following features have been enabled on the Enable/Disable Features (CS100000) form:
- Standard Financials, which provides the standard financial functionality
- Multibranch Support, which supports multiple branches in your instance of MYOB Acumatica
- Multicompany Support, which supports multiple companies within one tenant
Also, on the Cash Accounts (CA202000) form, the 10210WH - KeyBank Checking account has been created for the HEADOFFICE (SweetLife Head Office and Wholesale Center) branch.
Process Overview
In this activity, you will upload the OFX bank statement on the Import Bank Transactions (CA306500) form and match the uploaded transactions with the transactions in the system on the Process Bank Transactions (CA306000) form.
On this form, you will enter a transaction that reflects an amount included in the bank statement that has not been entered into the system. You will also create a disbursement cash transaction and match a receipt transaction to a debit adjustment found in the system. Finally, you will prepare a reconciliation statement on the Reconciliation Statements (CA302000) form and review the transactions that have been reconciled.
System Preparation
To prepare the system, do the following:
- Launch the MYOB Acumatica website and sign in to a company with the U100 dataset preloaded. To
sign in as an accountant, use the following credentials:
- Username: johnson
- Password: 123
- In the info area, in the upper-right corner of the top pane of the MYOB Acumatica screen, make sure that the business date in your system is set to 2/28/2026. If a different date is displayed, click the Business Date menu button and select 2/28/2026. For simplicity, in this activity, you will create and process all documents in the system on this business date.
- On the Company and Branch Selection menu, also on the top pane of the MYOB Acumatica screen, make sure that the SweetLife Head Office and Wholesale Center branch is selected. If it is not selected, click the Company and Branch Selection menu button to view the list of branches that you have access to, and then click SweetLife Head Office and Wholesale Center.
- Download the Bank_Statement_KeyBank_02282026.ofx file, which you will import in Step 2.
- Be sure that you have completed the following prerequisite activity: Bank Reconciliation: To Process a Bank Statement in OFX Format (Part 1).
Step 1: Uploading the Bank Statement for the Cash Account
To upload the 2/28/2026 bank statement for the 10210WH - KeyBank Checking cash account, do the following:
- On the Import Bank Transactions (CA306500) form, click Add New Record on the form toolbar.
- In the Cash Account box, select 10210WH - KeyBank Checking.
- On the form toolbar, click Upload File.
- In the Statement File Upload dialog box, which opens,
click Choose File and select
the Bank_Statement_KeyBank_02282026.ofx file that you
downloaded during system
preparation.
Click Upload to close the dialog box and upload the
file.
The system uploads the transactions from the file to the current form for the cash account. The OFX file contains the 2/28/2026 bank statement with the transactions in the bank account at KeyBank from 2/1/2026 to 2/28/2026, as shown in the screenshot below.
Tip: The uploaded OFX file is now attached to the form; if you ever needed to download the file, you could do so by clicking Files on the form title bar while viewing the form.The Statement Date, Start Balance Date, End Balance Date, and Ending Balance values have been imported from the OFX file. Because this is not the first statement for the cash account, the system uses the Ending Balance value of the previous bank statement as the current Beginning Balance value, as shown in the following screenshot.
Figure 1. February bank transactions uploaded from the OFX file 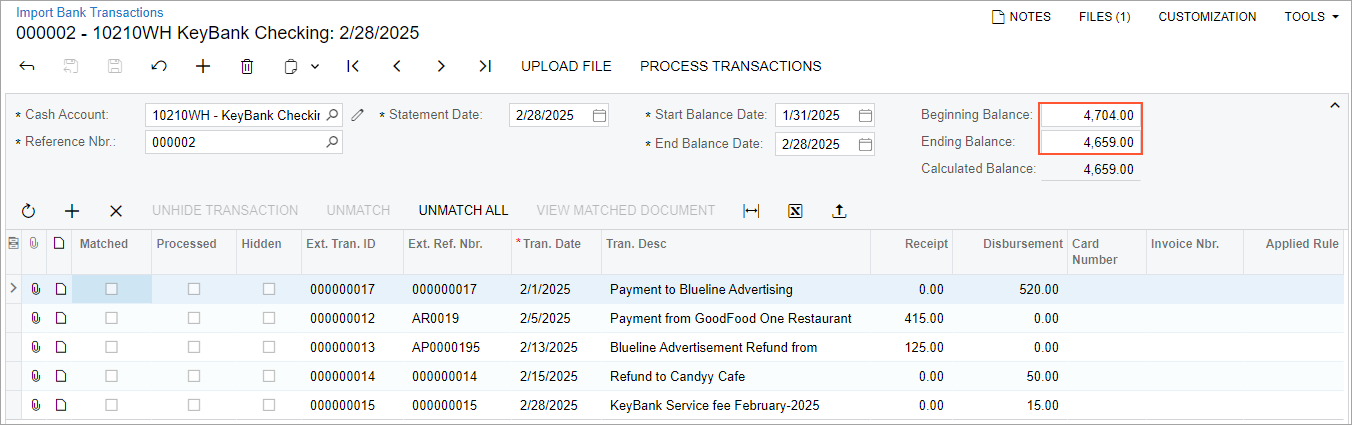
- Leave the Beginning Balance box as is (4,704.00).
- On the form toolbar, click Process Transactions.
The system opens the Process Bank Transactions (CA306000) form.
- In the left pane, click the $520 transaction.
- On the Match to Payments tab, review the payment that the system has found. Select the check box in the Matched column for this payment.
Step 2: Processing a Payment from a Customer
To process the $415 payment from a customer, while remaining on the Process Bank Transactions (CA306000) form, do the following:
- In the left pane, click the $415 payment transaction.
- To create the AR payment in the
system,
on the Create Payment tab of the right
pane, specify the following settings:
- Create: Selected
- Module: AR
- Payment Date: 2/5/2026 (inserted by default from the bank transaction information)
- Fin. Period: 02-2026
- Business Account: GOODFOOD
- Payment Method: CHECK (inserted by default)
- On the form toolbar,
click Save to save your changes.
The $415 payment transaction has the Matched check box selected because you have specified the information from which the system will create a payment when you run the processing of transactions. The following screenshot shows the matched transaction.
Figure 2. A bank transaction matched to a new payment 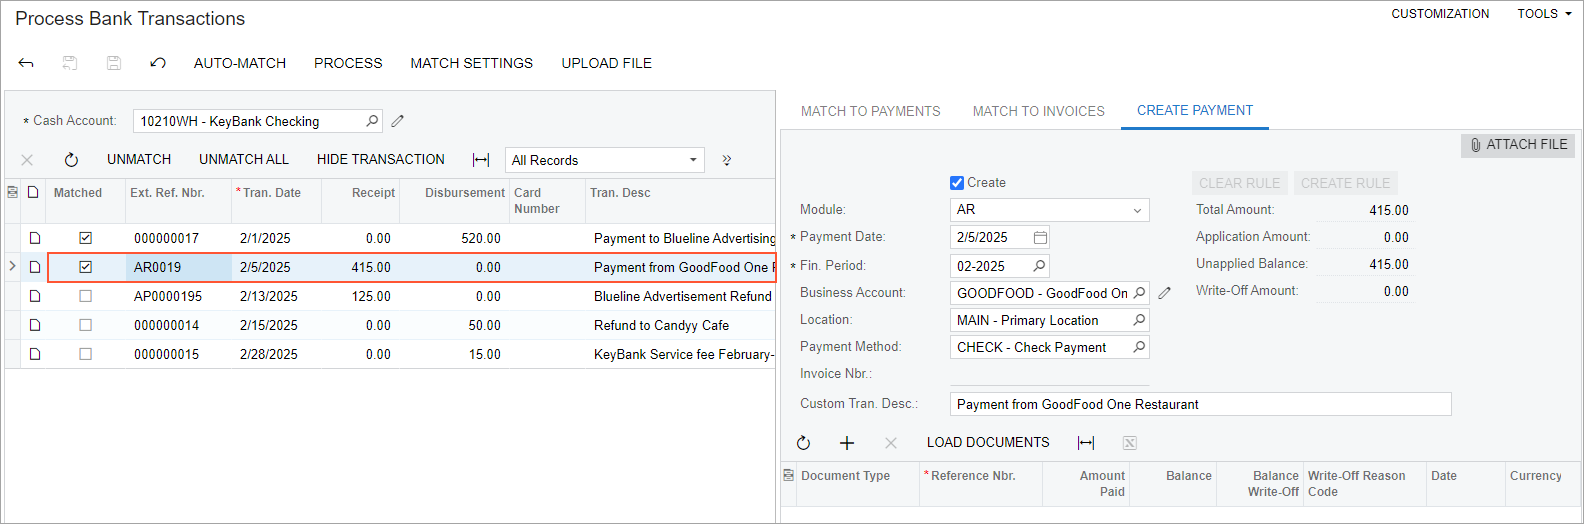
Step 3: Matching a Transaction to a Debit Adjustment
To match a $125 receipt transaction to a debit adjustment, while remaining on the Process Bank Transactions (CA306000) form, do the following:
- On the form toolbar, click Match Settings.
- In the Transaction Matching Settings dialog box, which is opened, select the Allow Matching to Debit Adjustment check box in the Receipt Matching section.
- Click Save & Close in the dialog box.
- In the left pane, click the $125 transaction.
- On the Match to Invoices tab, the system has displayed a
debit adjustment, as shown in the following screenshot.
Figure 3. A debit adjustment that can be matched to a bank transaction 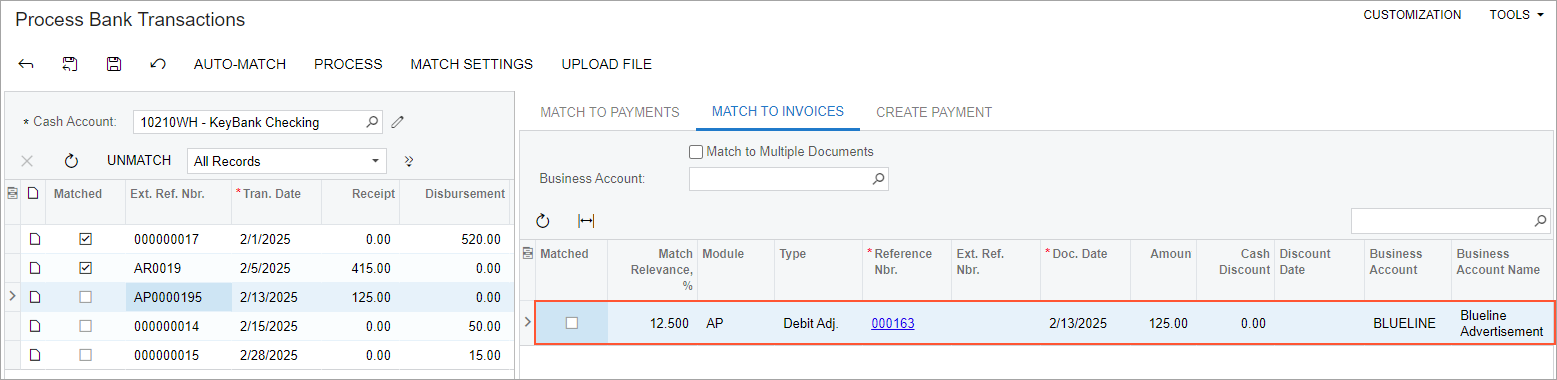
- In the right pane, select the Matched check box for the debit adjustment.
- On the form toolbar, click Save.
Step 4: Creating an AR Refund with an Open Balance
To create an AR refund with an open balance—that is, unapplied to any document—while remaining on the Process Bank Transactions (CA306000) form, do the following:
- In the left pane, select the $50 transaction.
- On the Create Payment tab of the right pane, specify the
following settings:
- Create: Selected
- Module: AR
- Payment Date: 2/15/2026 (inserted by default by the bank transaction information)
- Business Account: CANDYY
- Leave the table on the Create Payment tab
empty.
Notice the $50 amount in the Unapplied Balance box in the Summary area, as shown in the following screenshot. When the system creates an AR refund based on the disbursement transaction, the document with the Refund type will not be applied to any document and will have an open balance.
Figure 4. A refund to be created for the bank transaction 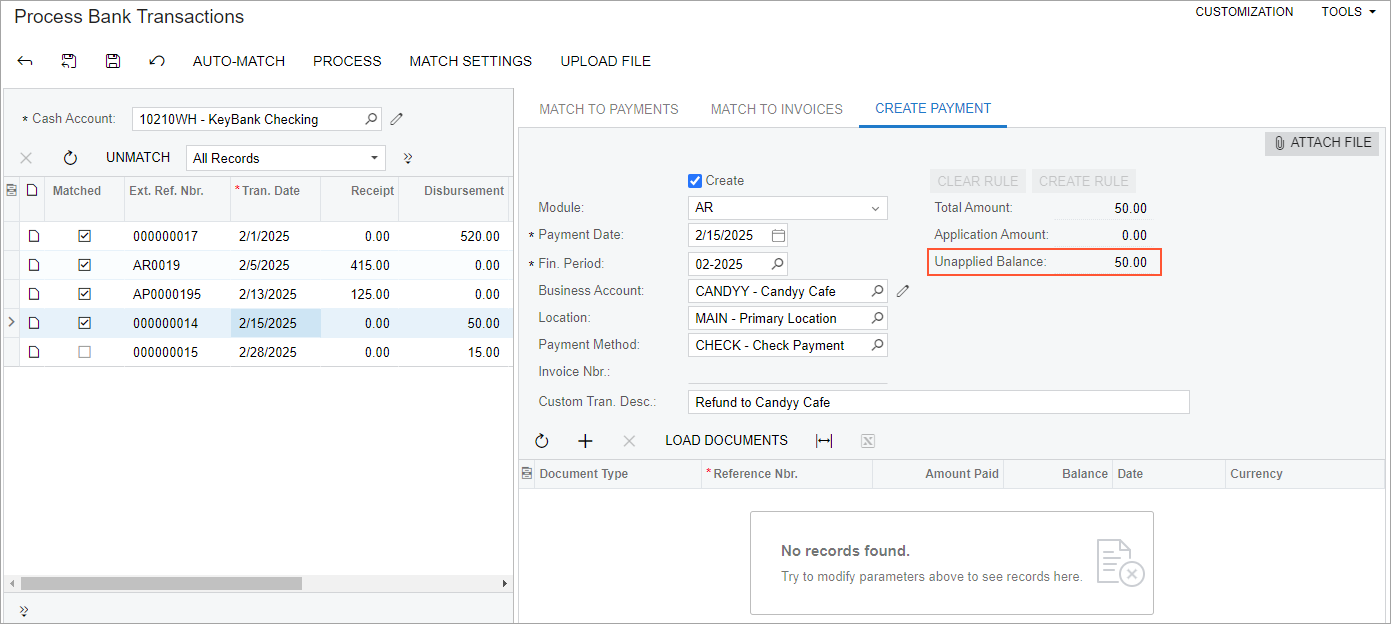
- On the form toolbar, click Save.
Step 5: Creating a Disbursement Cash Transaction
To create a disbursement cash transaction, while remaining on the Process Bank Transactions (CA306000) form, do the following:
- In the left pane, click the $15 transaction.
- On the Create Payment tab of the right
pane, specify the following settings to create the cash transaction in the
system:
- Create: Selected
- Module: CA
- Payment Date: 2/28/2026 (inserted by default from the bank transaction information)
- Fin. Period: 02-2026
- Entry Type ID: BANKFEE
- On the form toolbar, click
Save to save your changes.
The $15 bank service fee transaction has the Matched check box selected because you have specified the information the system will use to create the document when you run the processing of transactions.
Step 6: Preparing Bank Transactions for Reconciliation
To process the bank transactions in preparation for reconciliation, while remaining on the Process Bank Transactions (CA306000) form, do the following:
- On the form
toolbar, click Process.
The system creates a cash transaction, an AR payment, an AP refund, and an unapplied refund based on the information you have specified in the previous steps. The system then releases the document and the transactions and selects the read-only Cleared check box for every created document and transaction on the Reconciliation Statements (CA302000) form.
Important: The results of the bank transaction processing cannot be reversed or changed. - In the left pane of the Process Bank Transactions form, notice that the transactions have been marked as processed.
- On the Import Bank Transactions (CA306500) form, open the bank statement for the 10210WH - KeyBank Checking cash account and the 2/28/2026 statement date and review the transactions. Notice that all transactions have been processed; for these transactions, the Processed check box is selected.
- On the Cash Transactions (CA304000) form, open the disbursement cash entry that was created from the $15 bank fee transaction in 02-2026 and make sure this transaction has been released.
- On the
Payments and Applications
(AR302000) form,
open the
document with the Refund type
dated
2/15/2026
for the
Candyy Cafe
customer.
Notice that the document has the Open status and an available balance of $50 because it has not been applied to any document.
- On the Bills and Adjustments (AP301000) form, open the $125 debit adjustment for the BLUELINE vendor and make sure that its status is Closed.
- On the Bank Transactions History
(CA402000) form, specify the following settings and
review the bank transactions that appear in the table:
- Cash Account: 10210WH
- Date Range: 2/1/2026 to 2/28/2026
Attention: In the Reference Nbr. column, you can find the reference numbers of the documents to which the bank transactions have been matched.
Step 7: Preparing the Reconciliation Statement
To prepare the reconciliation statement for February 2026, do the following:
- Open the Reconciliation Statements (CA3020PL) list of records and click New Record on the form toolbar. The system opens the Reconciliation Statements (CA302000) form.
- In the Cash Account box, select 10210WH - Key Bank Checking.
- Specify the following settings in the Summary area:
- Reconciliation Date: 2/28/2026
- Statement Balance: 4659
- On the form toolbar, click Save to save the reconciliation statement.
- Select the
Reconciled check box for the transactions that have
the Cleared check box selected.Tip: You can select and clear the Cleared check box for transactions until they are involved in bank transaction processing on the Process Bank Transactions (CA306000) form. After you have processed a bank transaction, the Cleared check box is selected and read-only for the corresponding document or transaction in the system. Therefore, once you have processed all transactions from a bank statement, reconciliation with the bank statement becomes easy: You select the Reconciled check box for all transactions that have the Cleared check box selected in the reconciliation statement, and the bank reconciliation is complete.Attention: The cash account balance in the system is not affected by the result of the processing of bank transactions.
The Reconciled Balance is the same as the Statement Balance, as shown in the following screenshot; now you can release the reconciliation statement.
Figure 5. Reconciled bank transactions for February 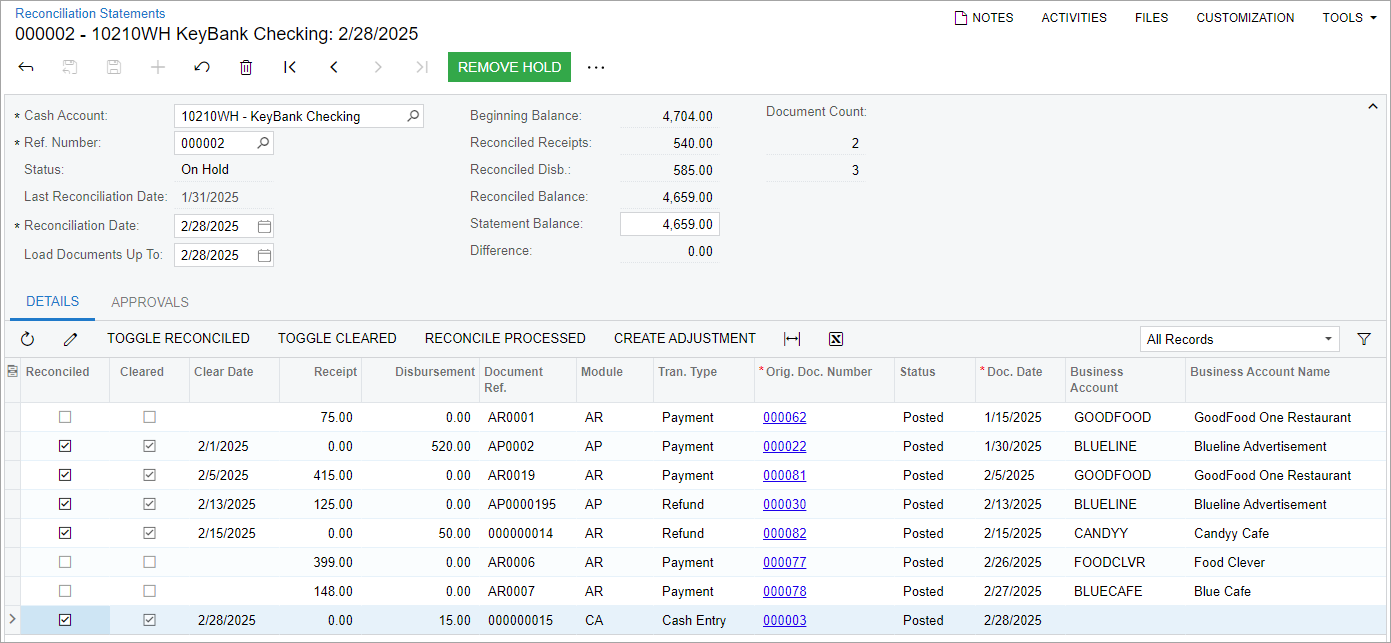
- On the form toolbar, click Save to save the reconciliation statement.
- On the form toolbar, click Remove Hold and then click Release to release the reconciliation statement.