
Configuring Editing Screens
You may have to configure an editing screen (that is, a screen that can be used to enter and edit a data record) based on the use of the corresponding form in MYOB Acumatica.
In some cases, MYOB Acumatica uses a single form to manage data records of a particular type (that is, the .aspx page contains the FormView and Grid controls). In these cases, in the mobile site map, you have to configure both the form view and the list view by using a single declaration of the Screen object.
- A list view (the .aspx page contains one Grid control) to manage records, which is called the substitute form. (It has this name because this form is brought up instead of the data entry form when a user navigates to or searches for the form; it shows these records in a tabular format. On the substitute form, when the user clicks a record, the entry form opens to show the details of the selected record.)
- A form view (the .aspx page with one FormView control) to enter and edit settings, which is usually called a form or entry form.
Example: Creating the Same Layout for the List View and the Form View
An example of a screen with the same layout for the list view and the form view is presented in the Configuring Lists topic.You can see the list of fields and edit them at the same time.
Example: Configuring the List and the Editing Form Separately
In this example, we will add the Invoices (SO3030PL) list screen, which corresponds to the Invoices (SO3030PL) substitute form (a grid listing all available invoices), and the Invoices (SO303000) editing screen, which corresponds to the Invoices (SO303000) entry form (used to enter and edit the data of one invoice) in MYOB Acumatica .
To configure these screens, do the following:
- Add the Invoices (SO3030PL) list screen, as described in To Add a Screen to the Mobile Site Map (Example).
- Insert the following code in the Commands area of the Add:
SO3030PL page.
add screen SO3030PL {
  add container "Result" {
    add field "ReferenceNbrSOInvoiceRefNbr"
    add field "Status"
    add field "Customer"
    add field "Date"
    add containerAction "Insert" {
      icon = "system://Plus"
      behavior = Create
      redirect = True
    }
    add containerAction "EditDetail" {
      behavior = Open
      redirect = True
    }
  }
}
In the screen, you find two actions that can be invoked to open the editing screen for a data record:
behavior = Createandbehavior = Open. Theredirect = Trueattribute indicates that the editing screen needs to be opened separately. The actual screen that will be opened is determined by the server logic. - Add the Invoices (SO303000) screen, as described in To Add a Screen to the Mobile Site Map (Example).
- Insert the following code in the Commands area of the Add:
SO303000 page.
add screen SO303000 { add container "InvoiceSummary" { add field "Customer" add field "Location" add field "Terms" add field "DueDate" add field "CashDiscountDate" add field "Currency" { selector { add field "CurrencyID" } PickerType = Attached } add recordAction "Save" { behavior = Save } add recordAction "Cancel" { behavior = Cancel } } } - Add the screens to the mobile site map by using the Update:
SITEMAP page as shown below.
add item "SO3030PL" { displayName = "Invoices" icon = "system://NewsPaper" } add item "SO303000" { displayName = "Invoice" visible = False }Note:The visible attribute of the Invoices (SO303000) screen is set to false to hide the editing screen from the Home screen of the mobile app so that a user can access it only from the Invoices (SO3030PL) screen.
After you publish the customization project, you should see a new tile on the main menu of the mobile app and the corresponding screens, as shown below.
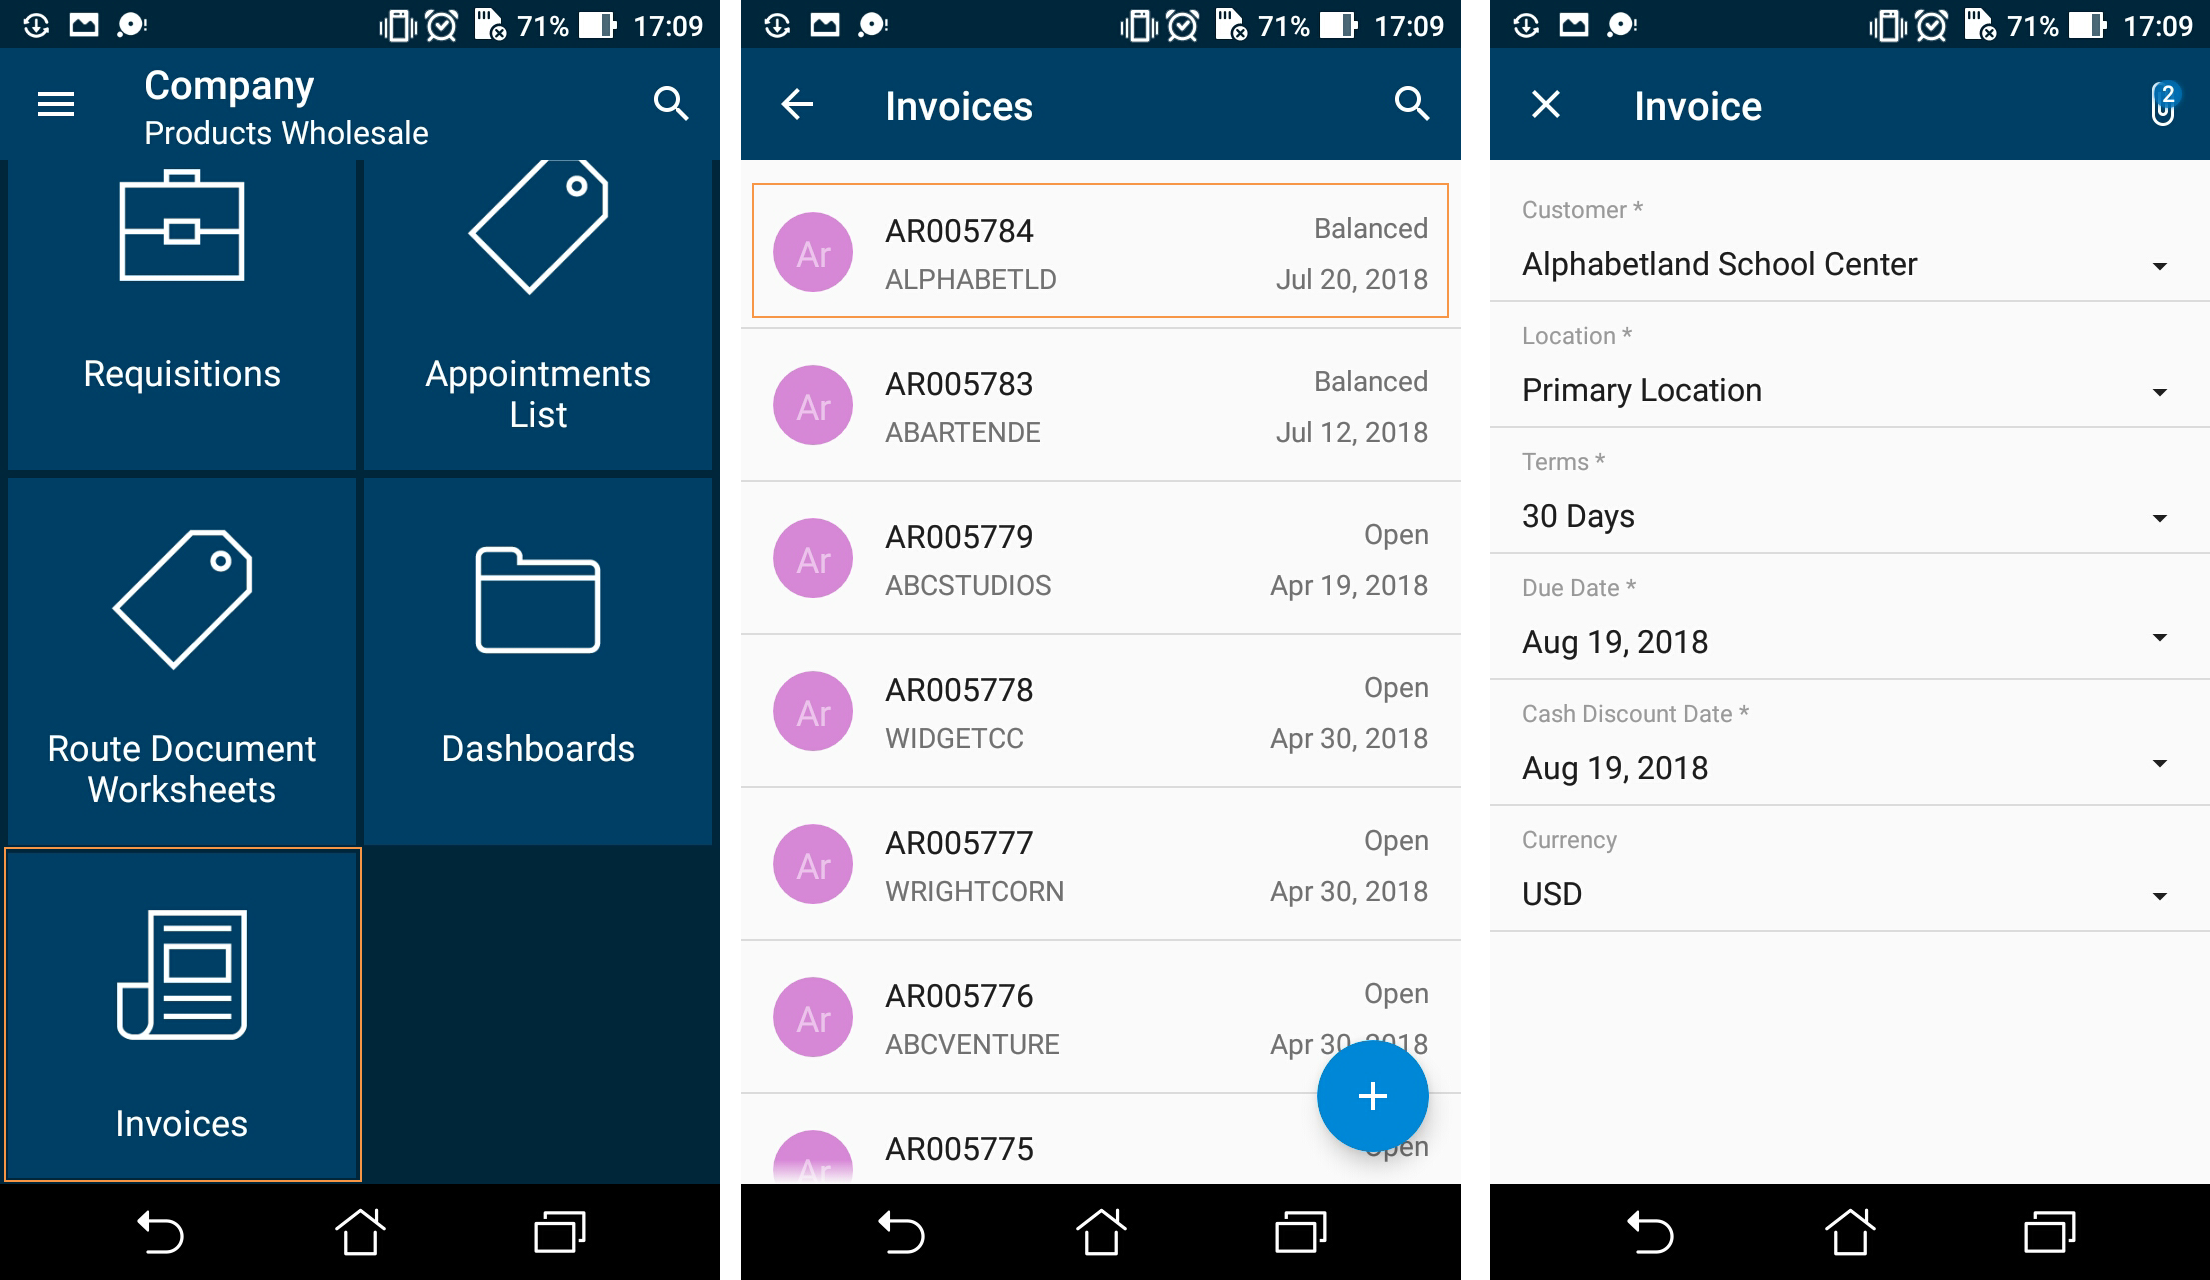
In this example, you use the Invoices (SO3030PL) screen to display the list screen, and you use the Invoices (SO303000) screen to display the editing screen. The same approach is used with forms in MYOB Acumatica.