
Form Layout: To Make System-Wide Form Configuration
This activity will walk you through the process of loading a personal configuration of a form layout, making changes to the form’s configuration, and applying these changes system-wide—while preserving individual users' configurations.
Story
Suppose that management has asked you to make some changes to the configuration of the Invoices and Memos (AR301000) form and apply these changes system-wide.
You have also reviewed the personal configuration that another user has made on this form and decided to apply this personal form configuration system-wide. While applying this configuration, however, you need to preserve other users’ personal configurations of the form.
You’ll load the user's configuration of the form, make additional changes, and apply the updated layout to all users, while preserving their personal configurations. You will then review the system-wide changes and confirm that the user's personal configuration remains intact.
Process Overview
In this activity, you’ll do the following on the Invoices and Memos (AR301000) form:
- Load the user's personal form configuration
- Manage UI elements in the groups of the Summary area
- Pin a UI element in the group
- Rename the group of elements
- Delete a UI element from the group
- Change the order of tabs
- Change the set of visible columns in the table
- Apply the changes system-wide, preserving users’ personal form configurations
- Review the system-wide and personal changes
System Preparation
Before you begin performing the steps of this activity, do the following:
- Prepare an MYOB Acumatica instance by performing the Customization Projects: To Deploy an Instance prerequisite activity, and sign in by using the admin username.
- Create the Yogifon customization project by performing the Customization Projects: To Create a Customization Project prerequisite activity.
- Make sure that you have completed the Form Layout: To Personalize a View of a Form prerequisite activity.
Step 1: Loading the Personal Form Configuration
To load another user's personal configuration of the Invoices and Memos (AR301000) form, do the following on this form:
- Notice the order of the tabs: The Addresses tab is after the Financial tab, the Applications tab is the last one, and the Commissions tab is visible.
- On the form title bar, click the Settings button and then click the
UI Configuration menu item, as shown below.
Figure 1. The UI Configuration menu item 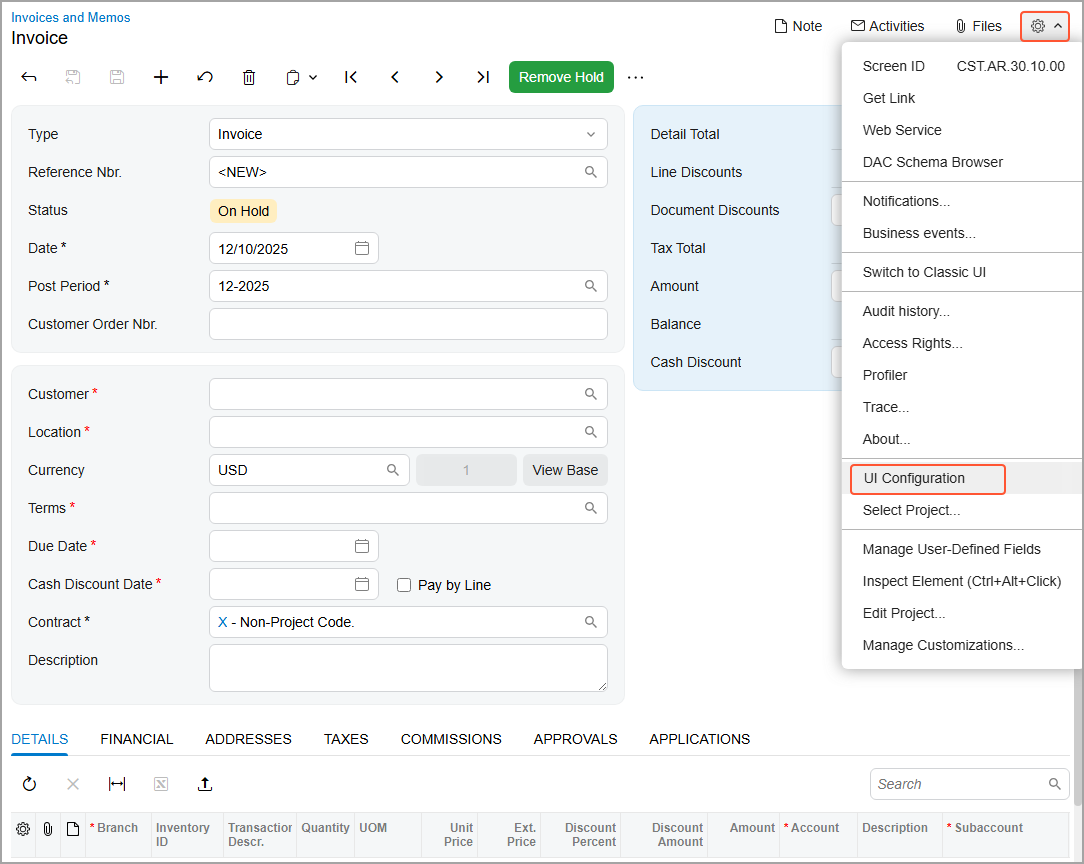
This activates UI Configuration mode, and displays the UI Configuration pane at the top of the form (see below).
Figure 2. The UI Configuration pane 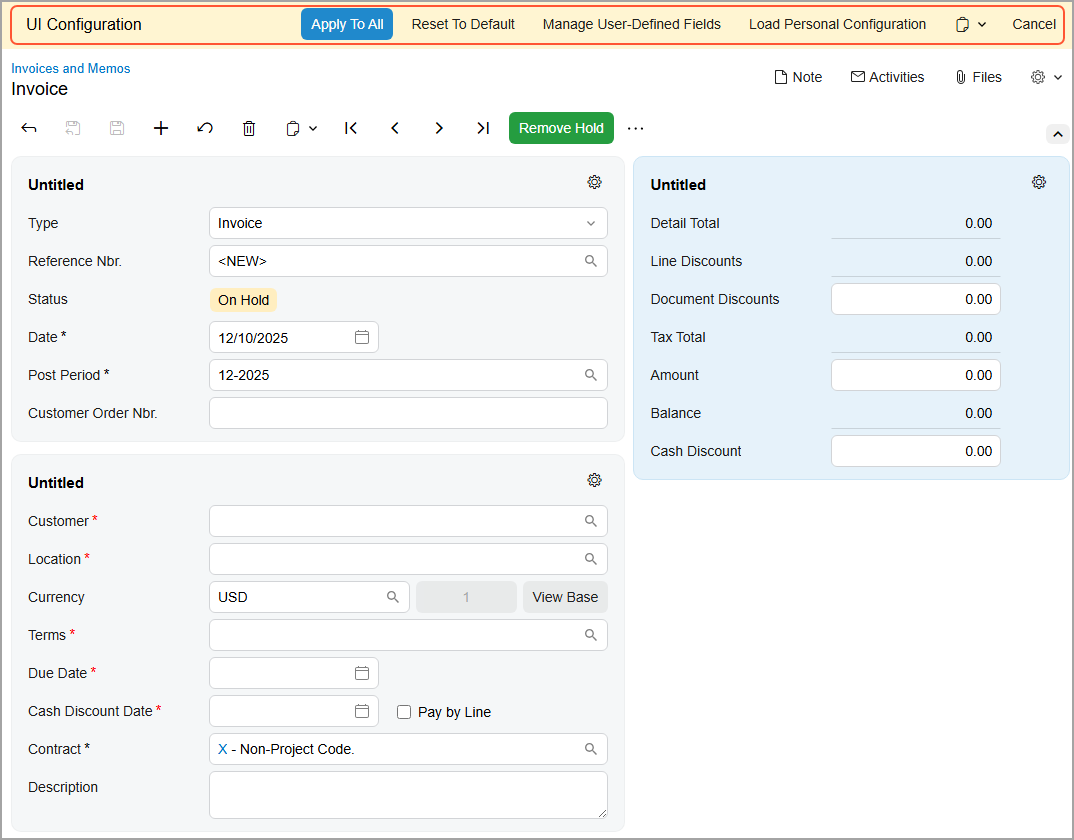
- In the UI Configuration pane, click Load Personal Configuration.
- In the Load Personal Configuration dialog box, which opens, select Baker, Maxwell in the User box.
- Click Load. The system loads this user's personal configuration of the form.
- Review the order of the tabs. Notice that the Addresses and Applications tabs are now after the Details tab, and the Commissions tab is hidden.
Step 2: Customizing the First Group of Elements
Suppose that you were asked to do the following in the Summary area of the Invoices and Memos (AR301000) form:
- Add the Branch box to the first group of elements
- Pin this box so that it stays visible when the group of elements is collapsed
To make these changes, do the following:
- While you are still on the Invoices and Memos form in
the UI Configuration mode, click the Settings button in the upper-right corner
of the first group of elements in the Summary area (see below).
Figure 3. The Settings button for the group of elements 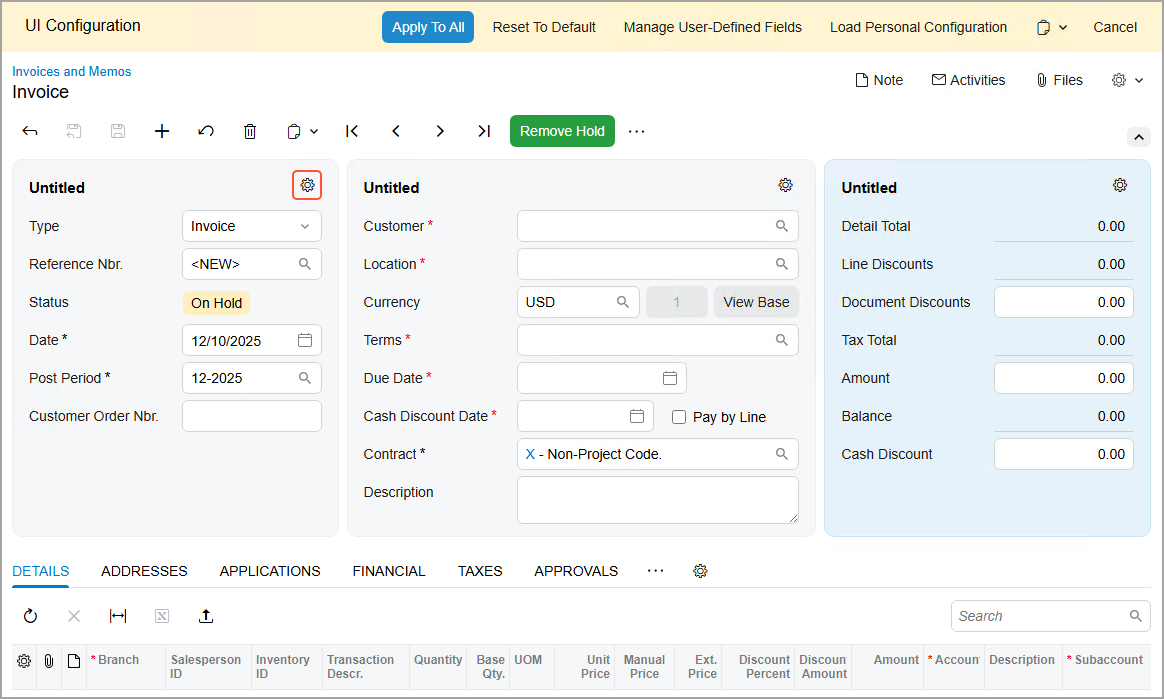
-
The Section Configuration dialog box opens.
- In the Available Elements pane of the dialog box, click
Branch (in the group), and then click the arrow that appears to the right of its
name, as shown below.
Figure 4. The Section Configuration dialog box 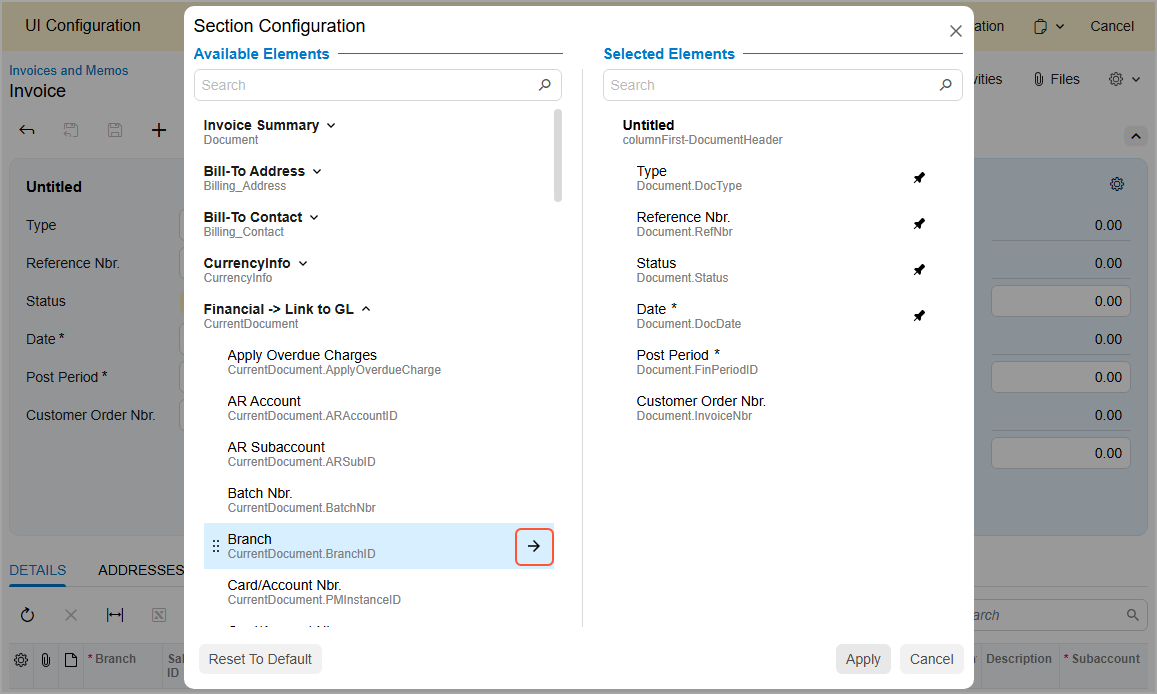
The system moves Branch to the end of the list in the Selected Elements pane.
- Click the Pin icon next to Branch (shown below). This
ensures that the Branch box will remain visible when the
group of elements is collapsed.
Figure 5. The Pin icon 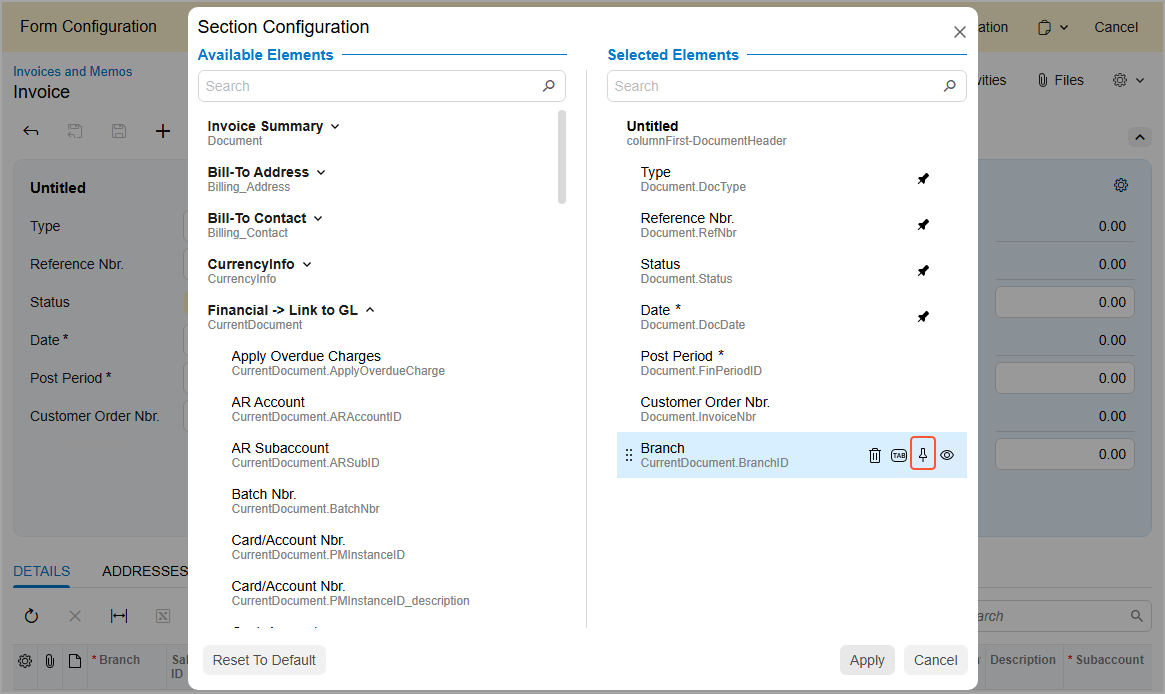
- Click Apply.
The Branch box appears in the first group of elements, as shown below.
Figure 6. The Branch box in the group of elements 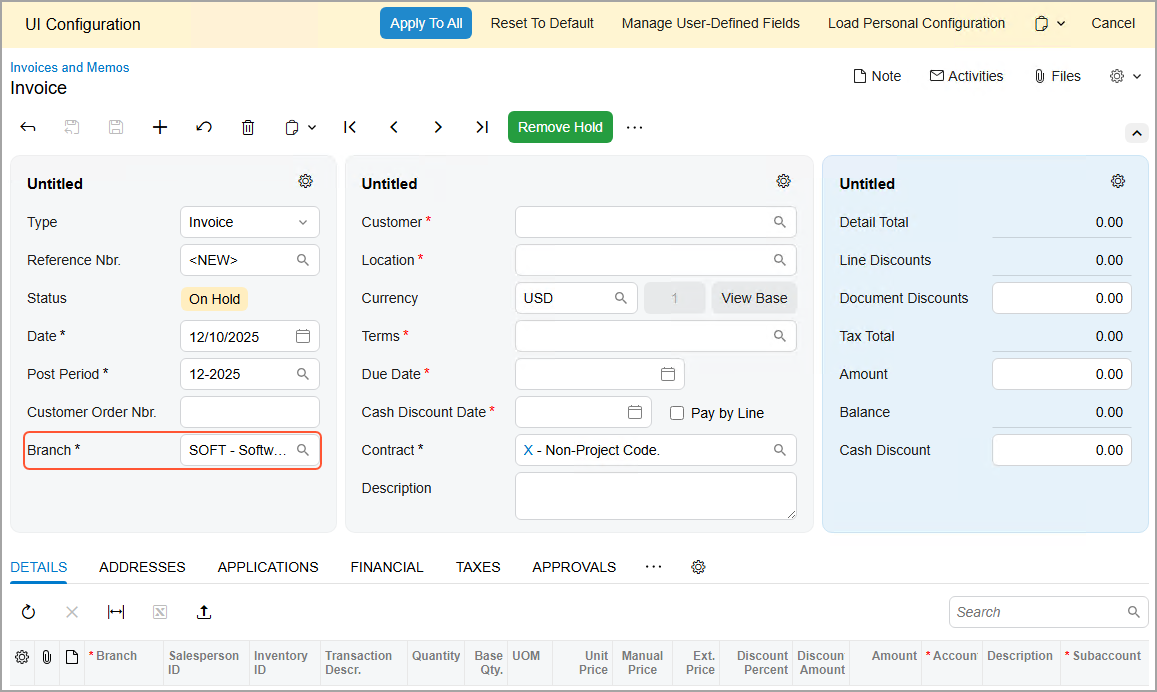
Step 3: Customizing the Second Group of Elements
Suppose that you were asked to add the Base Currency ID box to the second group of elements after the Cash Discount Date box. Do the following:
- While you are still on the Invoices and Memos form in the UI Configuration mode, click the Settings button in the second group of elements.
- In the Available Elements pane of the Section
Configuration dialog box, type Base Currency
ID in the Search box.
The CurrencyInfo group appears.
- In this group, click Base Currency ID, and then click the
arrow next to its name.
The system adds Base Currency ID to the end of the list in the Selected Elements pane.
- Drag Base Currency ID immediately after Cash
Discount Date, and click Apply.
The Base Currency ID box appears in the second fieldset after the Cash Discount Date box, as shown below.
Figure 7. The added Base Currency ID box 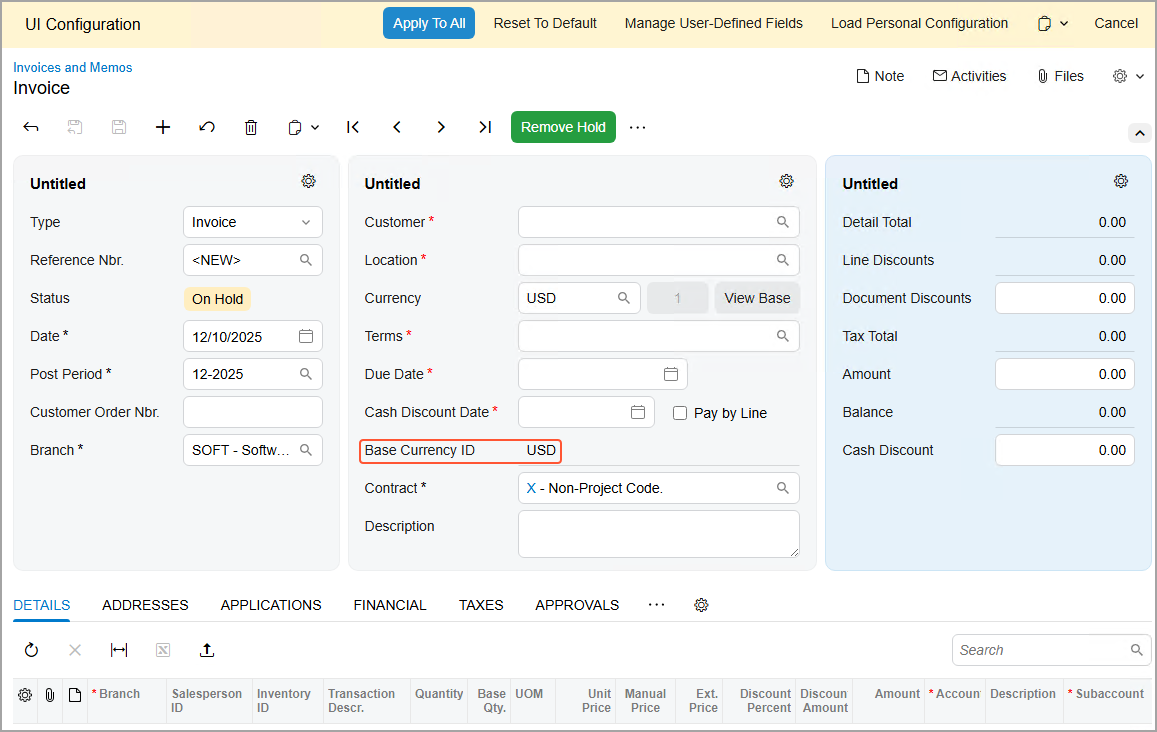
Step 4: Customizing the Third Group of Elements
Suppose that you were asked to rename the third group of elements in the Summary area of the Invoices and Memos (AR301000) form to Total. Do the following:
- While you are still on the Invoices and Memos form in the UI Configuration mode, click the Settings button in the third group of elements.
- In the Selected Elements pane of the Section Configuration dialog box, hover over Untitled and click the Edit button, which appears to the right of it.
- In the editing area, type Total.
- Click Apply.
The name of the third group of elements changes, as shown below.
Figure 8. The renamed group of elements 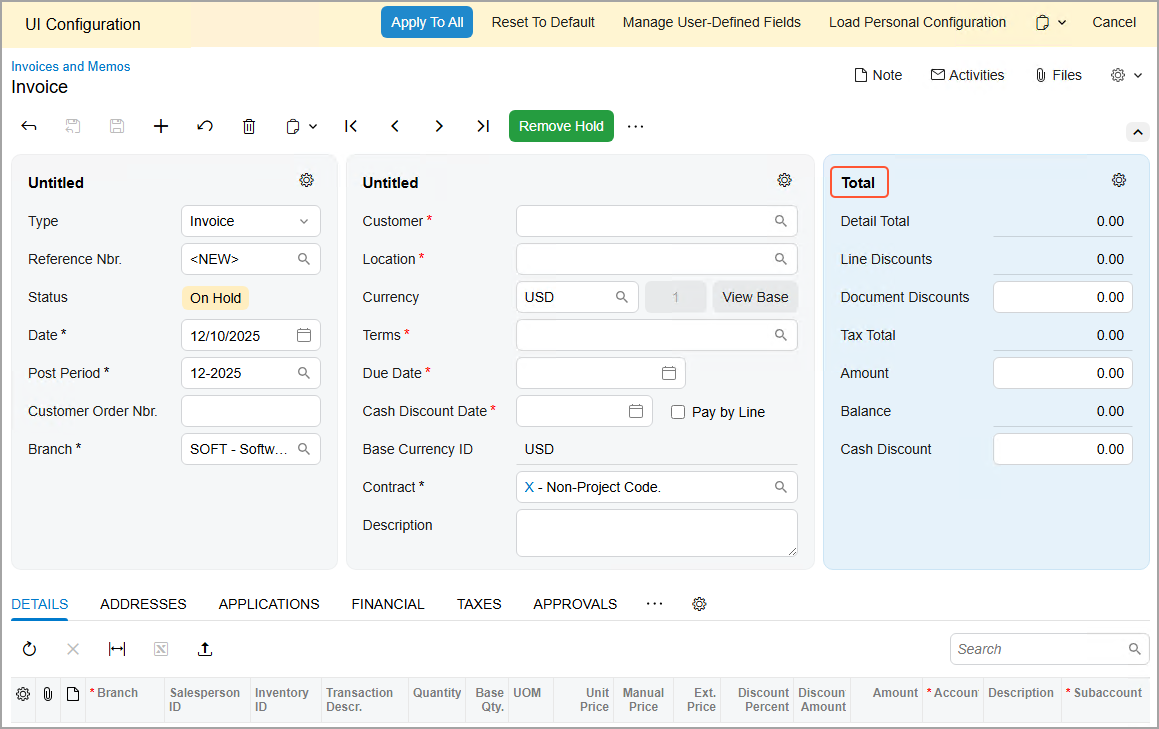
Step 5: Changing Tabs’ Order and Managing Columns
Suppose that you were asked to apply the following changes system-wide on the Invoices and Memos (AR301000) form:
- Move the Taxes tab after the Details tab
- Hide the Applications tab
- Add the Warehouse column to the table on the Details tab and hide the Tax Category column
To make these changes, do the following:
- While you are still on the Invoices and Memos form in the UI Configuration mode, drag the Taxes tab to place it immediately after the Details tab.
- Drag the Applications tab to the More button and then
move it to the Hidden Tabs section that appears below the
More button (see below).
Figure 9. The change in tabs’ order and visibility 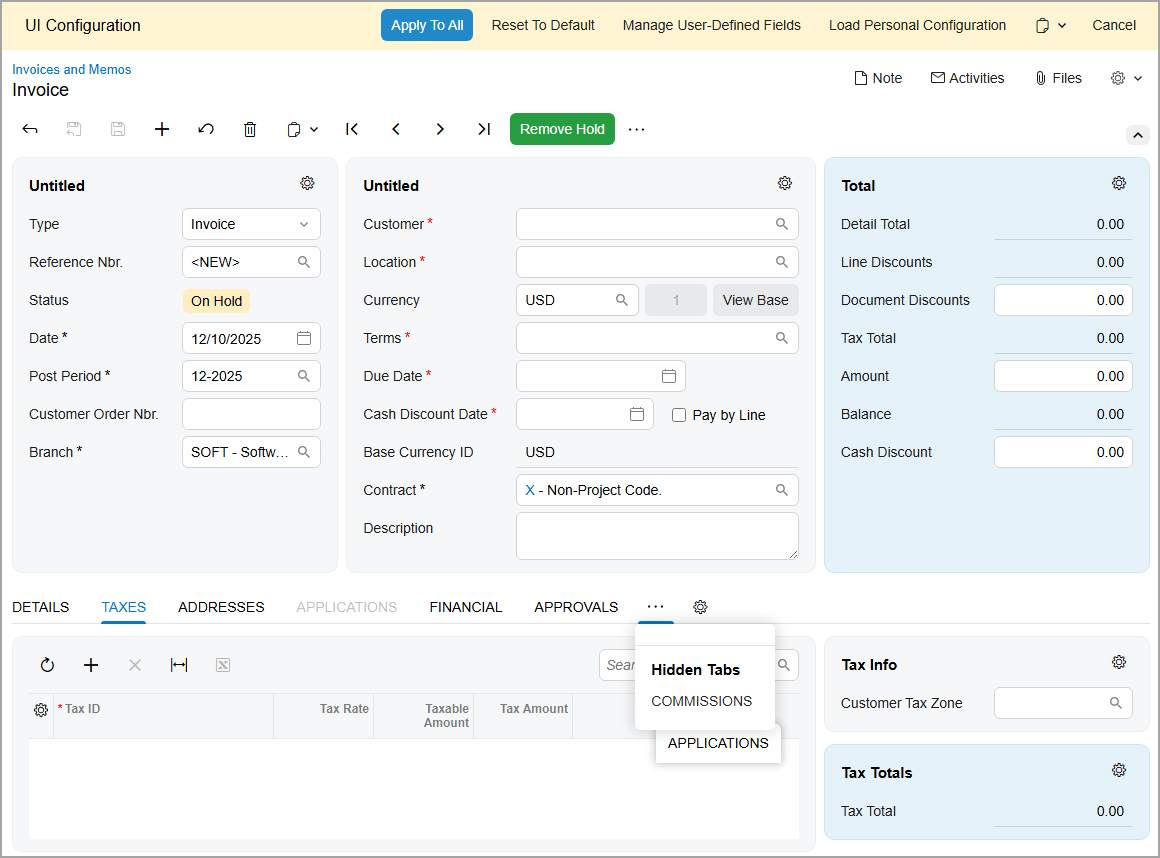
- In the upper-left corner of the table toolbar of the Details tab, click the Settings button. The Column Configuration dialog box opens.
- Select the check box for Warehouse.
- Clear the check box for Tax Category.
- Click OK.
The system adds the Warehouse column (see below). Notice that the Tax Category column is not displayed.
Figure 10. The added Warehouse column 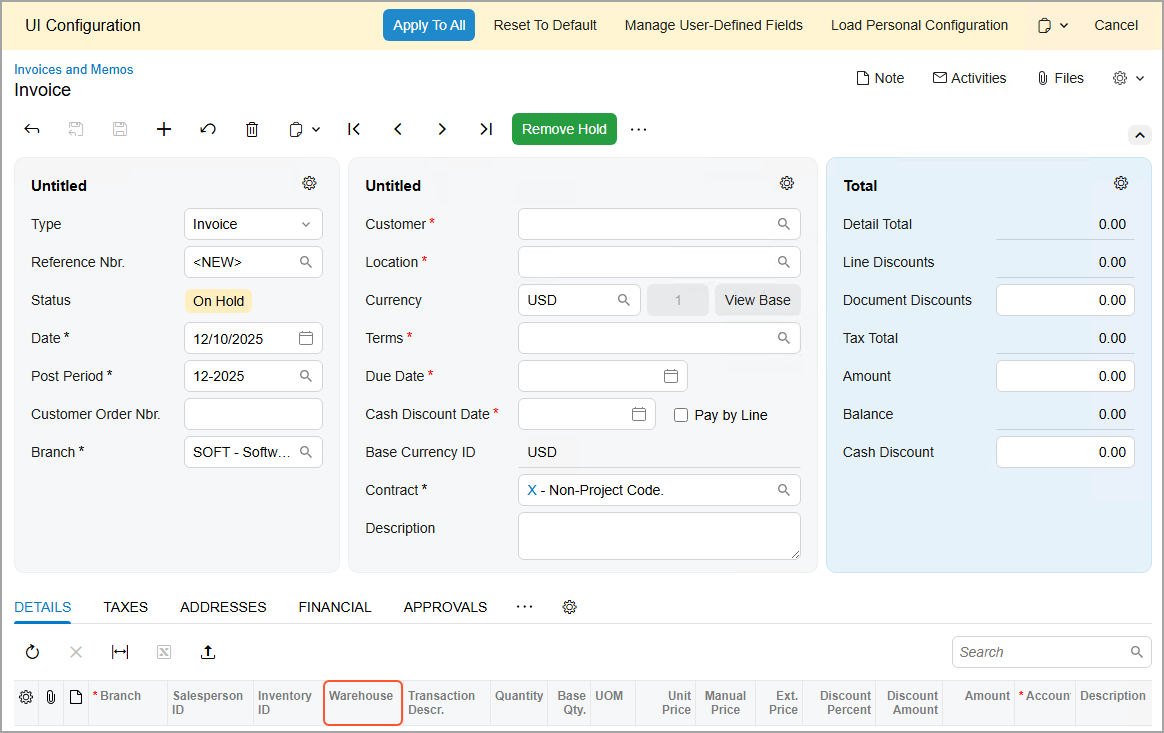
Step 6: Applying the Changes System-Wide
To apply the changes on the Invoices and Memos (AR301000) form system-wide, do the following while you are still on this form in Form Configuration mode:
- Click Apply to All in the UI Configuration pane at the top of the form.
- In the Apply to All dialog box, which opens, click
Preserve Personal Configuration (shown below).
Figure 11. Applying system-wide changes 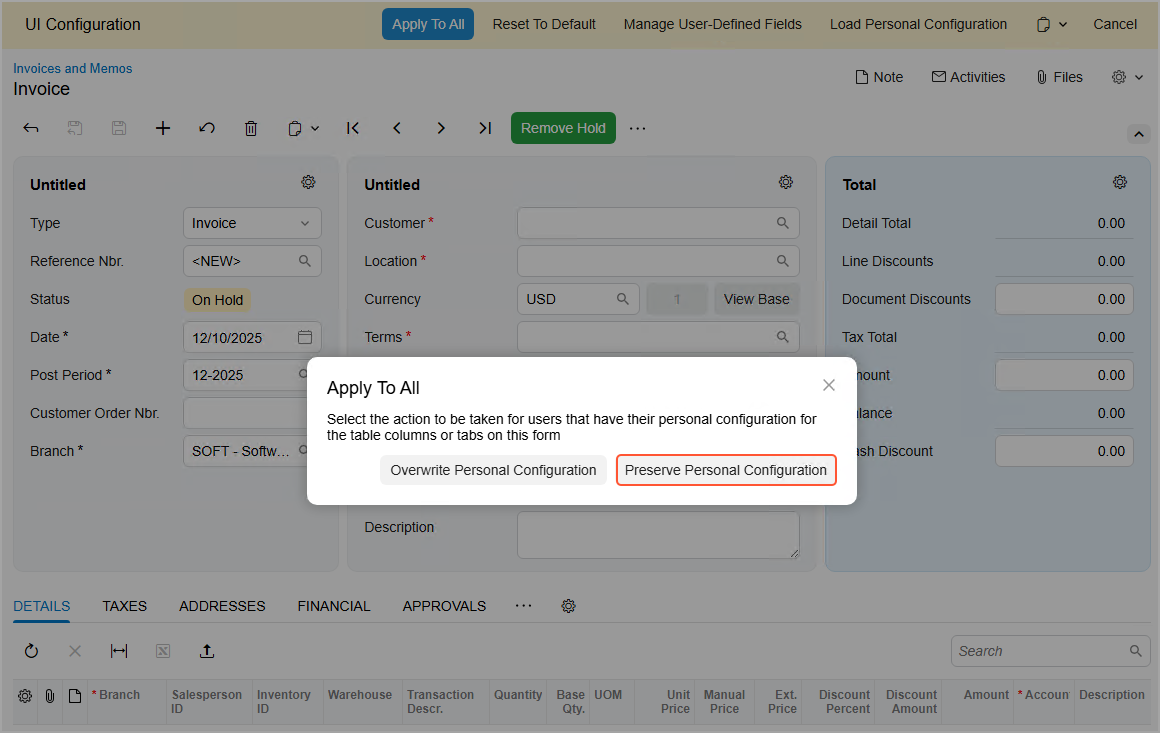
The system applies the changes (except for users with their own configuration of the form) and closes the UI Configuration pane.
- Sign out of the system.
Step 7: Reviewing the System-Wide Changes
Now suppose that you are Maxwell Baker. After the system administrator has applied the system-wide changes on the Invoices and Memos (AR301000) form, you need to review the form and verify that your personal configuration of it has been preserved. Do the following:
- Sign in to the system by using the baker username.
- Open the Invoices and Memos (AR301000) form and add a new record.
- Review the first group of elements in the Summary area to confirm that the Branch box is there.
- Click the arrow icon in the upper-right corner of the area to collapse it.
The groups collapse and show only pinned UI elements, including the Branch box in the first group of elements.
- Review the third group of elements to confirm that it’s named Total.
- Review the order and visibility of the tabs. They should be in the same order
that you previously configured:
- The Taxes tab should be after the Financial tab—not after the Details tab.
- The Commissions tab is hidden.
- On the Details tab, confirm that the table contains the
following columns:
- The Warehouse column that has been added in the system-wide configuration.
- The Manual Price column that has been added in your personal configuration.
- On the Addresses tab, review the appearance of the Bill-To Contact and Bill-To Address sections. They should be collapsed while the other sections of the tab are expanded.
As a system administrator and customizer, you loaded the personal configuration of the form and made other changes to it. Then you applied all the changes, including the personal configuration, system-wide while preserving users’ personal configurations. As a user, you reviewed the applied system-wide changes and verified that your personal configuration had not changed.