Form Layout: To Add a Column to a Lookup Table
The following activity will walk you through the process of adding a new column to a lookup table. A lookup table opens when a user clicks the magnifier button for a box that has this button, and the information in the table can help the user find and select the needed record.
Story
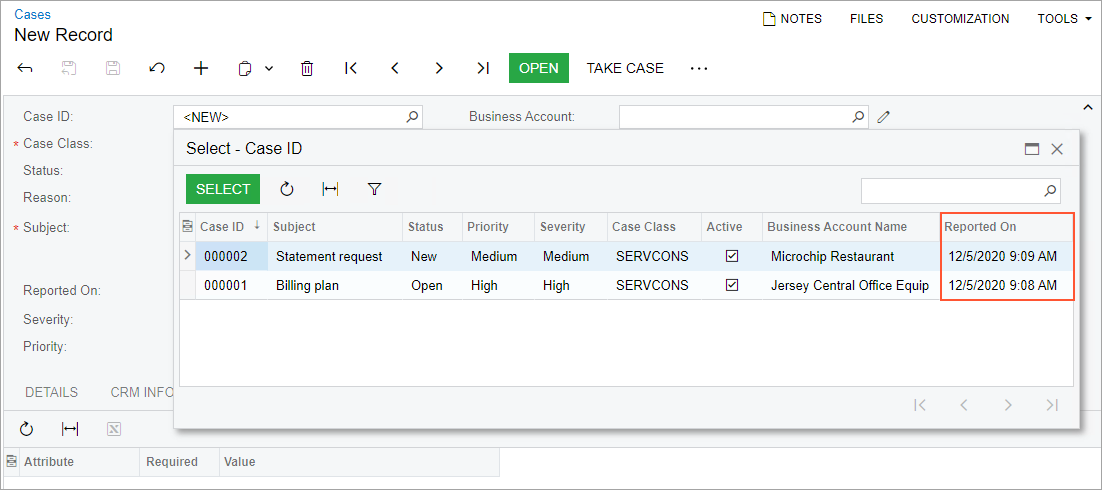
Suppose that you want users to be able to select cases on the Cases (CR306000) form by the date on which they have been reported. You need to change the lookup table for the Case ID box on the form so that it contains the Reported On column.
Process Overview
By using the Customized Data Classes and Data Class pages of the Customization Project
Editor, you will add the column to the lookup table of the CaseCD
field, which corresponds to the Case ID box of the Cases (CR306000) form. You will then publish
the customization project and test the change on the form.
System Preparation
Before you begin performing the steps of this activity, do the following:
- Prepare an MYOB Acumatica instance by performing the Customization Projects: To Deploy an Instance prerequisite activity.
- Create the Yogifon customization project by performing the Customization Projects: To Create a Customization Project prerequisite activity.
- Make sure that you have completed the Form Layout: To Add a New Tab to a Form prerequisite activity.
Step 1: Adding the Column to the Lookup Table
To modify the settings of the lookup table for a box, do the following:
- On the Customization Projects (SM204505) form, click Yogifon to open the Customization Project Editor for this customization project.
- In the navigation pane, click Data Access.
The Customized Data Classes page opens.
- In the table on the page, click the link in the row with the
CRCaseclass.The Data Class page opens.
- On the page toolbar, click Change Attributes of Base Field.
- In the Change Existing Field dialog box, which opens, select CaseCD, and click OK.
- In the table on the Customized Fields pane, click the added field.
- On the More menu (under Actions), click Edit Selector Columns.
- In the Customize Selector Columns dialog box, which opens, click Add Columns on the table toolbar.
- On the All tab of the Add Columns to Selector dialog box, which opens, select the unlabeled check box in the row with the Reported On column name, and click OK to close the dialog box.
- In the Customize Selector Columns dialog box, to which you return, click OK.
- Save your changes.
Step 2: Testing the Added Column
Publish the customization project and test the added column as follows:
- On the main menu of the Customization Project Editor, click .
- Wait until the Website updated row appears in the Compilation pane, and click Close Compilation Pane.
- On the Cases (CR306000) form, click the magnifier button of the Case ID box.
- In the lookup table, make sure that the Reported On
column is displayed, as shown in the
following
screenshot.
Figure 1. The added Reported On column