
Form Layout: To Add a New Tab to a Form
The following activity will walk you through the process of adding a new tab to a form and then adding new boxes to this tab.
Story
Suppose that you want to add the new Problem Type and Comments boxes to the Cases (CR306000) form. Further suppose that you want to arrange these boxes on a separate Problem Summary tab (which should be placed after the Closure Notes tab). By using the added tab and boxes, the employees will be able to specify and view information related to the closure of the case (such as the type of the problem and customer's comments).
Because the boxes do not yet exist in the system, you need to create the underlying fields. Then you need to add the corresponding boxes to the form.
Process Overview
On the Screens page, you will add the Cases (CR306000) form so that it can be customized. By using the Customized Data Classes page, you will add the fields that will underlie the new boxes on the Cases (CR306000) form. By using the Screen Editor page, you will add a new tab for this form, and add the created fields to this tab. Finally, you will publish the customization project and test the new layout.
System Preparation
Before you begin performing the steps of this activity, do the following:
- Prepare an MYOB Acumatica instance by performing the Customization Projects: To Deploy an Instance prerequisite activity.
- Create the Yogifon customization project by performing the Customization Projects: To Create a Customization Project prerequisite activity.
Step 1: Modifying the List of Customized Screens
To add a new tab on the Cases (CR306000) form, you first need to add the form to the list of customized screens. Do the following:
- On the Customization Projects (SM204505) form, click Yogifon to open the Customization Project Editor for this customization project.
- In the navigation pane of the Customization Project Editor, click
Screens.
The Screens page opens.
- On the page toolbar, click Customize Existing
Screen.
The Customize Existing Screen dialog box opens.
- In the Select Screen box of the dialog box, click the magnifier button. In the lookup table, type CR306000 in the Search box, and double-click the Cases form.
- Click OK to close the dialog box.
The Cases form is added to the list of forms on the Screens page, and the Screen Editor: CR306000 (Cases) page opens.
Step 2: Adding New Fields
To add new fields, do the following in the Customization Project Editor:
- In the navigation pane, click Data Access.
The Customized Data Classes page opens.
- On the page toolbar, click Add New Record.
- In the Select Existing Data Access Class dialog box,
which opens, select PX.Objects.CR.CRCase by using the lookup table, and
click OK.
The Data Class page opens.
Tip:Notice that the name on the page is Data Class: CR.CRCase, with the name of the customized DAC following the page name. - On the page toolbar, click Create New Field.
- In the Create New Field dialog box, which opens, specify
the following settings:
- Field Name:
ProblemType
Notice that the system changes this name to UsrProblemType to indicate that this is a user-created field.
- Display Name: Problem Type
- Storage Type: DBTableColumn
- Data Type: String
- Length: 1
- Field Name:
ProblemType
- Click OK to save your changes.
The system creates the field and opens the Data Class page for it.
- In the Custom Attributes area of the Source Code pane of
the page, add the
[PXStringList("Y;Functionality,L;Licensing,P;Performance,M;Maintenance")]
attribute after the [PXUIField(DisplayName="Problem Type")] attribute
(see the following screenshot).
This setting will make the added field a drop-down list with the four options.
Figure 1. The Customize Attributes area with the added attribute 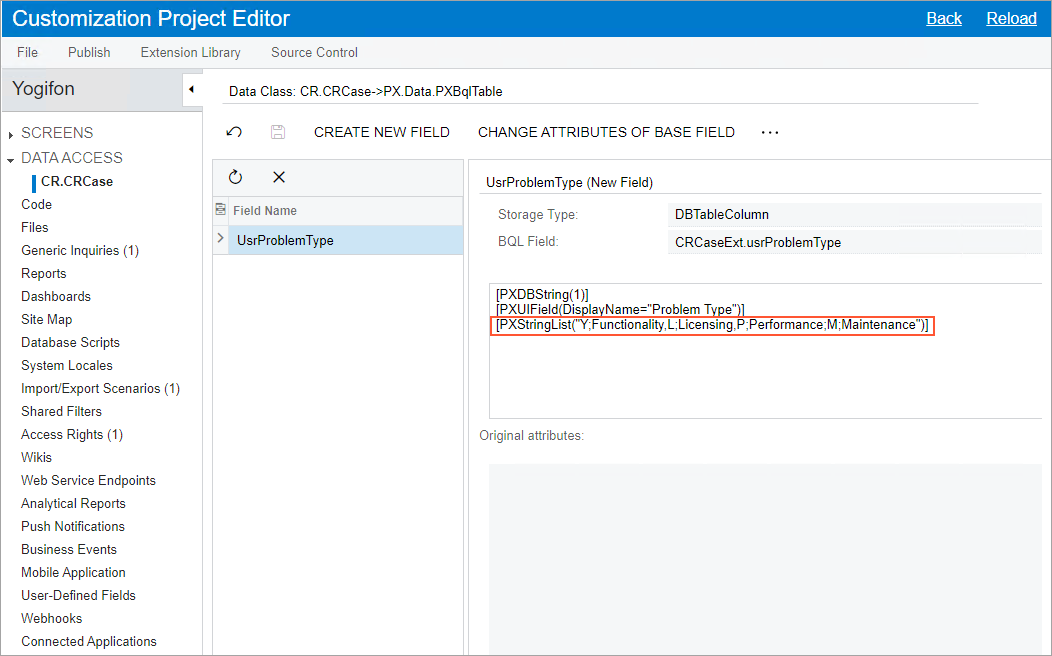
- Save your changes.
- On the page toolbar, click Create New Field again.
- In the Create New Field dialog box, which opens, specify
the following settings:
- Field Name:
Comments
Notice that the system changes this name to UsrComments to indicate that this is a user-created field.
- Display Name: Comments
- Storage Type: DBTableColumn
- Data Type: String
- Length: 1024
- Field Name:
Comments
- Click OK to add the field and close the dialog box.
The system creates the field.
- Save your changes.
- On the Database Scripts page, notice that the system
has generated a script to add the
two
created fields to the database table (see the following screenshot).
Figure 2. The generated script on the Database Scripts page 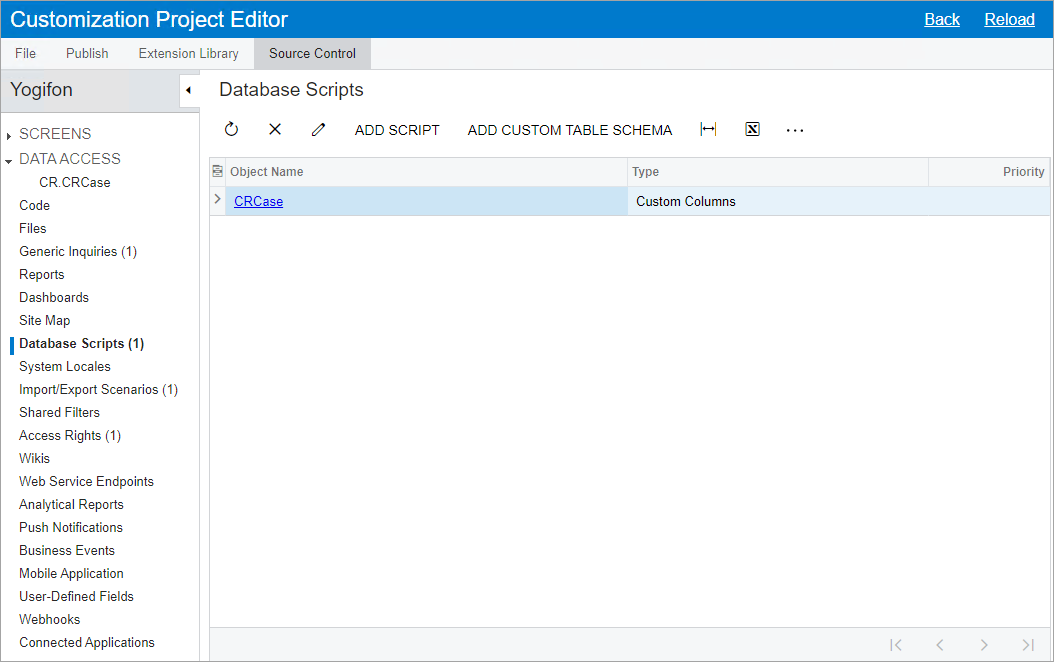
- Publish the customization project.
You need to publish your project before you proceed to make the system generate the specified fields, so that you can then add boxes for them to the form.
Step 3: Adding New Fields to the List of Available Fields
To add a new tab to the Cases (CR306000) form, do the following in the Customization Project Editor:
- In the navigation pane, click .
The Modern UI Editor: CR306000 (Cases) page opens.
- On the page toolbar, click Add Field.
- In the Add Field dialog box, which opens, specify the
following settings:
- Data View: Case (Case Summary)
- DAC: PX.Objects>CR.CRCase
- Field or Display Name: usr
The system displays the fields whose names contain usr.
- Select the unlabeled check boxes in the row with the
UsrComments and UsrProblemType fields
(see the following screenshot).
Figure 3. Selection of the new fields 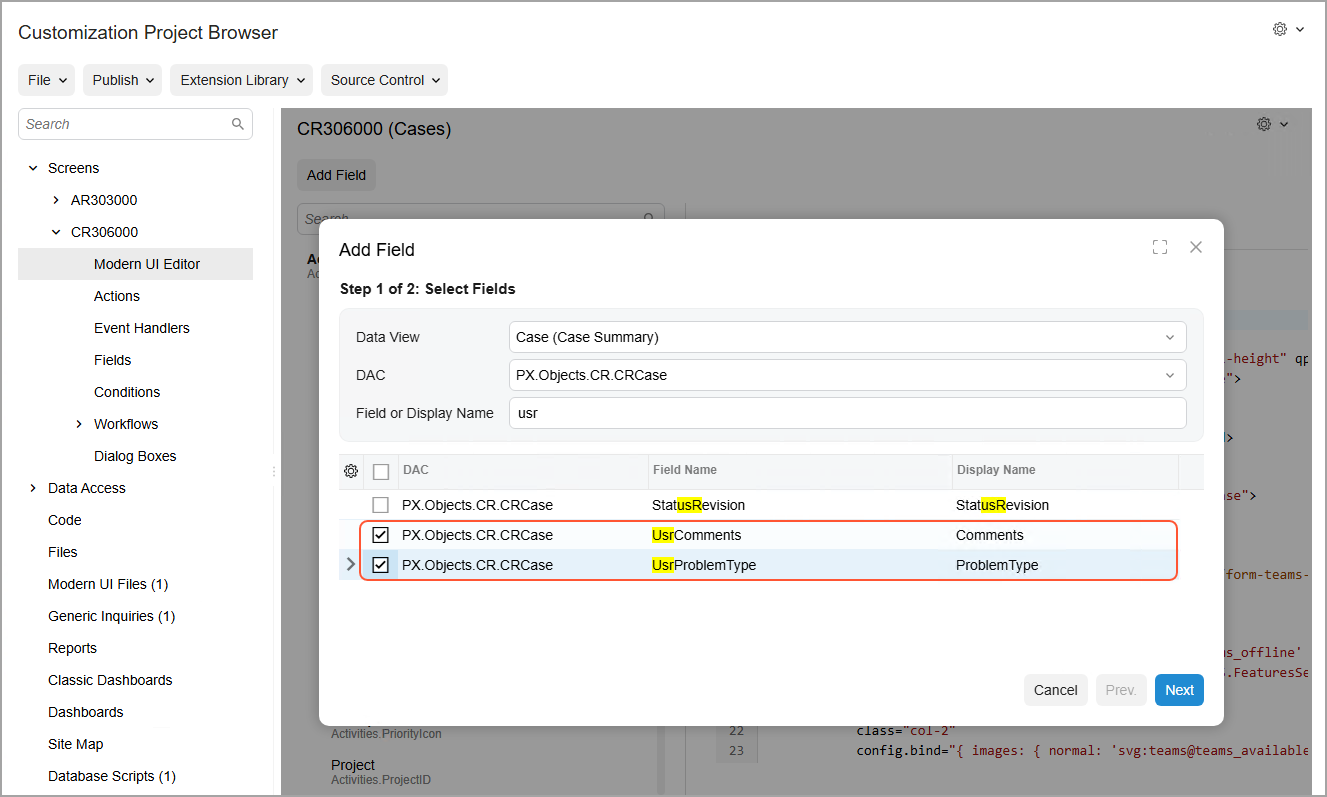
- Click Next.
The system displays the Typescript code for the added fields (shown below).
Figure 4. The Typescript code for the added fields 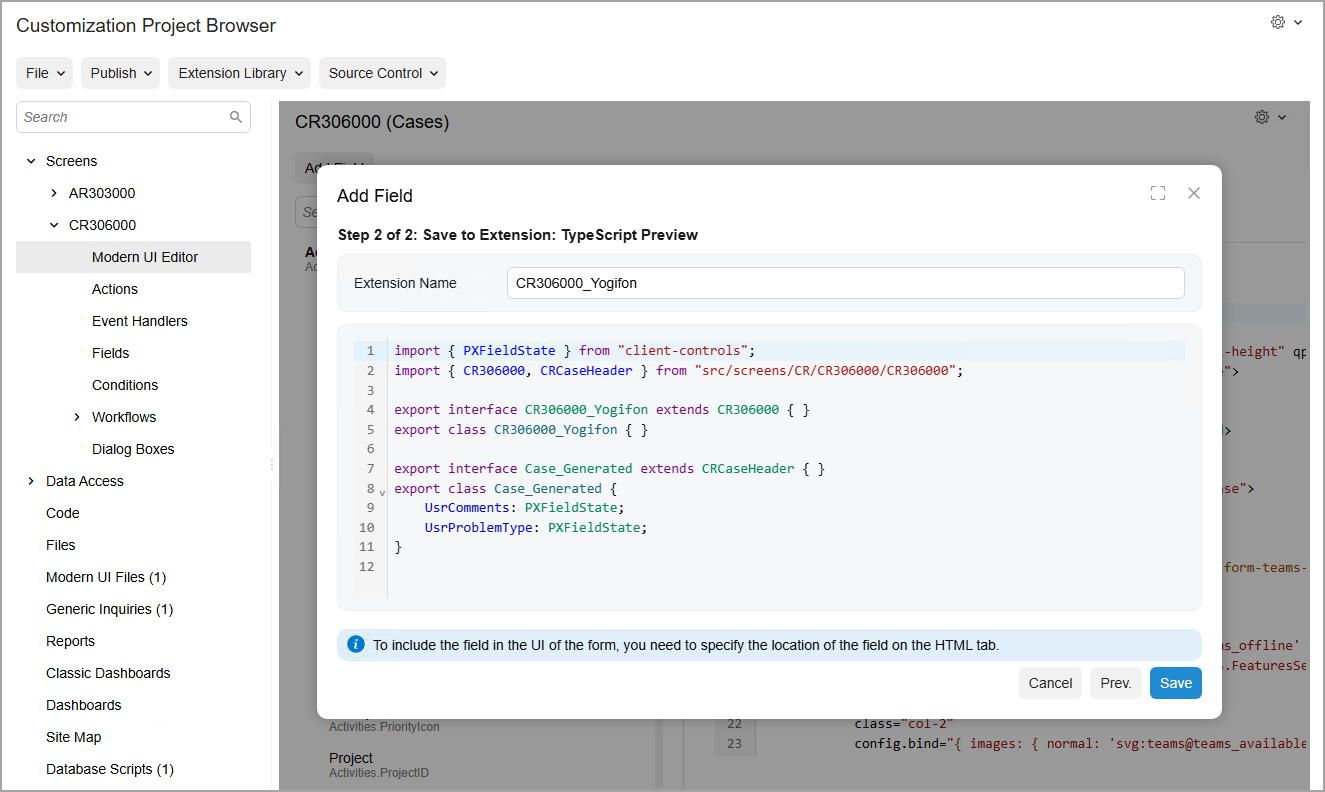
- Click Save.
The system adds the new fields to the list of available fields on the page.
Step 4: Adding a New Tab
In this step, you will add to the new tab the boxes that correspond to the fields you have created in Step 1. In the Customization Project Editor, do the following:
- On the HTML tab of the page, locate the following
code:
<qp-tab id="closure_tab" caption="Closure Notes">
      <qp-rich-text-editor id="edClosureNote"
          state.bind="Case.ClosureNotes"
          class="stretch"
          wg-field=""></qp-rich-text-editor>
    </qp-tab>
This is the code for the Closure Notes tab. You will add the new tab after this tab.
- Add the following code after this
code:
<template> <qp-tab id="problemSummary_tab" caption="Problem Summary" after="#closure_tab"> <qp-template id="problemSummary_template" name="7-10-7" class="equal-height" qp-collapsible="" wg-container="Case_form"> <qp-fieldset id="problemSummary_formLeft" slot="A" view.bind="Case"> </qp-fieldset> </qp-template> </qp-tab> </template> - In the element tree, locate the Problem Type field, and click arrow button next to it to add it to the new tab.
- By performing similar actions, add the Comments field
after the Problem Type field.
The resulting code is shown in the following screenshot.
Figure 5. The code for the Problem Summary tab 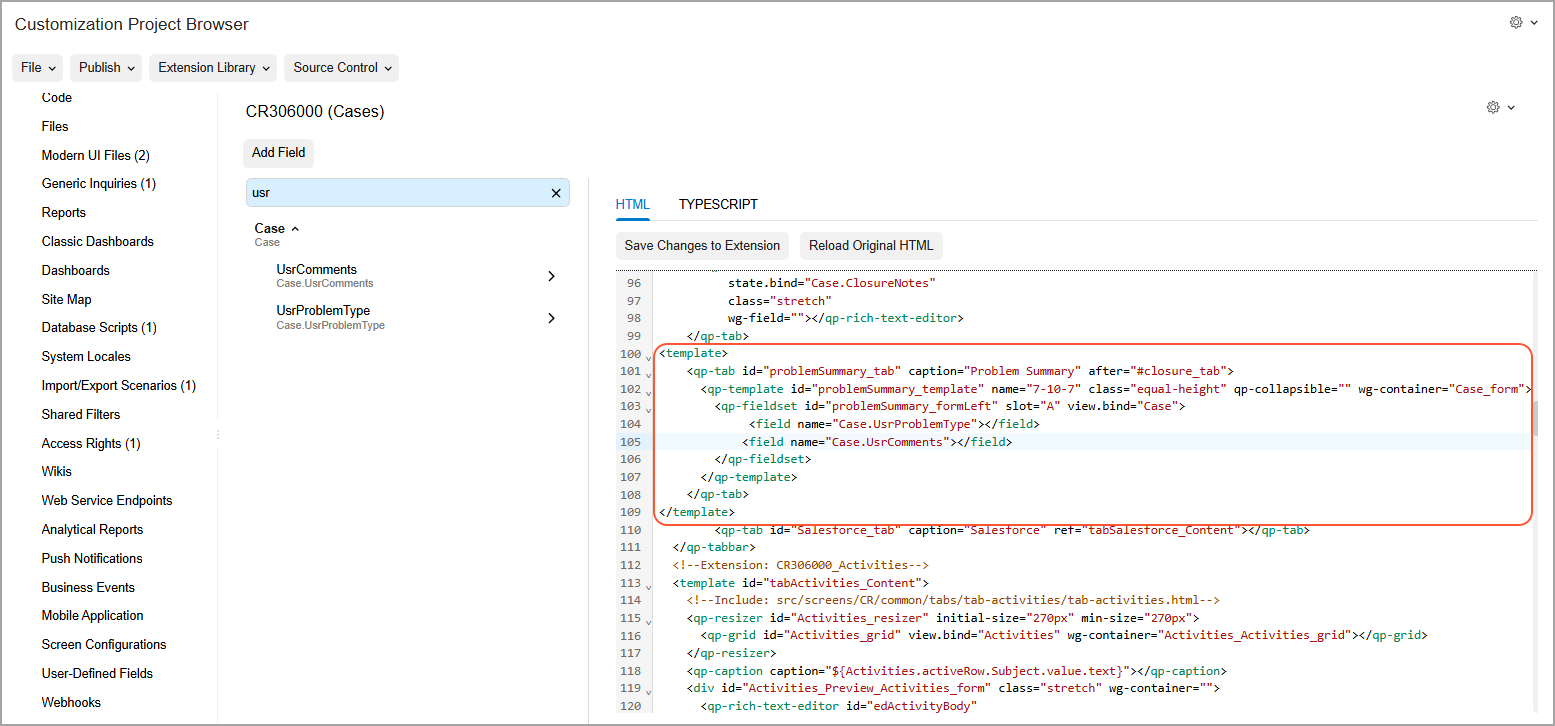
- On the tab toolbar, click Save Changes to Extension, and then click Save in the dialog box that opens.
Step 5: Testing the Layout
Finally, you will publish the customization project and then test the layout of the Cases (CR306000) form as follows:
- On the main menu of the Customization Project Editor, click .
- Wait until the Website updated row appears in the Compilation pane, and click Close Compilation Pane.
- On the Cases (CR306000) form, open the case with the 000002 ID.
- Go to the Problem Summary tab, which you have added to
the form. Make sure that the tab contains the Problem
Type and Comments boxes (see the
following screenshot).
Figure 6. The added Problem Summary tab 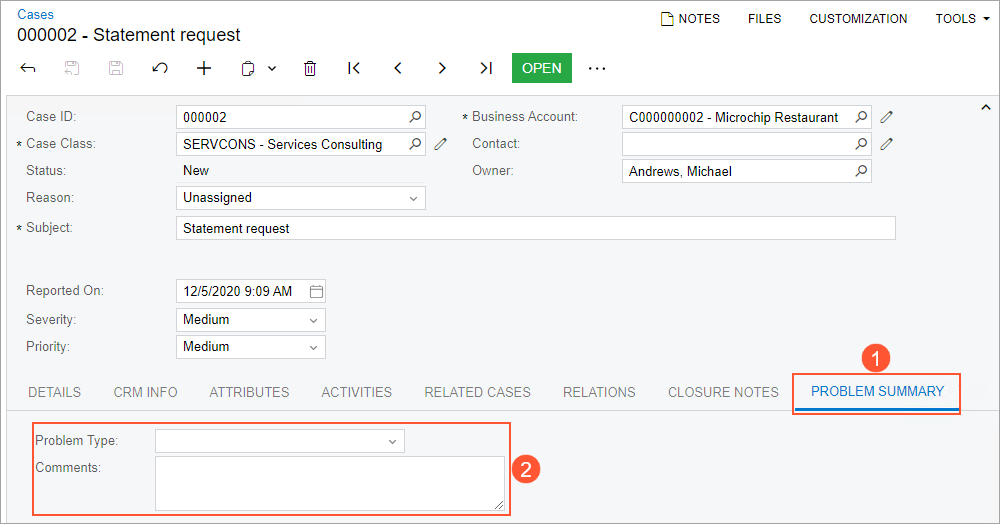
- In the Problem Type box, make sure that the following
options are available for selection:
- Functionality
- Licensing
- Performance
- Maintenance