
Form Layout: To Add a Box to a Form
The following activity will walk you through the process of adding a new box to a form.
Story
Suppose that management has determined that MYOB Acumatica would better fit the needs of your company if employees could specify the type of a customer’s address on the Customers (AR303000) form. The field that contains the address type is already available in the system. You need to add the corresponding box to the form.
Process Overview
You will do the following to add a box for the customer's address type to the Customers (AR303000) form:
- By using the form as a starting point, use the Element Inspector dialog box to open the Screen Editor page for the form.
- Add the field to the form on the Modern UI Editor page.
- Configure the added field's properties on the Fields page, and then publish the customization project.
- Test the changes on the Customers form.
System Preparation
Before you begin performing the steps of this activity, do the following:
- Prepare an MYOB Acumatica instance by performing the Customization Projects: To Deploy an Instance prerequisite activity.
- Create the Yogifon customization project by performing the Customization Projects: To Create a Customization Project prerequisite activity.
Step 1: Opening the Modern UI Editor Page from the Form
To start customizing a form from the form itself, open the Screen Editor page for the form by doing the following:
- In MYOB Acumatica, on the Customers (AR303000) form, open the record with the C000000001 customer ID.
- On the form title bar, click .
- Click on the Account Information section in the
General
tab
on the form.
The Element Properties dialog box opens (see the following screenshot).
Figure 1. The Element Properties dialog box 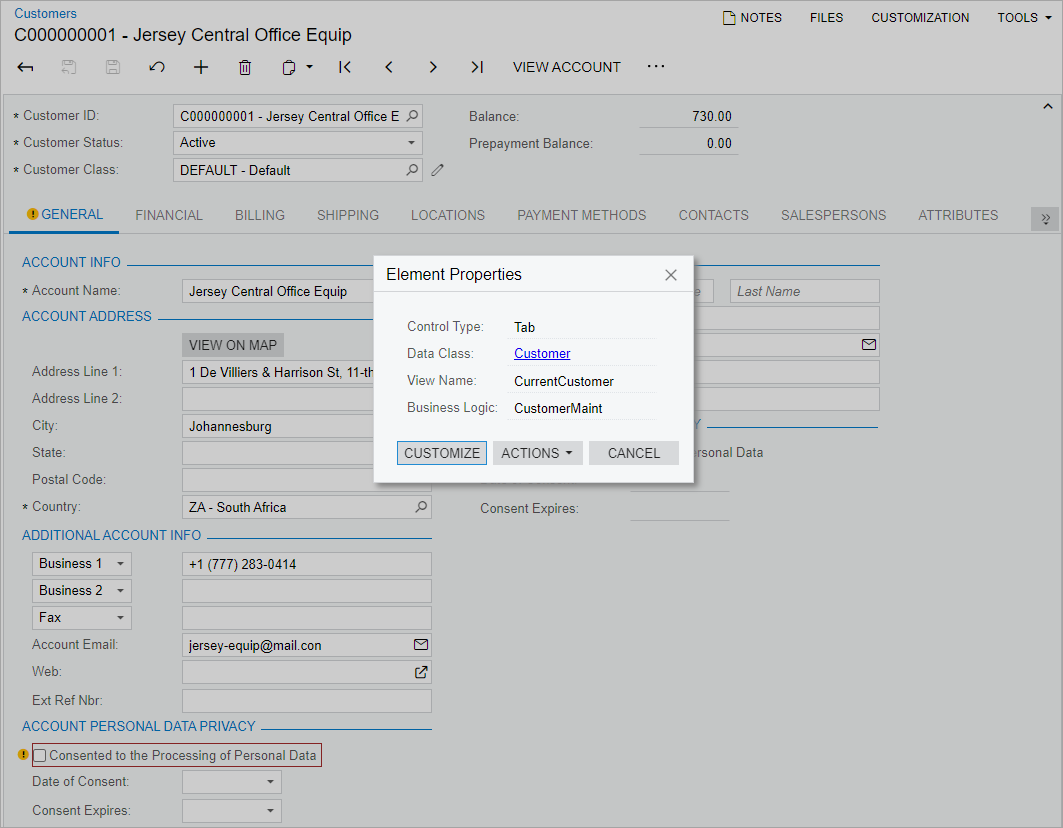
Tip:As another way to open the dialog box, you can click the General tab while pressing Ctrl + Alt. - In the Element Properties dialog box, click Customize.
- In the Select Customization Project dialog box, which
opens, select the Yogifon project name, and click OK.
The Screen Editor page opens for the Customers form.
- On the page toolbar, click Save.
- In the navigation pane, click .
The Modern UI Editor page for the Customers form is shown in the following screenshot.
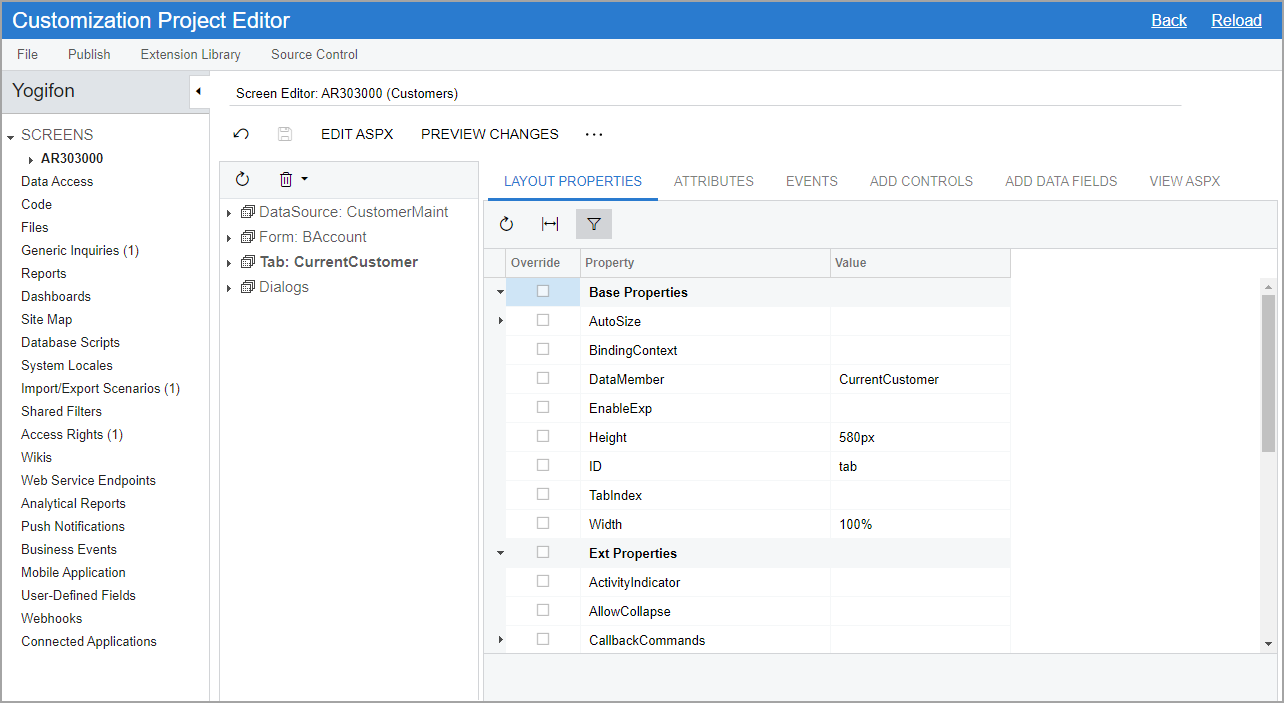
Notice that the name that appears on the page is AR303000 (Customers), which corresponds to the form that you have added.
Also notice that the Screens node on the navigation pane can be expanded. To open the Modern UI Editor page for any form that has been added to the customization project, you expand the Screens node and then click the form ID beneath it.
Step 2: Adding the Box to the Form
In this step, you will add the box containing the address type to the Account Address section of the General tab of the Customers (AR303000) form. Do the following:
- On the Customers form, locate the
Account Address section (see Item 1 in the following
screenshot).
It is located in the first column of the General tab (Item 2). Locating the section on the tab will help you to find it on the Modern UI Editor page.
Figure 3. The location of the Account Address section 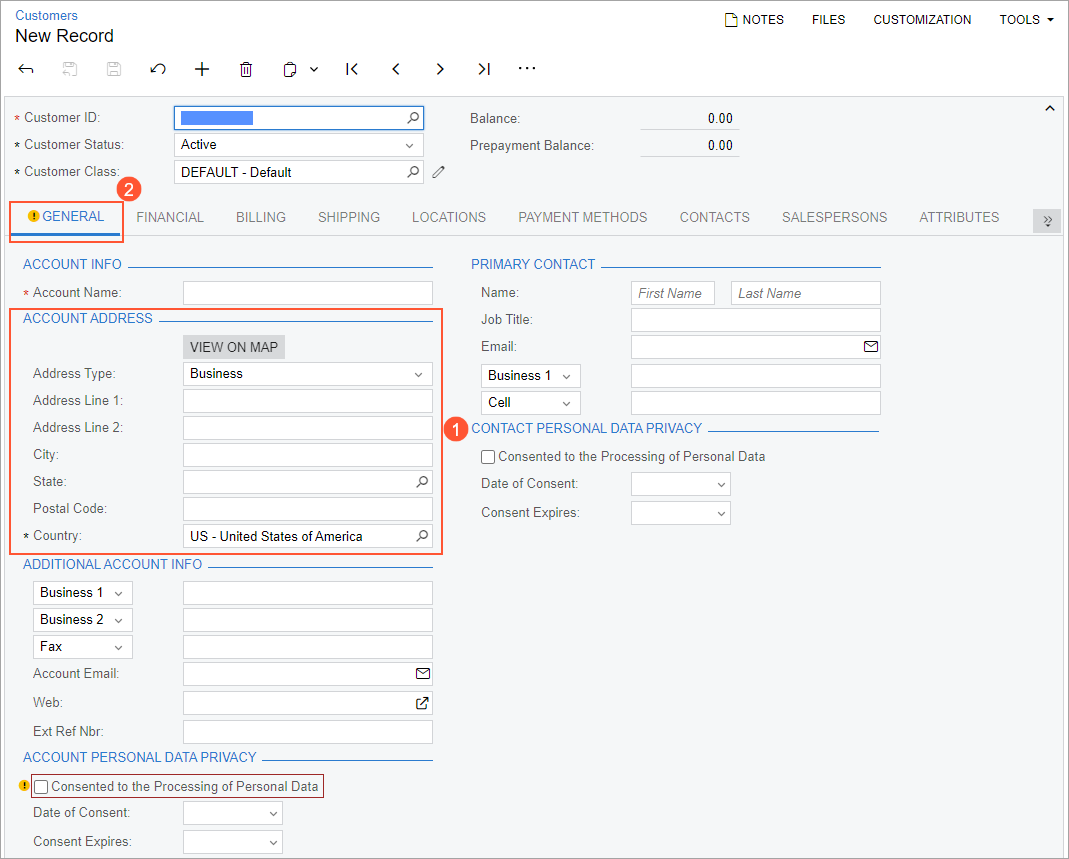
- In the navigation pane of the Customization Project Editor, click .
The Modern UI Editor page for the Customers form opens.
- On the page toolbar, click Add Field.
- In the Add Field dialog box, which opens, specify the
following settings:
- Container: DefAddress (General -> Account Address)
- DAC: PX.Objects.CR.Address (Address) (specified automatically)
- In the table, select the unlabeled check box in the row with the
AddressType field.
The settings should look as shown in the following screenshot.
Figure 4. Add Field dialog box 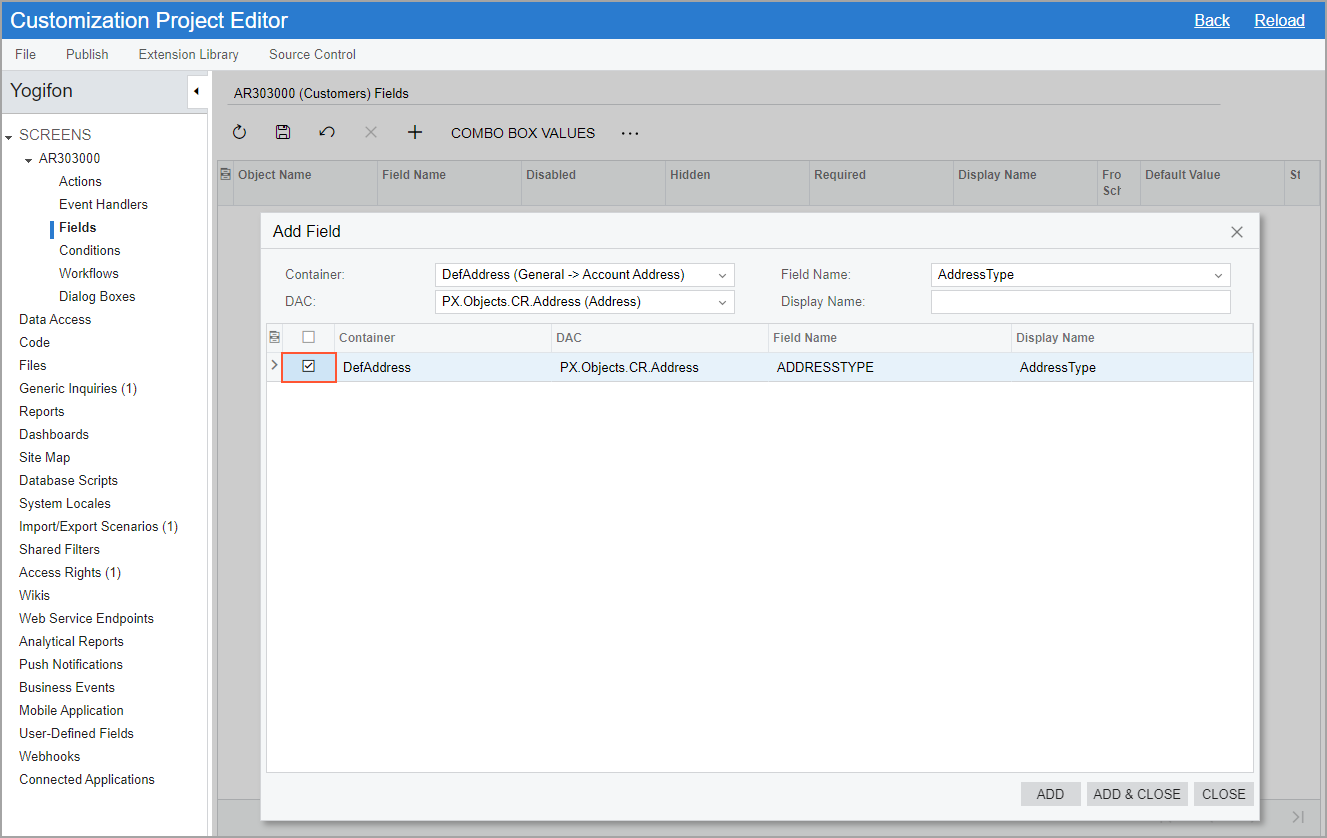
- In the dialog box, click Next, and then click Save.
- On the Modern UI Editor, to which you return, type
AddressType in the Search box.
The system filters the fields and displays the AddressType field in the DefAddress container (see Item 1 in the screenshot below).
- On the HTML tab, locate the
<field
                        name="AddressLine1"></field>
string, and place the cursor before it. - In the
element tree, click the arrow button next to the new
field
(Item 2).
The system adds the AddressType field before the AddressLine1 field (Item 3).
Figure 5. The HTML tab with the added field 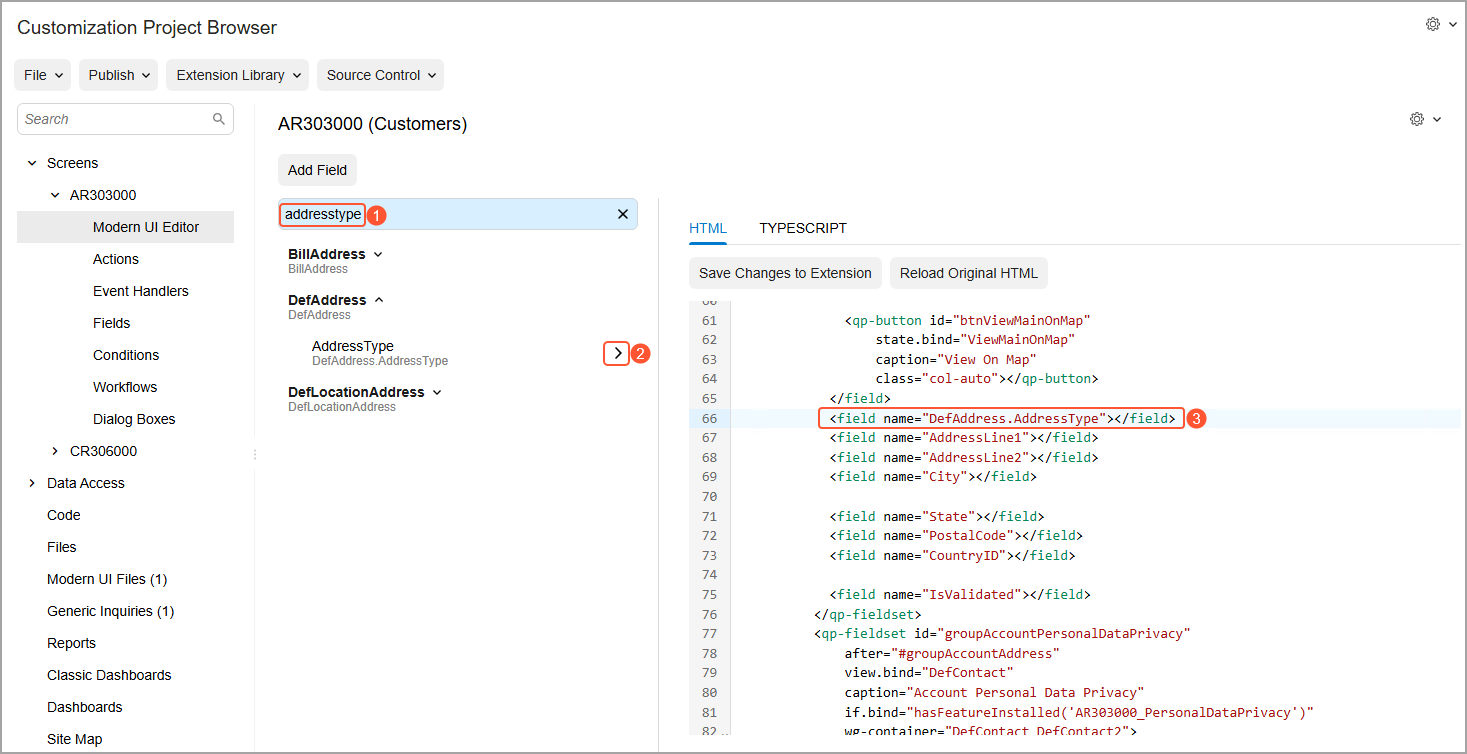
Tip:The system also adds the AR303000_Yogifon.ts file to the Modern UI Files page. - On the tab toolbar, click Save Changes to Extension, and in the dialog box that opens, click Save.
Step 3: Adjusting the Properties of the New Box
In this step, you will specify the name of the Address Type box. Do the following:
- In the navigation pane, click .
The Fields page opens.
Tip:In the name that appears on the page, AR303000 (Customers) Fields, Fields is preceded by the form ID and then the form name in parentheses. - On the page toolbar, click Add New Record.
- In the Add Field dialog box, which opens, specify the
following settings:
- Container: DefAddress (General -> Account Address)
- DAC: PX.Objects.CR.Address (Address) (specified automatically)
- Field Name: AddressType
- Select the unlabeled check box in the row with the added field.
- Click Add & Close to apply your changes.
The dialog box is closed, and a row for the added field appears in the table on the page.
- In the Display Name column of the row for the field,
enter Address Type, as shown in the following
screenshot.
This name will be displayed on the Customers (AR303000) form for the box that corresponds to the added field.
Figure 6. Fields page of the screen 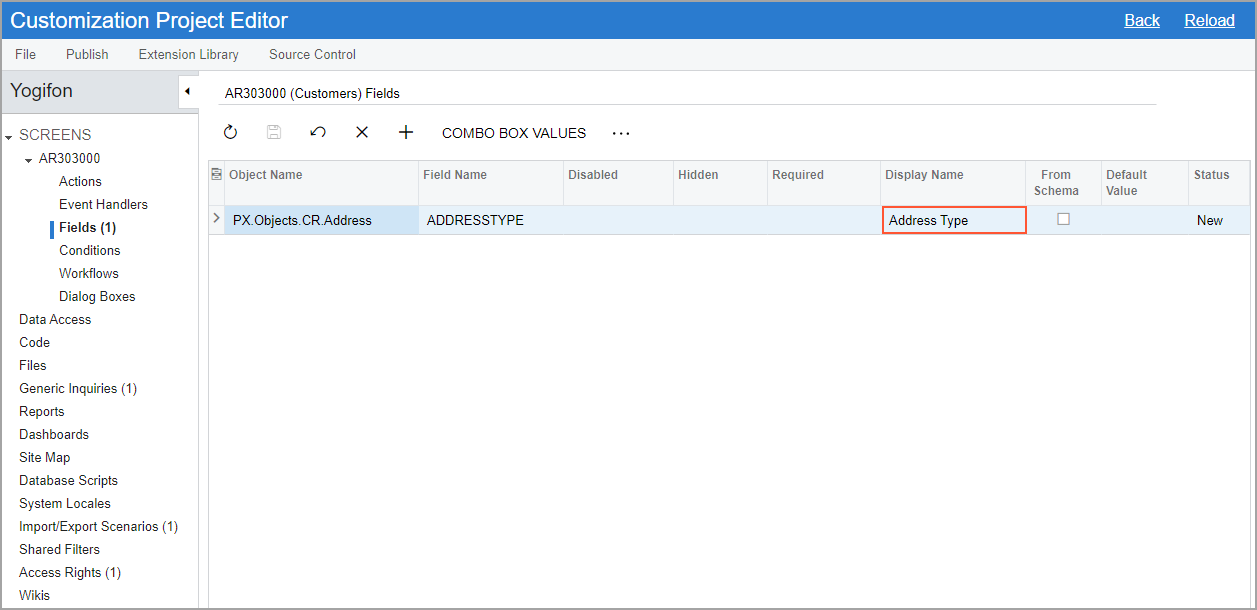
- On the page toolbar, click Save.
- To apply the changes to the instance, on the main menu of the Customization Project Editor, click .
- Wait until the Website updated row appears in the Compilation pane, and click Close Compilation Pane.
Step 4: Testing the New Element
To test the box added to the Customers (AR303000) form in MYOB Acumatica, do the following:
- On the Customers form of MYOB Acumatica, open the record with the C000000001 customer ID.Important:If the record is already open, refresh the page.
- On the form title bar, click .
- In the Account Address section, click Settings.
- In the Available Elements section of Section Configuration dialog box, which opens, type Addresstype in the Search box.
- Locate the AddressType field in the container and drag it to the Selected Elements section above the Address Line 1 field.
- Click Apply.
- Click Apply.
The dialog box is closed, and the Address Type box appears in the Account Address section. View the list of options in this box (see the following screenshot).
Figure 7. The Address Type box on the Customers form 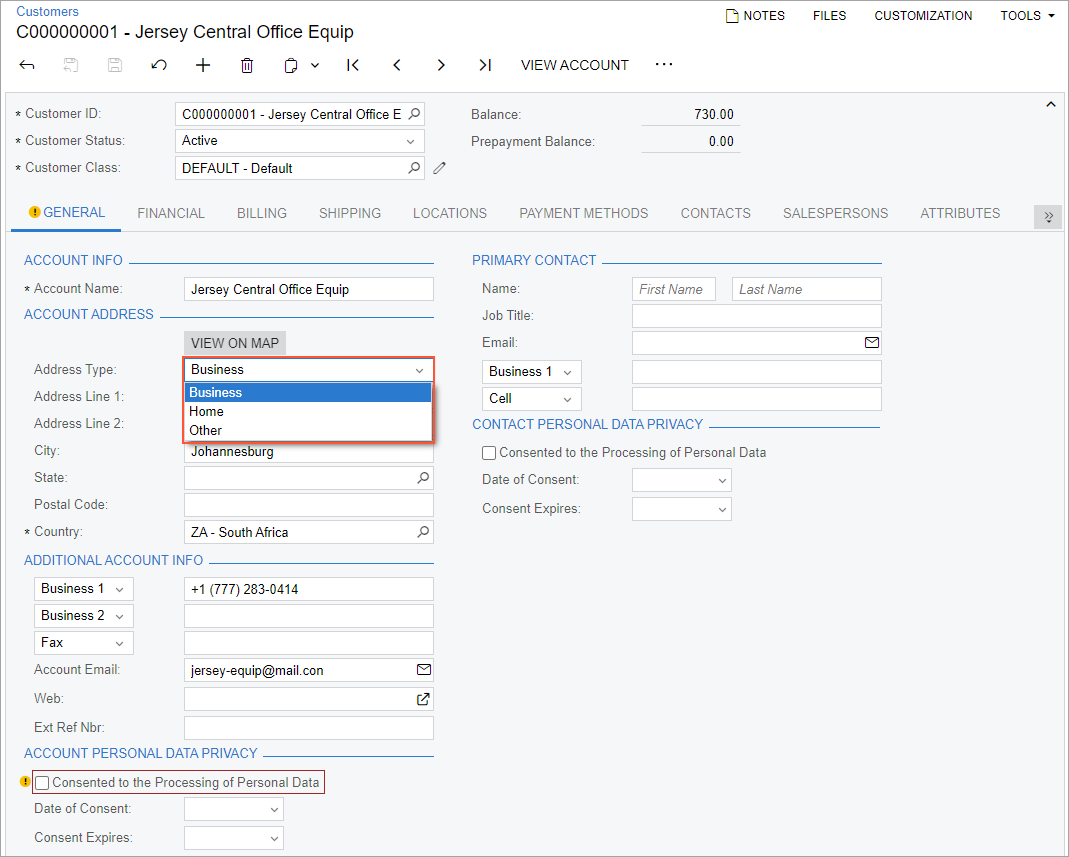
- On the form title bar, click Apply to All.
- In the Apply to All dialog box, which opens, click
Overwrite Personal Configuration.
The system applies the updated configuration to the form for all users.
- In the Address Type box, select Home.
- On the page toolbar, click Save.