
AR Invoices: To Create an AR Invoice and Apply a Payment to It
The following activity will walk you through the process of creating an AR invoice, applying a payment to it, and releasing the invoice and its application.
Video Tutorial
This video shows you the general process but may contain less detail than the activity has. If you want to repeat the activity on your own or you are preparing to take the certification exam, we recommend that you follow the instructions in the steps of the activity.
Story
Suppose that on January 26, 2025, Cakeado Cafe made a payment of $429 to SweetLife Fruits & Jams for a training course that its employees were going to take on January 30, 2025. Acting as a SweetLife accountant, you need to create an AR invoice for the customer, apply the payment to it, and release the invoice and the payment application.
Configuration Overview
In the U100 dataset, the following configuration tasks have been performed to prepare the system for this activity to be performed:
- On the Enable/Disable Features (CS100000) form, the Standard Financials, Multibranch Support, and Multicompany Support features have been enabled.
- On the Accounts Receivable Preferences (AR101000) form, the Hold Documents on Entry check box has been selected in the Data Entry Settings section.
- On the Customers (AR303000) form, the CAKEADO (Cakeado Cafe) customer has been configured.
Process Overview
In this activity, on the Invoices and Memos (AR301000) form, you will create an AR invoice, and apply a payment to it. You will then release the invoice and the payment application to close both the invoice and the payment. On the Payments and Applications (AR302000) form, you will review the payment to make sure that its status is Closed.
System Preparation
To prepare the system, do the following:
- Launch the MYOB Acumatica website, and sign in to a company with the U100 dataset preloaded. You should sign in as Anna Johnson by using the johnson username and the 123 password.
- In the info area, in the upper-right corner of the top pane of the MYOB Acumatica screen, make sure that the business date in your system is set to 1/30/2025. If a different date is displayed, click the Business Date menu button and select 1/30/2025 on the calendar. For simplicity, in this activity, you will create and process all documents in the system on this business date.
- On the Company and Branch Selection menu, on the top pane of the MYOB Acumatica screen, select the SweetLife Head Office and Wholesale Center branch.
Step 1: Creating an AR Invoice
To create an AR invoice, do the following:
- Open the Invoices and Memos
(AR301000) form.Tip:To open the form for creating a new record, type the form ID in the Search box, and on the Search form, point at the form title and click New right of the title.
- On the form toolbar, click Add New Record.
- Specify the following settings in the Summary area:
- Type: Invoice
- Customer: CAKEADO
- Terms: 30D (inserted by default based on the selected customer)
- Date: 1/30/2025 (the current business date, which is inserted by default)
- Post Period: 01-2025 (inserted by default based on the selected date)
- Description: On-site training
- On the Details tab, click Add Row on the table toolbar.
- Specify the following settings for the added row:
- Branch: HEADOFFICE (inserted by default)
- Transaction Descr.: On-site training
- Ext. Price: 429
- On the form toolbar, click Save.
The invoice has been saved with the On Hold status.
Step 2: Applying the Payment to the Invoice
To apply the payment that has been already created in the system to the invoice, do the following:
- While you are still on the Invoices and Memos (AR301000) form with the invoice opened, on the Applications tab, click Add Row on the table toolbar.
- In the added row, specify the following settings:
- Doc. Type: Payment
- Reference Nbr.: A payment for $429 dated 1/26/2025
- Amount Paid: 429
- On the form toolbar, click
Save.
The following screenshot illustrates the unreleased AR invoice to which the payment has been applied.
Figure 1. The invoice with the payment applied to it 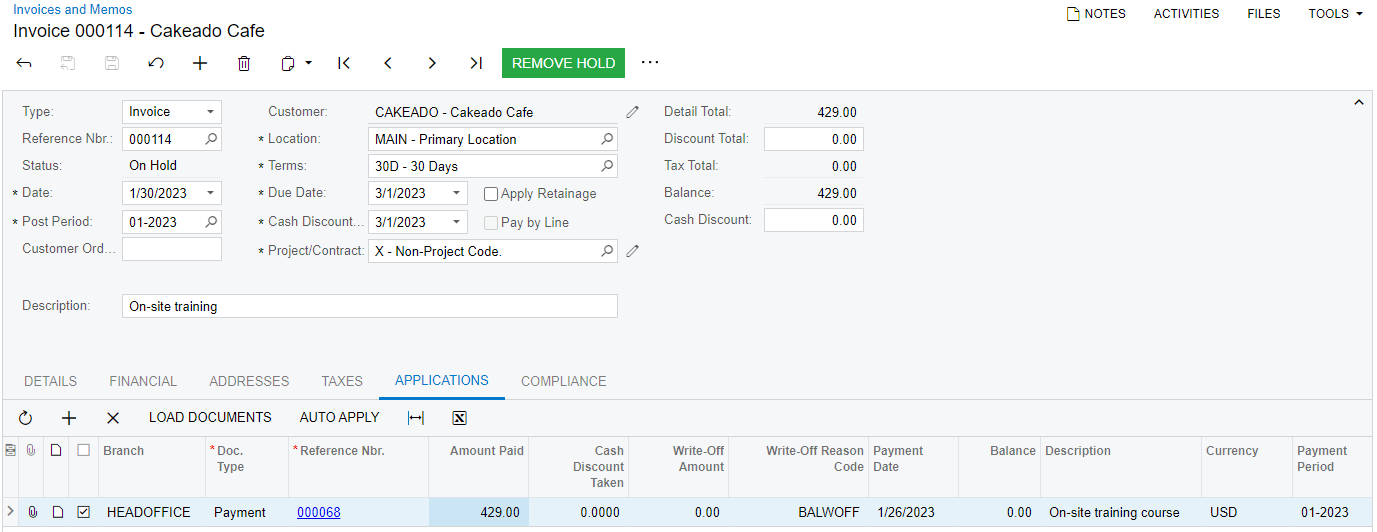
Step 3: Releasing the Invoice and Payment Application
To release the invoice and its application to the payment, do the following:
- While you are still on the Invoices and Memos (AR301000) form, click Remove Hold on the form toolbar. The system changes the status of the invoice to Balanced.
- On the form toolbar, click Release. The system changes the status of the invoice to Closed because it has been fully applied to the payment.
- On the Applications tab, click the link in the Reference Nbr. column for the payment. The system opens the payment on the Payments and Applications (AR302000) form.
- Notice that the payment's status is Closed, because it has been fully applied to the invoice.