Implementing the Contract Functionality: To Configure the System
Before you can start managing your contracts and billing your customers based on these contracts in MYOB Acumatica, you need to configure the system so that the contract management functionality can be used. You will perform the following tasks, each of which is described in detail in one of the sections below:
- Activate the Contract Management feature in your MYOB Acumatica instance
- Configure the accounts receivable functionality, which includes the contract management functionality
- Enable auto-numbering for contracts
Step 1: Activating the Contract Management Feature
To activate the needed feature to use the contract functionality, do the following:
- Sign in to the company you have prepared, and use the gibbs username and 123 password.
- Open the Enable/Disable Features (CS100000) form.
- On the form toolbar, click Modify.
- Under the Advanced Financials group of features, select
the Contract Management check box.Note: The Contract Management feature provides support for service contracts, including contract billing, in MYOB Acumatica. It makes available forms related to contract processing and provides integration with accounts receivable and the tracking of time and expenses.
- On the form toolbar, click Enable.
Step 2: Configuring the Settings of the Accounts Receivable Functionality
To be able to use the needed accounts receivable functionality, on the Accounts Receivable Preferences (AR101000) form, do the following:
- On the General tab, clear the Hold Documents
on Entry check box.
With this check box cleared, any invoice issued when a contract is billed will have the Balanced status.
- On the form toolbar, click Save.
Step 3: Enabling Auto-Numbering for Contracts
In MYOB Acumatica, contract identifiers are created based on the CONTRACT segmented key. To configure the system to assign automatically numbered identifiers to contracts, do the following:
- In the Segmented Key ID box of the Segmented Keys (CS202000) form (the Summary area), select CONTRACT.
- Click Edit to the right of the Numbering ID box to review the configuration of the CONTRACT numbering sequence on the Numbering Sequences (CS201010) form. This predefined numbering sequence is used in the CONTRACT segmented key by default.
- Close the Numbering Sequences form.
- In the table on the Segmented Keys form, select
the Auto Number check box for the only row, which
contains the settings of the single segment included in the segmented key. (See
the following screenshot.)
Contract identifiers can be defined to include multiple segments. However, automatic numbering can be enabled for only one segment. Note that the length of the auto-numbered segment must match the length of the numbering sequence specified in the Numbering ID box.
Figure 1. Settings of the CONTRACT segmented key 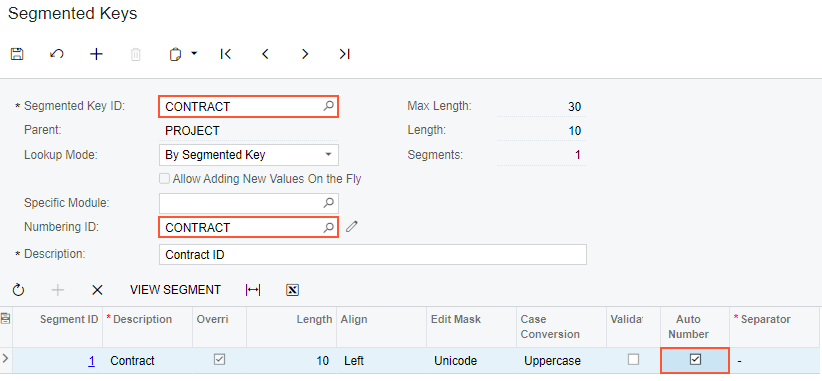
- On the form toolbar, click Save.