Contract Template Creation: To Create an Empty Support Contract Template
In this activity, you will learn how to create an empty template for a support contract.
Story
Suppose that the SweetLife Fruits & Jams company, in addition to deploying juicers, also specializes in providing maintenance. The Unifruit LLC customer previously purchased juicers and now needs to enter into a maintenance support contract. On 3/8/2025, the support contract was signed by both parties.
According to the terms of the contract, it has the Expiring type, and the contract span is three months. On 3/10/2025, the service under the contract was provided by one regular specialist for four hours for a total sum of $480. This service was reflected in the system in a separate case.
The service of maintenance specialists costs $120 per hour, and the price is not dependent on the skills and position of the employee performing the service. The billing of the contract will be performed monthly and on a per-case basis.
Acting as a sales manager, you will create an empty contract template for the support contract.
Process Overview
On the Contract Templates (CT202000) form, you will create an empty template for a support contract.
Configuration Overview
In the U100 dataset, the following tasks have been performed for the purposes of this activity:
- On the Enable/Disable Features (CS100000) form, the Contract Management feature has been enabled.
- On the Customers (AR303000) form, the UNIFRUIT (Unifruit LLC) customer has been created.
System Preparation
To prepare to perform the instructions of this activity, do the following:
- As a prerequisite to this activity, complete the Contract Configuration: To Create Entities for a Support Contract to create a labor item and a new case class for the support services you will use during the creation of the empty contract template.
- Launch the MYOB Acumatica website with the U100 dataset preloaded, and sign in as the sales manager David Chubb by using the chubb username and the 123 password.
Step: Creating an Empty Contract Template
Now you need to create an empty contract template and specify the default settings for a support contract.
On the Contract Templates (CT202000) form, do the following:
- Add a new record.
- In the Contract Template box of the Summary area, type REGULARSUP.
- In the Description box, type Regular support services.
- In the Contract Settings section of the
Summary tab, do the following:
- In the Contract Type box, select Expiring.
- In the Duration boxes, enter 1, and select Quarter.
- Leave the Refundable and Enable Template Item Override check boxes cleared.
- In the Billing Settings section, do the following:
- In the Billing Period box, leave Month to define the time period into which the contract billing schedule should be divided.
- In the Bill To box, leave Customer Account to indicate that by default, a contract based on this template is to be billed to the customer account specified for the contract.
- In the Billing Schedule Starts On box, leave Activation Date to specify the starting point of the contract billing schedule. (In this lesson, it does not matter which value you select in this box, because you will activate the contract of this type by using the Set Up and Activate command, and the setup date will be the same as the activation date.)
- In the Billing Format box, select Detail to define the format of an invoice generated when a contract based on this template is billed. Each occurrence of contract usage (that is, each case) will be shown as a separate line in the resulting invoice. You can change the billing format of this template at any time, and this change will affect the format of the invoices generated afterward for any existing contracts based on the template.
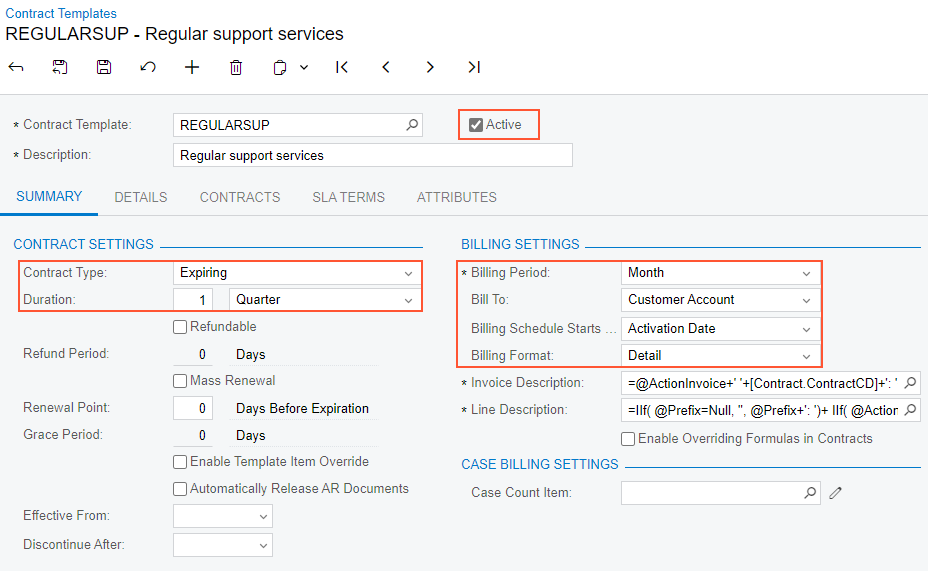
Tip:By editing the Line Description formula, you can modify the descriptions shown in the invoices issued for the contracts. - Make sure the Active check box is selected in the Summary
area, so that you can create contracts based on the template. These settings are
shown in the following screenshot.
Figure 1. Template for support contract 
- On the form toolbar, click Save.
You have created an empty contract template for a support contract and now you can configure an empty support contract.
