
Contract Setup and Activation: To Create and Activate an Empty Support Contract Draft
In this activity, you will learn how to create an empty contract draft for a support contract and activate it.
Story
Suppose that the SweetLife Fruits & Jams company, in addition to deploying juicers, also specializes in providing maintenance. The Unifruit LLC customer previously purchased juicers and now needs to enter into a maintenance support contract. On 3/8/2025, the support contract was signed by both parties.
According to the terms of the contract, it has the Expiring type, and the contract span is three months. On 3/10/2025, the service under the contract was provided by one regular specialist for four hours for a total sum of $480. This service was reflected in the system in a separate case.
The service of maintenance specialists costs $120 per hour, and the price is not dependent on the skills and position of the employee. The billing of the contract will be performed monthly and on a per-case basis.
Acting as a sales manager, you will create an empty contract draft for a support contract and activate it.
Process Overview
In this activity, on the Segmented Keys (CS202000) form, you will first configure the system to assign automatically numbered identifiers to contracts. On the Accounts Receivable Preferences (AR101000) form, you will configure the settings of the accounts receivable functionality. Then on the Customer Contracts (CT301000) form, you will create an empty support contract with Draft status. Then you will set up and activate the contract simultaneously.
Configuration Overview
In the U100 dataset, the following tasks have been performed for the purposes of this activity:
- On the Enable/Disable Features (CS100000) form, the Contract Management feature has been enabled.
- On the Customers (AR303000) form, the UNIFRUIT (Unifruit LLC) customer has been created.
System Preparation
To prepare to perform the instructions of this activity, do the following:
- As a prerequisite to this activity, complete the Contract Template Creation: To Create an Empty Support Contract Template activity to create the empty contract template that you will use during the creation of the empty contract draft for the support contract.
- Launch the MYOB Acumatica website with the U100 dataset preloaded, and for Step 1 and Step 2 sign in to the system as a system administrator Kimberly Gibbs by using the gibbs username and the 123 password. For Step 3 and Step 4 sign in as the sales manager David Chubb by using the chubb username and the 123 password.
- In the info area, in the upper-right corner of the top pane of the MYOB Acumatica screen, make sure that the business date in your system is set to 3/8/2025.
Step 1: Enabling Auto-Numbering for Contracts
In MYOB Acumatica, contract identifiers are created based on the CONTRACT segmented key. To configure the system to assign automatically numbered identifiers to contracts, on the Segmented Keys (CS202000) form, do the following:
- On the Summary area in the Segmented Key ID box, select CONTRACT.
- Click Edit to the right of the Numbering ID box to review the configuration of the CONTRACT numbering sequence on the Numbering Sequences (CS201010) form. This predefined numbering sequence is used in the CONTRACT segmented key by default.
- Close the Numbering Sequences form.
- In the table on the Segmented Keys form, select
the Auto Number check box for the only row, which
contains the settings of the single segment included in the segmented
key.
Contract identifiers can be defined to include multiple segments. However, automatic numbering can be enabled for only one segment. Note that the length of the auto-numbered segment must match the length of the numbering sequence specified in the Numbering ID box.
- On the form toolbar, click Save.
Step 2: Configuring the Settings of the Accounts Receivable Functionality
To be able to use the needed accounts receivable functionality, on the Accounts Receivable Preferences (AR101000) form, do the following:
- On the General tab, clear the Hold Documents
on Entry check box.
With this check box cleared, any invoice issued when a contract is billed will have the Balanced status.
- On the form toolbar, click Save.
Step 3: Configuring an Empty Contract
To create an empty support contract, do the following:
- Sign in to the system as a sales manager by using the chubb username and the 123 password.
- On the Customer Contracts (CT301000) form, add a new record.
- In the Summary area, do the following:
- In the Contract Template box, select REGULARSUP. The system will automatically fill in the billing policy settings with those of the selected template.
- In the Customer box, select UNIFRUIT.
- On the form toolbar, click Save.
Step 4: Setting Up and Activating the Contract Simultaneously
To set up and activate the consulting contract simultaneously, do the following:
- On the Customer Contracts (CT301000) form, open the Regular support services)contract you have created in Step 3.
- On the More menu (under Processing), click Set Up and Activate Contract to activate the contract.
- In the Activation Date box of the Activate
Contract dialog box, which opens, leave 3/8/2025, and then click OK (see the screenshot below).
After the contract is set up and activated, notice the following:
- The contract now has the Active status.
- The setup and activation dates have become unavailable for editing.
- The Expiration Date is 6/7/2025 and the boxes in the Billing Schedule section have been populated based on the template settings and the activation date that you have specified.
- The next billing date is 4/8/2025.
- No invoice has been generated on the initiation of an empty contract, so the table on the AR History tab of the form is still empty.
Figure 1. The activated support contract 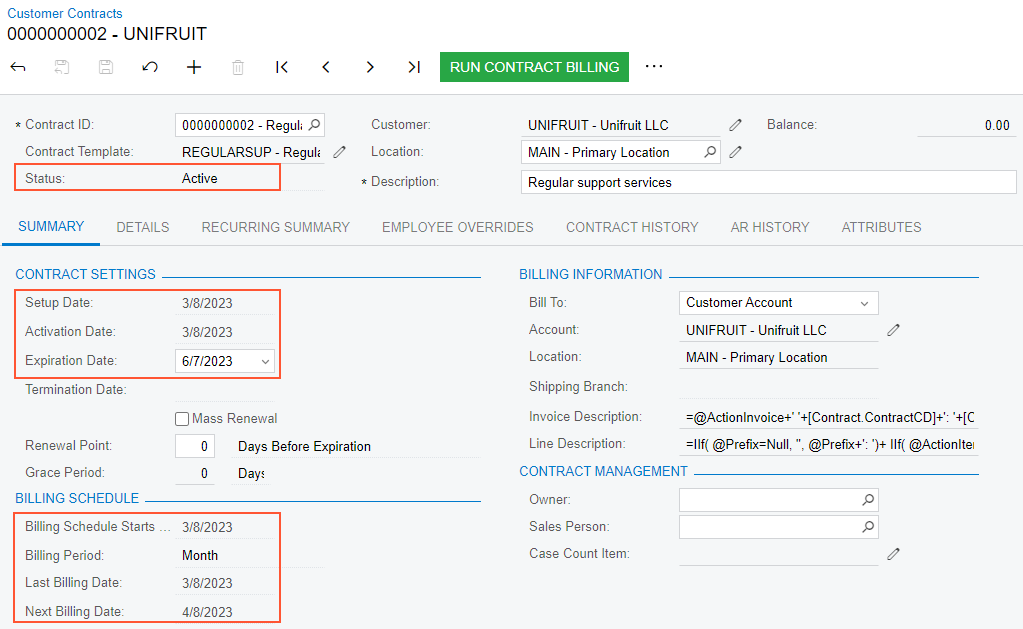
You have created the empty support contract and activated it. Now you can proceed to creating the case usage for the support contract.