- Contents
- Index
- Search

Show results that include all search words
Creating Jobs
You create jobs, sub jobs, and duplicate jobs on the Job Management screen.
To create a job:
-
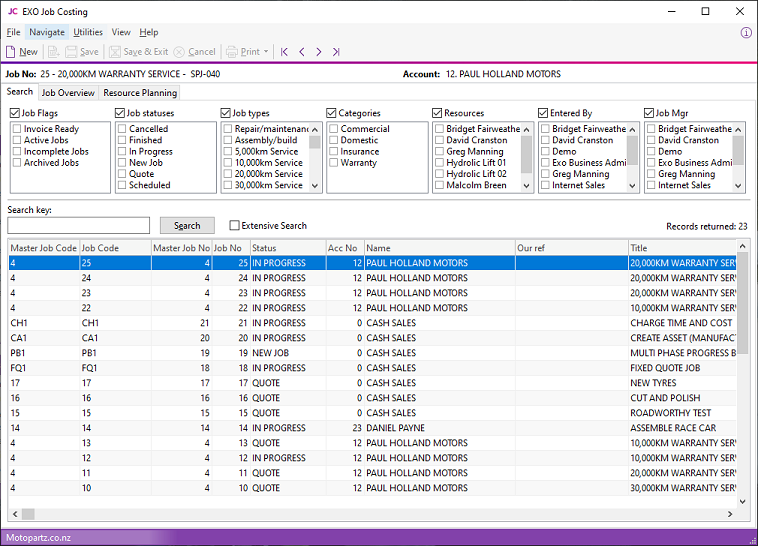
Select Account > Job Management Screen. This window displays:
-
Click New. A warning displays if the account is cash only. Click OK.
Note:This warning only appears if the Warn if cash sales account is used on jobs User-level profile setting is enabled.
-
This window displays:
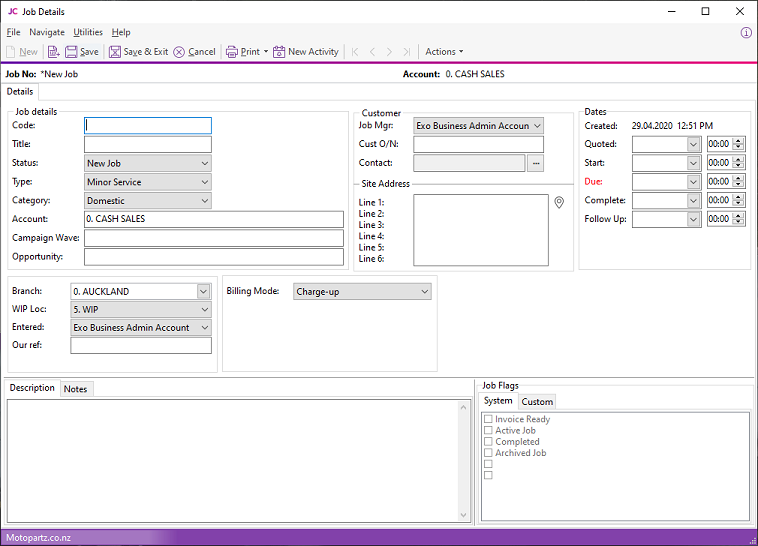
Enter information in these fields:
Field
Description
Job details
Code
A unique code for the job, up to 15 alphanumeric characters. If you don't enter a code, Exo Business assigns a job number.
Allow Invoice via Master Job
This option is enabled if the job is a sub job.
Select this option to invoice the job from its master job.
Title
A short description of the job.
Status
A Job Status to identify the current stage of the job. Select the status from the dropdown list.
If you can't change the status, the job might be read-only and only an administrator can edit it. This is controlled by the Make job read only option when setting Job Statuses.
Type
Select a Job Type from the dropdown list. The default is set by a user-level profile setting.
Category
Select a Job Category from the dropdown box. The default is set by a user-level profile setting.
Account
Use the default Cash Sale account or enter a customer code.
If you don't know the code, enter ? and press TAB, then select from list. To drill down to the account details, double-click on this field after an account has been selected.
Campaign Wave
This field is enabled if the Exo Business CRM module is installed.
You can associate a job with a campaign wave — for example, to indicate that the job was created as a result of a campaign. This enables you to report on the effectiveness of the campaign.
Note: You can also use Job Costing to provide advanced costing for a campaign. Open the campaign in Exo Business CRM and select the job to use for costing the campaign in the Campaign Costs field.
Opportunity
This field is enabled if the Exo Business CRM module is installed.
If the job was generated from an Opportunity, the Opportunity is entered in this field automatically. You can enter an Opportunity in this field or search for one by entering ? and pressing tab.
Customer
Job Mgr
Select a staff member from the dropdown list. The default staff member is either the staff member associated with the Debtor account, or the user who is currently logged in, depending on the Default the Job Manager from Debtor Account Staff User-level profile setting.
Cust order no
Enter a customer order number.
Contact
The name of the contact person. You can leave this field blank.
Clicking the edit button displays a list of known contacts associated with the account. Double click to select or click New to add a contact to the account.
Site address
The address(es) of the job site. Enter an address or click the Additional Addresses button. Click the small button next to the delivery address to retrieve the latitude and longitude of the address in this field. An icon on the button displays the status of the match:
-
 - Exo Business
hasn't attempted to retrieve details.
- Exo Business
hasn't attempted to retrieve details. -
 - details
were successfully retrieved. Clicking the button
again opens your default web browser, showing the location
on a map. shift+clicking
the button attempts to retrieve location details again.
- details
were successfully retrieved. Clicking the button
again opens your default web browser, showing the location
on a map. shift+clicking
the button attempts to retrieve location details again. -
 - an error occurred when retrieving
the details. Hovering the mouse over the button displays
a popup message indicating why the attempt failed.
- an error occurred when retrieving
the details. Hovering the mouse over the button displays
a popup message indicating why the attempt failed.
Dates
Create Date
The date and time on which the job was created. You cannot change the date.
Quoted date
The date and time on which the quote was created.
Start date
The start date and time of the job.
Due date
The date and time on which the job is expected to be completed. This defaults to Start time + the value of the Job Default due days user-level profile setting.
Completed date
The date and time on which the job was completed.
Follow-up date
Defaults to the Job Default follow-up days user-level profile setting.
Branch
Enter the Branch code for this job. This defaults to the user’s branch profile setting.
WIP Loc
The Work in Progress stock location. This defaults to the Job work in progress stock location computer profile setting.
This field becomes read only after you enter lines for the job.
Entered by
Select an active staff member from the dropdown list. This defaults to the user who is currently logged in.
Our Ref
A reference that you can search from the main job search screen.
If a Sales Order has been created for the job, enter the Sales Order number in this field. You can view the Sales Order by selecting View Sales Order from the Utilities menu if the Link 'Our ref' to sales order number lookup profile setting has been enabled.
Billing Mode
The billing mode that determines how the Job is charged:
-
Charge-up - charge items added to the job
-
Invoice Ex-Quote - the quoted value is charged.
-
Manufacture - output items - the job creates stock assets (items) for on-sale.
-
Progress Invoices - the job uses progress billing.
Extra fields
The Extra Fields section displays optional addition fields that you can use to record business specific information, which are set up by an Exo Business partner. The first five Extra Fields are displayed here, while any additional fields are displayed on a separate Extra Fields tab.
Note: The Extra Fields tab is only available if Extra Fields have been defined for position 6 or later.
Sub-tabs
Description
Details relating to the job, which can appear on the invoice.
The content of this field is scanned when you select the Extensive job search option. If there is a value in this field then this tab is highlighted.
Notes
Notes about the job. What you type in this field does not appear on the customer invoice.
The contents of this field are scanned when you select the Extensive job search option. If there is a value in this field then this tab is highlighted.
Serviceable Units
This tab only displays if the Serviceable Units module is installed. Use it to list serviceable units to assign or create for the job. At line level, you can select a serviceable unit from this list.
Output Item
This tab enabled you to pre-load the asset stock codes for the item that this job produces.
Job Flags
Flags that you can set against the job. You can select multiple flags.
You can set System Flags (which are predefined) and Custom Flags (which an implementer creates).
-
Timestamps
You can stamp fields, like Description and Notes, with the name of the user who's currently logged in, and with the system time and date.
Press CTRL+T while in a field to insert a timestamp:
<< FRED Tuesday, April 1, 2020 at 09:16 >>
Common Phrases
You can build a library of common phrases to save typing and to set a generic format to notes.
To select or create a common phrase press CTRL+' (single quote), or CTRL+" (double quote) in a field. The Common Phrases window displays:
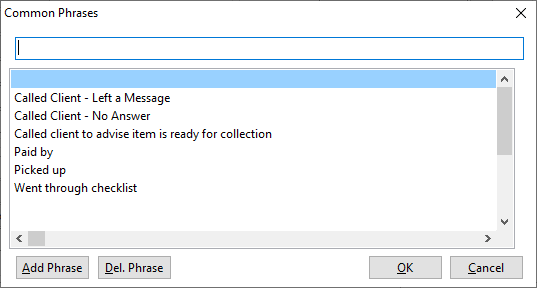
To add a phrase, type the phrase and click the Add Phrase button.
To select a common phrase, start typing the phrase. The cursor focuses on the nearest match in the search grid. Either click OK to select the highlighted phrase, or double-click the phrase.
To delete a phrase from the list, highlight the phrase and click the Del. Phrase button.
Selecting Site Addresses
Choose Select Address from the Actions menu, and then click Yes on the message that displays. A list of addresses displays:
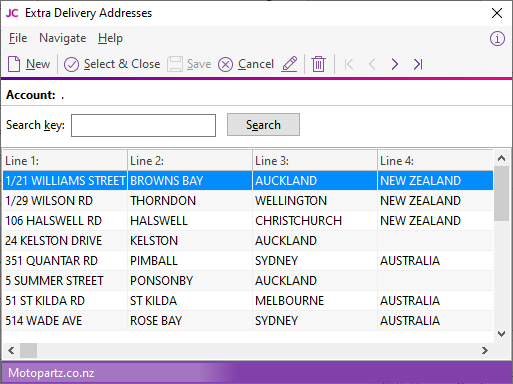
Click the New button to add addresses, or select an address and click the Select & Close button to add it to the job.
Serviceable Units
Serviceable Units is an optional module. Serviceable units can be assets of your company running the Job Costing module or assets owned by your customers.
Output Items
Items in jobs might not be invoiced directly to the customer. Instead, they might create stock that you can sell by invoicing a Debtor or entering a Sales Order. The items are created as part of the invoicing phase of the job and you can specify them at that time. You can also pre-load them and later reference them when creating assets on the Invoice tab.
Saving the Job
Once you have entered the header information for the job, you can save the job by clicking:
- Save & Exit - saves the details and returns to the main search menu, ready to create the next job.
- Cancel - abandons all entries made.
- Save - saves data and continues with entering data on this job.
Once the job header has been saved, tabs are enabled next to the Details tab:
- Quote/Budget
- Timesheets
- Costs
- Purchases
- Invoice
- Analysis
- Documents
- History Notes
- Sub Jobs
- Activities
The Dashboard tab contains a blank Dashboard interface, which you can customise by adding widgets.
Use these tabs to change from one type of entry to another associated with the same job:
You can reorder the tabs by dragging them to a new position. You can lock the tabs into position by selecting Utilities > Lock Tabs. Most tabs contain a grid with resizable columns. By selecting Utilities > Lock Column Widths you can prevent accidental resizing.
You can hide tabs by editing the Hide tabs in Job management screen User-level profile setting in Exo Business Configurator.