
The Use of Formulas
You can specify formulas on multiple forms. For example, to convert data into a different format during data import or export, you can map an internal field to a formula by using the Import Scenarios (SM206025) or Export Scenarios (SM207025) form.
Components of a Formula
A formula can include the following components:
- Digital and text literals: Literals are constants within the formula that
you do not want to be modified:
- Type digital literals as they are, such as 2, 8.25, or 13.84.
- Enclose text literals within single quotation marks—for example, 'DEF_CLASS' and 'FOB'.
- Operators: The following types of operators are available:
- Arithmetic operators use numerical values and return a numerical value.
- Logical operators evaluate one or two Boolean expressions and return a Boolean result.
- Comparison operators compare two expressions and return a Boolean value that represents the result.
- Functions: Functions, which perform specific tasks and return results,
include the following types:
- Text functions perform operations on text strings.
- Math functions perform calculations.
- Conversion functions convert data from one type to another.
- Date/time functions perform functions related to the date, the time, or both.
- Fields: External or internal fields (elements) can be used in a formula as operands or function arguments.
Assigning a Formula
To assign a formula to a field, do the following on the form with a formula box or column:
- Double-click in the formula box or column, and then click the Edit button, which
appears. This invokes the Formula Editor dialog box, which can be used to create
the formula you want. See Formula Editor Dialog Box for details on using the dialog box, as well as descriptions
of components.
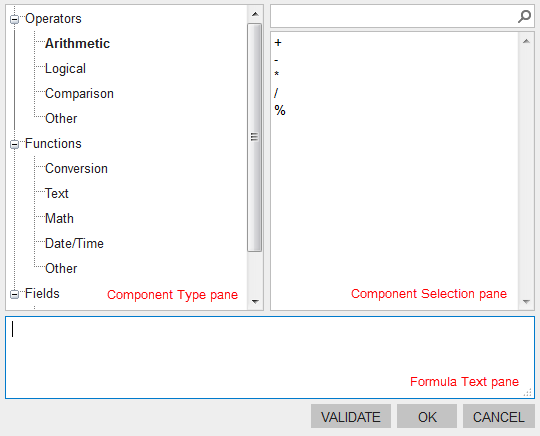
- Click any of the types in the Component Types pane (on the upper left of the dialog box) to open the list of related components in the right pane.
- Double-click a component from the list of components. Note that all components are added to the right of the formula text.
- Repeat the two previous steps as needed to add all the needed components.
- In the Formula Text pane (at the bottom of the dialog box), manually edit the text to construct a correct formula: Move the function argument or arguments within a function's parentheses, correctly arrange operands and operations, and add any needed brackets to ensure the proper order of operations.
- Click Validate to check the syntax of the formula and make necessary corrections if required.
- Click OK to save the formula.
Once it is inserted, a formula is preceded by an equal sign (=).
Formulas in Export Scenarios
When you map the data in MYOB Acumatica to the external fields, you will usually need field-to-field mapping. In some cases, however, you may need to add values from multiple internal fields to export the resulting value to an external one, to extract only a part of the internal field's value, or to perform another transformation or conversion for the data to be exported.
If you map an internal field to a formula instead of an external field, the resulting value will be assigned back to the MYOB Acumatica field. This functionality can be used, for example, to set criteria on inquiry forms to export only filtered data or to mark exported records as exported.
Formulas in Import Scenarios
When you map MYOB Acumatica fields to the external data, you will usually need field-to-field mapping. For some fields, however, you may need to add values from multiple external fields to an internal one, to extract only a part of the external field's value, or to perform another transformation or conversion.
As you map an MYOB Acumatica field to the external data, the system checks the functionality of the mapped field and automatically adds, if necessary, a line that contains the system action (hidden by default) required for the field, such as a refresh of the form or a commit to the database.
Formula Examples
Here are some examples illustrating the use of formulas:
- This formula is used for assigning a literal:
ClassID ='Imported
						Vendors'
. - This formula assigns a concatenated string:
VendorID =
						'X'+[VendID]
. - This formula is used for assigning a value to a check box:
IsAddressSameAsMain = true. - If the internal field is required, it's important to check that the field value
is not blank. To do this, use the
Iif(str, truestatement,
						falsestatement)
function, as in the following example:CountryID =iif(trim[Country]='','US',[Country]). Then the internal field will get theUSvalue if the external field is blank. - If the customer IDs from the source cannot be used in your implementation,
create new IDs for them. For example, in the demo data, customer and vendor IDs
are short versions (up to 15 characters) of their names converted to uppercase.
To do this, remove any spaces from the name by using the
trim(arg)function, convert it to uppercase with theUCase(arg)function, and remove any characters in excess of 10 by using theLeft(arg)function:Customer ID =Left( trim(UCase([Name])),10).
You can find more information on the operators and functions that can be used in formulas in the mapping in the following topics: