Check Reprinting: Process Activity
The following activity will walk you through the process of printing, correcting, and reprinting a check.
Story
Suppose that in November 2024, the SweetLife Fruits & Jams company bought glass jars and lids from Jar Co. in the amount of $410, and a check was entered in the system.
Acting as a SweetLife accountant, you have to print the check to prepare it for further processing. Further suppose that after printing the check, you find out that the items in one of the two bills included in this check (with an amount of $50) have not been delivered. You have to exclude this bill from the check, reprint the check, and release the check.
Configuration Overview
For the purposes of this activity, on the Accounts Payable Preferences (AP101000) form, the Hold Documents on Entry check box has been selected in the Data Entry Settings section.
Process Overview
You will initially print a check on the Checks and Payments (AP302000) form. When you discover that the check you printed was in error, on the Process Payments / Print Checks (AP505000) form, you will select the Reprint action for the check to change its status from Printed to Pending Print; this makes it possible to put the check on hold (assign the On Hold status to it) so that it can be edited. On the Checks and Payments form, you will make necessary edits to the check. Then on the Process Payments / Print Checks form, you will reprint the check on a new blank check with a new number. Finally, you will release the updated and reprinted check on the Release Payments (AP505200) form.
System Preparation
To prepare the system, do the following:
- Launch the MYOB Acumatica website, and sign in as an accountant by using the following credentials:
- Username: johnson
- Password: 123
- In the info area, in the upper-right corner of the top pane of the MYOB Acumatica screen, make sure that the business date in your system is set to 1/30/2025. If a different date is displayed, click the Business Date menu button and select 1/30/2025. For simplicity, in this activity, you will create and process all documents in the system on this business date.
- On the Company and Branch Selection menu, also on the top pane of the MYOB Acumatica screen, make sure that the SweetLife Head Office and Wholesale Center branch is selected. If it is not selected, click the Company and Branch Selection menu to view the list of branches that you have access to, and then click SweetLife Head Office and Wholesale Center.
Step 1: Finding and Printing a Check
To find a check and print it, do the following:
- Open the Checks and Payments (AP3020PL) list of records.
- Find a check with the On Hold status and an amount of $410 as follows:
- In the filtering area, click the Filter Settings button.
- In the Filter Settings dialog box, which opens,
click Add Row, and specify the following
settings:
- Property: Status
- Condition: Equals
- Value: On Hold
- Click Apply to close the dialog box.
- In the table, find a check with the payment amount of $410.
- Click the link in the Reference Nbr. column.
- On the Checks and Payments (AP302000) form, which opens for the
check you want to print, click Remove Hold on the form
toolbar, and save the check.
Notice that the payment's status has changed to Pending Print.
- On the form toolbar, click Print/Process.
- On the Process Payments / Print Checks (AP505000) form, which is opened with the
payment listed in the table and the unlabeled check box selected for the row,
review the details of the payment (Vendor ID and
Payment Amount) and click
Process.
A separate browser tab is opened showing the printable version of the check.
- Review the printable version of the check, note the check number, and close the
browser tab. (For the purposes of this activity, you do not need to actually
print the check. In a production setting, you would click
Print on the form toolbar to print the check before
closing the browser tab.)
The system opens the Release Payments (AP505200) form with the payment ready for release. Do not release the payment yet.
Step 2: Removing a Bill from the Check
To remove the $50 bill, which contains the items not delivered, from the check, do the following:
- Open the Checks and Payments (AP3020PL) list of records.
- If you applied any filters before on this form, click the Filter Settings button in the filtering area.
- In the Filter Settings dialog box, which opens, click Delete Row, and then click Apply to close the dialog box.
- In the table, find the check you opened in Step 1 as follows:
- In the filtering area, click the Filter Settings button.
- In the Filter Settings dialog box, which opens,
click Add Row, and specify the following
settings:
- Property: Status
- Condition: Equals
- Value: Printed
- Click Apply to close the dialog box.
- In the table, review the payment. Notice its status and payment amount.
- Open the Release Payments (AP505200) form.
- In the Action box, select Reprint with New
Number.
With this action selected, for all checks you select and then process, the system will change the status from Printed to Pending Print. The number of this check will be kept in the system, and it will not be possible to reuse it for another check.
- In the table, select the unlabeled check box for the payment you have been working with, and on the form toolbar, click Process.
- In the Processing pop-up window, which is opened, click the Processed tab.
- Click the link in the Reference Nbr. column to again open the payment on the Checks and Payments form.
- On the form toolbar, click Hold to change the payment's
status to On Hold.
Now you can edit the payment to remove the bill of $50, whose products have not yet been delivered.
- On the Documents to Apply tab, click the bill in the amount of $50, and click Delete Row on the table toolbar.
- In the Summary area, enter 360 in the Payment Amount box.
- In the Description box, enter Glass jars.
- Save the payment, and on the form toolbar, click Remove
Hold.
The payment's status has changed again to Pending Print.
Step 3: Reprinting the Check
To reprint the already-printed check with a new number, because the blank with the old number cannot be used, do the following:
- While you are still viewing the payment on the Checks and Payments (AP302000) form, on the form toolbar, click Print/Process.
- On the Process Payments / Print Checks (AP505000) form, which is opened with the
payment listed in the table and the unlabeled check box selected for the row,
click Process on the form toolbar.
A separate browser tab is opened showing the printable version of the check, which has a new check number but the updated amount of $360. You have not yet sent the check, but you have printed it on a blank. So you should reprint it with the new number on a new blank.
Step 4: Releasing the Check
To release the updated check, do the following:
- On the Release Payments (AP505200) form, which opened after you
printed the check, click the link in the Reference Nbr.
column to open the payment on the Checks and Payments (AP302000)
form.
Notice that the payment's status has changed again to Printed.
- On the form toolbar, click Release to release the payment.
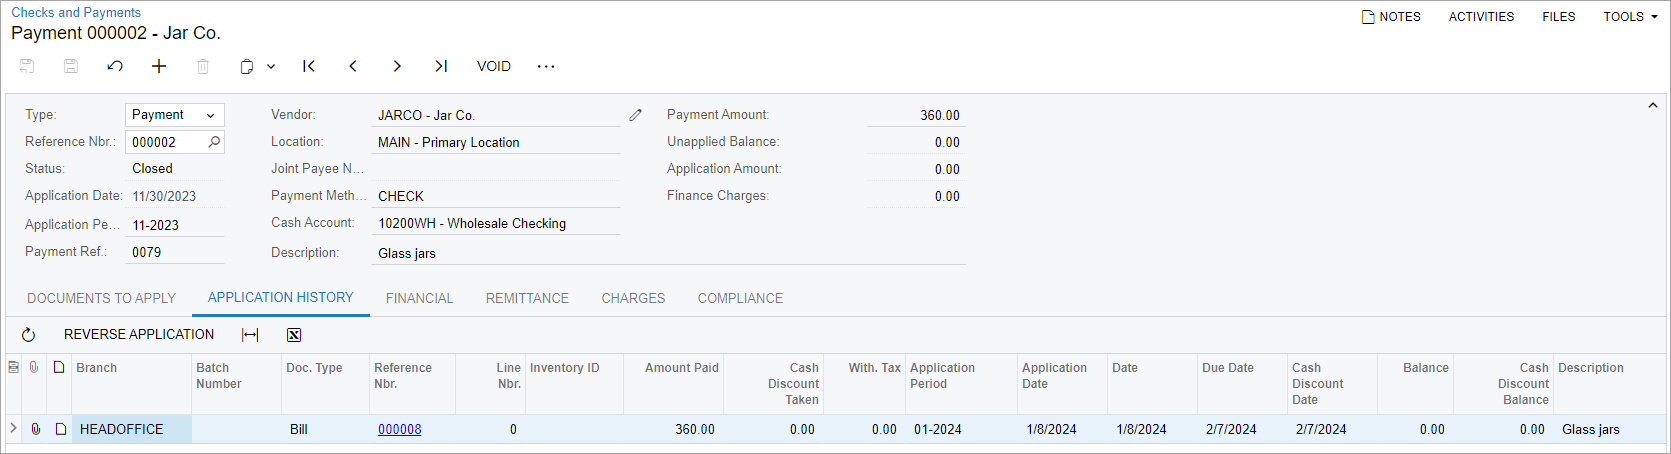
- Click the Application History tab, and make sure that the payment was applied to one bill in the amount of $360, as shown in the following screenshot.