To Add Another Supported Control
You use the Screen Editor to add to a container a control of any of the following types, which are supported in the MYOB Acumatica Customization Platform (listed under Other Controls on the Add Controls tab item):
- Panel (PXPanel)
- Group Box (PXGroupBox)
- Label (PXLabel)
- Radio Button (PXRadioButton)
- Button (PXButton)
- Java Script (PXJavaScript)
We recommend that you not include a PXRadioButton control in a container that neither is bound to a data view nor inherits the DataMember property from the parent container.
You can nest a control of the listed types in a PXPanel or PXGroupBox container. However the PXGroupBox control type is especially designed to be used as a radio button container to render a drop-down field as a set of radio buttons. It contains scripts with the logic to support a nested radio button for each value of a drop-down field. So we recommend that you use PXGroupBox exclusively to include radio buttons.
To add a control of one of the listed types to a container, perform the following actions:
- Open the container in the Screen Editor, as described in To Open a Container in the Screen Editor.
- Ensure that the container node is selected in the Control Tree of the editor. Click the arrow left of the node to expand the node if needed.
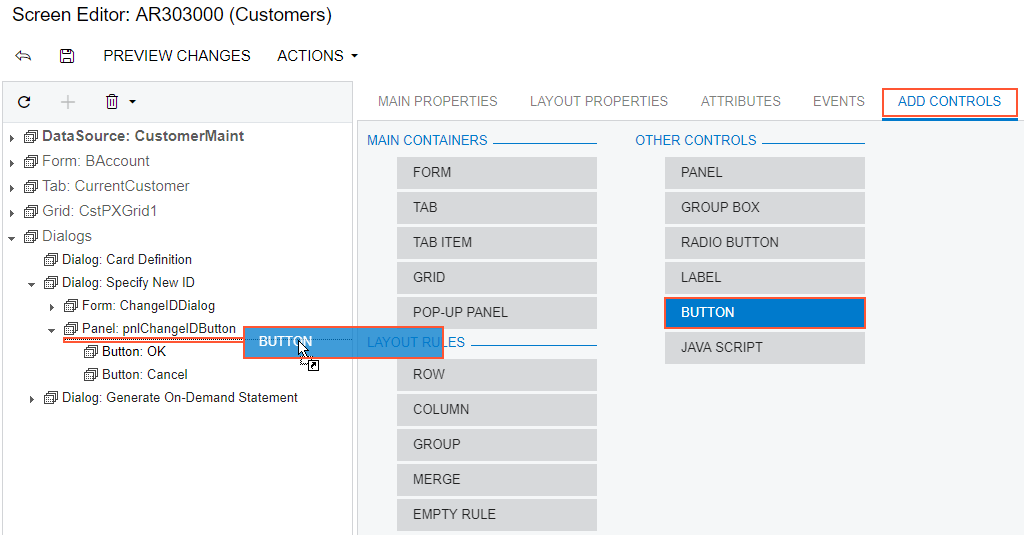
- Click the Add Controls tab item (see the screenshot below).
- From the Other Controls group, drag the required control type to
the needed location in the Control Tree within the container, as shown in the following
screenshot.
Figure 1. Adding a layout rule to a container 
- If required, specify properties for the new control.
- Click Save to save your changes in the customization project.
