- Contents
- Index
- Search

Show results that include all search words
The POS Interface
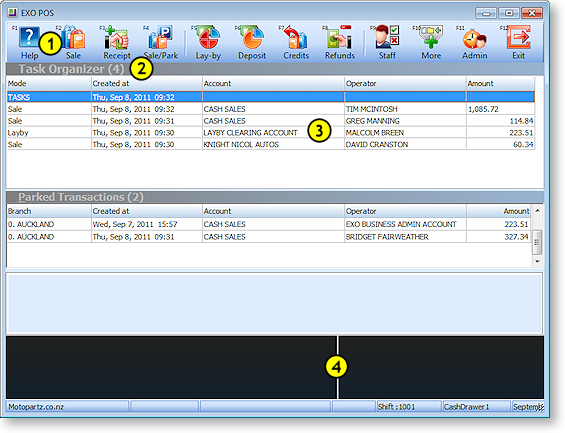
The Task Organizer is the main interface for the POS module, and is used to launch new tasks (transactions) or retrieve parked tasks. The main areas of the window are described below.
-
Function key driven Toolbar
The blank area between the activity zone and the status panel can be customised with a company logo or background image.
Note: Where
POS is installed, you can run the core EXO Business
module in "POS
mode" by adding /POS to the main MYOB EXO Business
shortcut, e.g.
"C:\Program Files\MYOB EXO Business\Exonet.exe" /POS
In POS mode, all
windows use POS-style
toolbars and the Task Organiser is launched automatically following startup.
Standard Toolbar
The toolbar provides you with the options you need to launch new tasks and are available as Function Keys on your keyboard. Some of the buttons on the menu bar contain sub menus while others are quick keys that assist you.

The following table describes the buttons on the toolbar:
|
Button |
Description |
|
Help F1 |
Open the EXO Business online Help |
|
Sale F2 |
Start a sales transaction. This is an invoice possibly accompanied by a receipt. It can be used for both cash and account sales. |
|
Receipt F3 |
Start a receipt payment. This allows receipt of a payment against an account. |
|
Sale/Park F4 |
Allows the operator to commence a sale similar to the sale F2 button but the default action for the transaction will be set to Park rather than save. This button is only available if the profile setting POS allow parking is active. |
|
Lay-by F5 |
Access lay-bys. This is used to create a new lay-by or access/supply an existing lay-by. A new lay-by may also have deposits. This button is only available if the profile setting Enable POS lay-bys is active. |
|
Deposit F6 |
Start a deposit against a lay-by entered on a previous occasion. This button is only available if the profile setting Deposits in sales orders and GL is active. |
|
Credits F7 |
This is similar to Sale, but is used where a credit note is to be produced |
|
Refunds F8 |
This is similar to Receipt, but will result in a refund payment. |
|
Staff F9 |
Access the Active Staff Control window that allows you to log in or log out of the system. |
|
More F10 |
Access additional options. The More button changes the toolbar to reveal additional tasks including invoice reprint, stock in and stock transfers. Holding down the CTRL key also activates the More options. |
|
Admin F11 |
Access the Shifts window for starting shifts and performing End of Day operations. |
|
Exit F12 |
Close the Task Organizer and optionally the POS module. |
The toolbar changes depending on the task currently being performed. While some toolbar options stay the same, others reflect the requirements of the current task.
Keyboard shortcuts are available for all functions on the toolbar - these are displayed next to each toolbar icon.
More Toolbar

The following table describes the keys on the More toolbar. The More toolbar is accessed by clicking More or pressing F10, or by holding down the CTRL key.
|
Button |
Description |
|
Custom F1 |
Accesses the list of custom button functions. |
|
Reprint F3 |
|
|
Transfers F5 |
Opens the Stock Transfer window. If Distribution Advantage is installed, it opens the Stock Transfer Requests window. |
|
Stock F6 |
Opens the Stock maintenance window. |
|
Debtors F7 |
Opens the Debtor maintenance window. |
|
Contacts F8 |
Opens the Contact maintenance window. |
|
More F10 |
Hides the More toolbar and reverts to the standard toolbar. |
|
Branch/Branches F11 |
Toggles the list of parked transactions to show all branches or the current branch. |
|
Parked/Tasks F12 |
Toggles the focus between the task list and parked list on the main window. |
Message Line
This is a bar that provides the name of the selected task. It also displays messages to suggest the usual action to be taken next.
Activity Zone
The activity zone lists currently active tasks and parked transactions.
Tasks are transactions that a temporarily interrupted, and are held open on the current terminal. These are current windows held open, ‘behind’ the current task window. They can be recalled from the main task menu for continued operation. Tasks must be completed and closed before POS can be closed. As tasks are simple window lists, they are not password protected. Tasks can include active sales, receipt, sales order or deposit transactions.
Parked transactions are optional, and are interrupted sale transactions that are stored in the database, allowing them to be recalled by other terminals within the branch.
Note: While a summary of parked transactions from other branches can be displayed, transactions from other branches cannot be "unparked".
Status Panel

The content of the status panel provides a summary of the current task, the contents of which changes to reflect the current task being undertaken. The contents may include information such as the type of account, the name of the salesperson, the total sale amount of the listed stock items and its tax content.
Custom Buttons
You can define up to five custom buttons to appear on the Custom Buttons window. This window is opened by pressing CTRL+F1 or clicking the Custom button on the More toolbar.
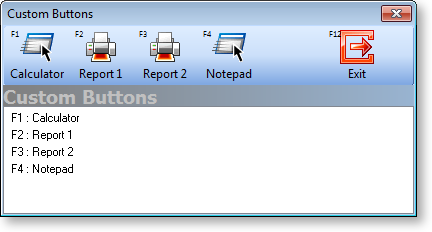
The button functions are configured via profile settings and allow extension of the workspace to run any application you wish including applications provided by other parties (e.g. calc.exe). It may also be used to run Clarity reports.
To configure custom buttons, specify values for the POS Button User profile settings in the EXO Business Configuration Assistant. There are two settings for each button: one to define the caption that appears in the Custom Buttons window and one to specify the application or report to be launched when the button is clicked.
Adding a Company Logo
The blank space between the activity zone and the status panel can be customised with a company logo or background image. This image must be named Cust-rm.bmp and must be placed in the same directory as the POS.exe executable. The image is not resized when it appears in the POS interface, and is always centered within the blank area - if it is larger than the size of the area, it will appear cropped.