- Contents
- Index
- Search

Show results that include all search words
Making a Sale
There are four basics steps to make a sale in POS:
-
Choose the account
-
Enter the stock item(s)
-
Edit the quantity, price and/or discount
-
Enter payment information
Choosing the Account
-
From the Task Organiser, click Sale or press F2.
-
A list of logged on staff members is displayed, select the staff member responsible for the sale and click Select.
-
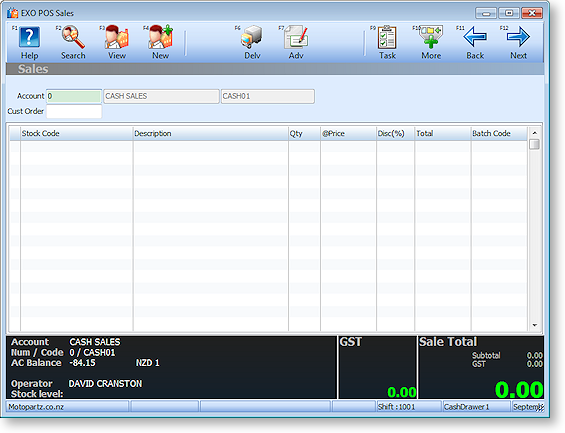
The Sales window is displayed:
Select the Account field and click Search or press F2. The Account Search window is displayed.
-
A list of all accounts is displayed. If you know the name of the account or part of it, type it in the Account field and press ENTER. This limits the search to this criteria.
Note: To have the search function search contact, address and phone number fields, select the extended search option by clicking Extend or pressing F5.
- To view an account's details before continuing with the sale, select the account and click View or press F3 The Debtor Account Details window for the specified account is displayed.
- To create a new account, click New or press F4.
- To choose an account for the sale, select the account and click Select or press F12. You are returned to the Sales window, and the account is displayed in the Account field.
-
Enter the customer order number into the Cust Order field.
Note: If you have set up account templates to standardise settings for a new account, a list of your account templates is displayed instead of a blank account screen. Select the account template you want to use and click OK.
Entering Stock Items
You can enter stock items either by typing the Stock Code directly in the Sales window, or you can scan the stock barcode (if POS is integrated with a barcode scanner).
-
Click on the Stock Code column or click Next to move the cursor to this field.
-
Type the Stock Code, or scan the barcode, and press ENTER. The stock details are displayed.
Note: The Details 2 page in the Stock Item Details window in EXO Business contains a Pop-Up Alert field. The message entered here is displayed when you select an item with an alert message. For example, "Sold as a 2-pack".
To search for a stock item, click Search or press F2. The Stock Item Search window is displayed. If you know the stock code or a part of it, type in the Stock field and press ENTER. A list of all existing stock items that match the search criteria is displayed. Select the stock item you require and click Select or press ENTER.
To select a Bill of Materials, click B.O.M. or press F7.
To view a stock item's details, click View or press F3 on a line with a valid stock code. This displays the EXO Business Stock Item Details window.
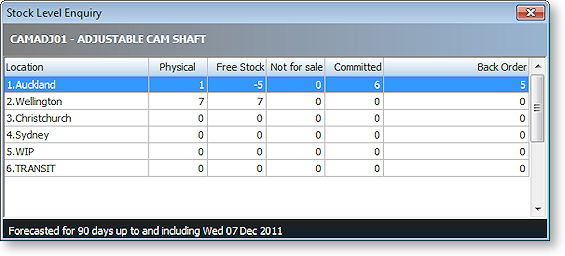
To quickly check the stock level for a stock item, click Stock Level or press F4. This window tells you whether any of your other branches have stock of the item you can transfer, or whether the stock item is on back order.
Entering Quantities and Discounts
Make changes to the following fields for each stock item, if necessary:
Qty The default quantity for stock items is one. If more than one is being purchased, enter the new quantity.
Disc (%) If a discount is being offered, type the discounted amount. This column appears only if this option is set.
You can also change the Price if the Password required for price override profile setting is set to "N". If this setting is set to "Y", you must press CTRL+F8 (or select Price from the More toolbar), then enter a supervisor password to be able to edit the price.
Note: A mixture of stock lines with positive and negative quantities (values) is permitted but a sale must have a positive total value. If a credit note is being produced the Credits F7 option must be used instead of Sale F2. An invalid sale total is indicated with a red background.
You can switch a stock item's price between GST-inclusive and GST-exclusive by pressing CTRL+F7.
Note: For this option to be available, the Allow change between tax-inclusive and -exclusive profile setting must be enabled.
Entering Payment Information
Payment for a sale can be taken directly, or charged to a selected account.
After all purchased stock items are listed, click Next or press F12 to move to the payment entry section.
If this is a cash sale:
-
Specify the payment type using one of the following methods:
- Click the toolbar button for the payment method you want, or press the relevant function key. Additional payment methods are available on the More toolbar (click More or hold down CTRL).
- Click Select or press F2 to display a shortcut menu of all payment types.
-
Type the amount being paid with this payment type into the Amount field and press ENTER.
Tip: Pressing the space bar populates the Amount field with the due amount.
-
If the customer wants to make payments using more than one payment type, select the additional type(s) and enter the amounts for each.
-
Click Save or press F12 to save the transaction. A message appears to confirm saving.
-
If the payment exceeds the sale amount, a message appears to check if you have given the customer change.
-
Other messages are now displayed to check if you want to print and e-mail the invoice.
The transaction is complete. (Payments are automatically allocated against the corresponding invoice created during this task.)
If the Save button is not enabled, then the sale is not allowed to proceed for one of the following reasons:
-
Insufficient payment has been made, and the account has cash only terms. To complete this sale, full payment must be made directly against the sale.
-
No default contact has been entered against the account. Each account is required to have a default contact (including a ‘placeholder contact’ in the cash sale account) before a sale can proceed.
If this is an account sale:
For account sales, the words Charge Account will appear instead of Due at the bottom of the window.
Your customer may make a part payment against the invoice and charge the rest to their account. Enter the payment details as for a cash sale.
Note: As any payments entered in a Sale transaction are allocated against the invoice for that transaction, any payments against previous invoices on the account should be performed as a separate Receipt transaction using F3 Receipt from the task organiser.
Click Save or press F12 to end the sale and create the appropriate account sale invoice.