
Automated Operations with Lot- and Serial-Tracked Items: To Process Purchase and Sales Orders, and Transfers
In the following activity, you will learn how to process purchase and sales orders, and transfers with lot-tracked stock items in automated mode.
Story
Suppose that on 1/27/2026, the purchasing manager of the wholesale warehouse of the SweetLife Fruits & Jams company entered a purchase order for 30 pounds of pears (three boxes of 10 pounds each, and the boxes can have different expiration dates) from the Glory Fruit Case vendor. The vendor supplies each box with a lot number that must be used for tracking the enclosed items in the Wholesale warehouse. Then, on 1/29/2026, the sales manager entered a sales order for 12 pounds of pears being sold to GoodFood One Restaurant.
As the warehouse worker, you will receive the items in the purchase order and put them away in the fruit locations. Then you will pick and pack the items for the sales order. Finally, at the request of the warehouse manager, you will move the remaining items (those not included in the sales order) from one location to another.
Configuration Overview
In the U100 dataset, the following tasks have been performed to support this activity:
- On the Enable/Disable Features (CS100000) form, the
following features have been enabled in the Inventory and Order
Management group of features:
- Inventory
- Lot and Serial Tracking
- Warehouse Management
- Fulfillment
- Receiving
- Inventory Operations
- On the Warehouses (IN204000) form, the WHOLESALE warehouse has been created. On the Locations tab, the following warehouse locations have been defined: F1S2, F2S1, and MAIN.
- On the Stock Items (IN202500) form, the PEARS stock item has been created. For this stock item, the PE1LB barcode has been specified on the Cross-Reference tab of the form, and the ALTFRT lot class has been assigned.
- On the Lot/Serial Classes (IN207000) form, the ALTFRT lot class has been created. The lot class is defined so that the fruits with the earliest expiration date are issued first. Also, auto-generation of lot numbers is configured for the lot class.
- On the Boxes (CS207600) form, the MEDIUM box has been defined.
- On the Vendors (AP303000) form, the GLORYFRUIT vendor has been created.
- On the Customers (AR303000) form, the GOODFOOD customer has been created.
- On the Purchase Orders (PO301000) form, the 000025 purchase order to GLORYFRUIT has been created.
- On the Sales Orders (SO301000) form, the 000061 sales order to GOODFOOD has been created.
Process Overview
In this process activity, you will act as a warehouse worker in the Wholesale warehouse. You will receive the items for a purchase order in automated mode and specify the lot number and expiration date for each unit of the items, and then put the received items away in the appropriate storage locations. Then you will create a shipment for a sales order on the Sales Orders (SO301000) form, and pick and pack the items for this shipment in the automated mode. Finally, you will prepare an inventory transfer to record the movement of the items from one location to another on the Scan and Transfer (IN304020) form.
System Preparation
Before you start processing purchase and sales documents, and transfer transactions with lot-tracked stock items in automated mode, do the following:
- Launch the MYOB Acumatica website, and sign in to a company with the U100 dataset preloaded. You should sign in as warehouse worker with the perkins username and the 123 password.
- In the info area at the upper-right corner of the top pane of the MYOB Acumatica screen, make sure that the business date is set to 1/30/2026. If a different date is displayed, click the Business Date menu button and select 1/30/2026 from the calendar. For simplicity, you'll create and process all documents in this activity using this business date.
- On the Enable/Disable Features (CS100000) form, enable the Lot and Serial Tracking feature.
Step 1: Receiving and Putting Away Items
Suppose that the Glory Fruit Case vendor has delivered the 30 pounds of pears to the Wholesale warehouse: three boxes of 10 pounds each. Two of the boxes (that is, 20 pounds of pears) have one lot number and expiration date, and the third box (that is, 10 pounds of pears) has a different lot number and expiration date. You will prepare the needed documents to reflect the receipt of the pears as follows:
- Open the Receive and Put Away (PO302020) form, and make sure the Receive tab is opened.
- In the Scan box, type 000025, which is the reference number of the purchase order for which you will perform receiving items and putting them away to storage locations. Press Enter. The system creates the purchase receipt for the purchase order and loads the purchase receipt line to the table on the Receive tab. The reference number of the purchase receipt that is currently being processed is displayed in the Receipt Nbr. box of the Summary area.
- Enter MAIN to select the location in which you have received the items.
- Enter PE1LB to select the item being received.
- Enter FR000762 to specify the lot number of the first and second boxes of pears. (These boxes have the same lot number.)
- Enter 02/20/2026 to specify the expiration date of these boxes, which have the same expiration date. The system highlights the purchase receipt line in bold, and specifies 1 as the Received Qty. The two boxes with the lot number and expiration date you have specified contain 20 pounds, so the quantity of the line should be 20.
- Set the quantity of the current line to 20 as follows:
- On the form toolbar, click Set Qty. The system prompts you to enter the item quantity.
- In the Scan box, type 20.
- Enter PE1LB to select the item being received. You are now processing the third box of 10 pounds of pears, which has a different lot number and expiration date than the first two boxes had.
- Enter FR000782 to specify the lot number of the third box of pears.
- Enter 02/13/2026 to specify the expiration date of this box. The system splits the line, and specifies 1 as the Received Quantity in the newly added line. The box with the lot number and expiration date you just entered contains 10 pounds, so the quantity of the line should be 10.
- Set the quantity of the current line to 10. On the Receive tab, the system highlights both lines in green, indicating that these lines have been received in full.
- On the form toolbar, click Release Receipt. The system releases the purchase receipt and generates a corresponding inventory receipt transaction to record the receipt of the items to the MAIN location of the warehouse.
- Enter @putaway to switch to Put Away mode. Notice that the purchase receipt is still selected and its reference number is shown in the Receipt Nbr. box of the Summary area.
- Enter F1S2 to select the location to which the items (the 20 pounds of pears in the first two boxes) are being put away.
- Enter PE1LB to select the item to be put away to this location.
- Enter FR000762 to specify the lot number of the first and second box of pears.
- Set the quantity to 20.
- Enter F2S1 to select the location to which the rest of the items (the remaining 10 pounds of pears, which are in the third box) are being put away.
- Enter PE1LB to select the item to be put away to this location.
- Enter FR000782 to specify the lot number of the third box of pears.
- Set the quantity to 10.
- On the form toolbar, click Release Transfer.
- On the Transfers tab, click the reference number in the Reference Nbr. column.
- On the Transfers (IN304000) form, which opens in a pop-up
window, make sure that the generated transfer has the Released status
shown in the Status box, and make sure that the lot
number and expiration date have been assigned to the lines, as shown in the
screenshot.
Figure 1. Lot-tracked items moved to storage locations 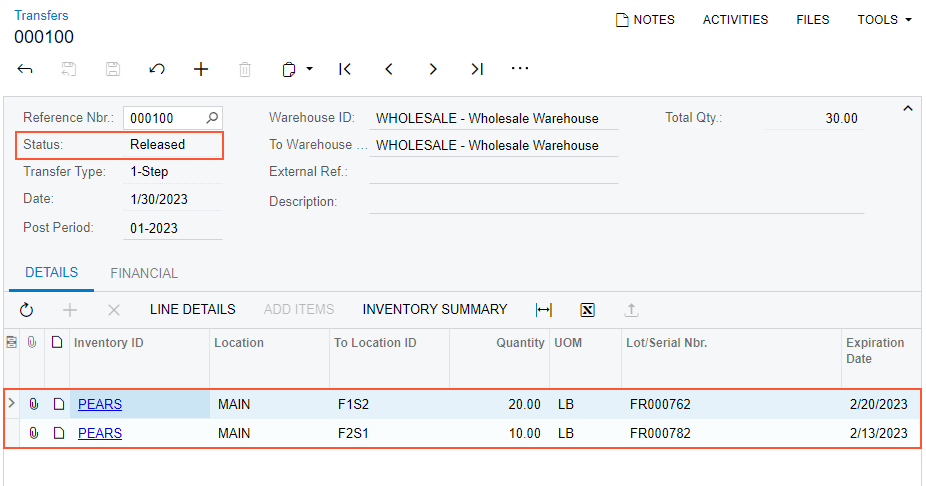
Step 2: Creating a Shipment
To create a shipment for some of the pears that have been received and put away, do the following:
- On the Sales Orders (SO301000) form, open a sales order to GOODFOOD dated 1/29/2026, and make sure it has a line with the PEARS item and quantity 12.
- On the form toolbar, click Create Shipment to prepare a shipment.
- In the Specify Shipment Parameters dialog box, which opens, make sure that the 1/30/2026 date and the WHOLESALE warehouse are selected, and click OK. The system creates a shipment and opens it on the Shipments (SO302000) form. In the Shipment Nbr., box, notice the reference number of the shipment; you will need it in the next step.
Step 3: Picking and Packing Items for the Shipment
To perform automated picking and packing of the ordered items, do the following:
- Open the Pick, Pack, and Ship (SO302020) form, and make sure that the Pick tab is opened.
- In the Scan box, type the reference number of the shipment that you have prepared earlier in this activity. The system loads the shipment lines to the Pick tab, and in the Shipment Nbr. box of the Summary area, shows the reference number of the shipment that is currently being processed. Notice that the system has split the line so that 10 units for the shipment are taken from the box with the earlier expiration date, and the rest of the shipment (2 units) are taken from another box.
- Enter F2S1 to select the location from which the item is picked.
- Enter PE1LB to select the item that is being picked from the selected location.
- Enter FR000782 to specify the lot number. The system highlights the second line of the shipment in bold and specifies 1 as the Picked Quantity.
- Set the quantity to 10 as follows:
- On the form toolbar, click Set Qty. The system prompts you to enter the quantity.
- In the Scan box, type 10. The system highlights the first line of the shipment in green and specifies 10 as the Picked Quantity.
- Enter F1S2 to select the location from which the item is picked for the remainder of the order.
- Enter PE1LB to select the item being picked from the selected location.
- Enter FR000762 to specify the lot number.
- Set the quantity to 2. You have picked items for both lines, and now can processed with packing them in the box.
- Enter @pack to switch to Pack mode. Notice that the shipment is still selected and its reference number is shown in the Shipment Nbr. box of the Summary area.
- Enter MEDIUM to select the box for packaging the shipment.
- Enter PE1LB to select the item to be packed to the selected box.
- Enter FR000782 to specify the lot number.
- Set the quantity to 10.
- Enter PE1LB to select the item to be packed to the selected box.
- Enter FR000762 to specify the lot number.
- Set the quantity to 2. All items are packed in the box, so you can confirm the package.
- On the form toolbar, click OK to confirm the package.
- On the form toolbar, click Confirm Shipment.
Step 4: Reviewing the Shipment
Review the shipment in the system as follows:
- On the Shipments (SO302000) form, open the shipment that you have processed earlier in this activity. Notice that it is assigned the Confirmed status.
- Review the Packages tab. Notice that one box with the
MEDIUM identifier is shown in the upper table, and the
Contents of Selected Package table shows the items
that have been packed into this box, as shown in the following screenshot.
Figure 2. Confirmed shipment 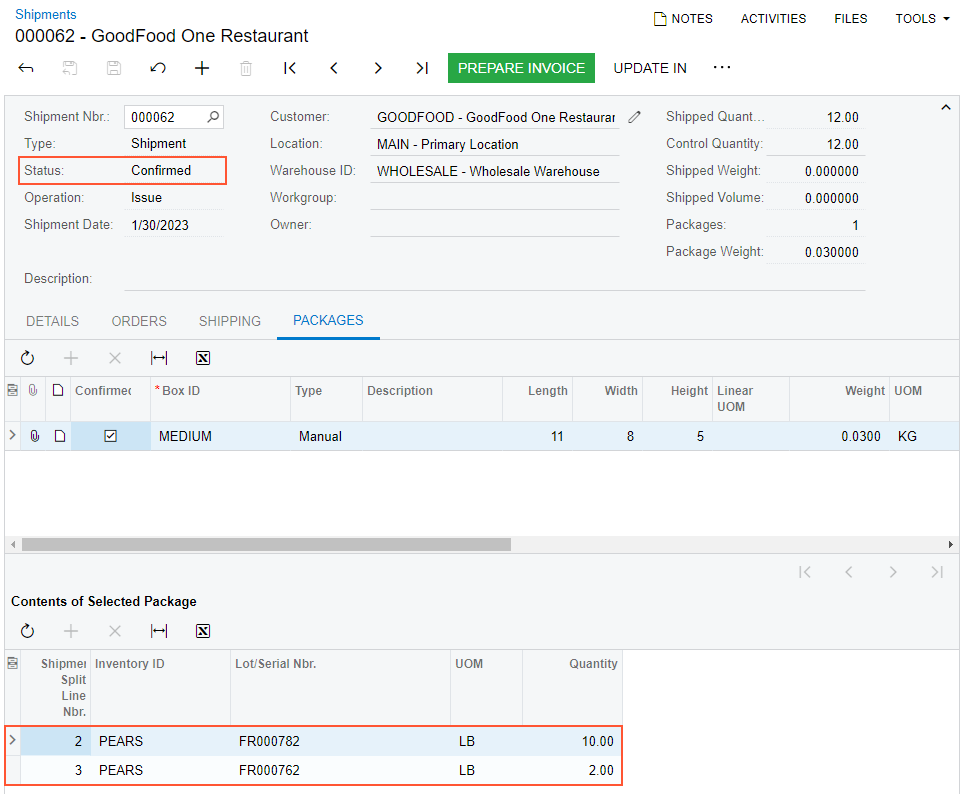
Step 5: Transferring Items
Suppose that the warehouse manager has decided to clean the F1S2 location and asked you to move all items from this location to the F2S1 location, which has already been cleaned. In the F1S2 location, you found 18 pounds of pears and moved them to the F2S1 location. Now you acting as a warehouse worker need to record this movement in the system by creating an inventory transfer. Do the following:
- Open the Scan and Transfer (IN304020) form.
- In the Scan box, enter F1S2 as the origin location.
- Enter F2S1 as the destination location.
- Enter PE1LB as the item to be transferred.
- Enter FR000762 to specify the lot number. The system adds a line with one unit of the item to the table on the Transfer tab.
- Set the quantity of the line to 18 as follows:
- On the form toolbar, click Set Qty. The system prompts you to enter the quantity.
- In the Scan box, enter 18.
- On the form toolbar, click Save. The system creates the transfer with the data you have entered. You can view the transfer number in the Reference Nbr. box of the Summary area.
- On the form toolbar, click Release. The system releases the transfer.
- Click the Edit button next to the Reference Nbr. box, and
on the Transfers (IN304000) form, which opens in a pop-up
window, review the inventory transfer transaction. Make sure that it includes
the needed line and is assigned the Released status, as shown in the
following screenshot.
Figure 3. Lot-tracked items transferred to another location 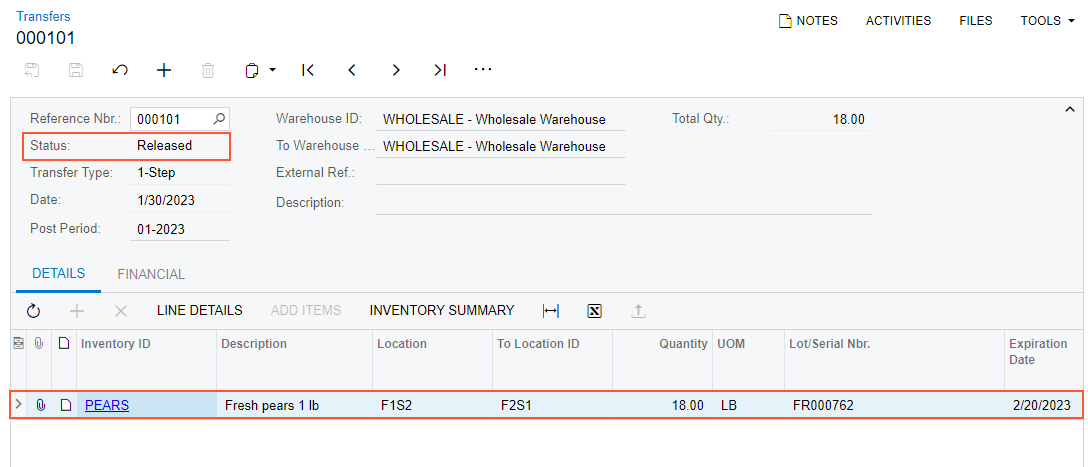
You have successfully moved pears between the locations.