
To Add a Payment Method for ACH Payments (Export Scenarios)
- By using the ACH (exports payments to an unbalanced file) and ACHBA (exports payments to a balanced file) predefined payment methods, which are available for selection on this form. ACH and ACHBA are already configured to be used for paying your vendors through the ACH network.
- By using the ACH or ACHBA payment method as a basis and using commands on the Clipboard menu on the form toolbar. You can copy the settings of a particular payment method and paste them to create another one (changing any needed settings), or you can create a template for multiple similar payment methods. For details, see Record Entry: Copy-and-Paste Options and Record Templates.
- By entering the settings of a payment method manually.
This procedure describes how to manually create a payment method based on an export scenario, which will be used to pay your vendors through the ACH network.
Before You Proceed
Review the cash accounts you have and decide which ones you are going to use as the source of payments to your vendors. You will specify these in Step 9 of the next section.
To Add a Payment Method for ACH Payments
To add a payment method that uses an export scenario, do the following:
- Open the Payment Methods (CA204000) form.
- On the form toolbar, click Add New Record.
- In the Payment Method ID box, type the identifier you want to use for the payment method (such as ACH).
- Select the Active check box to make the payment method available for use in the system.
- In the Means of Payment box, select the Direct Deposit option.
- Select the Use in AP check box to make the payment method available to be assigned to vendors.
- Select the Require Remittance Information for Cash Account check box. The Remittance Settings tab appears on the form so you can add elements to fill with the ACH credentials for the cash accounts.
- In the Description box, type a description for the payment method.
- On the Allowed Cash Accounts tab, do the following to add
the list of cash accounts you are planning to use as a source for payments made
to vendors by using the payment method:
- For each cash account you want to link to the payment method, on the table toolbar, click Add Row. In the Cash Account box, select the cash account.
- Select the AP Default check box for the listed cash account that is to be used by default.
- On the Settings for Use in AP tab, configure the export
of batches to a file to be sent to the ACH operator for processing as
follows:
- In the Additional Processing section, select the
Create Batch Payments option button to
indicate that the payment method involves creating payment batches.Tip: Once you select this option button, the Quick Batch Generation check box appears on the Allowed Cash Accounts tab. You can select this check box to quickly prepare batches of AP payments on the Prepare Payments (AP503000) form. For details, see To Quickly Prepare a Batch of Payments.
- In the Export Method box, select Export Scenario.
- In the Export Scenario box, under the Export Settings section (which appears to the right), select the Export AP Payments to ACH v2 or Export AP Payments to ACH Balanced v2 scenario, which is designed to export the batch payments in the proper format.
- Select the Release Batch Payment Before Export check box if you want to export ACH payment batches after they are released. If you want to export batches before release, leave this check box cleared.
- In the Payment Method Details table, add the
elements shown in the following screenshot, which will appear on the
Vendors (AP303000) form so
users can enter the ACH credentials specific to the particular
vendor.

- In the Additional Processing section, select the
Create Batch Payments option button to
indicate that the payment method involves creating payment batches.
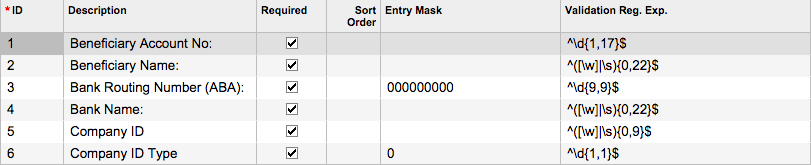
- On the Remittance Settings tab, add the elements shown in
the following screenshots, which will appear on the Cash Accounts (CA202000) form so users can enter your company's
ACH credentials for each cash account. If you create a payment method to export payments to unbalanced file, add the following elements:
 If you create a payment method to export payments to balanced file, add the following elements:
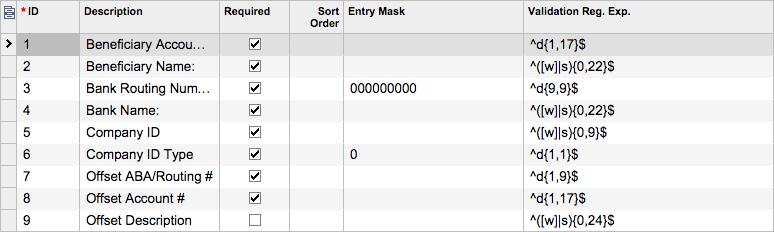
- On the form toolbar, click Save.
After the payment method is configured, you should specify your remittance information for each cash account you have listed on the Allowed Cash Accounts tab (as described in To Add Remittance Information to a Cash Account), and specify ACH credentials for each vendor that agreed to receive your payments through the ACH network.