
Configuring Nested Containers
This topic describes how to configure the types of related containers on the same screen.
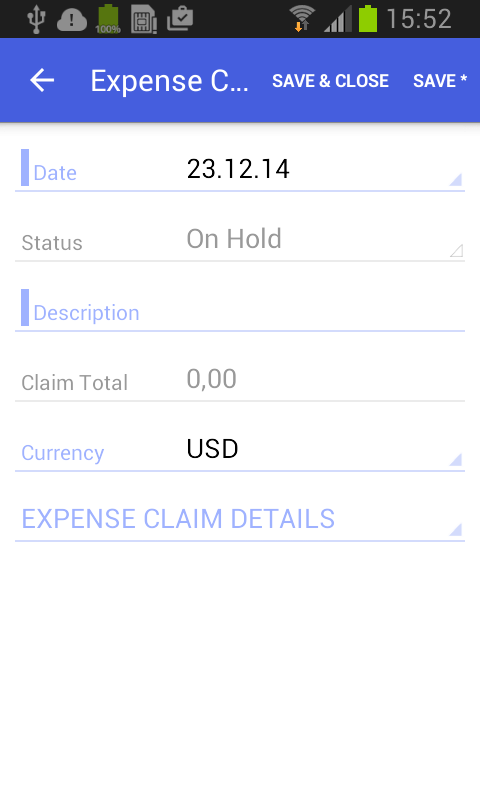
Example: Configuring a Screen with One-to-Many (Master-Detail) Containers
With one-to-many containers, one container declared inside the sm:Screen tag is considered the master container, while all other containers are considered detail containers.
To see an example of configuring one-to-many containers, copy the code below to an .xml file, put the file in the \App_Data\Mobile folder of the MYOB Acumatica website, and start the mobile application.
<?xml version="1.0" encoding="UTF-8"?>
<sm:SiteMap xmlns:sm="http://acumatica.com/mobilesitemap" xmlns:xsi="http://www.w3.org/2001/XMLSchema-instance">

    <sm:Folder DisplayName="Expense Claims" Type="HubFolder" Icon="system://Folder" IsDefaultFavorite="true">
        <sm:Screen Id="EP301030" Type="FilterListScreen" DisplayName="Expense Claims" Visible="true" >

            <sm:Container Name="Selection">
                <sm:Field Name="Employee"/>
            </sm:Container>

            <sm:Container Name="Claim" >
                <sm:Field Name="Date" />
                <sm:Field Name="Status" />
                <sm:Field Name="Description" />
                <sm:Field Name="ClaimTotal" />

                <sm:Action Name="CreateNew" Context="Container" Behavior="Create" Redirect="true" Icon="system://Plus" />
                <sm:Action Name="EditDetail" Context="Container" Behavior="Open" Redirect="true" />
            </sm:Container>
        </sm:Screen>
    </sm:Folder>
    <sm:Screen Id="EP301000" Type="SimpleScreen" DisplayName="Expense Claim" Visible="false" OpenAs="Form">

        <sm:Container Name="DocumentSummary" >
            <sm:Attachments Disabled="true"/>

            <sm:Field Name="Date" />
            <sm:Field Name="Status" />
            <sm:Field Name="Description" />
            <sm:Field Name="ClaimTotal" />
            <sm:Field Name="Currency" />

            <sm:Action Name="Save" Context="Record" Behavior="Save" />
            <sm:Action Name="Cancel" Context="Record" Behavior="Cancel" />
        </sm:Container>

        <sm:Container Name="ExpenseClaimDetails" >
            <sm:Attachments Disabled="true"/>
            <sm:Field Name="Date" ListPrioruty="99" FormPriority="99" />
            <sm:Field Name="Description" FormPriority="98" />
            <sm:Field Name="ExpenseItem" FormPriority="97"/>
            <sm:Field Name="Currency" FormPriority="95"/>

            <sm:Field Name="TotalAmount" ListPriority="96" FormPriority="94" />
            <sm:Field Name="ProjectContract" Container="ReceiptClassification" FormPriority="93" />
            <sm:Field Name="ProjectTask" Container="ReceiptClassification" FormPriority="92" />

            <sm:Action Name="Insert" Context="Container" Behavior="Create" Icon="system://Plus"/>
            <sm:Action Name="Delete" Context="Selection" Behavior="Delete" />
            <sm:Action Name="Save" Context="Record" Behavior="Save" />
            <sm:Action Name="Cancel" Context="Record" Behavior="Cancel" />
        </sm:Container>

    </sm:Screen>
</sm:SiteMap>
All declared detail containers are displayed on a screen below the screen fields in the order of their declaration.
To add, update, and delete data records in a detail container, you use the
Behavior="Create", Behavior="Open"
and Behavior="Delete" actions, as you do on the master
screen.
The screenshot below shows the resulting screen in the mobile application.
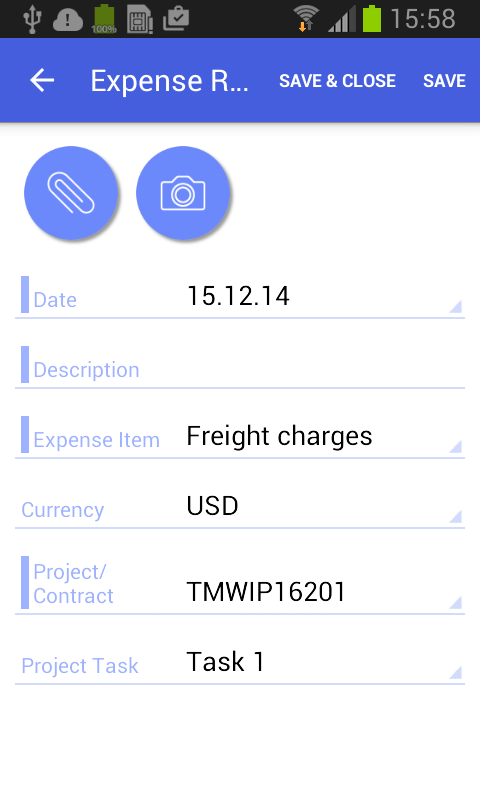
Example: Configuring a Screen with Many-as-One Containers
Some screens include multiple containers that are displayed as one container.
The screen in this example includes the ReceiptDetails and ReceiptClassification containers, which have a many-as-one relationship. You do not declare both containers; instead, you use the Container attribute of the sm:Field tag to display fields from the ReceiptClassification container.
To configure these containers, copy the code below to an .xml file, put the file in the \App_Data\Mobile folder of the MYOB Acumatica website, and start the mobile application.
<?xml version="1.0" encoding="UTF-8"?>
<sm:SiteMap xmlns:sm="http://acumatica.com/mobilesitemap" xmlns:xsi="http://www.w3.org/2001/XMLSchema-instance">

    <sm:Folder DisplayName="Expense Receipts" Type="HubFolder" Icon="system://NewsPaper" >
        <sm:Screen Id="EP301010" Type="SimpleScreen" DisplayName="Expense Receipts" >
            <sm:Container Name="ExpenseReceipts" >
                <sm:Field Name="Date" />
                <sm:Field Name="ClaimAmount" />
                <sm:Field Name="DescriptionTranDesc" />
                <sm:Field Name="Currency" />

                <sm:Action Name="addNew" Context="Container" Behavior="Create" Redirect="true" Icon="system://Plus" />
                <sm:Action Name="editDetail" Context="Container" Behavior="Open" Redirect="true" />
                <sm:Action Name="Delete" Context="Selection" Behavior="Delete" Icon="system://Trash" />
            </sm:Container>
        </sm:Screen>
    </sm:Folder>

    <sm:Screen Id="EP301020" Type="SimpleScreen" Icon="system://Display1" DisplayName="Expense Receipt" Visible="false" OpenAs="Form">
        <sm:Container Name="ReceiptDetails" >

            <sm:Field Name="Date" />
            <sm:Field Name="Description" />
            <sm:Field Name="ExpenseItem" />
            <sm:Field Name="Currency" />

            <sm:Field Name="ProjectContract" Container="ReceiptClassification" />
            <sm:Field Name="ProjectTask" Container="ReceiptClassification" />

            <sm:Action Name="Save" Context="Record" Behavior="Save" />
            <sm:Action Name="Cancel" Context="Record" Behavior="Cancel" />
        </sm:Container>
    </sm:Screen>
</sm:SiteMap>
The following screenshot shows the resulting screen in the mobile application.
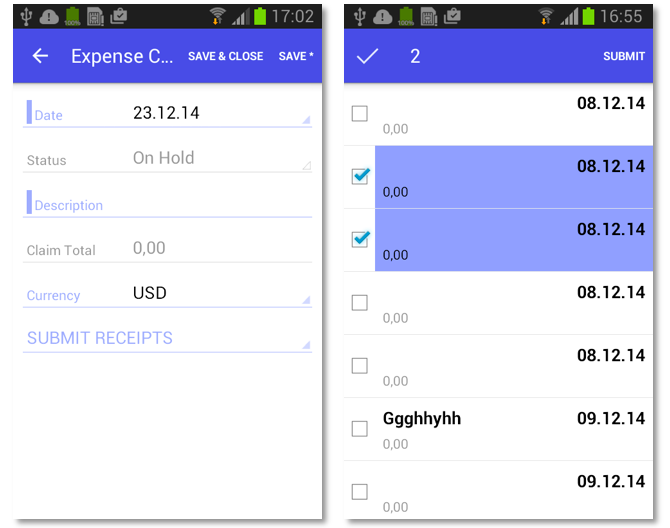
Example: Configuring a Screen with Many-to-One (Master-Detail) Containers with Multi-Selection
MYOB Acumatica includes a special type of container that supports multi-selection—selection of multiple items or options.
To see an example of configuring a container with multi-selection, copy the code below to an .xml file, put the file in the \App_Data\Mobile folder of the MYOB Acumatica website, and start the mobile application.
<?xml version="1.0" encoding="UTF-8"?>
<sm:SiteMap xmlns:sm="http://acumatica.com/mobilesitemap" xmlns:xsi="http://www.w3.org/2001/XMLSchema-instance">

    <sm:Folder DisplayName="Expense Claims" Type="HubFolder" Icon="system://Folder" IsDefaultFavorite="true">
        <sm:Screen Id="EP301030" Type="FilterListScreen" DisplayName="Expense Claims" Visible="true" >

            <sm:Container Name="Selection">
                <sm:Field Name="Employee"/>
            </sm:Container>

            <sm:Container Name="Claim" >
                <sm:Field Name="Date" />
                <sm:Field Name="Status" />
                <sm:Field Name="Description" />
                <sm:Field Name="ClaimTotal" />

                <sm:Action Name="CreateNew" Context="Container" Behavior="Create" Redirect="true" Icon="system://Plus" />
                <sm:Action Name="EditDetail" Context="Container" Behavior="Open" Redirect="true" />
            </sm:Container>
        </sm:Screen>
    </sm:Folder>

    <sm:Screen Id="EP301000" Type="SimpleScreen" DisplayName="Expense Claim" Visible="false" OpenAs="Form">

        <sm:Container Name="DocumentSummary" >
            <sm:Attachments Disabled="true"/>

            <sm:Field Name="Date" />
            <sm:Field Name="Status" />
            <sm:Field Name="Description" />
            <sm:Field Name="ClaimTotal" />
            <sm:Field Name="Currency" />

            <sm:Action Name="Save" Context="Record" Behavior="Save" />
            <sm:Action Name="Cancel" Context="Record" Behavior="Cancel" />
        </sm:Container>

        <sm:Container Name="SubmitReceipts" Type="SelectionActionList" >
            <sm:Field Name="Description" />
            <sm:Field Name="Date" />
            <sm:Field Name="ClaimAmount"  />
            <sm:Action Name="SubmitReceipt" Context="List" Behavior="Void" Icon="system://Plus" />
        </sm:Container>

    </sm:Screen>
</sm:SiteMap>
In the code, you enable multi-selection by setting
the container type with Type="SelectionActionList" and specifying
the action context with Context="List".
The screenshots below show the resulting screen in the mobile application.
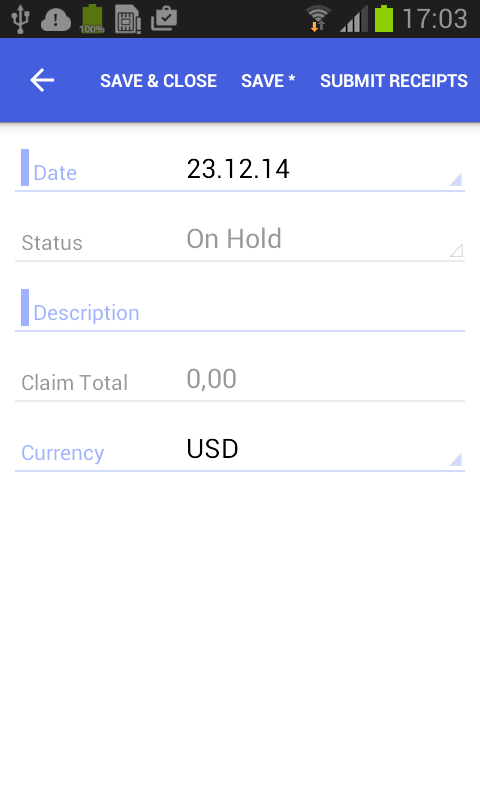
Example: Configuring a Screen with a Container Link
In the mobile application, a container can contain a link to another container on the action panel or on the screen among the fields. To create a container link on the action panel, use the sm:ContainerLink tag, as the following example shows.
To see an example of creating a container link on the action panel, copy the code below to an .xml file, put the file in the \App_Data\Mobile folder of the MYOB Acumatica website, and start the mobile application.
<?xml version="1.0" encoding="UTF-8"?>
<sm:SiteMap xmlns:sm="http://acumatica.com/mobilesitemap" xmlns:xsi="http://www.w3.org/2001/XMLSchema-instance">

    <sm:Folder DisplayName="Expense Claims" Type="HubFolder" Icon="system://Folder" IsDefaultFavorite="true">
        <sm:Screen Id="EP301030" Type="FilterListScreen" DisplayName="Expense Claims" Visible="true" >

            <sm:Container Name="Selection">
                <sm:Field Name="Employee"/>
            </sm:Container>

            <sm:Container Name="Claim" >
                <sm:Field Name="Date" />
                <sm:Field Name="Status" />
                <sm:Field Name="Description" />
                <sm:Field Name="ClaimTotal" />

                <sm:Action Name="CreateNew" Context="Container" Behavior="Create" Redirect="true" Icon="system://Plus" />
                <sm:Action Name="EditDetail" Context="Container" Behavior="Open" Redirect="true" />
            </sm:Container>
        </sm:Screen>
    </sm:Folder>
    <sm:Screen Id="EP301000" Type="SimpleScreen" DisplayName="Expense Claim" Visible="false" OpenAs="Form">

        <sm:Container Name="DocumentSummary" >
            <sm:Attachments Disabled="true"/>

            <sm:Field Name="Date" />
            <sm:Field Name="Status" />
            <sm:Field Name="Description" />
            <sm:Field Name="ClaimTotal" />
            <sm:Field Name="Currency" />

            <sm:ContainerLink Container="SubmitReceipts" Control="Button"/>

            <sm:Action Name="Save" Context="Record" Behavior="Save" />
            <sm:Action Name="Cancel" Context="Record" Behavior="Cancel" />
        </sm:Container>

        <sm:Container Name="SubmitReceipts" Type="SelectionActionList" >
            <sm:Field Name="Description" />
            <sm:Field Name="Date" />
            <sm:Field Name="ClaimAmount"  />
            <sm:Action Name="SubmitReceipt" Context="List" Behavior="Void" Icon="system://Plus" />
        </sm:Container>

    </sm:Screen>
</sm:SiteMap>
In this code, you can open the SubmitReceipts container by using
the button in the action panel (because of the Control="Button"
attribute of sm:ContainerLink).
To locate the container link among the screen fields, you use the
Control="ListItem" attribute instead of the
Control="Button" one. To set the exact position of the
container link among the screen fields, specify the appropriate value for the
Priority attribute.