
Time and Expenses: Track Time with a Click
Say goodbye to manual time tracking if your company:
- Employs hourly workers
- Bills customers based on labor costs
- Has employees log time spent on project tasks each day
To simplify this process, MYOB Acumatica 2025.2.200 introduces streamlined time tracking.
Once time tracking is set up, you open the project task and clock in—the new timer on the Project Tasks (PM302000) form starts tracking your time automatically. When you clock out, it stops tracking time, and the system logs your working time. No manual entry needed!
- The new Clock In and Clock Out feature in the Experimental group of features is enabled on the Enable/Disable Features (CS100000) form.
- On the Users (SM201010) form, your user account is linked to an employee record.
Read on to learn how to track time simply and create time activities in just a few clicks.
Setting Up Time Types
Get started by using the new Time Log Types (EP209000) form (see below) to define the types of time that can be logged. You’ll find the following predefined types:
- Break: For break time
- Travel: For travel time
- Work: For work time

Need additional types of time? Just fill in the following columns:
- Type: The ID of the time type.
- Description: A brief description.
- Earning Type: The earning type code, which determines how labor costs are calculated.
Next, to speed up clocking in and out, select the most frequently used type of time as the default one in the Default Time Log Type box on the Time and Expenses Preferences (EP101000) form. (Initially, Work is selected.) This way, users won't need to select it manually each time they start working on a task.
How Time Tracking Works: A Real-World Example
Suppose that you’re an employee working on a project. During the day, you switch between project tasks and need to properly log time for each task. By using the timer, you can easily manage time tracking for one or multiple project tasks.
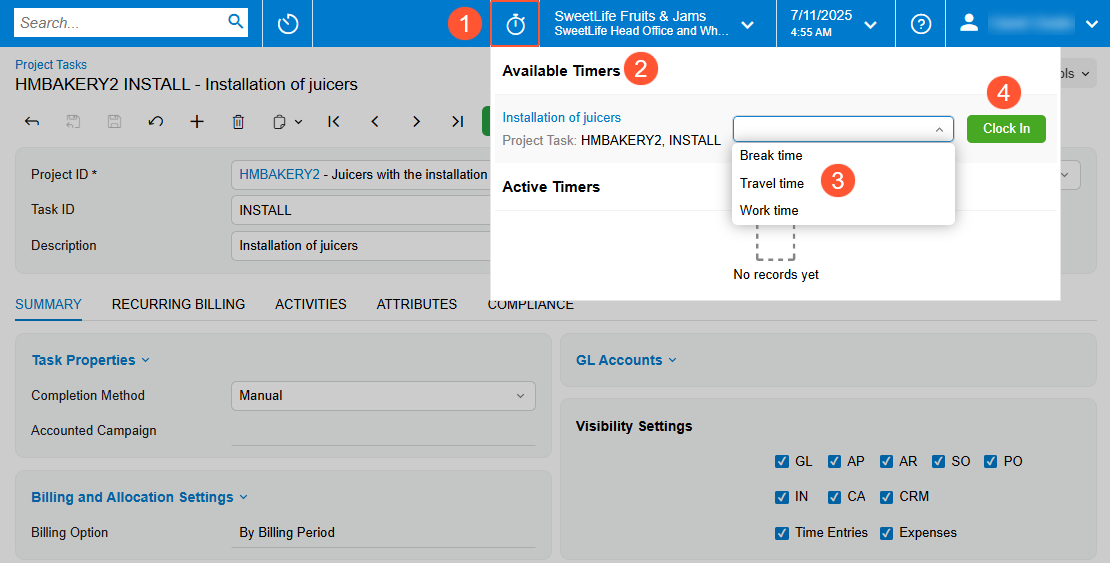
Starting the timer: Here’s how you clock in:
- Open a project task on the Project Tasks (PM302000) form
and click the timer icon (Item 1 below) on the top pane of the screen.
In the timer panel, which opens, notice the current project task selected in the Available Timers section (Item 2).
- Select the time type (Item 3).
- Click Clock In (Item 4). You’re officially on the clock!
Checking your active timers: Once you’re clocked in, this timer moves to the Active Timers section of the timer panel (Item 1 below), and the timer starts counting the working time (Item 2). You’ll see the timer icon, the timer and the project task’s name in the timer area on the top pane (Item 3) for easy reference.
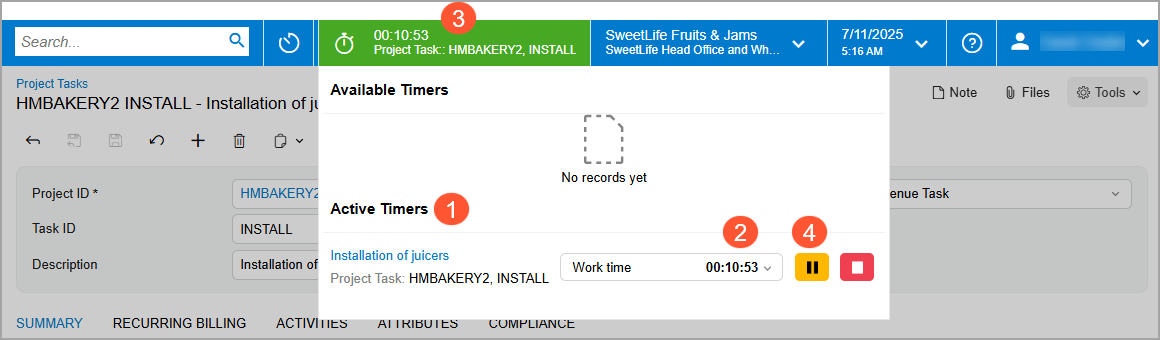
Collapsing the timer panel: Click anywhere outside the panel to collapse it. On the top pane, you’ll still see the timer area—which shows the timer icon, the timer, and the task name. Click the timer icon to expand the panel.
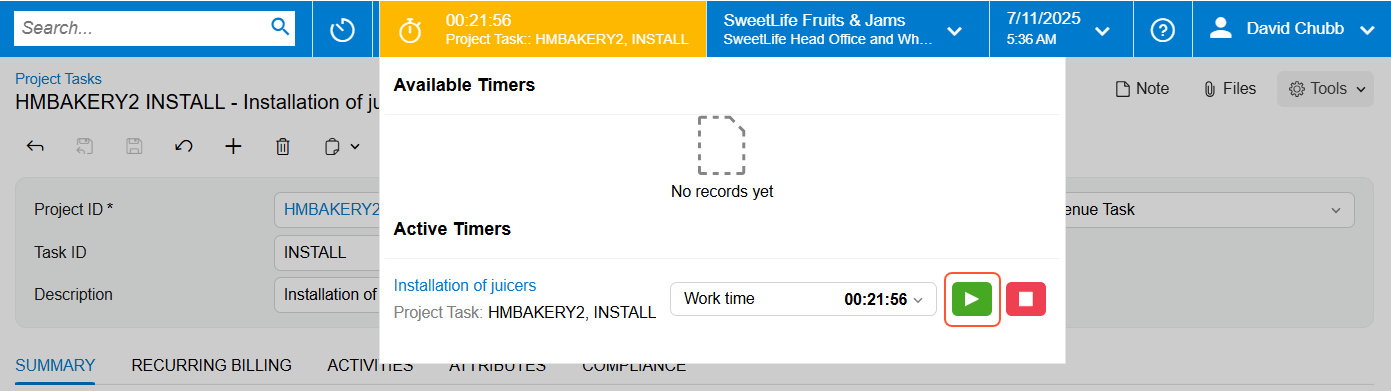
Switching tasks: Now suppose that another project task demands your immediate attention. No problem! You can pause the timer for the current task or leave it running. Then open the new task and click anywhere in the timer area of the top pane. You’ll see the timer with the new task in the Available Timers section, while the timer for the current task remains in the Active Timers section (shown below).
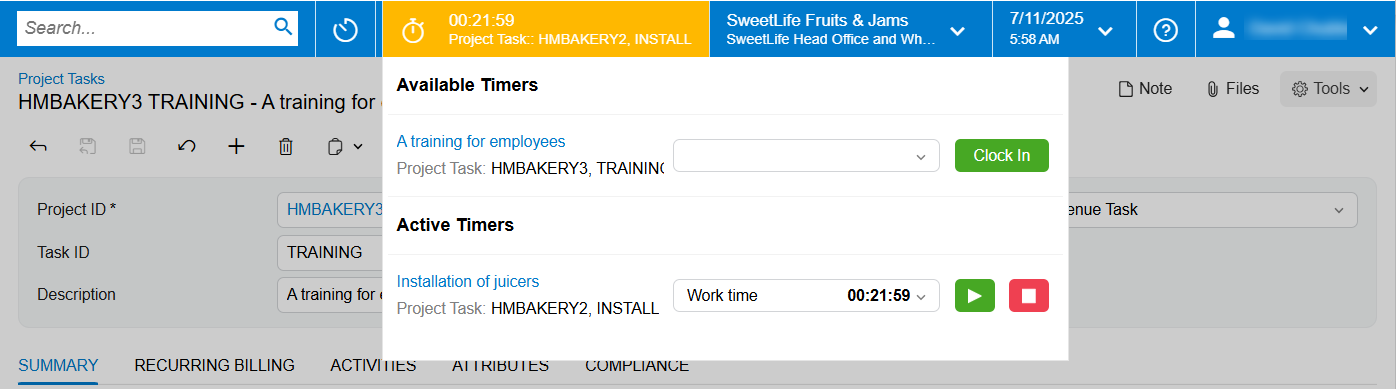
Click Clock In to start tracking time for the new task. The second timer starts running and appears in the Active Timers section (see below).
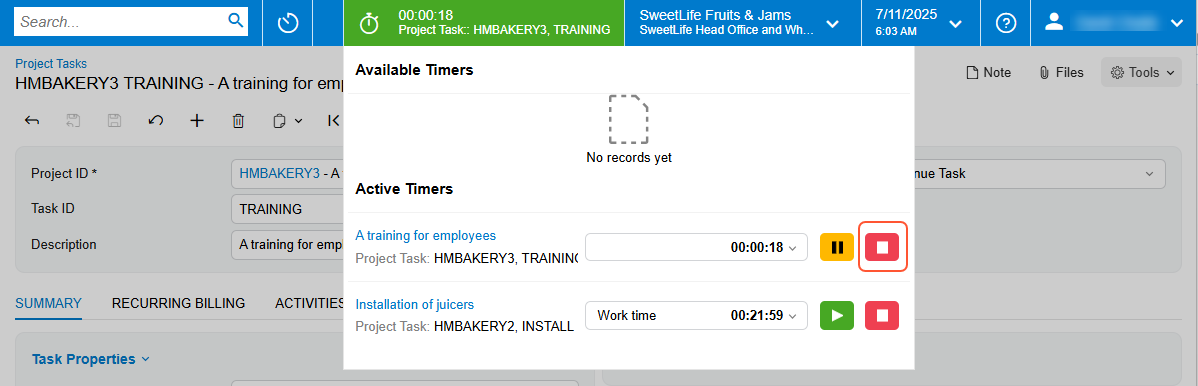
Clocking out: When you finish working on a task, click Stop (shown above). The system stops the timer and creates a time log automatically—no need to remember or calculate times.
Reviewing the Time Log
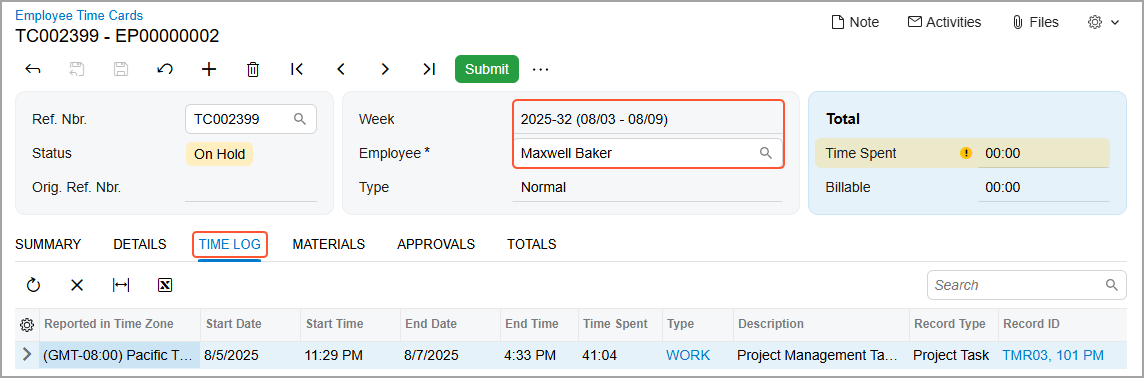
- How much logged time is spent on the activity
- Which projects, project tasks or both are associated with the activity
- What the activity's earning type is
- Whether the activity is billable or non-billable
Updating the Time Log
For each time log entry on the Employee Time Cards (EP305000) form for which no time activity has been created yet, you can change:
- The time type
- The logged hours
- Entry descriptions
- Start and end times
You cannot change:
- The linked project and project task
- The time zone where the time entry was recorded
If a time activity based on the time log entry already exists, you must delete it before you make changes to the time log entry.
Creating Time Activities
Once you’ve reviewed an employee’s time logs, you can create time activities based on the time entries—in one click. To do this:
- Open the Employee Time Cards (EP305000) form.
- Go to the Summary tab.
- On the table toolbar, click Load from Time Log button (shown below). The system creates time activities based on the time logs.
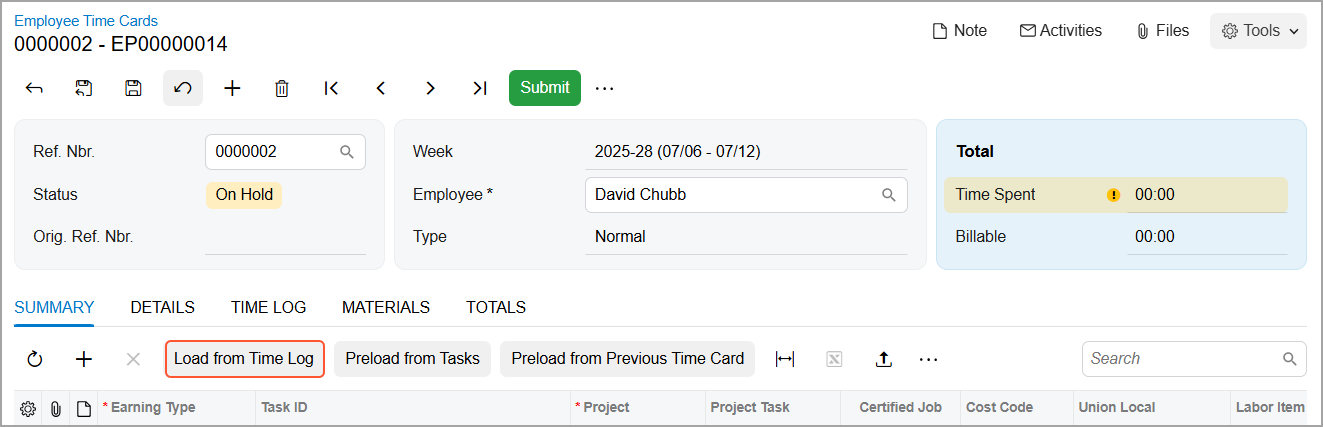
When you create time activities from time logs, the system fills in the following columns on the Summary tab of the Employee Time Cards form based on each time log:
- Project
- Project Task
- Cost Code
If the system has left these columns empty, you need to populate them manually to be able to save the time card. The columns could be left empty in either or both of the following cases:
- Access to the project is restricted for employees, and the employee who ran the timer hasn't been added to the Employees tab of the Projects (PM301000) form.
- Time tracking is turned off for the project or project task.
To confirm that a time activity is linked to a time log, go to the Details tab of the Employee Time Cards form and review the Time Log check box. (The column is hidden by default, but you can make it visible by using the Column Configuration dialog box.) If it's selected, then the time activity has a link to the time log.
Key Takeaways
- Time tracking for project tasks is now built into your workflow—just click to start or stop.
- Timers automatically log working time and reduce manual input.
- You can manage multiple active timers, switch tasks, pause, and resume as needed.
- Time logs are easy to review, update, and convert into time activities.
Learn More
See these topics for more information: