
Projects and Construction: Project Document Management
In construction, where timelines are tight and precision is critical, you need centralized, reliable control of project-related documents—from field photos and safety reports to RFIs. MYOB Acumatica 2025.2.200 introduces enhanced document management functionality that securely stores files, makes them easily searchable through tagging, and provides real-time access from one place. With robust access rights management, you can maintain full control over sensitive documentation and confidently protect critical information.
These enhancements eliminate disorganization and limited collaboration, reduce the risk of lost or outdated information through version control, and ensure seamless project documentation management. Your teams stay connected, organized, and focused on delivering projects with accuracy and speed. Whether you’re in construction, engineering, or software development, this new functionality boosts productivity and streamlines collaboration.
Ready to learn more? We’ll guide you through it.
New Capabilities
- Centralized file storage
- Easy management of documents for office and field staff
- Efficient version control
- Easy uploading, downloading, and viewing of files through the user-friendly interface
Typical Use Cases
Use Case 1: Streamlined File Management for Construction Teams
A project coordinator on a construction site manages hundreds of documents—all critical to daily operations. Instead of juggling files across email threads and shared folders, the coordinator uploads everything to MYOB Acumatica’s document management system grouping files by project and tagging them by category. Whether it’s a PDF permit, a DWG drawing, or a Word-based report, the system supports it and makes it easy to find.
When another team member needs the latest RFI, they don’t have to guess which one is correct—version control ensures that only the most current file is visible. And due to role-based access, only the right people can view, edit, and approve documents. This transforms a scattered, error-prone process into one that’s streamlined, accurate, and secure.
Use Case 2: Handling of a Project Claim
A project manager must respond to a legal claim from a subcontractor over unpaid work. To build a defense, they need to gather key documents—such as invoices, signed agreements, and progress photos—to verify the project’s payment history and progress. Instead of digging through outdated folders or looking for email attachments, they turn to MYOB Acumatica’s document management system.
Within minutes, the manager locates all the needed files, thanks to clear tagging and organized storage by record type and document category. Everything is easy to find and fully traceable. The manager exports the files and shares them with legal counsel the same day—reducing delays and supporting their case with complete documentation.
Easily Access Project File Management
From the Document Management workspace category, click the links to quickly go to these forms:
- Configure Tags (PM201500)
- Manage Project Files by Tag (PM509000)
- Manage Project Files by Record Type (PM509500)
The links to these forms appear in the Construction, Project Management, and Projects workspaces available depending on the features enabled in your system.
Overview: Configuration of Tag and File Access
You start configuring access to project files by setting up tags on the new Configure Tags (PM201500) form, shown below. Tags are labels you assign to files to control role-based access to them. You perform these general steps:
- Assigning access rights to the Untagged node for all files without tags.
- In the Tags pane, creating tags (each represented by a node) under the All Tags node.
- In the Access Rights table, assigning each role’s access level to the selected tag.
- Repeating the two previous steps as needed for each tag.
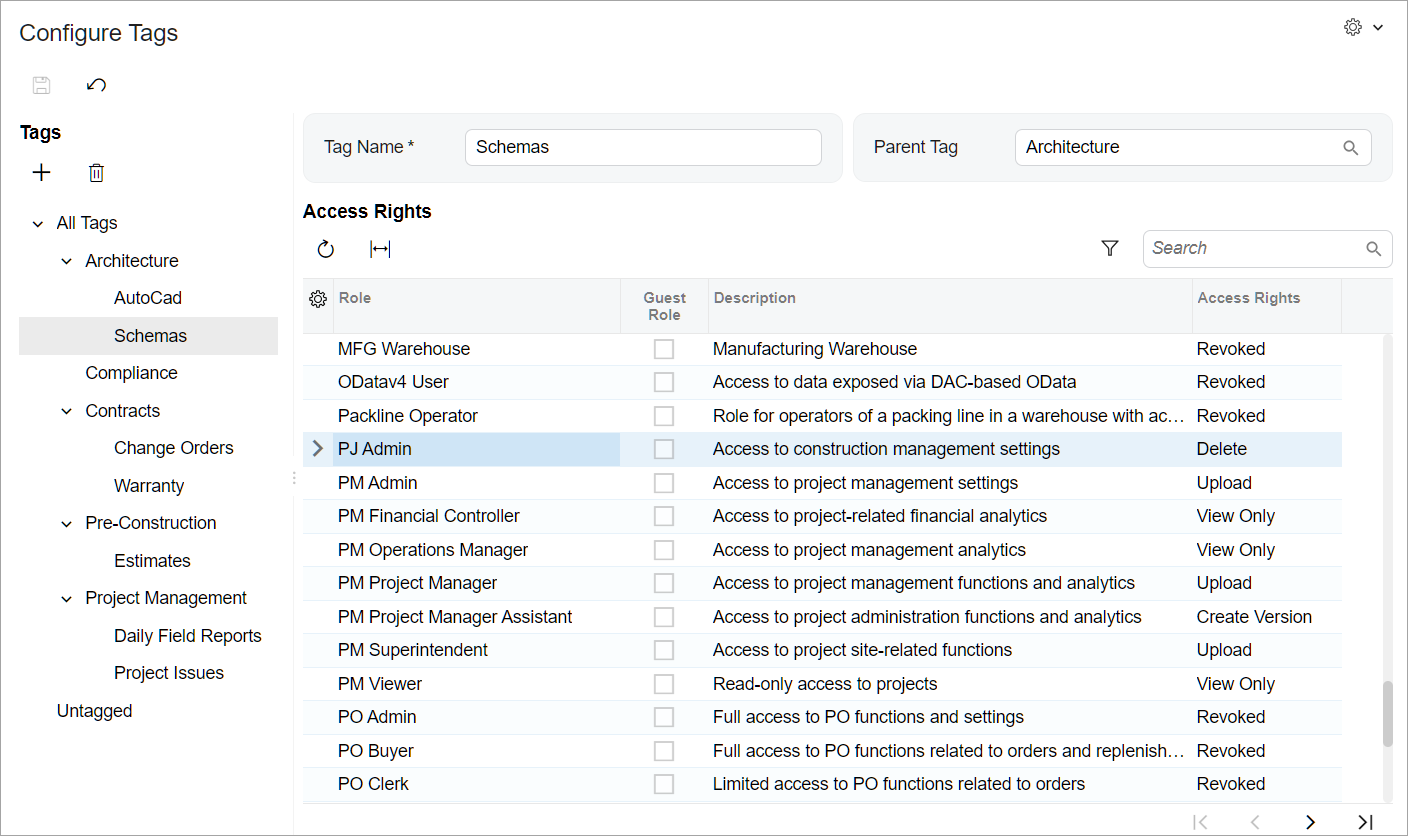
Each user role’s assigned access level determines what users with the role assigned can do. A tag’s assigned role, then, controls how the role’s users can work with files that have the tag. For each user role, you assign one of these access levels to a tag, determining how a file with the tag can be used:
- Revoked: Users can't access the tag or its files.
- View Only: View and download.
- Create Version: View, download, check out, and upload new versions.
- Upload: View, download, check out, upload new files or versions, and assign the tag.
- Delete: Perform all actions plus delete.
Set Up Tag-Based Access to Project Files
Now that you understand the basics, here’s how to set up tag-based access to project files step by step.
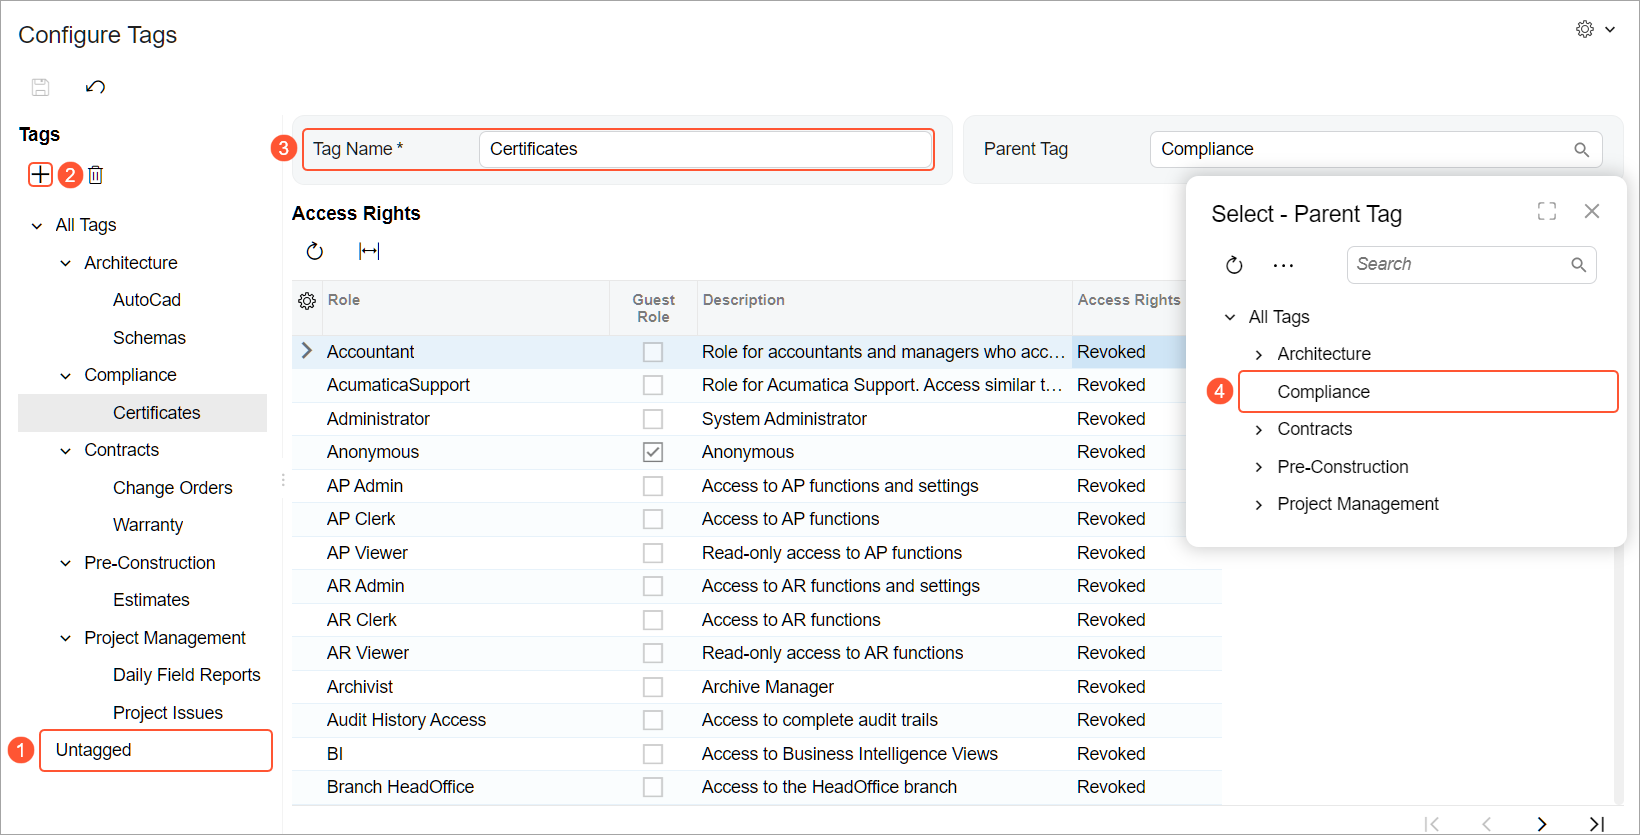
In an out-of-the-box system, the following default system nodes appear on the Tags pane of the Configure Tags (PM201500) form:
- All Tags: This is the top-level node under which you create all tags.
- Untagged: This node corresponds to a system tag that’s invisible to users. The system adds this tag to each file with no other tags.
Start by assigning access rights to the Untagged node (Item 1 below). The system applies these access rights to all files without tags.
Then create tags under the All Tags node. You can create tags within tags for better visibility and easier maintenance—but note that access rights aren’t actually inherited. Add a new tag by clicking Add in the Tags pane (Item 2) and entering the tag's name (Item 3). To nest the tag under another tag, select that tag in the Parent Tag box (Item 4); otherwise, the tag will be under All Tags.
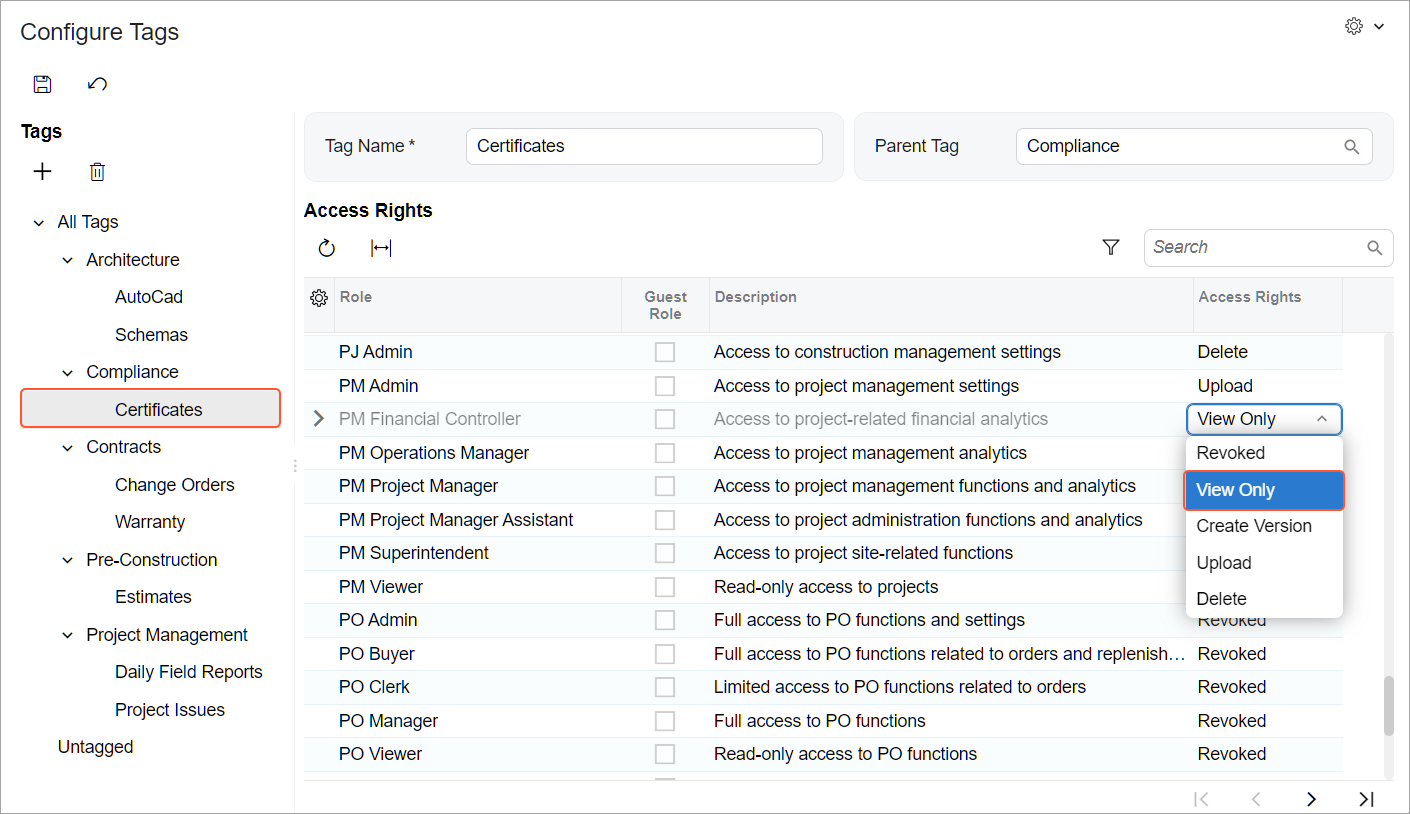
For each role an employee might have while working with projects, select the needed access level in the Access Rights column (see below). The default access level, Revoked, is assigned to the remaining user roles, indicating that users with these roles won’t have access to files with this tag.
Now that you’ve created all the tags and assigned access rights to them, tags can be assigned to project files.
Manage All Project Files Centrally
Gone are the days of hunting for project-related files on multiple forms. The new Manage Project Files by Tag (PM509000) form brings together all files attached to a project and its related records in one centralized location. This gives you—and any user with the needed access rights—complete control over your project files.
To start, select the project in the Project box to view its status, manager, and start date. By default, the All Files node is selected (Item 1 below), and the central pane shows all the project’s files.
When you select a tag (Item 2), the system shows only the files associated with that tag. You’ll see each file’s name, the size, latest version details, uploader, and assigned tags (Item 3). The name of the central pane reflects the selected tag (Item 4).
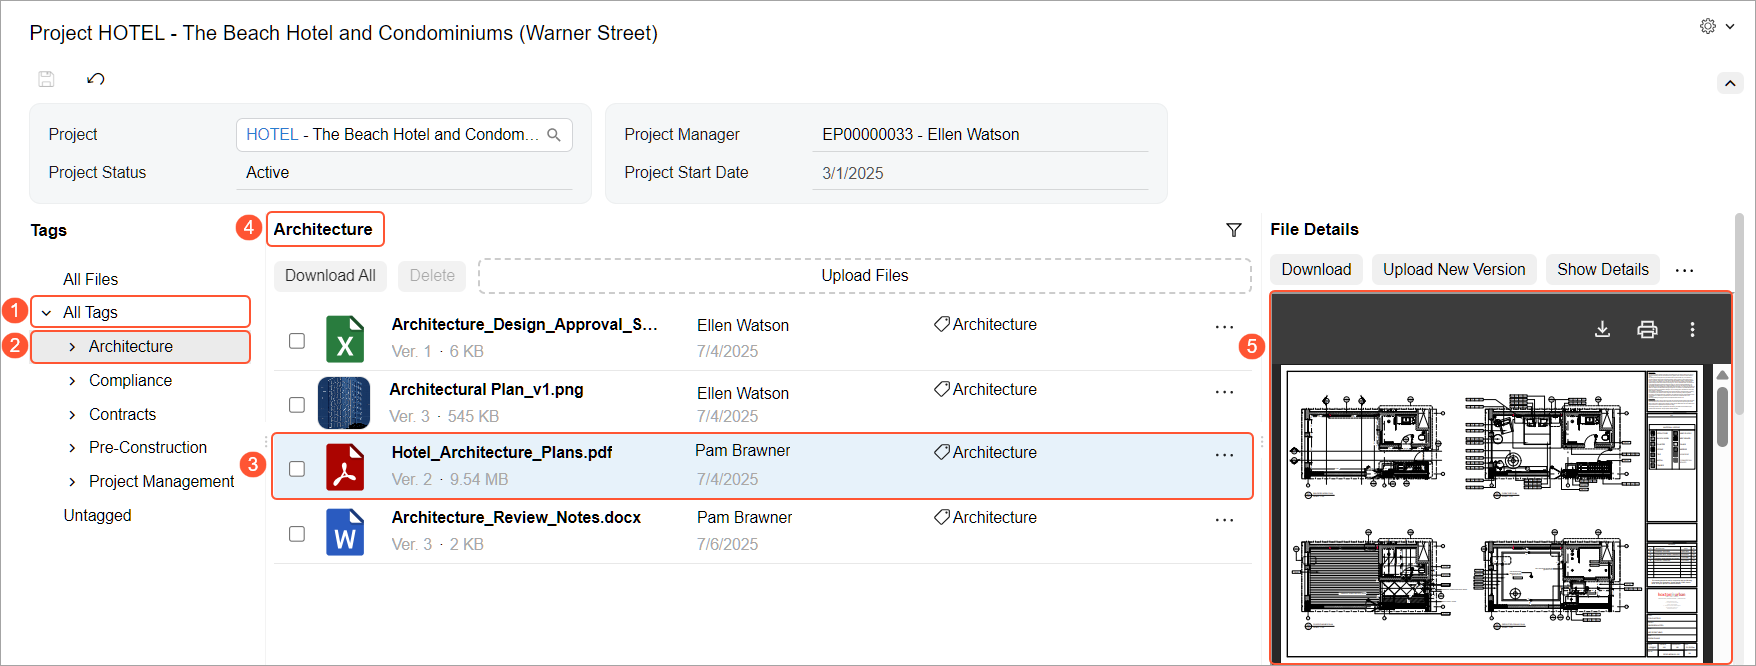
To quickly see a PDF file or image, you can open a preview pane by clicking a line with a file; its contents are shown in the File Details pane (Item 5 above). If you click an image, it opens in a full-screen view.
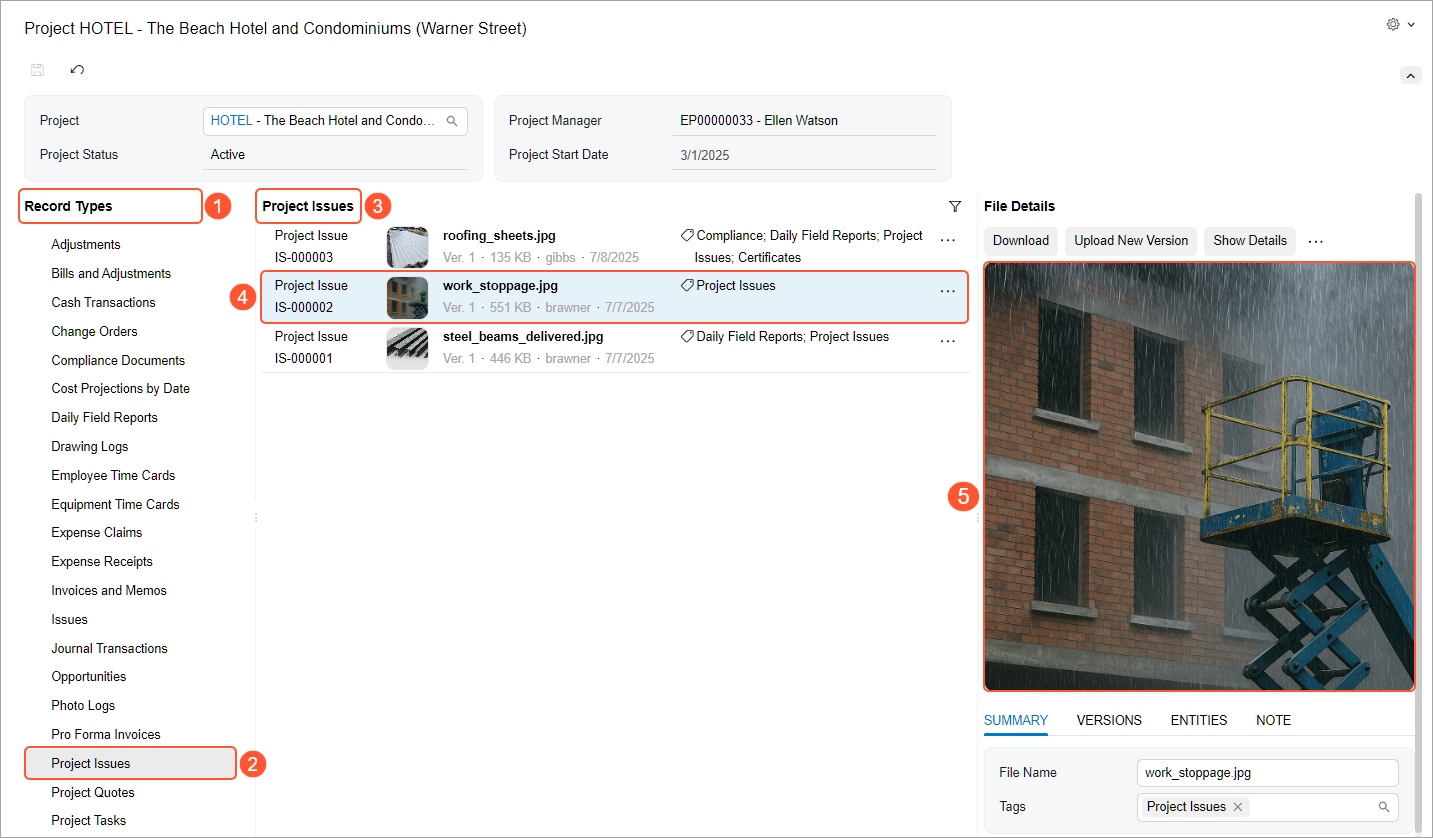
Manage Project Files by Record
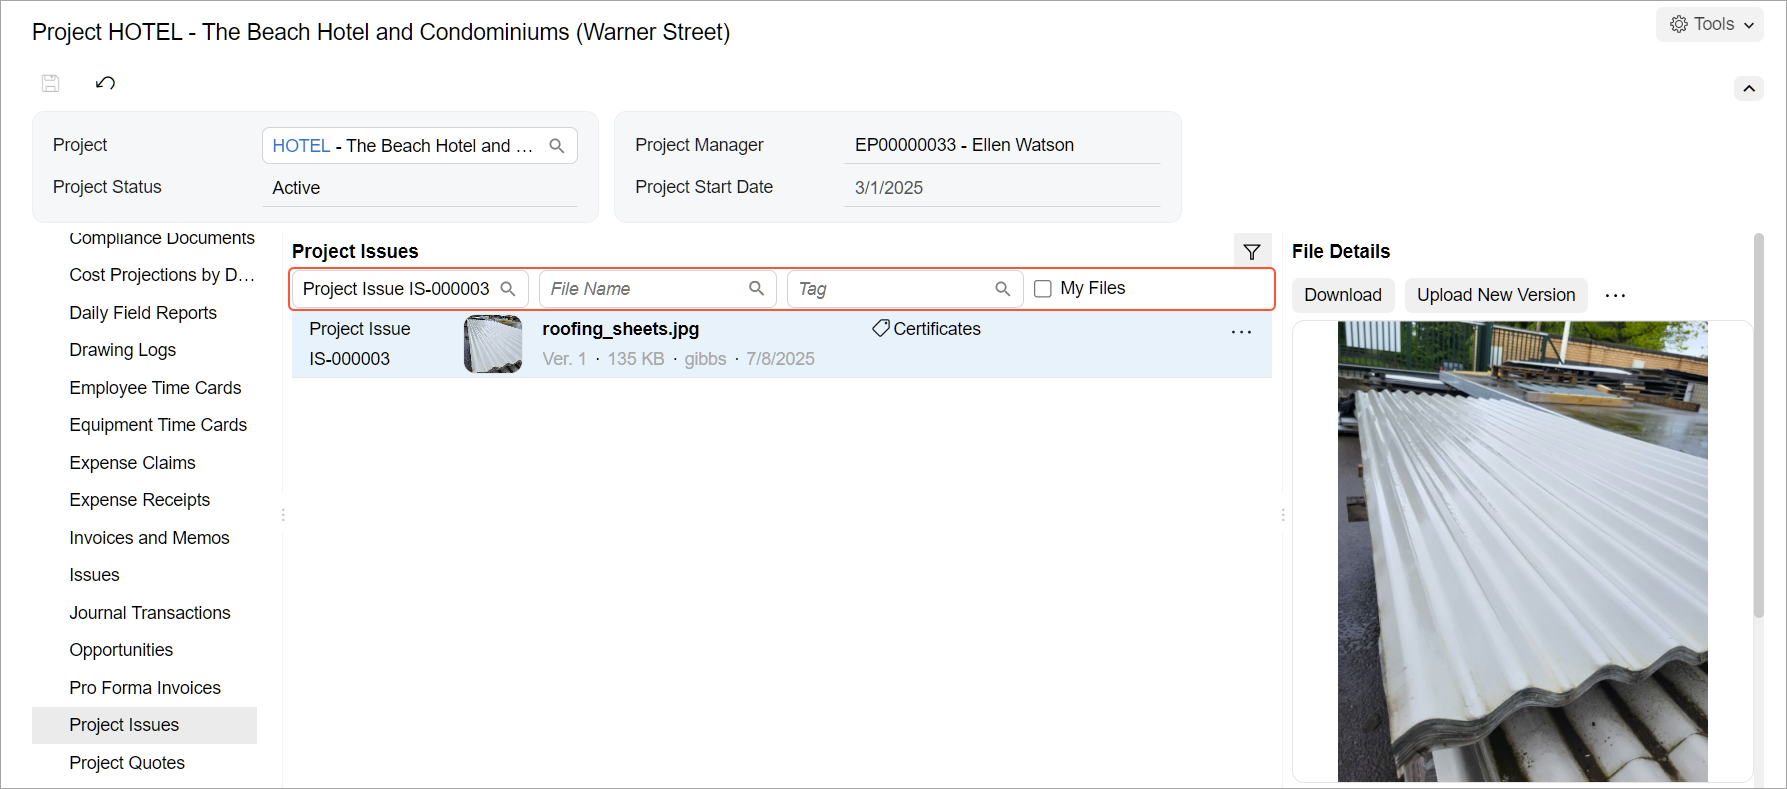
You can easily find all the files related to a project-related record—such as a change order, project issue, or task—in one place. You use the new Manage Project Files by Record Type (PM509500) form, shown below, to manage files attached to or linked to a project-related record.
To start, select a project in the Project box; the system shows its status, manager, and start date. By default, the system selects the first record type in the Record Types pane (Item 1 below).
When you select a record type (Item 2), the central pane shows the files associated with that record type. The name of the central pane (Item 3) reflects the selected record type. For each file, you’ll see the record's ID, the file name, size, uploader, associated tags, and number and upload date of the latest version.
For PDF files and images, click a row with a file (Item 4) to view its contents in the File Details pane (Item 5). If you click an image, it opens in a full-screen view.
Find Files Attached to a Record
If you're looking for a specific file or set of files attached to a project-related record, it's easy to narrow the list or find the file you need. On the Manage Project Files by Tag (PM509000) form, click Filter (Item 1) to open the filtering area (Item 2). Here, you can narrow project-related records by their type, reference number, file name, or tag. To see only the files that you’ve uploaded, select My Files.
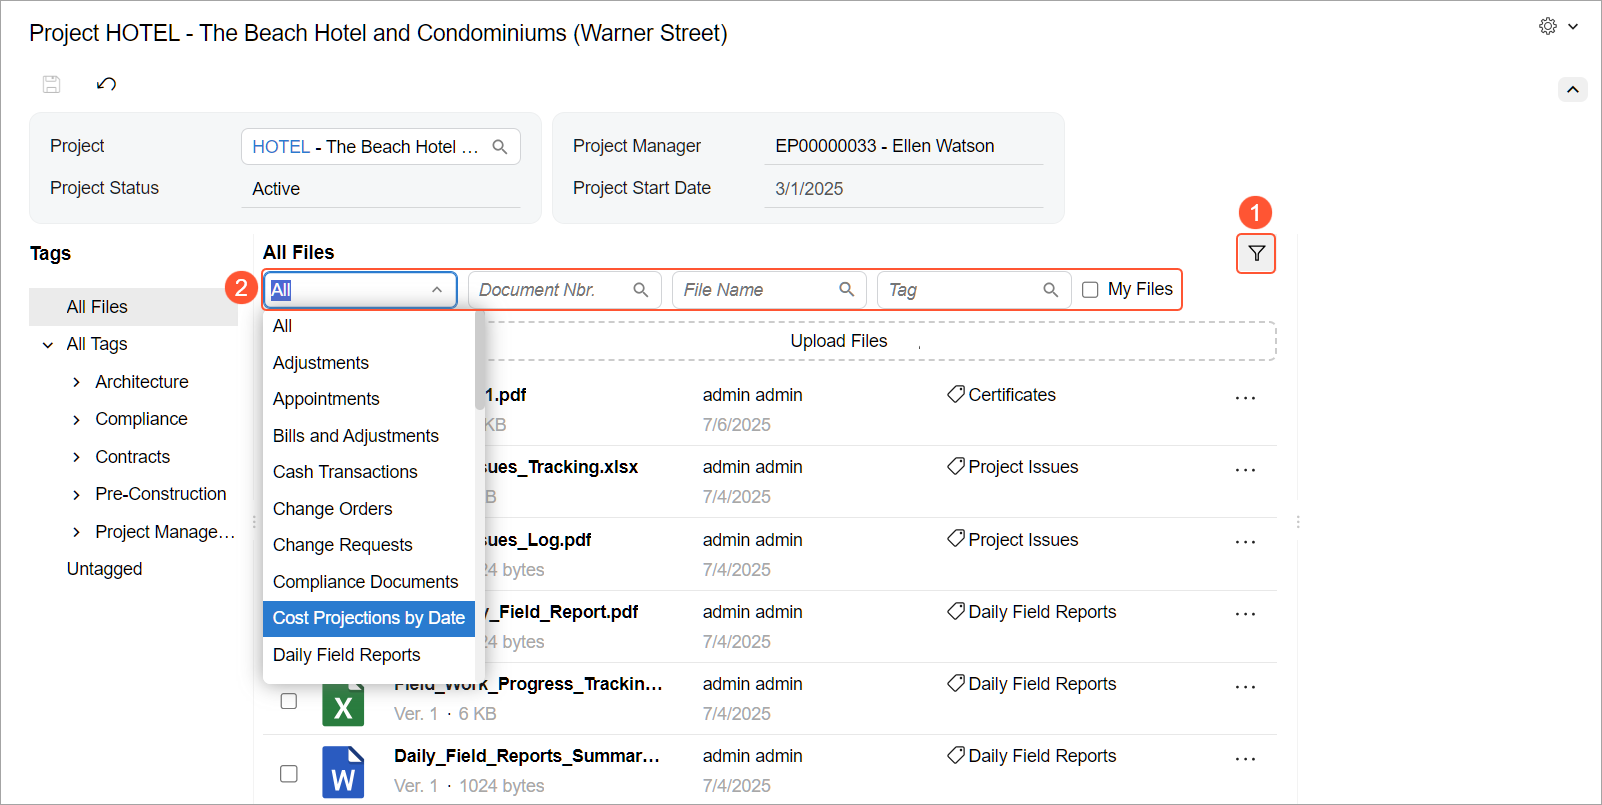
The Manage Project Files by Record Type (PM509500) form includes a similar filtering area that helps you to quickly find the file you need.
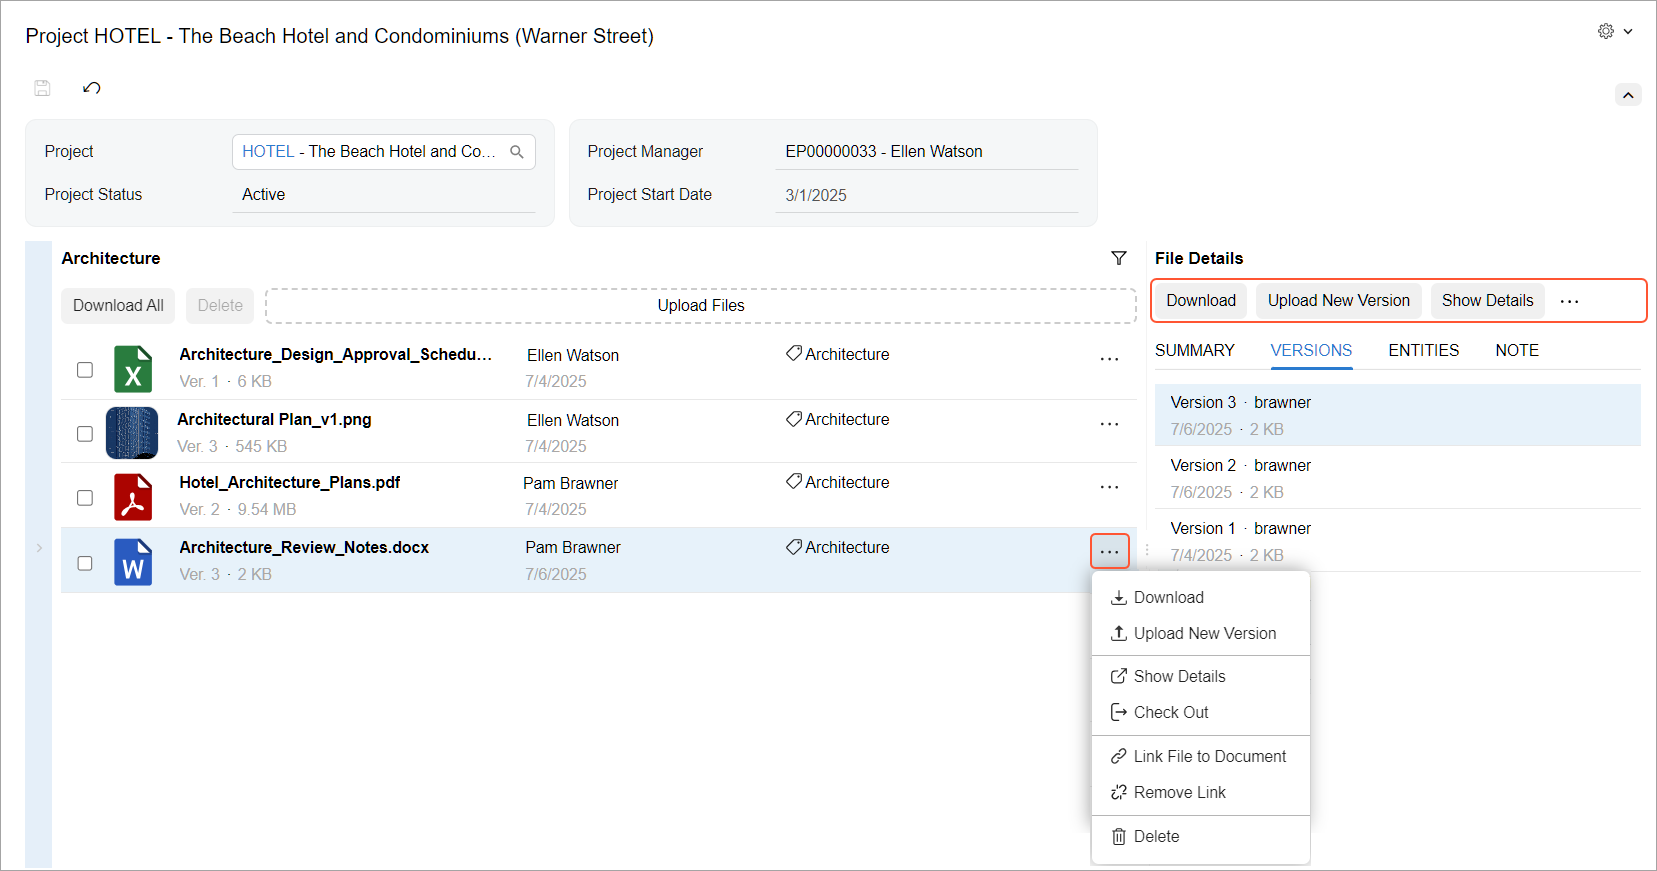
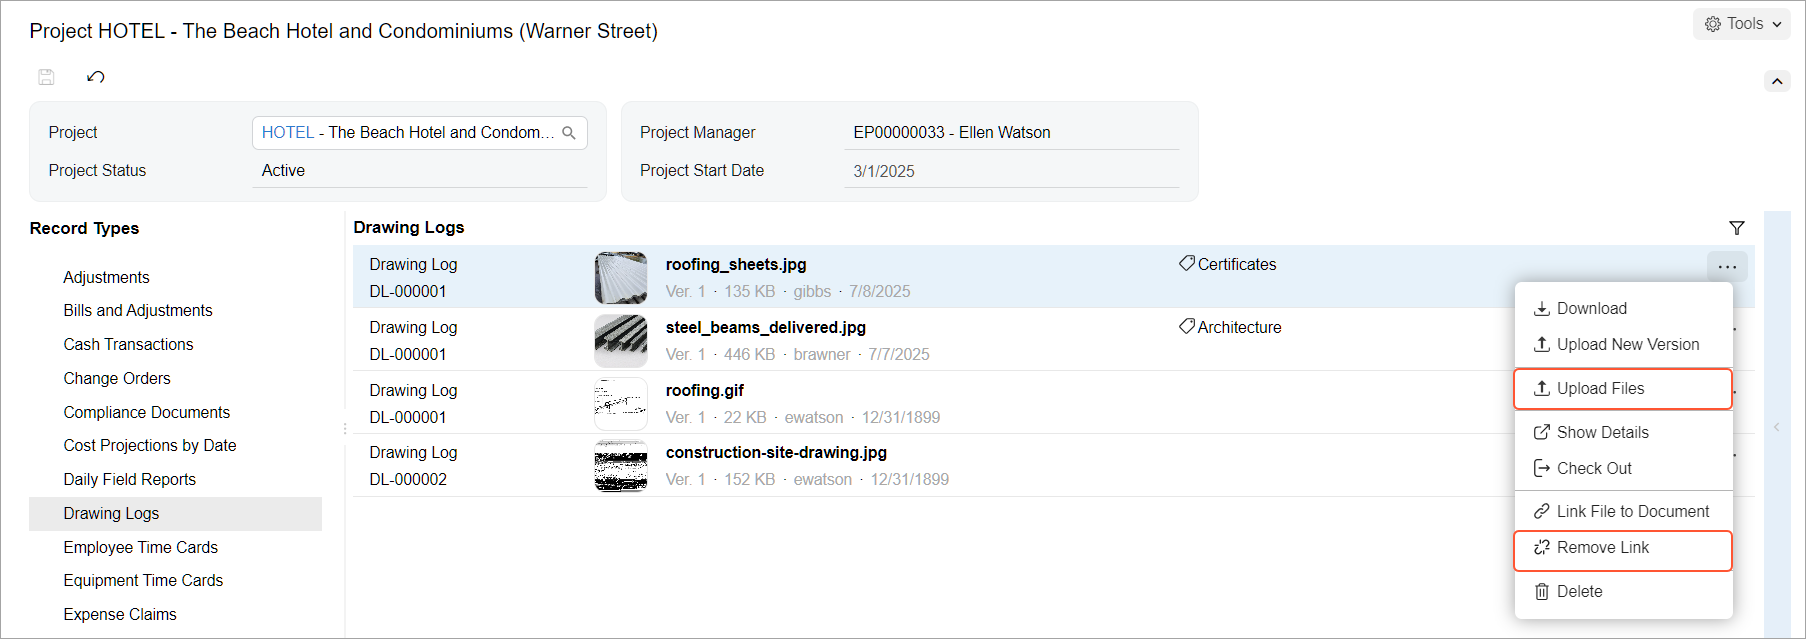
Take Action on Files
On both the Manage Project Files by Tag (PM509000) form and the Manage Project Files by Record Type (PM509500) form, you manage files through the File Details pane toolbar and the row-level More menu (click …). Here you'll find buttons and commands (shown below) to perform these operations:
- Download the latest version of a file
- Upload a new version (with a maximum size of 25,000 KB)
- Open the file on the File Maintenance (SM202510) form
- Check the file out to prevent others from editing it
- Check the file in so other users can edit it
- Link the file to a project-related record
- Remove the link to the file from the related record
- Delete the file
On the Manage Project Files by Record Type form, you can also perform the following operations, as shown below:
- Upload files
- Remove the link to the file from the record
Check Out a File
You check a file out to edit it and prevent others from making changes or deleting it. To do this, click Check Out on the Manage Project Files by Tag (PM509000) or Manage Project Files by Record Type (PM509500) form. In the Check Out File dialog box, enter a reason and then click OK.

The Summary tab of the File Details pane displays information about the checkout.
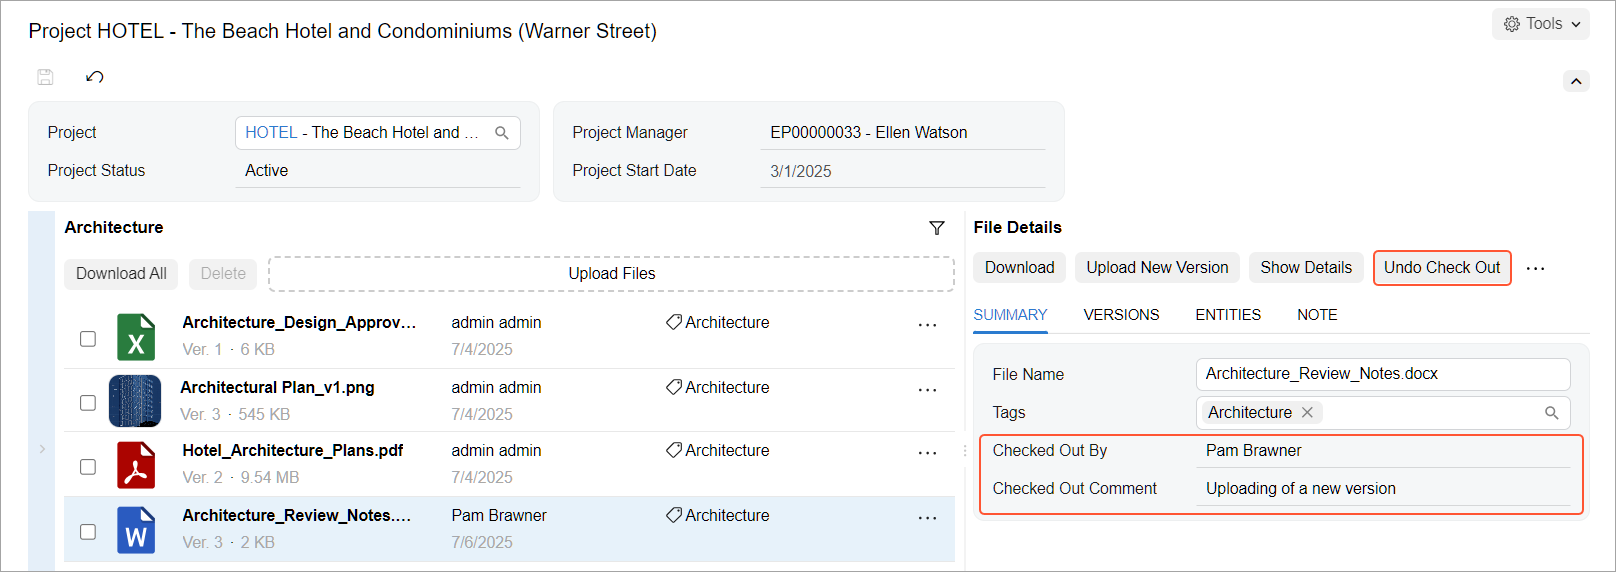
When you're done editing the file, make it available to other users by clicking Undo Check Out on the File Details pane or on the row-level More menu (click …).
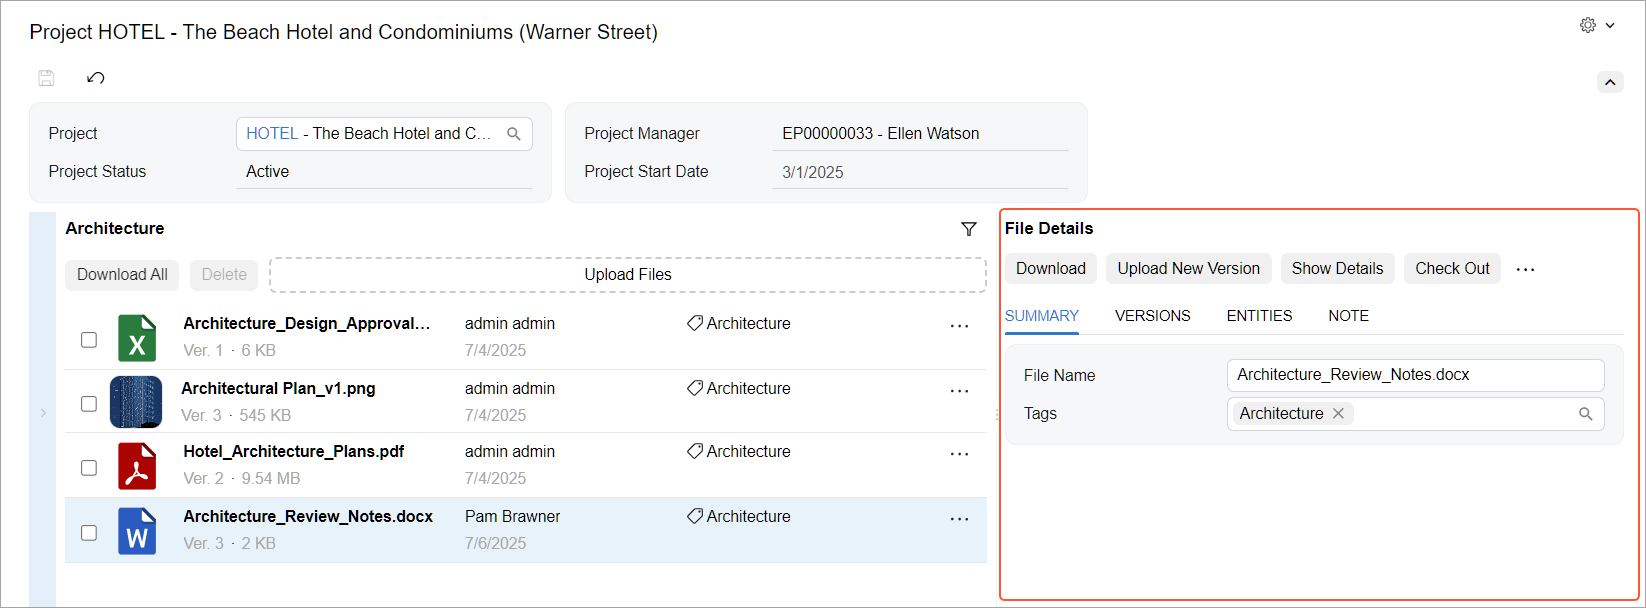
Look Up File Details
You may need to learn more about a file or edit its name. On the Manage Project Files by Tag (PM509000) or Manage Project Files by Record Type (PM509500) form, you can use the following tabs in the File Details pane, as shown below:
- Summary: View and edit the file’s tags and name.
- Versions: Review the file’s version history, including its size, upload dates, and uploader.
- Entities: View the records that the file is attached to and linked to.
- Note: Read or add a note about the file.
Use Additional Tagging Options
When uploading a file directly on the File Maintenance (SM202510) form, you can assign tags to ensure that users have the needed access to it.
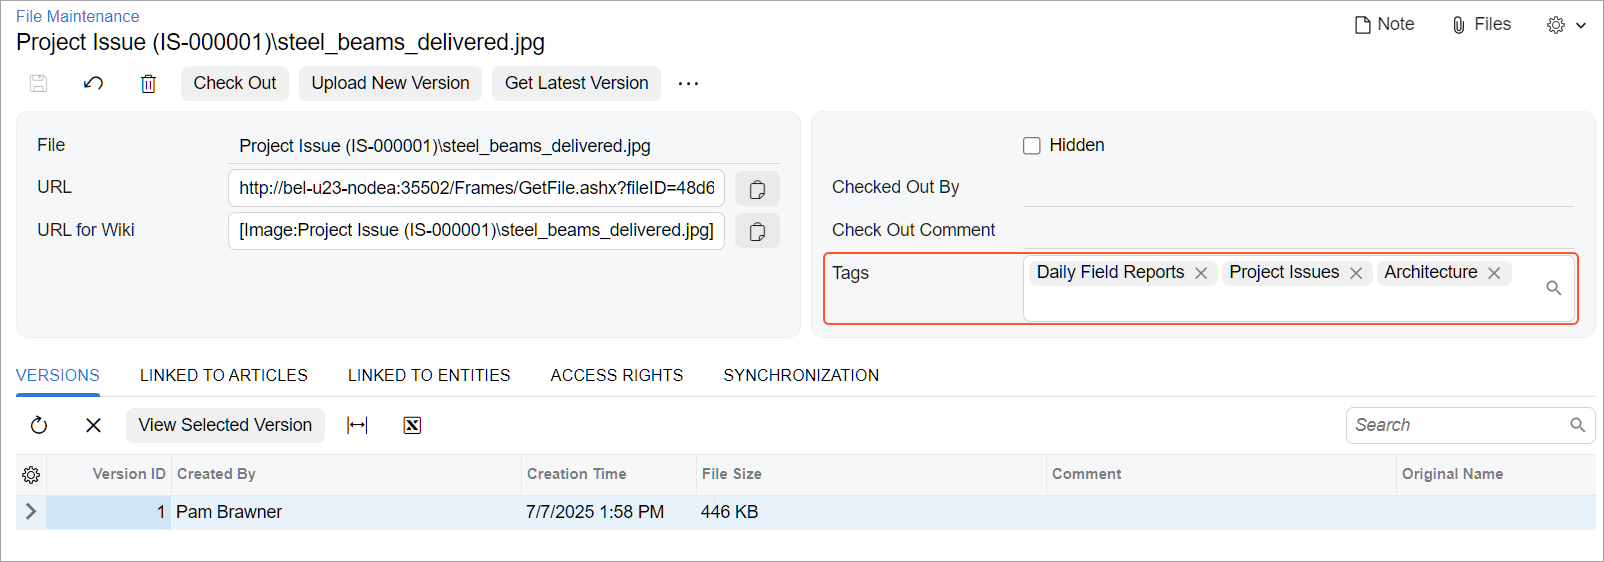
Also, you can add tags to files attached to the Drawing Log (PJ303000), Photo Log (PJ305000), and Photo (PJ305010) forms by using the Tags box on these forms.