
Conditional Properties: To Require an Element
The following activity will walk you through the process of conditionally making a box required on a form.
Story
Suppose that employees of your company often work with the Leads (CR301000) form. Further suppose that if a lead comes from a campaign, you want the user to specify the identifier of the marketing campaign from which the lead was generated on the Leads (CR301000) form. That is, you need to require the user to select an identifier in the Source Campaign box if Campaign is selected as the Source.
Process Overview
By invoking the Element Properties dialog box on the Leads (CR301000) form, you will learn the internal name of the element that will be used in the condition (that is, of the Source Campaign box). By using the Screens page of the Customization Project Editor, you will add the Leads form so that it can be customized. By using the Conditions page, you will create a condition that uses the value of the Source Campaign box. On the Fields page, you will specify the created condition for the Required property for the Owner box; you will then publish the project. Finally, you will test the condition on the Leads (CR301000) form.
System Preparation
Before you begin performing the steps of this activity, do the following:
- Prepare an MYOB Acumatica instance by performing the Customization Projects: To Deploy an Instance prerequisite activity.
- Create the Yogifon customization project by performing the Customization Projects: To Create a Customization Project prerequisite activity.
Step 1: Learning the Internal Name of the Element
First, you need to learn the internal name of the element that will be used in the condition; on the Leads (CR301000) form, this is the Source Campaign box. Do the following:
- On the form title bar of the Leads form, select .
- In the Summary area, click the Source Campaign box.
The Element Properties dialog box opens, as shown in the following screenshot. The internal name of the field is displayed in the Data Field box.
Figure 1. The properties of the Email element 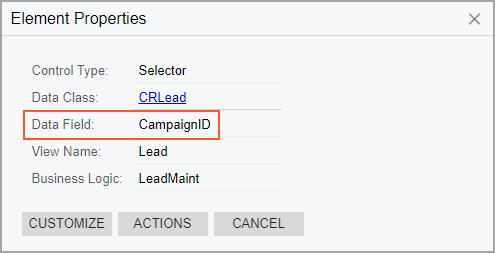
As you can see, the box contains
CampaignID. Close the dialog box.
Step 2: Modifying the List of Customized Screens
To add a condition for a box on the Leads (CR301000) form, you need to add the form to the list of customized screens. In the Customization Project Editor, do the following:
- In the navigation pane, click Screens to open the Screens page.
- On the page toolbar, click Customize Existing
Screen.
The Customize Existing Screen dialog box opens.
- In the Select Screen box of the dialog box, click the magnifier button. In the lookup table, type CR301000 in the Search box, and double-click the Leads form.
- Click OK to close the dialog box.
Notice that the Leads (CR301000) form is added to the list of customized screens on the page.
Step 3: Defining the Condition
To define the condition, do the following in the Customization Project Editor:
- In the navigation pane, click . The Conditions page
opens.Tip:In the name that appears on the page, Conditions: CR301000 (Leads), Conditions is followed by the form ID and then the form name in parentheses.
- On the page toolbar, click Add New Record.
- In the Condition Properties dialog box, which opens, enter the name of the condition: CampaignCondition.
- On the table toolbar, click Add Row.
- In the new row, specify the following settings:
- Field Name: Source
- Conditions: Equals
- From Schema: Selected
- Value: Campaign
- Click OK to save your changes and close the dialog box.
Step 4: Specifying the Condition for the Required Property
To specify the condition you have defined as the value for the
Required
property of the Source Campaign field, do the following:
- In the navigation pane, click . The Fields page
opens.Tip:In the name that appears on the page, CR301000 (Leads) Fields, Fields is preceded by the form ID and then the form name in parentheses.
- On the page toolbar, click Add New Record.
- In the Add Field dialog box, which opens, specify the
following settings:
- Container: Lead (Lead Summary)
- DAC: PX.Objects.CR.CRLead (specified automatically)
- Field Name: Source Campaign
- Display Name: Source Campaign
- In the table, select the unlabeled check box in the only row, and click
Add & Close to save your changes.
The dialog box is closed, and the added field appears in the table on the Fields page.
- In the Required column of the CampaignID row, select CampaignCondition.
- Save your changes.
- To apply the changes to the instance, on the main menu of the Customization Project Editor, click .
- Wait until the Website updated row appears in the Compilation pane, and click Close Compilation Pane.
Step 5: Testing the Condition
To test the condition, do the following on the Leads (CR301000) form of MYOB Acumatica:
- Create a lead.
- In the Contact section of the Contact
Info tab, specify the following settings:
- First Name: Sam
- Last Name: Collins
- Account Name: Muffin Secret
- In the Address section, specify the following
settings:
- City: New York
- Country: US
- In the Lead Class box of the CRM Info tab, select Lead.
- In the table on the Attributes tab, enter Food, Beverages & Tobacco in the Industry row.
- In the Summary area, specify the following settings:
- Source: Campaign
- Source Campaign: Empty
- Try to save your changes.
An error should be displayed.
- In the Source Campaign box, select Partner.
- Save your changes.
Make sure that the system does not display the error and that the record is saved.