
User-Defined Fields in Customization Projects: General Information
By using the MYOB Acumatica Customization Platform, you can add boxes for fields that were already defined in the database of the MYOB Acumatica instance (see Form Layout: General Information for details). If you need to add elements to a form that do not exist in an out-of-the-box system, you have the ability to create user-defined fields. You can then transfer these user-defined fields to another instance by adding them to your customization project.
Learning Objectives
In this chapter, you will learn how to do the following:
- Define an attribute for a user-defined field
- Add the user-defined field to a form
- Add the user-defined field to a customization project
Applicable Scenarios
You add user-defined fields to a customization project if you have made the following changes in your MYOB Acumatica instance and you want to replicate these changes in another instance:
- You have added to a form at least one element that does not exist in an out-of-the-box system.
- Because of the user-defined fields you have added, the company has been able to gather additional information about records, and it wants to gather this information in other instances as well.
User-Defined Fields and Attributes
A user-defined field is based on an attribute: a property (such as age or industry) that you define in MYOB Acumatica so that users can specify additional information for particular entities in the system. Attributes may carry information about such factors as product brand, manufacturer, lead age, gender, or industry. For details, see Attributes.
For some entities, attributes can be assigned to an entity class and displayed on the Attributes tab of the corresponding data entry form. However, the functionality of using the Attributes tab is not available for all entities. In the latter case, attributes can be added as user-defined fields to a fieldset of a data entry form. See User-Defined Fields for a list of the forms that support user-defined fields.
Managing User-Defined Fields of a Form
Adding each user-defined field to a form involves the following steps:
- Selecting or creating the attribute that will be used as the user-defined field.
- Associating the selected field with the desired form.
- Adding the field as a UI element to the desired section of the form.
Associating the Field with the Form
To associate a user-defined field with the form where it will be shown, you open this form and use the Manage User-Defined Fields dialog box (shown in the screenshot below). To open the dialog box, you first turn on Form Configuration mode by clicking the Settings button on the form title bar and then clicking Screen Configuration. Then you click the Manage User-Defined Fields button at the top of the form.
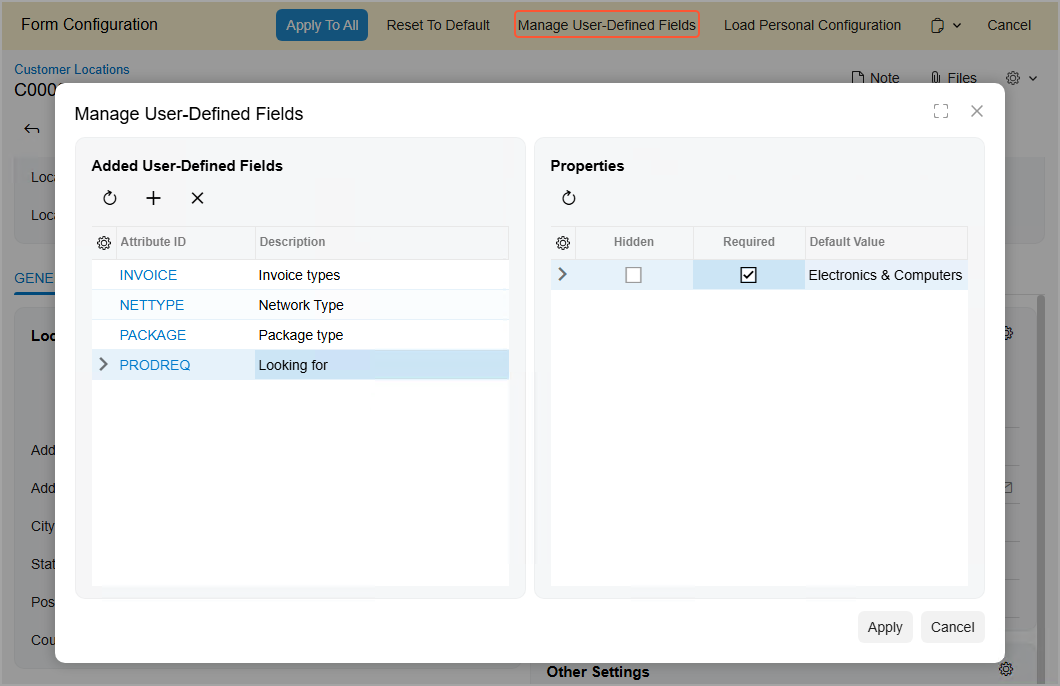
In the Manage User-Defined Fields dialog box, you can perform the following actions:
- To associate a user-defined field with the form, click the Add Row button in the Added User-Defined Fields pane and specify the ID of the attribute in the Attribute ID column.
- To remove a user-defined field from a form, first click the row in the Added User-Defined Fields pane and then click the Delete Row button on the table toolbar.
- To refresh the list of user-defined fields, click the Refresh button on the table toolbar of the Added User-Defined Fields pane.
- To refresh the list of properties, click the Refresh button on the table toolbar of the Properties pane.
- To denote that a field should not be displayed on the form, select the desired field and record type (if the form supports multiple types of records) and select the Hidden check box.
- To mark a field as mandatory, select the desired field and record type (if the form supports multiple types of records) and select the Required check box.
- To specify the field's default value, select the desired field and record type (if the form supports multiple types of records) and specify the value in the Default Value column.
- To close the dialog box and apply the changes to the user-defined fields, click Apply in the lower right corner.
- To close the dialog box without saving any changes, click Cancel in the lower right corner.
Adding a Field to the Form
Once user-defined fields are associated with the form, you can add them to any fieldset of the form by using the Section Configuration dialog box (shown in the screenshot below). To open the dialog box, you first turn on Form Configuration mode by clicking the Settings button on the form title bar and then clicking Screen Configuration. Then you click the Settings button in the top-right corner of the target fieldset.
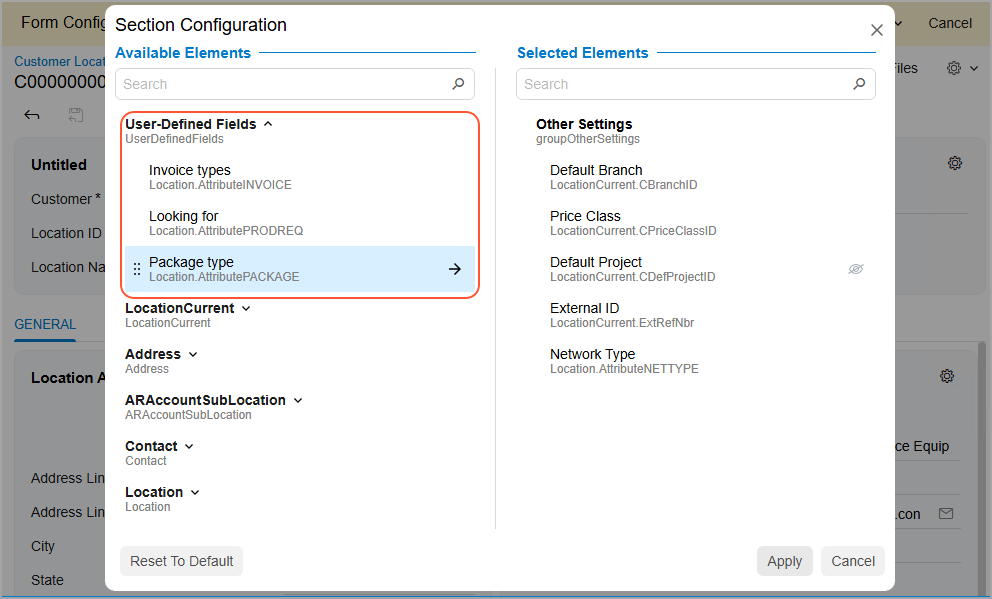
User-defined fields associated with the form are listed under the User-Defined Fields node of the Available Elements pane.
To add a field to the fieldset, locate the field in the Available Elements pane and drag it to the Selected Elements pane.
Once you have added all the needed user-defined fields, click Apply to close the Section Configuration dialog box. Then click Apply to All in the Form Configuration pane to apply the layout changes to the form and turn off Form Configuration mode.
In this way, you can customize any form to display user-defined fields.
User-Defined Fields in a Customization Project
The user-defined fields that you have added to your instance initially exist in only this instance. If you need to have the same fields in another instance, you perform the following general actions:
- In the source instance, you add the user-defined fields to a customization project by using the User-Defined Fields page.
- In the source instance, you export this customization project.
- In the target instance, you import the customization project.
- In the target instance, you publish the customization project.
For details on how to export and import projects, see Project Publication: General Information.