
Project Inventory Tracking by Warehouse Location: To Purchase Materials and Services for a Project
This activity will walk you through the process of purchasing materials and services to a project-specific warehouse location with a purchase order.
Story
Suppose that the HM's Bakery and Cafe customer has ordered two juicers, along with four hours of the installation service from the SweetLife Fruits & Jams company. The SweetLife company contracted the Squeezo Inc. vendor to provide the juicers and perform the installation. SweetLife's project manager has created the project.
Acting as SweetLife's purchasing manager, you will process the purchase of materials and services for the project. When the vendor delivers the juicers to company's warehouse, you will process a purchase receipt for the juicers. When the vendor provides the installation service, you will process an accounts payable bill from the vendor for the delivered juicers and provided service.
Configuration Overview
In the U100 dataset, the following tasks have been performed to support this activity:
- On the Enable/Disable Features (CS100000) form, the
following features have been enabled:
- Projects, which provides support for the project accounting functionality
- Inventory and Order Management, which provides the purchase order functionality
- On the Projects (PM301000) form, the HMBAKERY2 project has been created and the INSTALL project task has been created for the project. This task is the default project task.
- On the Account Groups (PM201000) form, the SUBCON account group has been created. The 54200 (Project Subcontract Expense) account has been mapped to the SUBCON account group.
- On the Warehouses (IN204000) form, the EQUIPHOUSE warehouse has been created, and the HMBAKERY2 location has been created for the INSTALL task of the HMBAKERY2 project.
- On the Vendors (AP303000) form, the SQUEEZO vendor has been created.
- On the Stock Items (IN202500) form, the JUICER10C stock item has been defined.
- On the Non-Stock Items (IN202000) form, the INSTALL non-stock item has been defined. On the General tab, the Require Receipt check box has been cleared. On the GL Accounts tab, 54200 (Project Subcontract Expense) has been selected in the Expense Account box. On the Price/Cost tab, Purchase is selected in the Post Cost to Expenses On box.
Process Overview
On the Purchase Orders (PO301000) form, you will create a purchase order for the project, specifying the project and project task. Then you will create a purchase receipt and release it on the Purchase Receipts (PO302000) form. You will bill the purchase order on the Purchase Orders form and then release the bill on the Bills and Adjustments (AP301000) form. Finally, you will review the project balances on the Projects (PM301000) form.
System Preparation
To sign in to the system and prepare to perform the instructions of the activity, do the following:
- Launch the MYOB Acumatica website, and sign in to a company with the U100 dataset preloaded; you should sign in as a project accountant by using the brawner username and the 123 password.
- In the info area, in the upper-right corner of the top pane of the MYOB Acumatica screen, make sure that the business date in your system is set to 1/30/2025. If a different date is displayed, click the Business Date menu button and select 1/30/2025 on the calendar. For simplicity, in this activity, you will create and process all documents in the system on this business date.
Step 1: Creating a Purchase Order for the Project
To create a purchase order for the project, do the following:
- On the Purchase Orders (PO301000) form, create a new record.
- In the Summary area, specify the following settings:
- Type: Normal
- Vendor: SQUEEZO
- Date: 1/30/2025
- Project: HMBAKERY2
- Description: Purchase for HM's Bakery & Cafe
- On the Details tab, add two purchase order lines that
have the settings shown in the following table.
Inventory ID Order Qty. Unit Cost Cost Code JUICER10C 2 1500 00-000 INSTALL 4 80 00-000 The system automatically inserts the INSTALL project task for each line when you select the HMBAKERY2 project because this task is the default project task of the project. Also, in the line with the JUICER10C stock item, the EQUIPHOUSE warehouse is inserted automatically.
- In the Summary area, make sure that the Order Total value, which is the sum of the Ext. Cost of two lines (3,000.00 and 320.00), is 3,320.00.
- Save the purchase order.
- On the form toolbar, click Remove Hold. The system assigns the purchase order the Open status.
Step 2: Receiving the Purchased Materials to a Warehouse
To create a purchase receipt for the purchased materials, do the following:
- While remaining on the Purchase Orders (PO301000)
form with the purchase order selected, on the form toolbar, click
Enter PO Receipt.
The system creates a purchase receipt with the Balanced status for the JUICER10C item and opens it on the Purchase Receipts (PO302000) form. The service item (INSTALL) does not require a receipt and is not added to the created document.
- On the form toolbar, click Release.
The system creates and releases an inventory receipt transaction based on the purchase receipt. On release of this transaction, the stock items are received to inventory. The purchase receipt is assigned the Released status.
Step 3: Creating a Bill for the Purchase Order
To bill the purchase order, do the following:
- On the Purchase Orders (PO301000) form, open the purchase order that you have created earlier in this activity.
- On the More menu (under Processing), click
Enter AP Bill to create a bill for the purchase
order.
The system creates an accounts payable bill and opens the bill on the Bills and Adjustments (AP301000) form. Make sure that both purchase order lines have been added to the bill.
- On the form toolbar, click Remove Hold to assign the AP bill the Balanced status, and then click Release.
- On the Projects (PM301000) form, open the
HMBAKERY2 project.
On the Cost Budget tab, review the actual values of the cost budget. Notice that the Actual Quantity and Actual Amount of the line with the INSTALL item have been updated and are now 4 and 320.00, respectively (see the following screenshot). The actual values for the line with the stock item (JUICER10C) are not updated yet: the system will record the cost of stock items to the project budget when the items are used for the project and issued from the project-specific warehouse location.
Figure 1. Actual values of the budget updated by the purchase 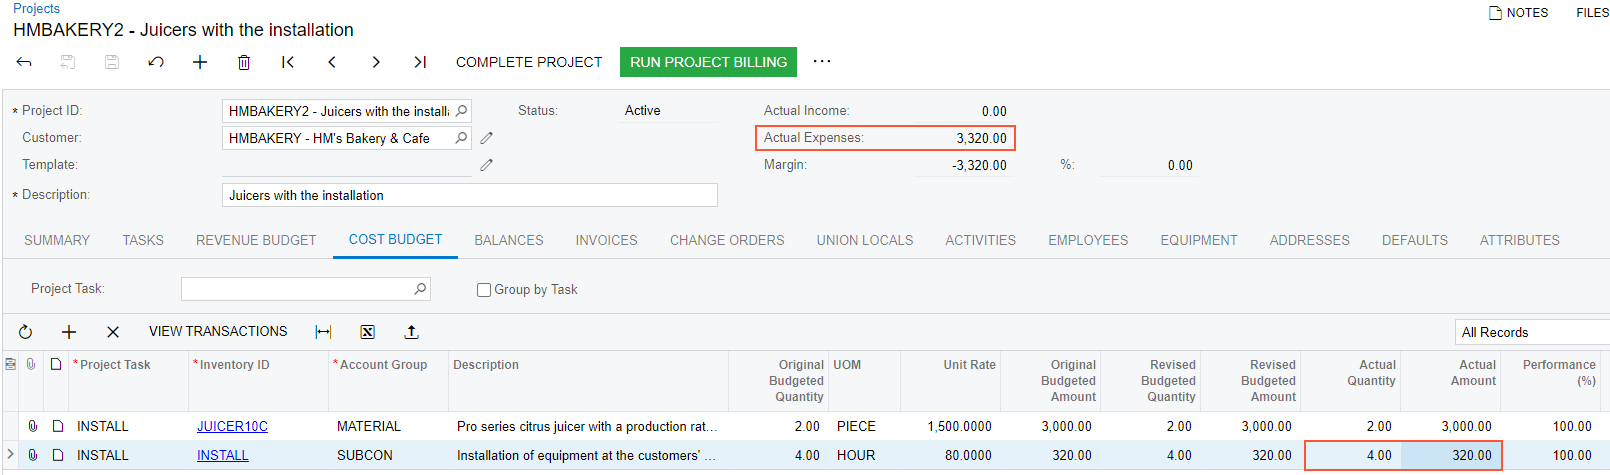
You have completed the processing of the purchase of materials and services for the project.